2017 NISSAN ARMADA wheel
[x] Cancel search: wheelPage 220 of 614
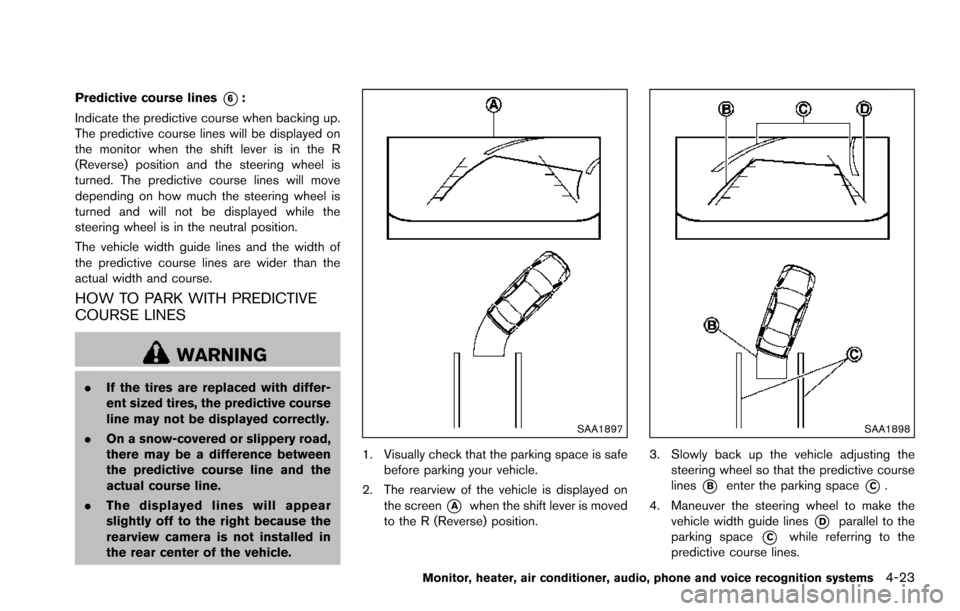
Predictive course lines*6:
Indicate the predictive course when backing up.
The predictive course lines will be displayed on
the monitor when the shift lever is in the R
(Reverse) position and the steering wheel is
turned. The predictive course lines will move
depending on how much the steering wheel is
turned and will not be displayed while the
steering wheel is in the neutral position.
The vehicle width guide lines and the width of
the predictive course lines are wider than the
actual width and course.
HOW TO PARK WITH PREDICTIVE
COURSE LINES
WARNING
. If the tires are replaced with differ-
ent sized tires, the predictive course
line may not be displayed correctly.
. On a snow-covered or slippery road,
there may be a difference between
the predictive course line and the
actual course line.
. The displayed lines will appear
slightly off to the right because the
rearview camera is not installed in
the rear center of the vehicle.
SAA1897
1. Visually check that the parking space is safe
before parking your vehicle.
2. The rearview of the vehicle is displayed on the screen
*Awhen the shift lever is moved
to the R (Reverse) position.
SAA1898
3. Slowly back up the vehicle adjusting the steering wheel so that the predictive course
lines
*Benter the parking space*C.
4. Maneuver the steering wheel to make the vehicle width guide lines
*Dparallel to the
parking space
*Cwhile referring to the
predictive course lines.
Monitor, heater, air conditioner, audio, phone and voice recognition systems4-23
Page 227 of 614
4-30Monitor, heater, air conditioner, audio, phone and voice recognition systems
Available views:
.Front view
An approximately 150-degree view of the
front of the vehicle.
. Rear view
An approximately 150-degree view of the
rear of the vehicle.
. Bird’s-eye view
The surrounding view of the vehicle from
above.
. Front-side view
The view around and ahead of the front
passenger’s side wheel.
. Front-wide view
An approximately 180-degree view of the
front of the vehicle.
. Rear-wide view
An approximately 180-degree view of the
rear of the vehicle.
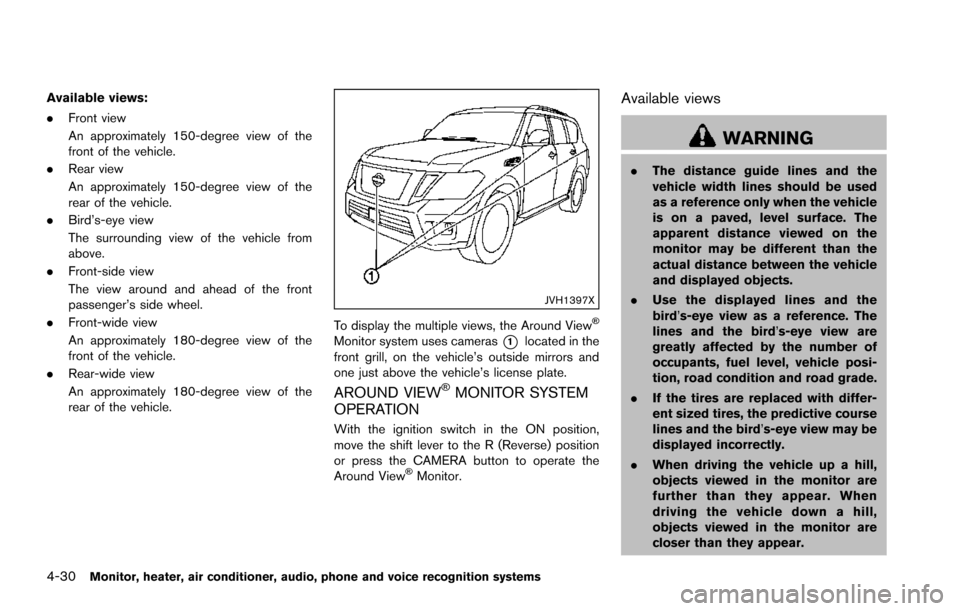
JVH1397X
To display the multiple views, the Around View�Š
Monitor system uses cameras*1located in the
front grill, on the vehicle’s outside mirrors and
one just above the vehicle’s license plate.
AROUND VIEW�ŠMONITOR SYSTEM
OPERATION
With the ignition switch in the ON position,
move the shift lever to the R (Reverse) position
or press the CAMERA button to operate the
Around View
�ŠMonitor.
Available views
WARNING
. The distance guide lines and the
vehicle width lines should be used
as a reference only when the vehicle
is on a paved, level surface. The
apparent distance viewed on the
monitor may be different than the
actual distance between the vehicle
and displayed objects.
. Use the displayed lines and the
bird’s-eye view as a reference. The
lines and the bird’s-eye view are
greatly affected by the number of
occupants, fuel level, vehicle posi-
tion, road condition and road grade.
. If the tires are replaced with differ-
ent sized tires, the predictive course
lines and the bird’s-eye view may be
displayed incorrectly.
. When driving the vehicle up a hill,
objects viewed in the monitor are
further than they appear. When
driving the vehicle down a hill,
objects viewed in the monitor are
closer than they appear.
Page 228 of 614
.Objects in the monitor will appear
visually opposite compared to when
viewed in the rearview and outside
mirrors.
. Use the mirrors or actually look to
properly judge distances to other
objects.
. The distance between objects
viewed in the rear view differs from
actual distance because a wide-
angle lens is used.
. On a snow-covered or slippery road,
there may be a difference between
the predictive course line and the
actual course line.
. The vehicle width and predictive
course lines are wider than the
actual width and course.
. The displayed lines on the rear view
will appear slightly off to the right
because the rearview camera is not
installed in the rear center of the
vehicle.
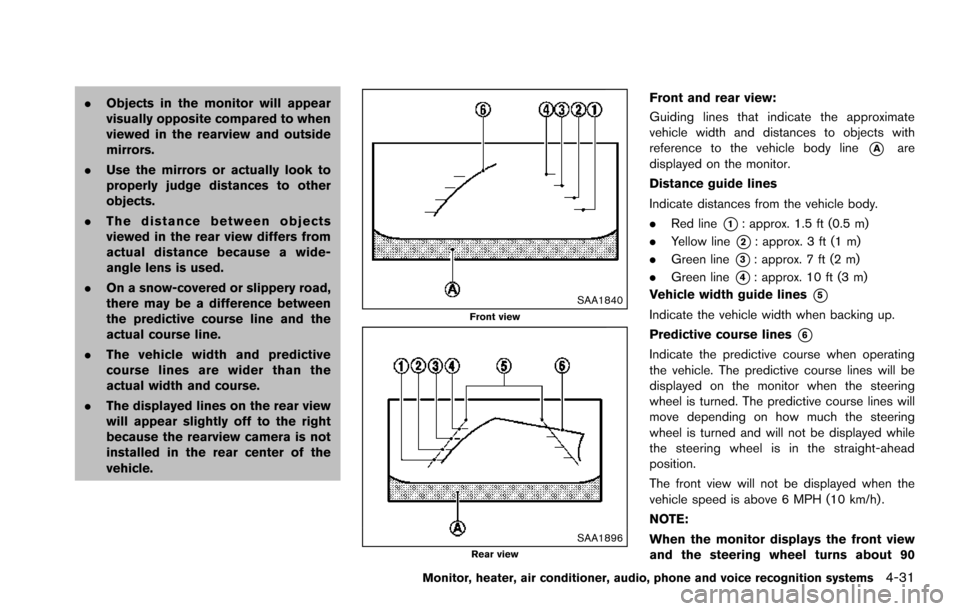
SAA1840Front view
SAA1896Rear view
Front and rear view:
Guiding lines that indicate the approximate
vehicle width and distances to objects with
reference to the vehicle body line
*Aare
displayed on the monitor.
Distance guide lines
Indicate distances from the vehicle body.
. Red line
*1: approx. 1.5 ft (0.5 m)
. Yellow line
*2: approx. 3 ft (1 m)
. Green line
*3: approx. 7 ft (2 m)
. Green line
*4: approx. 10 ft (3 m)
Vehicle width guide lines
*5
Indicate the vehicle width when backing up.
Predictive course lines
*6
Indicate the predictive course when operating
the vehicle. The predictive course lines will be
displayed on the monitor when the steering
wheel is turned. The predictive course lines will
move depending on how much the steering
wheel is turned and will not be displayed while
the steering wheel is in the straight-ahead
position.
The front view will not be displayed when the
vehicle speed is above 6 MPH (10 km/h) .
NOTE:
When the monitor displays the front view
and the steering wheel turns about 90
Monitor, heater, air conditioner, audio, phone and voice recognition systems4-31
Page 229 of 614

4-32Monitor, heater, air conditioner, audio, phone and voice recognition systems
degrees or less from the straight ahead
position, both the right and left predictive
course lines
*6are displayed. When the
steering wheel turns about 90 degrees or
more, a line is displayed only on the
opposite side of the turn.
JVH1140X
Bird’s-eye view:
The bird’s-eye view shows the overhead view of
the vehicle, which helps confirm the vehicle
position and the predictive course to a parking
space.
The vehicle icon
*1shows the position of the
vehicle. Note that the size of the vehicle icon on
the bird’s-eye view may differ somewhat from
the actual distance to the vehicle.
The areas that the cameras cannot cover
*2are
indicated in black.
The non-viewable area
*2is highlighted in
yellow for several seconds after the bird’s-eye
view is displayed. It will be shown only the first time after the ignition switch is placed in the ON
position.
The driver can check the approximate direction
and angle of the tire on the display by tire icon
*3when driving the vehicle forward or back-
ward.
Predictive course lines (
*4and*5) indicate
the predictive course when operating the
vehicle. The predictive course lines will be
displayed on the monitor when the steering
wheel is turned. The predictive course lines will
move depending on how much the steering
wheel is turned and will not be displayed while
the steering wheel is in the straight-ahead
position.
When the monitor displays the front view and
the steering wheel turns about 90 degrees or
less from the straight-ahead position, the two
green predictive course lines
*4are shown in
front of the vehicle.
When the steering wheel turns about 90
degrees or more, one green predictive course
line
*5is shown in front of the vehicle and the
other green predictive course line
*5is shown
at side of the vehicle.
When the monitor displays the rear view, the
predictive course lines are shown at back of the
vehicle.
Page 234 of 614
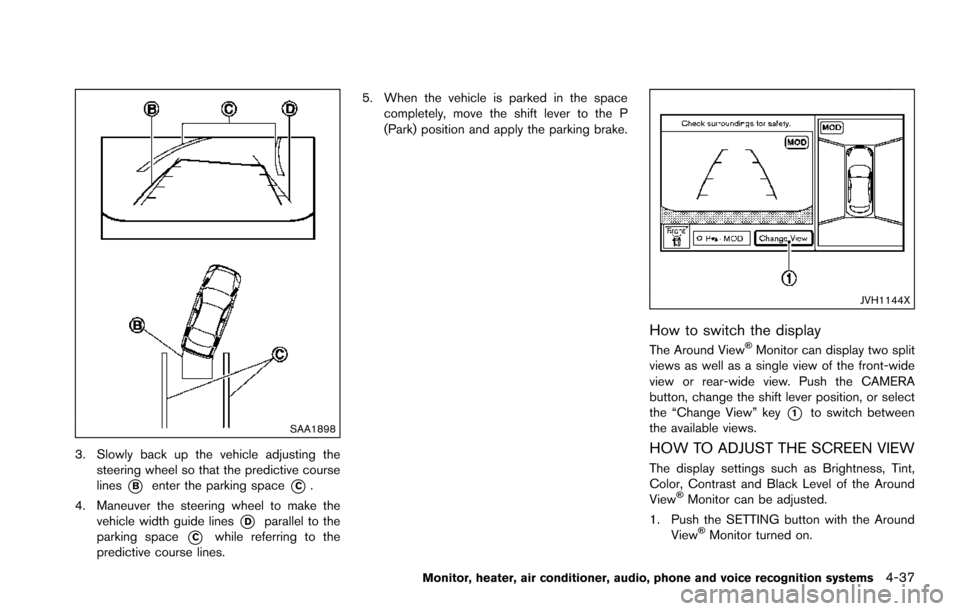
SAA1898
3. Slowly back up the vehicle adjusting thesteering wheel so that the predictive course
lines
*Benter the parking space*C.
4. Maneuver the steering wheel to make the vehicle width guide lines
*Dparallel to the
parking space
*Cwhile referring to the
predictive course lines. 5. When the vehicle is parked in the space
completely, move the shift lever to the P
(Park) position and apply the parking brake.
JVH1144X
How to switch the display
The Around View�ŠMonitor can display two split
views as well as a single view of the front-wide
view or rear-wide view. Push the CAMERA
button, change the shift lever position, or select
the “Change View” key
*1to switch between
the available views.
HOW TO ADJUST THE SCREEN VIEW
The display settings such as Brightness, Tint,
Color, Contrast and Black Level of the Around
View
�ŠMonitor can be adjusted.
1. Push the SETTING button with the Around View
�ŠMonitor turned on.
Monitor, heater, air conditioner, audio, phone and voice recognition systems4-37
Page 288 of 614
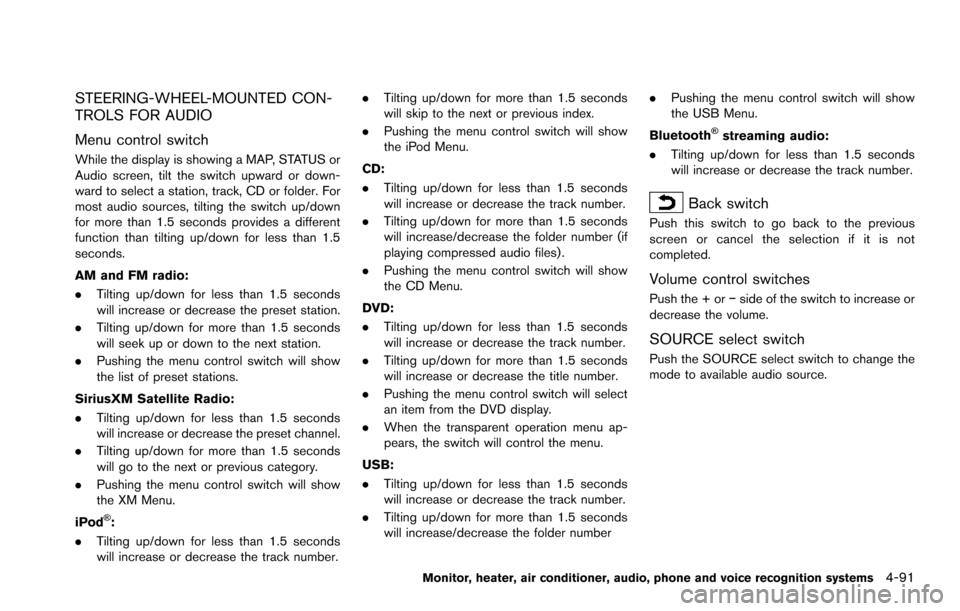
STEERING-WHEEL-MOUNTED CON-
TROLS FOR AUDIO
Menu control switch
While the display is showing a MAP, STATUS or
Audio screen, tilt the switch upward or down-
ward to select a station, track, CD or folder. For
most audio sources, tilting the switch up/down
for more than 1.5 seconds provides a different
function than tilting up/down for less than 1.5
seconds.
AM and FM radio:
.Tilting up/down for less than 1.5 seconds
will increase or decrease the preset station.
. Tilting up/down for more than 1.5 seconds
will seek up or down to the next station.
. Pushing the menu control switch will show
the list of preset stations.
SiriusXM Satellite Radio:
. Tilting up/down for less than 1.5 seconds
will increase or decrease the preset channel.
. Tilting up/down for more than 1.5 seconds
will go to the next or previous category.
. Pushing the menu control switch will show
the XM Menu.
iPod
�Š:
. Tilting up/down for less than 1.5 seconds
will increase or decrease the track number. .
Tilting up/down for more than 1.5 seconds
will skip to the next or previous index.
. Pushing the menu control switch will show
the iPod Menu.
CD:
. Tilting up/down for less than 1.5 seconds
will increase or decrease the track number.
. Tilting up/down for more than 1.5 seconds
will increase/decrease the folder number (if
playing compressed audio files) .
. Pushing the menu control switch will show
the CD Menu.
DVD:
. Tilting up/down for less than 1.5 seconds
will increase or decrease the track number.
. Tilting up/down for more than 1.5 seconds
will increase or decrease the title number.
. Pushing the menu control switch will select
an item from the DVD display.
. When the transparent operation menu ap-
pears, the switch will control the menu.
USB:
. Tilting up/down for less than 1.5 seconds
will increase or decrease the track number.
. Tilting up/down for more than 1.5 seconds
will increase/decrease the folder number .
Pushing the menu control switch will show
the USB Menu.
Bluetooth
�Šstreaming audio:
. Tilting up/down for less than 1.5 seconds
will increase or decrease the track number.
Back switch
Push this switch to go back to the previous
screen or cancel the selection if it is not
completed.
Volume control switches
Push the + or �íside of the switch to increase or
decrease the volume.
SOURCE select switch
Push the SOURCE select switch to change the
mode to available audio source.
Monitor, heater, air conditioner, audio, phone and voice recognition systems4-91
Page 309 of 614
4-112Monitor, heater, air conditioner, audio, phone and voice recognition systems
allow easy dialing using the NISSAN Voice
Recognition system. (See “NISSAN Voice
Recognition system” (P.4-117) .)
To delete an entry, select the “Delete” key at
step 3.
JVH0479X
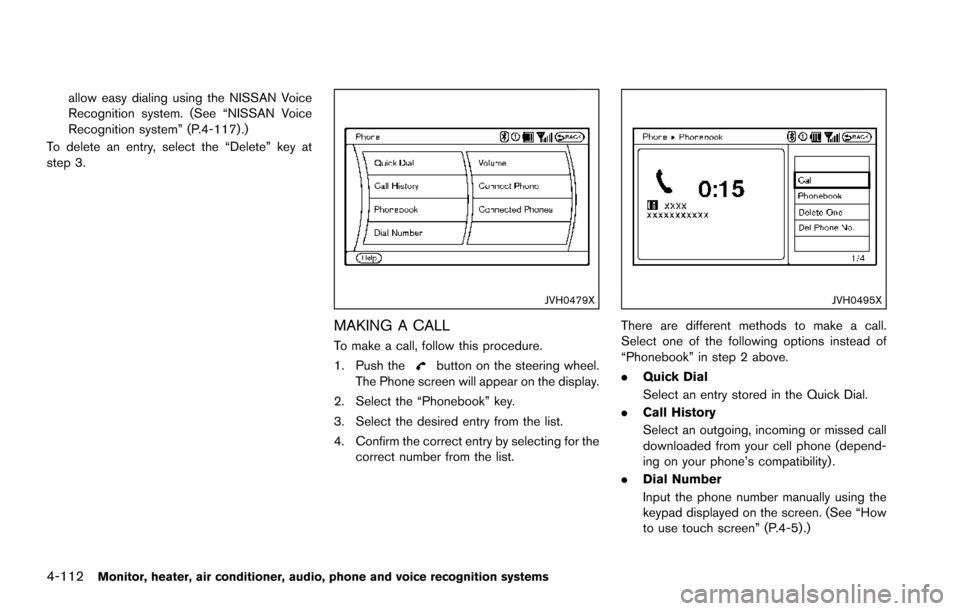
MAKING A CALL
To make a call, follow this procedure.
1. Push the
button on the steering wheel.
The Phone screen will appear on the display.
2. Select the “Phonebook” key.
3. Select the desired entry from the list.
4. Confirm the correct entry by selecting for the correct number from the list.
JVH0495X
There are different methods to make a call.
Select one of the following options instead of
“Phonebook” in step 2 above.
.Quick Dial
Select an entry stored in the Quick Dial.
. Call History
Select an outgoing, incoming or missed call
downloaded from your cell phone (depend-
ing on your phone’s compatibility) .
. Dial Number
Input the phone number manually using the
keypad displayed on the screen. (See “How
to use touch screen” (P.4-5) .)
Page 310 of 614
SAA2525
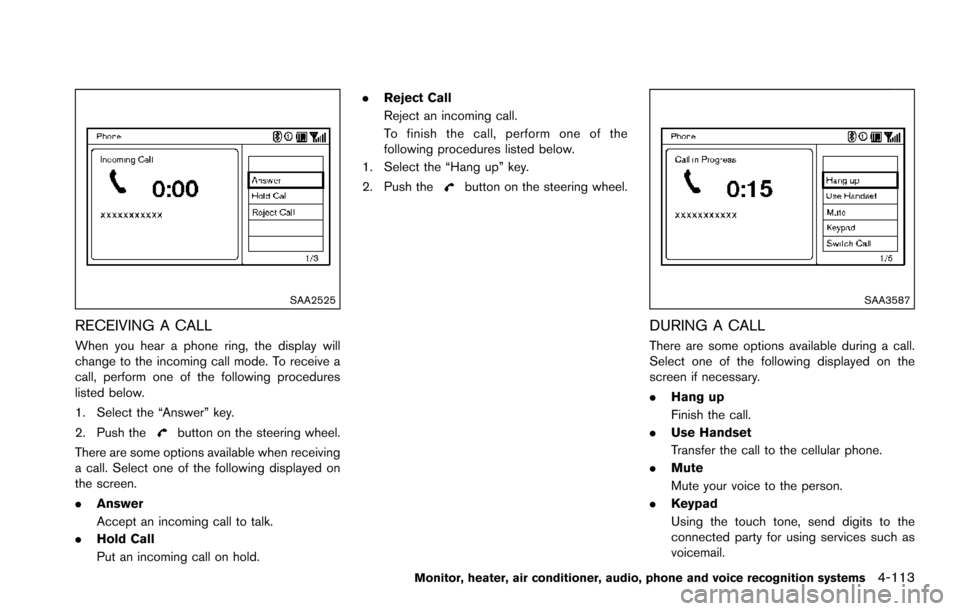
RECEIVING A CALL
When you hear a phone ring, the display will
change to the incoming call mode. To receive a
call, perform one of the following procedures
listed below.
1. Select the “Answer” key.
2. Push the
button on the steering wheel.
There are some options available when receiving
a call. Select one of the following displayed on
the screen.
. Answer
Accept an incoming call to talk.
. Hold Call
Put an incoming call on hold. .
Reject Call
Reject an incoming call.
To finish the call, perform one of the
following procedures listed below.
1. Select the “Hang up” key.
2. Push the
button on the steering wheel.
SAA3587
DURING A CALL
There are some options available during a call.
Select one of the following displayed on the
screen if necessary.
. Hang up
Finish the call.
. Use Handset
Transfer the call to the cellular phone.
. Mute
Mute your voice to the person.
. Keypad
Using the touch tone, send digits to the
connected party for using services such as
voicemail.
Monitor, heater, air conditioner, audio, phone and voice recognition systems4-113