2017 NISSAN ARMADA mirror
[x] Cancel search: mirrorPage 251 of 614
4-54Monitor, heater, air conditioner, audio, phone and voice recognition systems
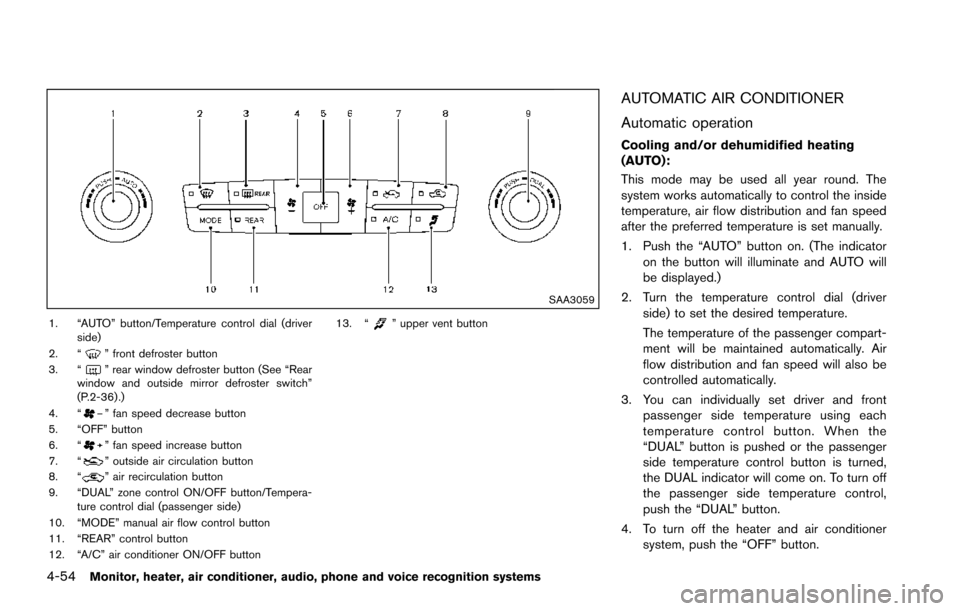
SAA3059
1. “AUTO” button/Temperature control dial (driverside)
2. “
” front defroster button
3. “” rear window defroster button (See “Rear
window and outside mirror defroster switch”
(P.2-36) .)
4. “
” fan speed decrease button
5. “OFF” button
6. “
” fan speed increase button
7. “” outside air circulation button
8. “” air recirculation button
9. “DUAL” zone control ON/OFF button/Tempera- ture control dial (passenger side)
10. “MODE” manual air flow control button
11. “REAR” control button
12. “A/C” air conditioner ON/OFF button 13. “
” upper vent button
AUTOMATIC AIR CONDITIONER
Automatic operation
Cooling and/or dehumidified heating
(AUTO):
This mode may be used all year round. The
system works automatically to control the inside
temperature, air flow distribution and fan speed
after the preferred temperature is set manually.
1. Push the “AUTO” button on. (The indicator
on the button will illuminate and AUTO will
be displayed.)
2. Turn the temperature control dial (driver side) to set the desired temperature.
The temperature of the passenger compart-
ment will be maintained automatically. Air
flow distribution and fan speed will also be
controlled automatically.
3. You can individually set driver and front passenger side temperature using each
temperature control button. When the
“DUAL” button is pushed or the passenger
side temperature control button is turned,
the DUAL indicator will come on. To turn off
the passenger side temperature control,
push the “DUAL” button.
4. To turn off the heater and air conditioner system, push the “OFF” button.
Page 356 of 614
JVS0404X
INTELLIGENT KEY BATTERY DIS-
CHARGE
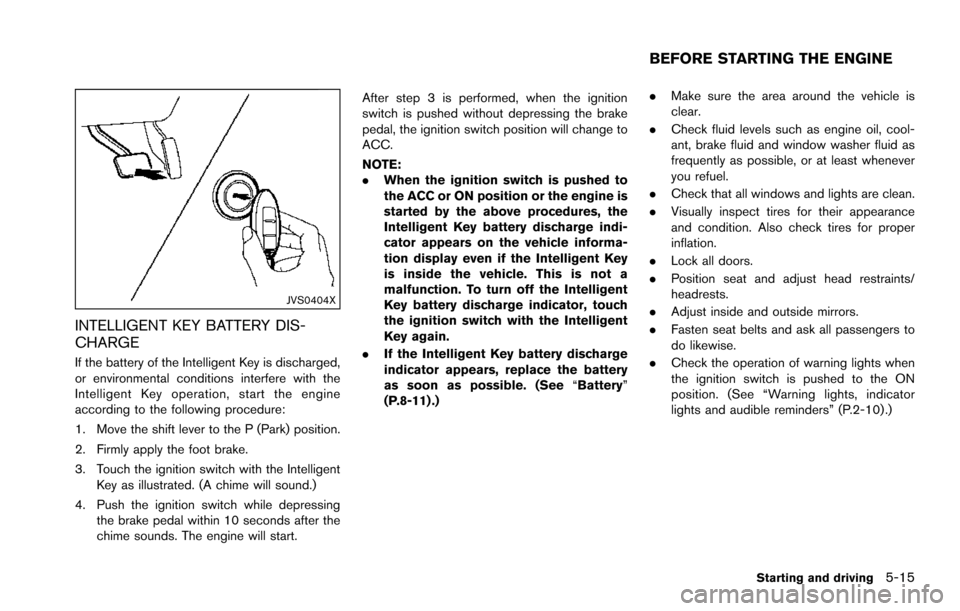
If the battery of the Intelligent Key is discharged,
or environmental conditions interfere with the
Intelligent Key operation, start the engine
according to the following procedure:
1. Move the shift lever to the P (Park) position.
2. Firmly apply the foot brake.
3. Touch the ignition switch with the IntelligentKey as illustrated. (A chime will sound.)
4. Push the ignition switch while depressing the brake pedal within 10 seconds after the
chime sounds. The engine will start. After step 3 is performed, when the ignition
switch is pushed without depressing the brake
pedal, the ignition switch position will change to
ACC.
NOTE:
.
When the ignition switch is pushed to
the ACC or ON position or the engine is
started by the above procedures, the
Intelligent Key battery discharge indi-
cator appears on the vehicle informa-
tion display even if the Intelligent Key
is inside the vehicle. This is not a
malfunction. To turn off the Intelligent
Key battery discharge indicator, touch
the ignition switch with the Intelligent
Key again.
. If the Intelligent Key battery discharge
indicator appears, replace the battery
as soon as possible. (See “Battery”
(P.8-11) .) .
Make sure the area around the vehicle is
clear.
. Check fluid levels such as engine oil, cool-
ant, brake fluid and window washer fluid as
frequently as possible, or at least whenever
you refuel.
. Check that all windows and lights are clean.
. Visually inspect tires for their appearance
and condition. Also check tires for proper
inflation.
. Lock all doors.
. Position seat and adjust head restraints/
headrests.
. Adjust inside and outside mirrors.
. Fasten seat belts and ask all passengers to
do likewise.
. Check the operation of warning lights when
the ignition switch is pushed to the ON
position. (See “Warning lights, indicator
lights and audible reminders” (P.2-10) .)
Starting and driving5-15
BEFORE STARTING THE ENGINE
Page 373 of 614
5-32Starting and driving
LDP system:If the vehicle is parked in direct
sunlight under high temperature conditions (over
approximately 1048F (408C)) and then the LDP
system is turned on, the LDP system will be
turned off automatically, a beep will sound and
the LDP ON indicator light (green)
*1will blink.
The LDW and LDP systems are not available
until the conditions no longer exist.
Action to take:
When the above conditions no longer exist, the
LDW system will resume automatically.
For the LDP system, push the dynamic driver
assistance switch
*3again to turn the LDP
system back on.
SYSTEM MALFUNCTION
LDW system: When the LDW system malfunc-
tions, it will cancel automatically, and the LDW
indicator light (orange) will illuminate.
LDP system: When the LDP system malfunc-
tions, it will be turned off automatically, a beep
will sound, and the LDW indicator light (orange)
will illuminate.
Action to take:
Stop the vehicle in a safe location, place the
vehicle in the P (Park) position, turn the engine
off and restart the engine. If the LDW indicator
light (orange) continues to illuminate, have the
system checked. It is recommended you visit a NISSAN dealer for this service.
SSD0453
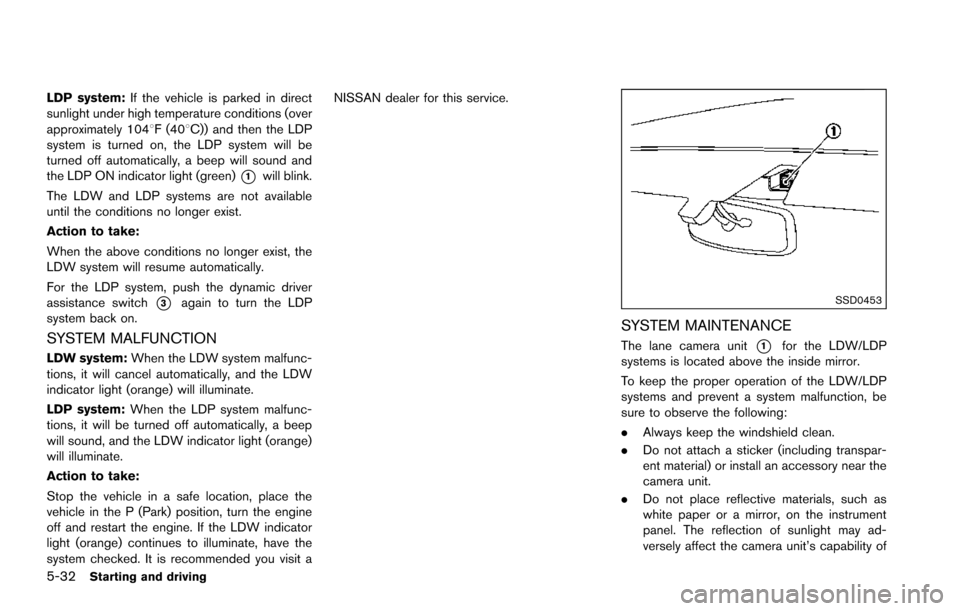
SYSTEM MAINTENANCE
The lane camera unit*1for the LDW/LDP
systems is located above the inside mirror.
To keep the proper operation of the LDW/LDP
systems and prevent a system malfunction, be
sure to observe the following:
. Always keep the windshield clean.
. Do not attach a sticker (including transpar-
ent material) or install an accessory near the
camera unit.
. Do not place reflective materials, such as
white paper or a mirror, on the instrument
panel. The reflection of sunlight may ad-
versely affect the camera unit’s capability of
Page 374 of 614
detecting the lane markers.
. Do not strike or damage the areas around
the camera unit. Do not touch the camera
lens or remove the screw located on the
camera unit. It is recommended you contact
a NISSAN dealer if the camera unit is
damaged due to an accident.
WARNING
Failure to follow the warnings and
instructions for proper use of the BSW
system could result in serious injury or
death.
. The BSW system is not a replace-
ment for proper driving procedure
and is not designed to prevent
contact with vehicles or objects.
When changing lanes, always use
the side and rear mirrors and turn
and look in the direction your vehi-
cle will move to ensure it is safe to
change lanes. Never rely solely on
the BSW system.
. There is a limitation to the detection
capability of the radar. Not every
moving object or vehicle will be
detected. Using the BSW system
under some road, ground, lane mar-
ker, traffic or weather conditions
could lead to improper system op-
eration. Always rely on your own
operation to avoid accidents.
The BSW system helps alert the driver of other
vehicles in adjacent lanes when changing lanes.
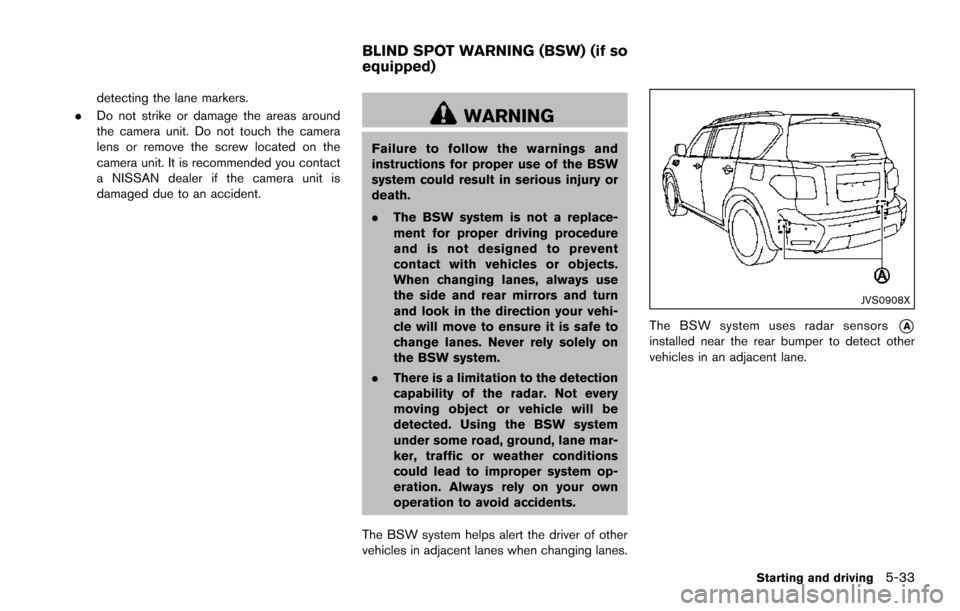
JVS0908X
The BSW system uses radar sensors*Ainstalled near the rear bumper to detect other
vehicles in an adjacent lane.
Starting and driving5-33
BLIND SPOT WARNING (BSW) (if so
equipped)
Page 375 of 614
5-34Starting and driving
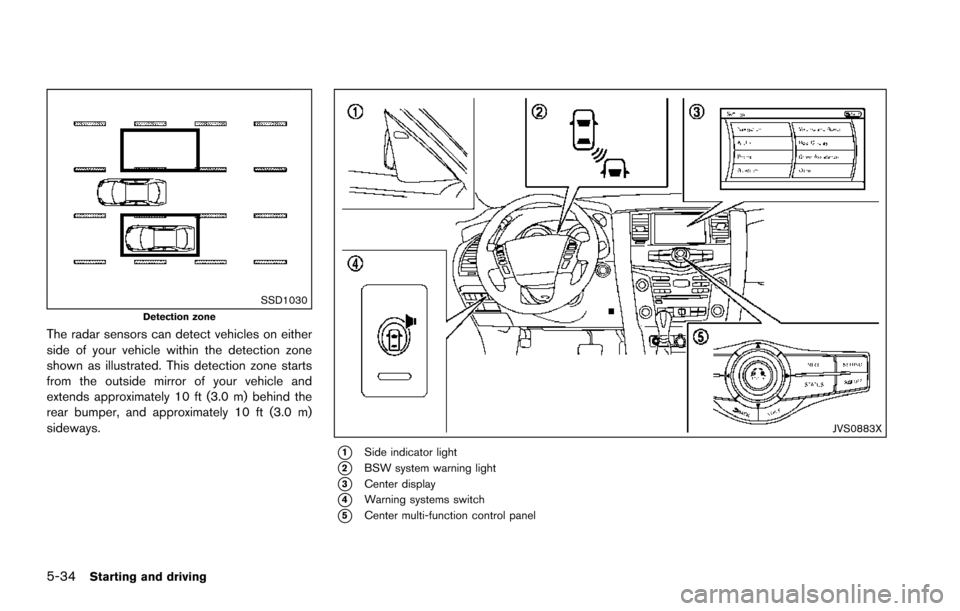
SSD1030Detection zone
The radar sensors can detect vehicles on either
side of your vehicle within the detection zone
shown as illustrated. This detection zone starts
from the outside mirror of your vehicle and
extends approximately 10 ft (3.0 m) behind the
rear bumper, and approximately 10 ft (3.0 m)
sideways.
JVS0883X
*1Side indicator light
*2BSW system warning light
*3Center display
*4Warning systems switch
*5Center multi-function control panel
Page 384 of 614
WARNING
Failure to follow the warnings and
instructions for proper use of the BSI
system could result in serious injury or
death.
.The BSI system is not a replacement
for proper driving procedures and is
not designed to prevent contact
with vehicles or objects. When
changing lanes, always use the side
and rear mirrors and turn and look
in the direction your vehicle will
move to ensure it is safe to change
lanes. Never rely solely on the BSI
system.
. There is a limitation to the detection
capability of the radar. Not every
moving object or vehicle will be
detected. Using the BSI system
under some road, ground, lane mar-
ker, traffic or weather conditions
could lead to improper system op-
eration. Always rely on your own
operation to avoid accidents.
The BSI system helps alert the driver of other
vehicles in adjacent lanes when changing lanes and helps assist the driver to return the vehicle
to the center of the traveling lane.
JVS0910X
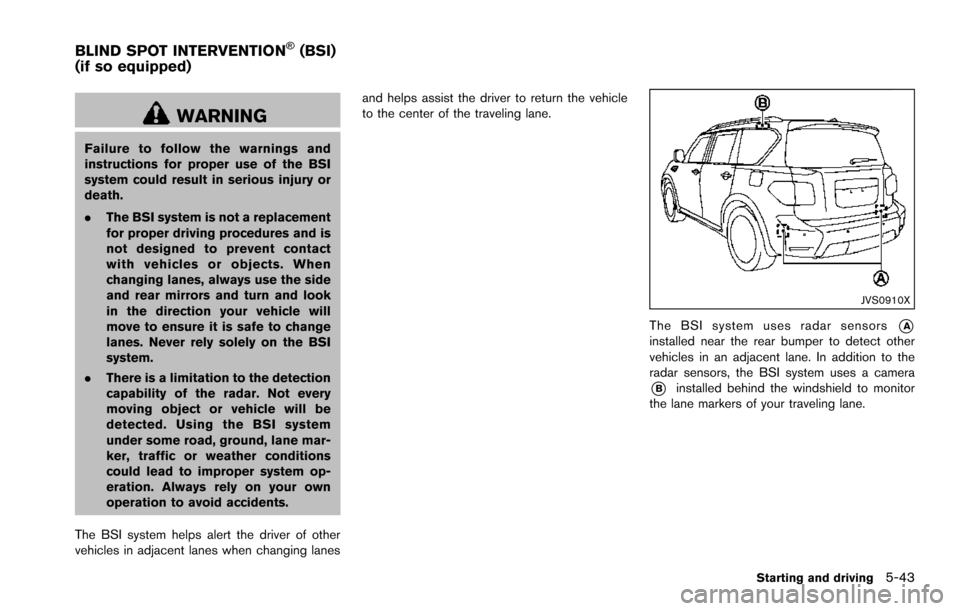
The BSI system uses radar sensors*Ainstalled near the rear bumper to detect other
vehicles in an adjacent lane. In addition to the
radar sensors, the BSI system uses a camera
*Binstalled behind the windshield to monitor
the lane markers of your traveling lane.
Starting and driving5-43
BLIND SPOT INTERVENTION�Š(BSI)
(if so equipped)
Page 385 of 614
5-44Starting and driving
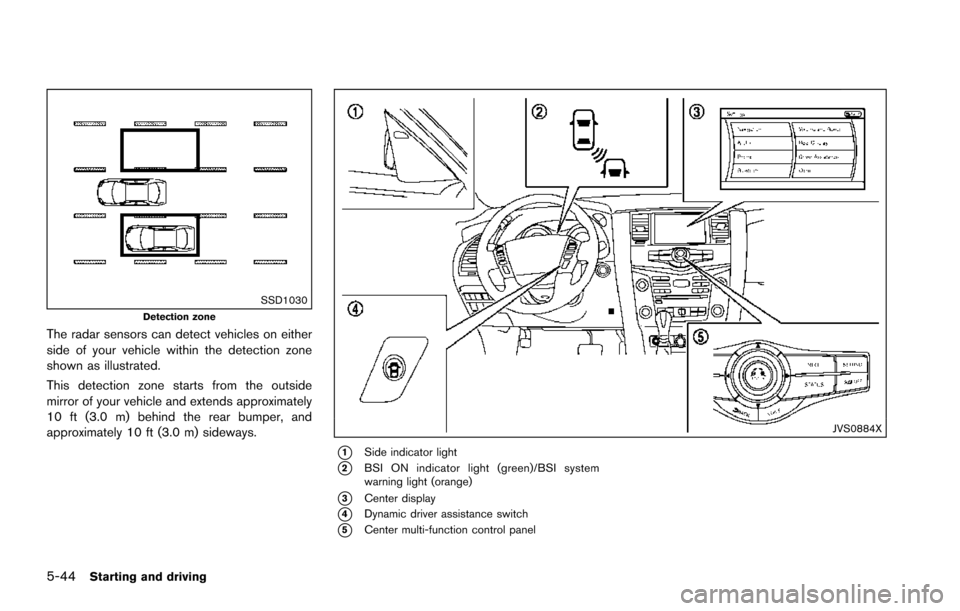
SSD1030Detection zone
The radar sensors can detect vehicles on either
side of your vehicle within the detection zone
shown as illustrated.
This detection zone starts from the outside
mirror of your vehicle and extends approximately
10 ft (3.0 m) behind the rear bumper, and
approximately 10 ft (3.0 m) sideways.
JVS0884X
*1Side indicator light
*2BSI ON indicator light (green)/BSI system
warning light (orange)
*3Center display
*4Dynamic driver assistance switch
*5Center multi-function control panel
Page 396 of 614
Action to take:
When the above conditions no longer exist, turn
the BSI system off and turn it on again. If the BSI
system warning light (orange)
*1continues to
blink even after the BSI system is turned on
again, stop the vehicle in a safe location, place
the shift lever in the P (Park) position and turn
the engine off. Check for and remove objects
obscuring the radar sensors on the rear bumper,
and restart the engine.
If the BSI system warning light (orange)
*1continues to blink, have the BSI system
checked. It is recommended you visit a NISSAN
dealer for this service.
SYSTEM MALFUNCTION
When the BSI system malfunctions, it will be
turned off automatically, a chime will sound and
the BSI system warning light (orange) will
illuminate.
Action to take:
Stop the vehicle in a safe location, place the shift
lever in the P (Park) position, turn the engine off
and restart the engine.
If the warning light (orange) continues to
illuminate, have the BSI system checked. It is
recommended you visit a NISSAN dealer for this
service.
JVS0910X
SYSTEM MAINTENANCE
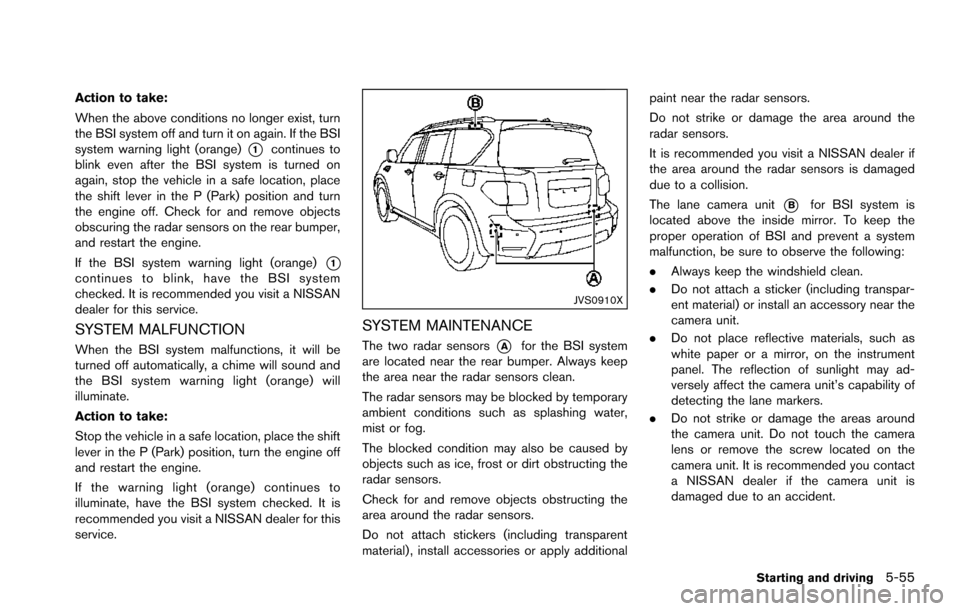
The two radar sensors*Afor the BSI system
are located near the rear bumper. Always keep
the area near the radar sensors clean.
The radar sensors may be blocked by temporary
ambient conditions such as splashing water,
mist or fog.
The blocked condition may also be caused by
objects such as ice, frost or dirt obstructing the
radar sensors.
Check for and remove objects obstructing the
area around the radar sensors.
Do not attach stickers (including transparent
material) , install accessories or apply additional paint near the radar sensors.
Do not strike or damage the area around the
radar sensors.
It is recommended you visit a NISSAN dealer if
the area around the radar sensors is damaged
due to a collision.
The lane camera unit
*Bfor BSI system is
located above the inside mirror. To keep the
proper operation of BSI and prevent a system
malfunction, be sure to observe the following:
. Always keep the windshield clean.
. Do not attach a sticker (including transpar-
ent material) or install an accessory near the
camera unit.
. Do not place reflective materials, such as
white paper or a mirror, on the instrument
panel. The reflection of sunlight may ad-
versely affect the camera unit’s capability of
detecting the lane markers.
. Do not strike or damage the areas around
the camera unit. Do not touch the camera
lens or remove the screw located on the
camera unit. It is recommended you contact
a NISSAN dealer if the camera unit is
damaged due to an accident.
Starting and driving5-55