2017 NISSAN ARMADA instrument panel
[x] Cancel search: instrument panelPage 182 of 614
.The theft alarm sounds due to illegal entry
into the vehicle.
. Two remote engine starts, or a single remote
start with an extension, have already been
used.
. The shift lever is not in the P (Park) position.
The remote engine start may display a warning
or indicator in the vehicle information display. For
an explanation of the warning or indicator, see
“Operational indicators” (P.2-23) .
JVP0463X
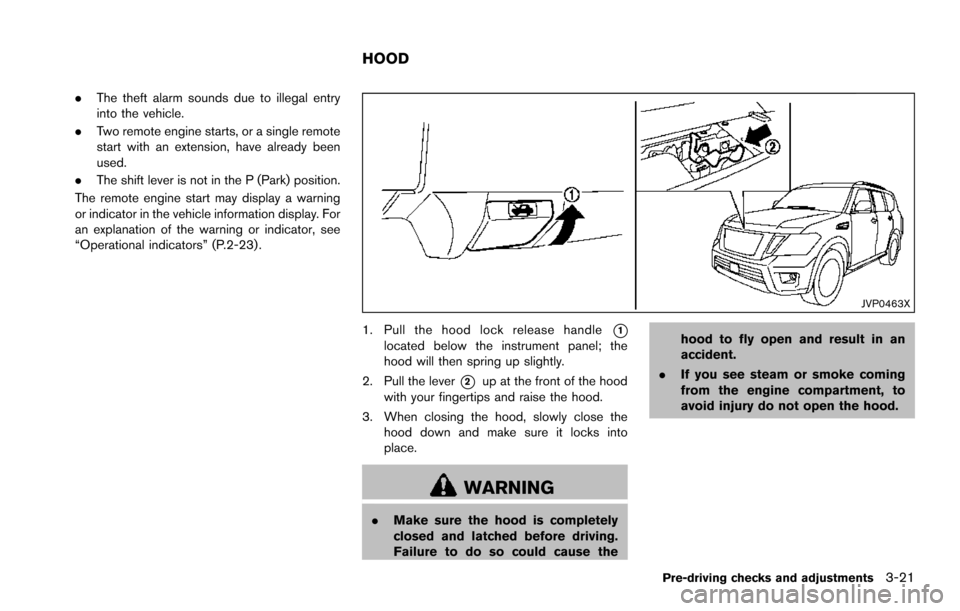
1. Pull the hood lock release handle*1located below the instrument panel; the
hood will then spring up slightly.
2. Pull the lever
*2up at the front of the hood
with your fingertips and raise the hood.
3. When closing the hood, slowly close the hood down and make sure it locks into
place.
WARNING
.Make sure the hood is completely
closed and latched before driving.
Failure to do so could cause the hood to fly open and result in an
accident.
. If you see steam or smoke coming
from the engine compartment, to
avoid injury do not open the hood.
Pre-driving checks and adjustments3-21
HOOD
Page 184 of 614
SPA2547
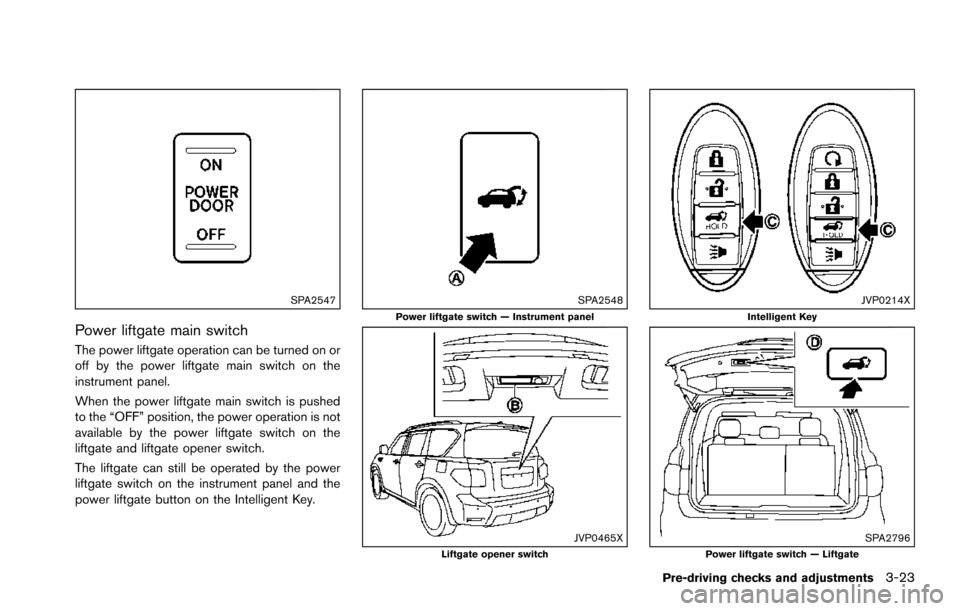
Power liftgate main switch
The power liftgate operation can be turned on or
off by the power liftgate main switch on the
instrument panel.
When the power liftgate main switch is pushed
to the “OFF” position, the power operation is not
available by the power liftgate switch on the
liftgate and liftgate opener switch.
The liftgate can still be operated by the power
liftgate switch on the instrument panel and the
power liftgate button on the Intelligent Key.
SPA2548Power liftgate switch — Instrument panel
JVP0465XLiftgate opener switch
JVP0214XIntelligent Key
SPA2796Power liftgate switch — Liftgate
Pre-driving checks and adjustments3-23
Page 185 of 614
3-24Pre-driving checks and adjustments
Power open
When the liftgate is fully closed, the liftgate will
fully open automatically by:
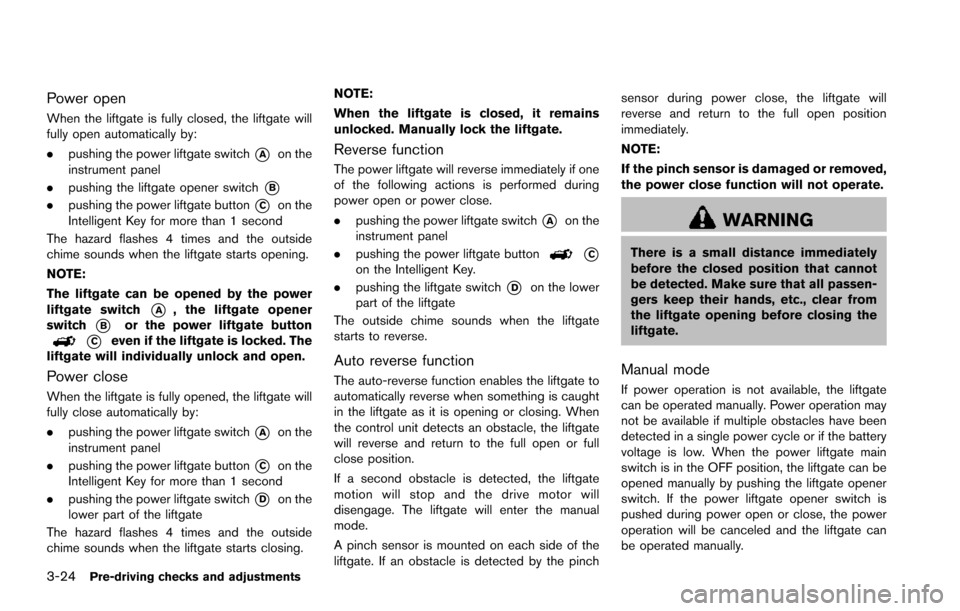
.pushing the power liftgate switch
*Aon the
instrument panel
. pushing the liftgate opener switch
*B
.pushing the power liftgate button*Con the
Intelligent Key for more than 1 second
The hazard flashes 4 times and the outside
chime sounds when the liftgate starts opening.
NOTE:
The liftgate can be opened by the power
liftgate switch
*A, the liftgate opener
switch
*Bor the power liftgate button
*Ceven if the liftgate is locked. The
liftgate will individually unlock and open.
Power close
When the liftgate is fully opened, the liftgate will
fully close automatically by:
. pushing the power liftgate switch
*Aon the
instrument panel
. pushing the power liftgate button
*Con the
Intelligent Key for more than 1 second
. pushing the power liftgate switch
*Don the
lower part of the liftgate
The hazard flashes 4 times and the outside
chime sounds when the liftgate starts closing. NOTE:
When the liftgate is closed, it remains
unlocked. Manually lock the liftgate.
Reverse function
The power liftgate will reverse immediately if one
of the following actions is performed during
power open or power close.
.
pushing the power liftgate switch
*Aon the
instrument panel
. pushing the power liftgate button
*Con the Intelligent Key.
. pushing the liftgate switch
*Don the lower
part of the liftgate
The outside chime sounds when the liftgate
starts to reverse.
Auto reverse function
The auto-reverse function enables the liftgate to
automatically reverse when something is caught
in the liftgate as it is opening or closing. When
the control unit detects an obstacle, the liftgate
will reverse and return to the full open or full
close position.
If a second obstacle is detected, the liftgate
motion will stop and the drive motor will
disengage. The liftgate will enter the manual
mode.
A pinch sensor is mounted on each side of the
liftgate. If an obstacle is detected by the pinch sensor during power close, the liftgate will
reverse and return to the full open position
immediately.
NOTE:
If the pinch sensor is damaged or removed,
the power close function will not operate.
WARNING
There is a small distance immediately
before the closed position that cannot
be detected. Make sure that all passen-
gers keep their hands, etc., clear from
the liftgate opening before closing the
liftgate.
Manual mode
If power operation is not available, the liftgate
can be operated manually. Power operation may
not be available if multiple obstacles have been
detected in a single power cycle or if the battery
voltage is low. When the power liftgate main
switch is in the OFF position, the liftgate can be
opened manually by pushing the liftgate opener
switch. If the power liftgate opener switch is
pushed during power open or close, the power
operation will be canceled and the liftgate can
be operated manually.
Page 255 of 614
4-58Monitor, heater, air conditioner, audio, phone and voice recognition systems
SAA3088
SAA3058
OPERATING TIPS
When the engine coolant temperature and
outside air temperature are low, the air flow
from the foot outlets may not operate. However,
this is not a malfunction. After the coolant
temperature warms up, the air flow from the
foot outlets will operate normally.
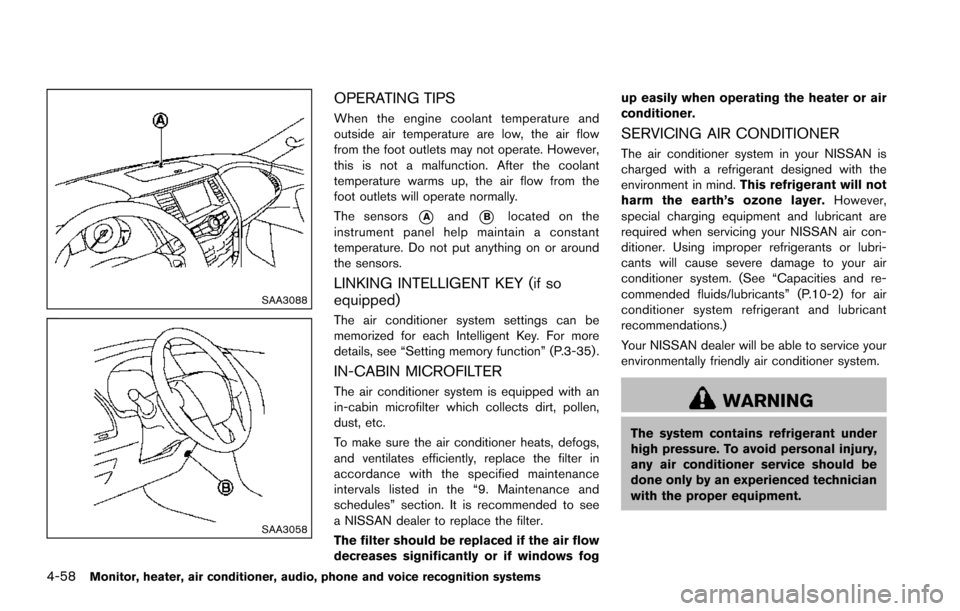
The sensors
*Aand*Blocated on the
instrument panel help maintain a constant
temperature. Do not put anything on or around
the sensors.
LINKING INTELLIGENT KEY (if so
equipped)
The air conditioner system settings can be
memorized for each Intelligent Key. For more
details, see “Setting memory function” (P.3-35) .
IN-CABIN MICROFILTER
The air conditioner system is equipped with an
in-cabin microfilter which collects dirt, pollen,
dust, etc.
To make sure the air conditioner heats, defogs,
and ventilates efficiently, replace the filter in
accordance with the specified maintenance
intervals listed in the “9. Maintenance and
schedules” section. It is recommended to see
a NISSAN dealer to replace the filter.
The filter should be replaced if the air flow
decreases significantly or if windows fog up easily when operating the heater or air
conditioner.
SERVICING AIR CONDITIONER
The air conditioner system in your NISSAN is
charged with a refrigerant designed with the
environment in mind.
This refrigerant will not
harm the earth’s ozone layer. However,
special charging equipment and lubricant are
required when servicing your NISSAN air con-
ditioner. Using improper refrigerants or lubri-
cants will cause severe damage to your air
conditioner system. (See “Capacities and re-
commended fluids/lubricants” (P.10-2) for air
conditioner system refrigerant and lubricant
recommendations.)
Your NISSAN dealer will be able to service your
environmentally friendly air conditioner system.
WARNING
The system contains refrigerant under
high pressure. To avoid personal injury,
any air conditioner service should be
done only by an experienced technician
with the proper equipment.
Page 272 of 614
The operation screen will be turned on when the
DISC·AUX button located on the instrument
panel is pushed while a DVD is being played,
and it will turn off automatically after a period of
time. To turn it on again, push the DISC·AUX
button again.
DVD operation keys:
When the DVD is playing without the operation
screen being shown as illustrated, you may use
the touch screen to select items from the
displayed video. You may also use the multi-
function controller to select an item from the
displayed video. When the operation screen is
being shown, use the multi-function controller or
touch screen to select an item from the
displayed menus.
PAUSE:
Select the “
” key to pause the DVD. To
resume playing the DVD, use the “PLAY” key.
PLAY:
Select the “
” key to start playing the DVD,
for example, after pausing the DVD.
STOP:
Select the “
” key to stop playing the DVD.
/Next/Previous Chapter:
Select the “
”or“” key to skip the
chapter(s) of the disc forward/backward. The
chapters will advance/go back the number of
times this key is selected.
/Commercial Skip:
This function is only for DVD-VIDEO, DVD-VR.
Select the “
”or“” key to skip forward or
backwards by the set amount as defined in the
DVD Settings menu.
Top Menu:
When the “Top Menu” key is selected in the
screen while a DVD is being played, the top
menu specific to each disc will be displayed. For
details, see the instructions on the disc.
SAA2498Example
DVD settings
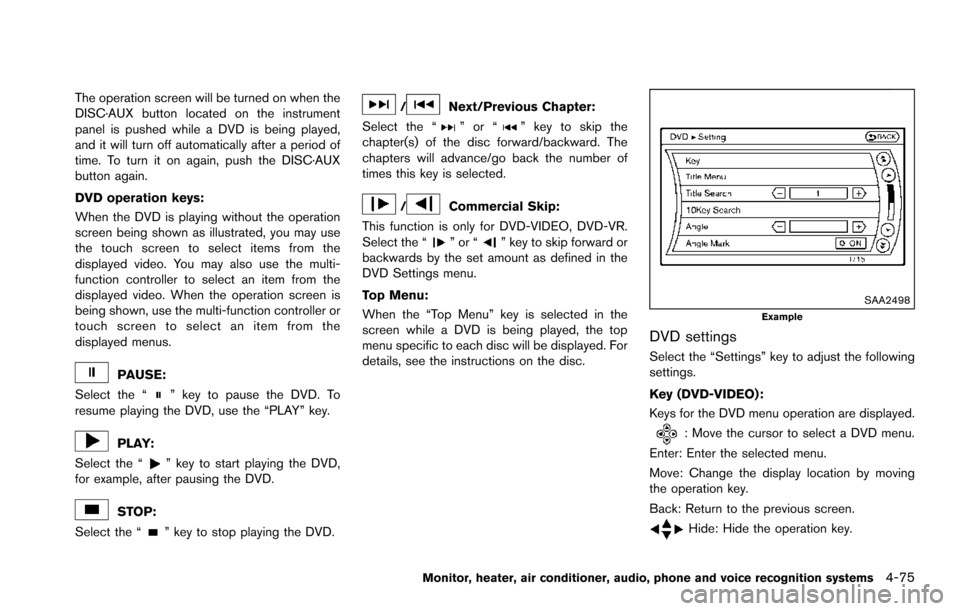
Select the “Settings” key to adjust the following
settings.
Key (DVD-VIDEO) :
Keys for the DVD menu operation are displayed.
: Move the cursor to select a DVD menu.
Enter: Enter the selected menu.
Move: Change the display location by moving
the operation key.
Back: Return to the previous screen.
Hide: Hide the operation key.
Monitor, heater, air conditioner, audio, phone and voice recognition systems4-75
Page 285 of 614
4-88Monitor, heater, air conditioner, audio, phone and voice recognition systems
SAA3162
FRONT AUXILIARY INPUT JACKS (if so
equipped)
The front auxiliary input jacks are located in the
console box. NTSC compatible devices such as
video games, camcorders and portable video
players can be connected to the auxiliary jacks.
Compatible audio devices, such as some MP3
players, can also be connected to the system
through the auxiliary jacks. The images from the
connected device can be viewed on the front
and rear displays.
The auxiliary jacks are color coded for identifica-
tion purposes..
Yellow - video input
. White - left channel audio input
. Red - right channel audio input
Before connecting a device to a jack, turn off the
power of the portable device.
With a compatible device connected to the
jacks, push the DISC·AUX button repeatedly
until the display switches to the AUX mode. The
output from the device will be played through
the monitor and audio system.
SAA2597
How to use AUX button
Images being played can be switched to the
center display if a device is connected to the
front auxiliary input jacks in the console box.
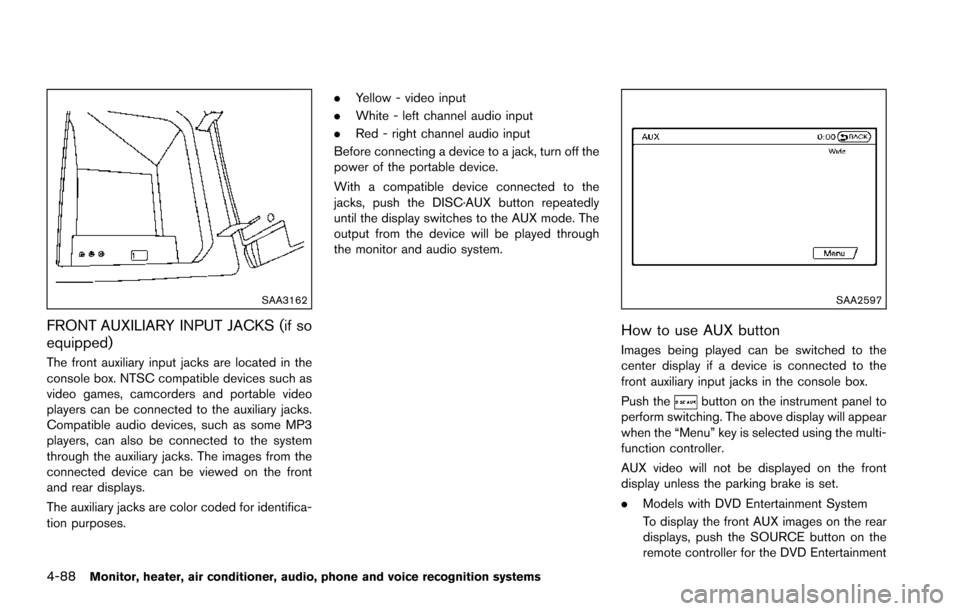
Push the
button on the instrument panel to
perform switching. The above display will appear
when the “Menu” key is selected using the multi-
function controller.
AUX video will not be displayed on the front
display unless the parking brake is set.
. Models with DVD Entertainment System
To display the front AUX images on the rear
displays, push the SOURCE button on the
remote controller for the DVD Entertainment
Page 297 of 614
4-100Monitor, heater, air conditioner, audio, phone and voice recognition systems
Available sources
The following sources are available to play on
each display:
Front display:
.Radio
. CD/DVD
. USB memory/iPod
Š
.BluetoothŠaudio
. AUX (front)
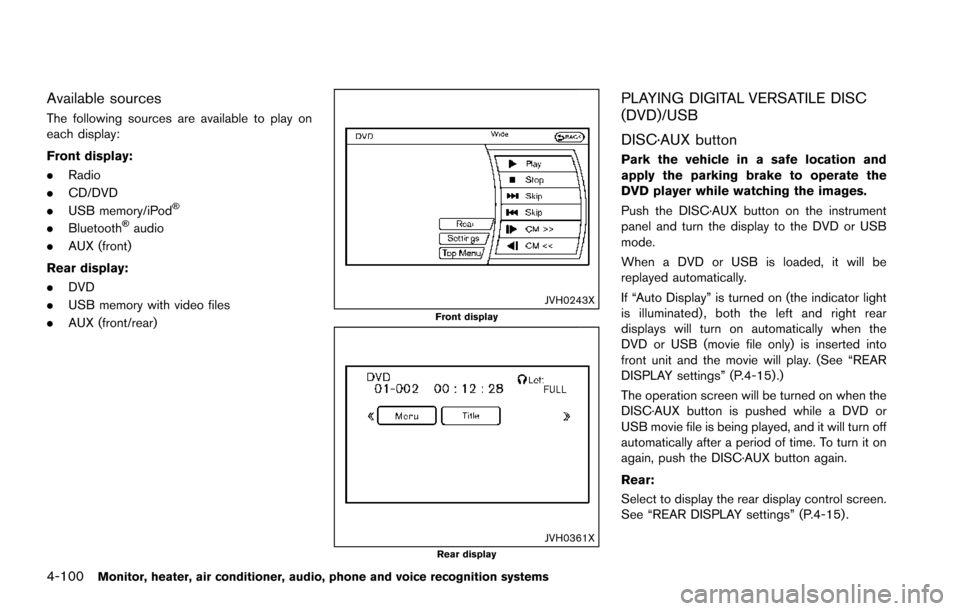
Rear display:
. DVD
. USB memory with video files
. AUX (front/rear)
JVH0243XFront display
JVH0361XRear display
PLAYING DIGITAL VERSATILE DISC
(DVD)/USB
DISC·AUX button
Park the vehicle in a safe location and
apply the parking brake to operate the
DVD player while watching the images.
Push the DISC·AUX button on the instrument
panel and turn the display to the DVD or USB
mode.
When a DVD or USB is loaded, it will be
replayed automatically.
If “Auto Display” is turned on (the indicator light
is illuminated) , both the left and right rear
displays will turn on automatically when the
DVD or USB (movie file only) is inserted into
front unit and the movie will play. (See “REAR
DISPLAY settings” (P.4-15) .)
The operation screen will be turned on when the
DISC·AUX button is pushed while a DVD or
USB movie file is being played, and it will turn off
automatically after a period of time. To turn it on
again, push the DISC·AUX button again.
Rear:
Select to display the rear display control screen.
See “REAR DISPLAY settings” (P.4-15) .
Page 311 of 614
4-114Monitor, heater, air conditioner, audio, phone and voice recognition systems
.Cancel Mute
This will appear after “Mute” is selected.
Mute will be canceled.
. Switch Call*
Select “Switch Call” to answer another
incoming call. By selecting “Hang up”, you
can end a call and can speak to a caller who
is on hold again.
* This function may not be usable, depend-
ing on the model of phone.
To adjust the person’s voice to be louder or
quieter, push the volume control switch (+ or í)
on the steering wheel or turn the volume control
knob on the instrument panel while talking on
the phone. This adjustment is also available in
the SETTING mode.
JVH0480X
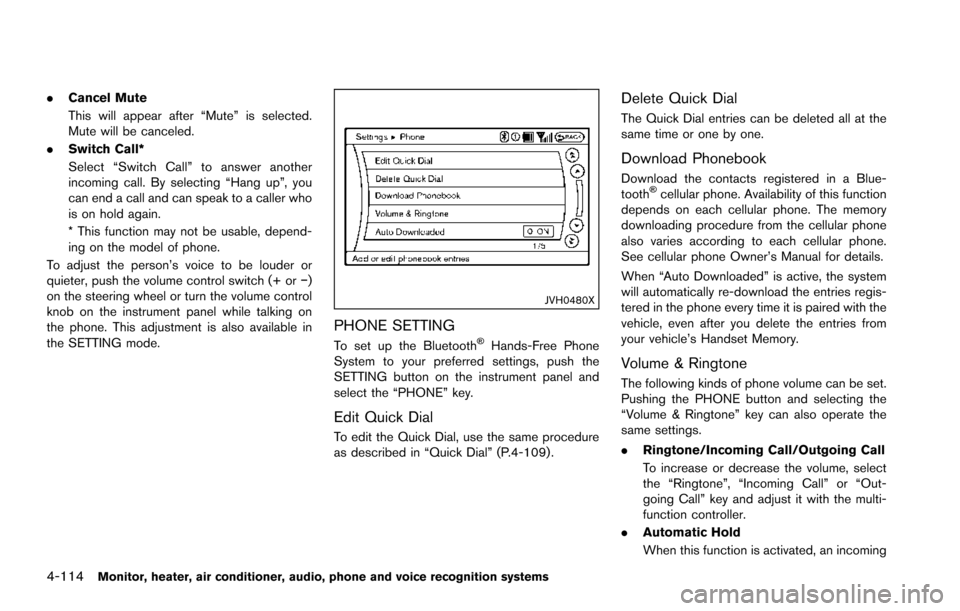
PHONE SETTING
To set up the BluetoothŠHands-Free Phone
System to your preferred settings, push the
SETTING button on the instrument panel and
select the “PHONE” key.
Edit Quick Dial
To edit the Quick Dial, use the same procedure
as described in “Quick Dial” (P.4-109) .
Delete Quick Dial
The Quick Dial entries can be deleted all at the
same time or one by one.
Download Phonebook
Download the contacts registered in a Blue-
toothŠcellular phone. Availability of this function
depends on each cellular phone. The memory
downloading procedure from the cellular phone
also varies according to each cellular phone.
See cellular phone Owner’s Manual for details.
When “Auto Downloaded” is active, the system
will automatically re-download the entries regis-
tered in the phone every time it is paired with the
vehicle, even after you delete the entries from
your vehicle’s Handset Memory.
Volume & Ringtone
The following kinds of phone volume can be set.
Pushing the PHONE button and selecting the
“Volume & Ringtone” key can also operate the
same settings.
. Ringtone/Incoming Call/Outgoing Call
To increase or decrease the volume, select
the “Ringtone”, “Incoming Call” or “Out-
going Call” key and adjust it with the multi-
function controller.
. Automatic Hold
When this function is activated, an incoming