2017 NISSAN ARMADA tow
[x] Cancel search: towPage 123 of 614
2-34Instruments and controls
Wiper drip wipe system:
The wiper will also operate once about 3
seconds after the washer and wiper are
operated. This operation is to wipe washer fluid
that has dripped on the windshield.
JVI1013X
RAIN-SENSING AUTO WIPER SYS-
TEM (if so equipped)
The rain-sensing auto wiper system can auto-
matically turn on the wipers and adjust the wiper
speed depending on the rainfall and the vehicle
speed by using the rain sensor located on the
upper part of the windshield.
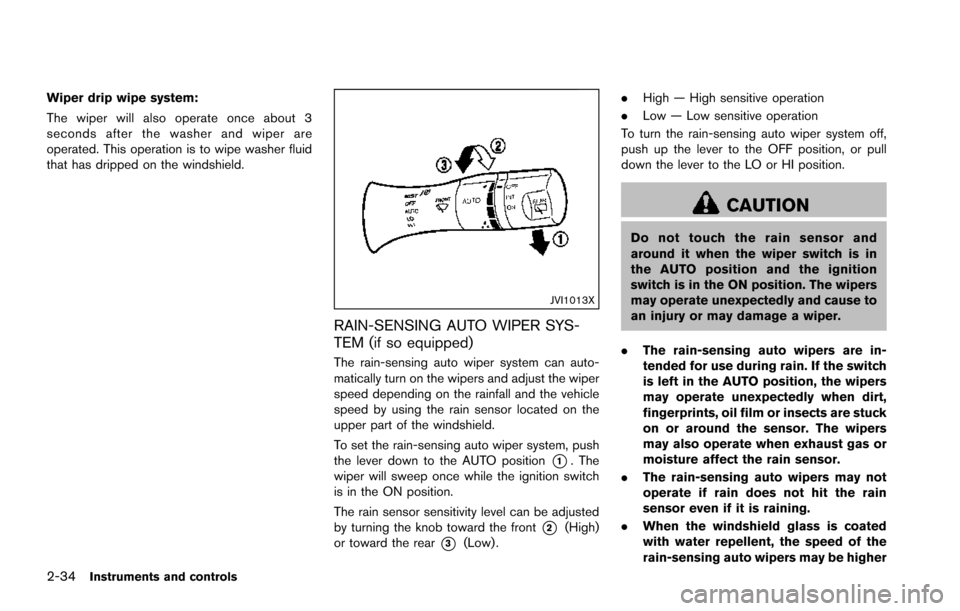
To set the rain-sensing auto wiper system, push
the lever down to the AUTO position
*1. The
wiper will sweep once while the ignition switch
is in the ON position.
The rain sensor sensitivity level can be adjusted
by turning the knob toward the front
*2(High)
or toward the rear
*3(Low) . .
High — High sensitive operation
. Low — Low sensitive operation
To turn the rain-sensing auto wiper system off,
push up the lever to the OFF position, or pull
down the lever to the LO or HI position.
CAUTION
Do not touch the rain sensor and
around it when the wiper switch is in
the AUTO position and the ignition
switch is in the ON position. The wipers
may operate unexpectedly and cause to
an injury or may damage a wiper.
. The rain-sensing auto wipers are in-
tended for use during rain. If the switch
is left in the AUTO position, the wipers
may operate unexpectedly when dirt,
fingerprints, oil film or insects are stuck
on or around the sensor. The wipers
may also operate when exhaust gas or
moisture affect the rain sensor.
. The rain-sensing auto wipers may not
operate if rain does not hit the rain
sensor even if it is raining.
. When the windshield glass is coated
with water repellent, the speed of the
rain-sensing auto wipers may be higher
Page 127 of 614
2-38Instruments and controls
headlights when it is light.
The headlights will also be turned on automa-
tically at twilight or in rainy weather (when the
windshield wiper is operated continuously) .
If the ignition switch is placed in the OFF
position and one of the doors is opened and this
condition is continued, the headlights remain on
for 5 minutes.
Automatic headlights off delay:
You can keep the headlights on for up to 180
seconds after you place the ignition switch in the
OFF position and open any door then close all
the doors.
You can adjust the period of the automatic
headlights off delay from 0 seconds (OFF) to
180 seconds. The factory default setting is 45
seconds.
For automatic headlights off delay setting, see
“How to use SETTING button” (P.4-13) .
SIC3784A
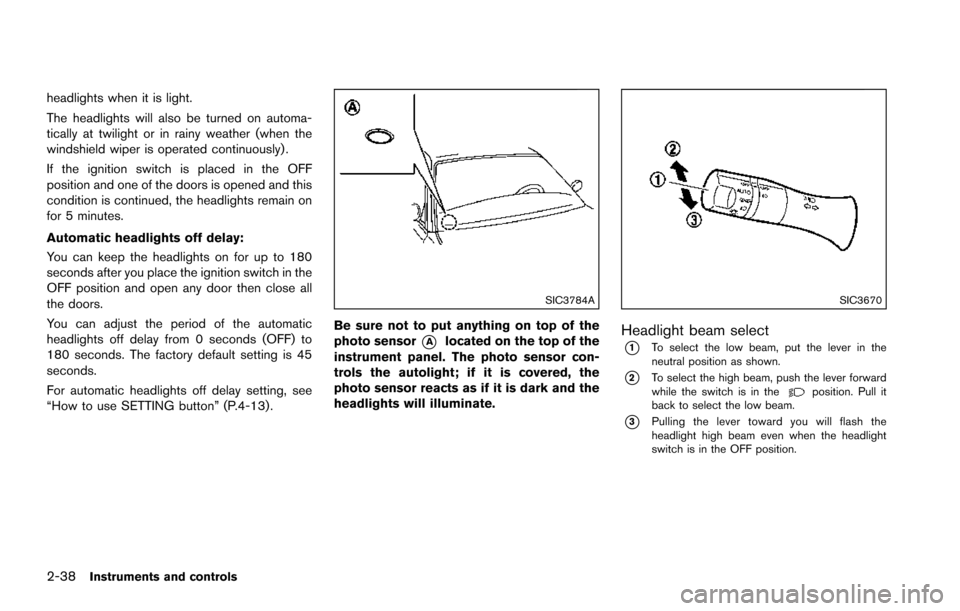
Be sure not to put anything on top of the
photo sensor
*Alocated on the top of the
instrument panel. The photo sensor con-
trols the autolight; if it is covered, the
photo sensor reacts as if it is dark and the
headlights will illuminate.
SIC3670
Headlight beam select
*1To select the low beam, put the lever in the
neutral position as shown.
*2To select the high beam, push the lever forward
while the switch is in theposition. Pull it
back to select the low beam.
*3Pulling the lever toward you will flash the
headlight high beam even when the headlight
switch is in the OFF position.
Page 136 of 614
SSD0972
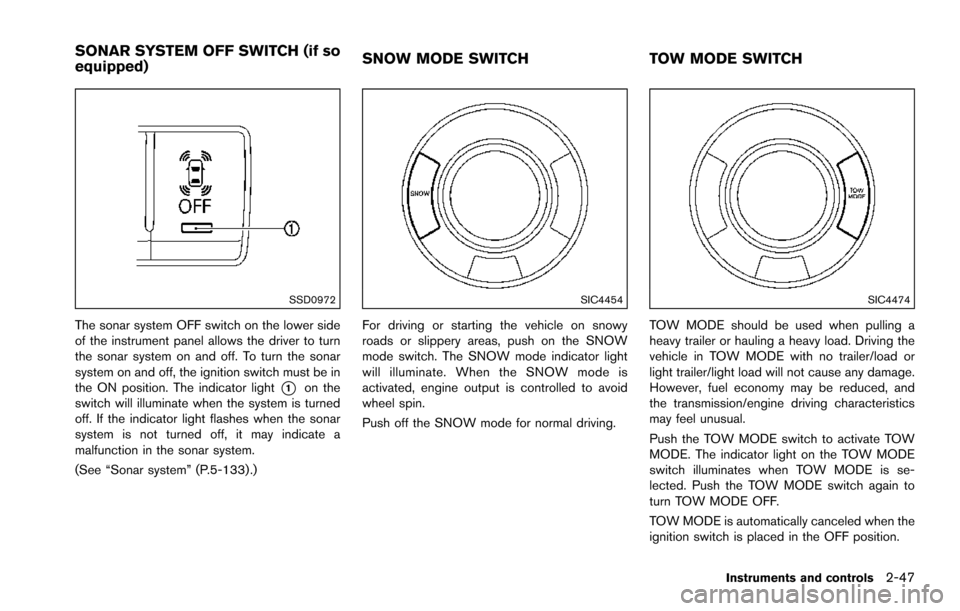
The sonar system OFF switch on the lower side
of the instrument panel allows the driver to turn
the sonar system on and off. To turn the sonar
system on and off, the ignition switch must be in
the ON position. The indicator light
*1on the
switch will illuminate when the system is turned
off. If the indicator light flashes when the sonar
system is not turned off, it may indicate a
malfunction in the sonar system.
(See “Sonar system” (P.5-133) .)
SIC4454
For driving or starting the vehicle on snowy
roads or slippery areas, push on the SNOW
mode switch. The SNOW mode indicator light
will illuminate. When the SNOW mode is
activated, engine output is controlled to avoid
wheel spin.
Push off the SNOW mode for normal driving.
SIC4474
TOW MODE should be used when pulling a
heavy trailer or hauling a heavy load. Driving the
vehicle in TOW MODE with no trailer/load or
light trailer/light load will not cause any damage.
However, fuel economy may be reduced, and
the transmission/engine driving characteristics
may feel unusual.
Push the TOW MODE switch to activate TOW
MODE. The indicator light on the TOW MODE
switch illuminates when TOW MODE is se-
lected. Push the TOW MODE switch again to
turn TOW MODE OFF.
TOW MODE is automatically canceled when the
ignition switch is placed in the OFF position.
Instruments and controls2-47
SONAR SYSTEM OFF SWITCH (if so
equipped) SNOW MODE SWITCH
TOW MODE SWITCH
Page 168 of 614
WARNING
.Radio waves could adversely affect
electric medical equipment. Those
who use a pacemaker should con-
tact the electric medical equipment
manufacturer for the possible influ-
ences before use.
. The Intelligent Key transmits radio
waves when the buttons are
pushed. The FAA advises that the
radio waves may affect aircraft na-
vigation and communication sys-
tems. Do not operate the
Intelligent Key while on an airplane.
Make sure the buttons are not
operated unintentionally when the
unit is stored during a flight.
The Intelligent Key system can operate all the
door locks using the remote controller function
or pushing the request switch on the vehicle
without taking the key out from a pocket or
purse. The operating environment and/or condi-
tions may affect the Intelligent Key system
operation.
Be sure to read the following before using the
Intelligent Key system.
CAUTION
. Be sure to carry the Intelligent Key
with you when operating the vehi-
cle.
. Never leave the Intelligent Key in
the vehicle when you leave the
vehicle.
The Intelligent Key is always communicating with
the vehicle as it receives radio waves. The
Intelligent Key system transmits weak radio
waves. Environmental conditions may interfere
with the operation of the Intelligent Key system
under the following operating conditions.
. When operating near a location where
strong radio waves are transmitted, such
as a TV tower, power station and broad-
casting station.
. When in possession of wireless equipment,
such as a cellular telephone, transceiver,
and CB radio.
. When the Intelligent Key is in contact with or
covered by metallic materials.
. When any type of radio wave remote control
is used nearby.
. When the Intelligent Key is placed near an
electric appliance such as a personal computer.
. When the vehicle is parked near a parking
meter.
In such cases, correct the operating conditions
before using the Intelligent Key function or use
the mechanical key.
Although the life of the battery varies depending
on the operating conditions, the battery’s life is
approximately 2 years. If the battery is dis-
charged, replace it with a new one.
Since the Intelligent Key is continuously receiv-
ing radio waves, if the key is left near equipment
which transmits strong radio waves, such as
signals from a TV and personal computer, the
battery life may become shorter.
For information regarding replacement of a
battery, see “Intelligent Key battery replacement”
(P.8-21) .
As many as 4 Intelligent Keys can be registered
and used with one vehicle. For information about
the purchase and use of additional Intelligent
Keys, contact a NISSAN dealer.
CAUTION
. Do not allow the Intelligent Key,
which contains electrical compo-
nents, to come into contact with
Pre-driving checks and adjustments3-7
INTELLIGENT KEY SYSTEM
Page 187 of 614
3-26Pre-driving checks and adjustments
SPA2751
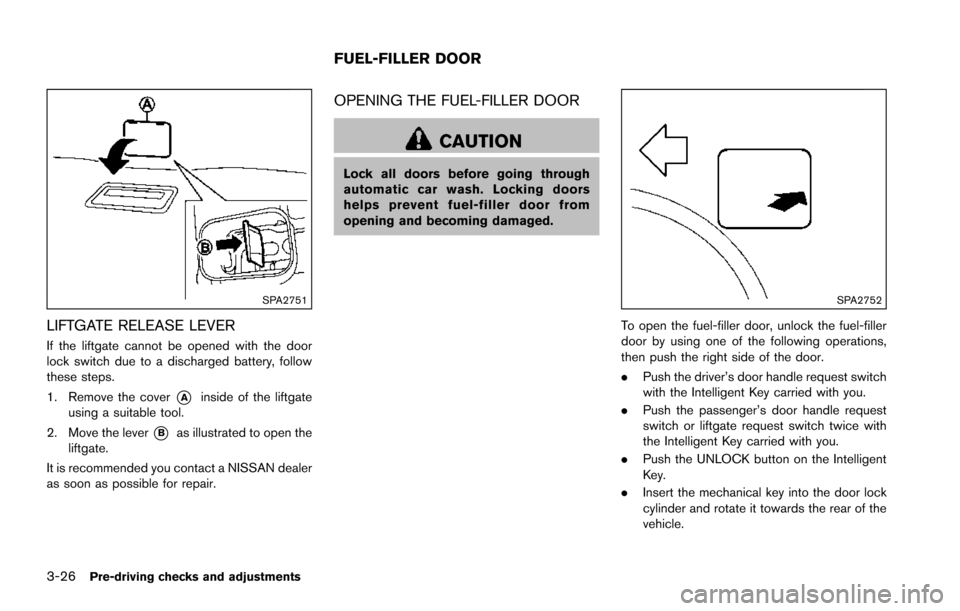
LIFTGATE RELEASE LEVER
If the liftgate cannot be opened with the door
lock switch due to a discharged battery, follow
these steps.
1. Remove the cover
*Ainside of the liftgate
using a suitable tool.
2. Move the lever
*Bas illustrated to open the
liftgate.
It is recommended you contact a NISSAN dealer
as soon as possible for repair.
OPENING THE FUEL-FILLER DOOR
CAUTION
Lock all doors before going through
automatic car wash. Locking doors
helps prevent fuel-filler door from
opening and becoming damaged.
SPA2752
To open the fuel-filler door, unlock the fuel-filler
door by using one of the following operations,
then push the right side of the door.
. Push the driver’s door handle request switch
with the Intelligent Key carried with you.
. Push the passenger’s door handle request
switch or liftgate request switch twice with
the Intelligent Key carried with you.
. Push the UNLOCK button on the Intelligent
Key.
. Insert the mechanical key into the door lock
cylinder and rotate it towards the rear of the
vehicle.
FUEL-FILLER DOOR
Page 202 of 614
SAA3025
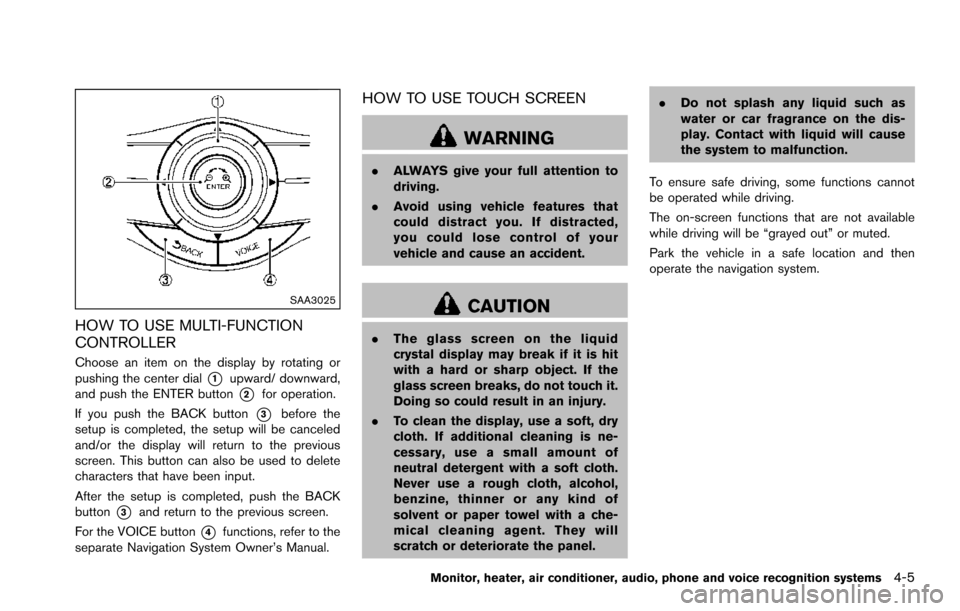
HOW TO USE MULTI-FUNCTION
CONTROLLER
Choose an item on the display by rotating or
pushing the center dial
*1upward/ downward,
and push the ENTER button
*2for operation.
If you push the BACK button
*3before the
setup is completed, the setup will be canceled
and/or the display will return to the previous
screen. This button can also be used to delete
characters that have been input.
After the setup is completed, push the BACK
button
*3and return to the previous screen.
For the VOICE button
*4functions, refer to the
separate Navigation System Owner’s Manual.
HOW TO USE TOUCH SCREEN
WARNING
. ALWAYS give your full attention to
driving.
. Avoid using vehicle features that
could distract you. If distracted,
you could lose control of your
vehicle and cause an accident.
CAUTION
.The glass screen on the liquid
crystal display may break if it is hit
with a hard or sharp object. If the
glass screen breaks, do not touch it.
Doing so could result in an injury.
. To clean the display, use a soft, dry
cloth. If additional cleaning is ne-
cessary, use a small amount of
neutral detergent with a soft cloth.
Never use a rough cloth, alcohol,
benzine, thinner or any kind of
solvent or paper towel with a che-
mical cleaning agent. They will
scratch or deteriorate the panel. .
Do not splash any liquid such as
water or car fragrance on the dis-
play. Contact with liquid will cause
the system to malfunction.
To ensure safe driving, some functions cannot
be operated while driving.
The on-screen functions that are not available
while driving will be “grayed out” or muted.
Park the vehicle in a safe location and then
operate the navigation system.
Monitor, heater, air conditioner, audio, phone and voice recognition systems4-5
Page 235 of 614
4-38Monitor, heater, air conditioner, audio, phone and voice recognition systems
2. Select the “Display” key.
3. Select an item you wish to adjust.
4. Adjust the level of the setting item using themulti-function controller.
NOTE:
Do not adjust any of the display settings of
the Around View
�ŠMonitor while the vehi-
cle is moving. Make sure the parking brake
is firmly applied.
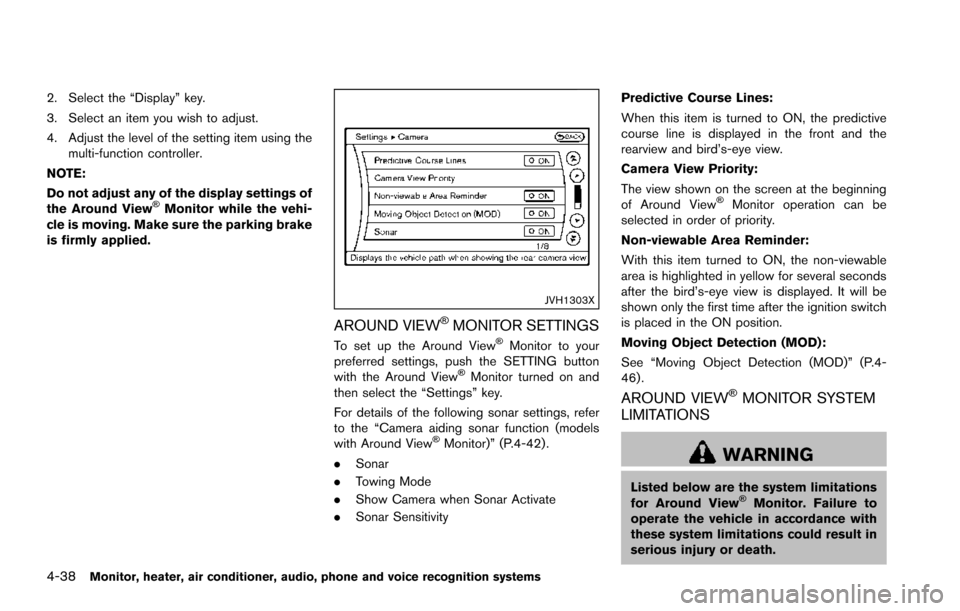
JVH1303X
AROUND VIEW�ŠMONITOR SETTINGS
To set up the Around View�ŠMonitor to your
preferred settings, push the SETTING button
with the Around View
�ŠMonitor turned on and
then select the “Settings” key.
For details of the following sonar settings, refer
to the “Camera aiding sonar function (models
with Around View
�ŠMonitor)” (P.4-42) .
. Sonar
. Towing Mode
. Show Camera when Sonar Activate
. Sonar Sensitivity Predictive Course Lines:
When this item is turned to ON, the predictive
course line is displayed in the front and the
rearview and bird’s-eye view.
Camera View Priority:
The view shown on the screen at the beginning
of Around View
�ŠMonitor operation can be
selected in order of priority.
Non-viewable Area Reminder:
With this item turned to ON, the non-viewable
area is highlighted in yellow for several seconds
after the bird’s-eye view is displayed. It will be
shown only the first time after the ignition switch
is placed in the ON position.
Moving Object Detection (MOD):
See “Moving Object Detection (MOD)” (P.4-
46) .
AROUND VIEW�ŠMONITOR SYSTEM
LIMITATIONS
WARNING
Listed below are the system limitations
for Around View�ŠMonitor. Failure to
operate the vehicle in accordance with
these system limitations could result in
serious injury or death.
Page 242 of 614
the ignition switch is placed in the ON position,
“Sonar is OFF” is displayed briefly.
Towing Mode:
When this item is turned ON, only the rear sonar
is OFF. The amber markers are displayed at the
rear corners of the vehicle icon.
Show Camera when Sonar Activate:
When this item is turned ON, the camera view is
automatically shown on the display in the case
that the distance to the objects measured by the
sonar is becoming short.
Sonar Sensitivity:
Adjust the sensitivity level of the sensor higher
(right) or lower (left) .
SONAR SYSTEM LIMITATIONS
WARNING
Listed below are the system limitations
for the sonar function. Failure to oper-
ate the vehicle in accordance with these
system limitations could result in ser-
ious injury or death.
.Inclement weather or ultrasonic
sources such as an automatic car
wash, a truck’ s compressed-air
brakes or a pneumatic drill may affect the function of the system,
including reduced performance or a
false activation.
. This function is designed as an aid
to the driver in detecting large
stationary objects to help avoid
damaging the vehicle.
. The system is not designed to pre-
vent contact with small or moving
objects.
. The system will not detect small
objects below the bumper, and may
not detect objects close to the
bumper or on the ground.
. The system may not detect the
following objects:
— Fluffy objects such as snow,
cloth, cotton, grass or wool.
— Thin objects such as rope, wire or chain.
— Wedge-shaped objects.
. If your vehicle sustains damage to
the bumper fascia, leaving it mis-
aligned or bent, the sensing zone
may be altered causing inaccurate
measurement of objects or false
alarms.
CAUTION
Excessive noise (such as audio system
volume or an open vehicle window) will
interfere with the tone and it may not be
heard.
SYSTEM TEMPORARILY UNAVAIL-
ABLE
When the amber markers are displayed at the
corners of the vehicle icon and the function
cannot be activated from the Camera setting
menu (the setting items are grayed out) , the
sonar system may be malfunctioning.
SYSTEM MAINTENANCE
CAUTION
Keep the surface of the sonar sensors
(located on the front and rear bumper
fascia) free from accumulations of
snow, ice and dirt. Do not scratch the
surface of the sonar sensors when
cleaning. If the sensors are covered,
the accuracy of the sonar function will
be diminished.
Monitor, heater, air conditioner, audio, phone and voice recognition systems4-45