Page 536 of 614

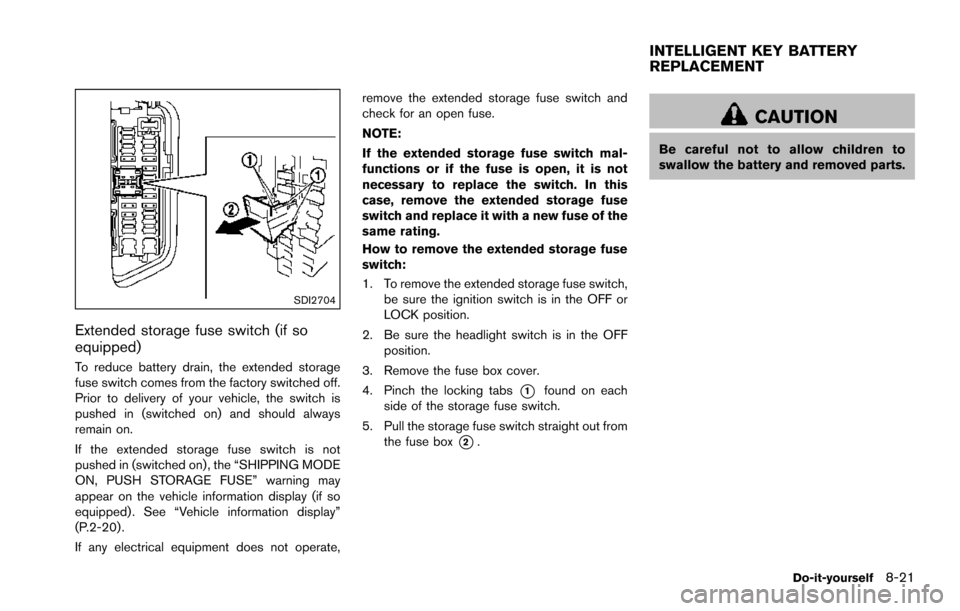
SDI2704
Extended storage fuse switch (if so
equipped)
To reduce battery drain, the extended storage
fuse switch comes from the factory switched off.
Prior to delivery of your vehicle, the switch is
pushed in (switched on) and should always
remain on.
If the extended storage fuse switch is not
pushed in (switched on), the “SHIPPING MODE
ON, PUSH STORAGE FUSE” warning may
appear on the vehicle information display (if so
equipped) . See “Vehicle information display”
(P.2-20) .
If any electrical equipment does not operate,remove the extended storage fuse switch and
check for an open fuse.
NOTE:
If the extended storage fuse switch mal-
functions or if the fuse is open, it is not
necessary to replace the switch. In this
case, remove the extended storage fuse
switch and replace it with a new fuse of the
same rating.
How to remove the extended storage fuse
switch:
1. To remove the extended storage fuse switch,
be sure the ignition switch is in the OFF or
LOCK position.
2. Be sure the headlight switch is in the OFF position.
3. Remove the fuse box cover.
4. Pinch the locking tabs
*1found on each
side of the storage fuse switch.
5. Pull the storage fuse switch straight out from the fuse box
*2.
CAUTION
Be careful not to allow children to
swallow the battery and removed parts.
Do-it-yourself8-21
INTELLIGENT KEY BATTERY
REPLACEMENT
Page 539 of 614
8-24Do-it-yourself
JVM0727X
1. Front turn signal light
2. Front side marker light
3. Front map light
4. Headlight (high beam)
5. Front parking light/Daytime running light
6. Front fog light (if so equipped)
7. Headlight (low-beam)
8. Puddle light (if so equipped)
9. Step light (if so equipped)
10. Side turn signal light
11. Tail light
12. Cargo light
13. High-mounted stop light
14. Rear personal light
15. Rear side marker light
16. Stop light
17. Rear turn signal light
18. Back-up light
19. License plate light
LIGHTS
Page 540 of 614

HEADLIGHTS
Fog may temporarily form inside the lens of the
exterior lights in the rain or in a car wash. A
temperature difference between the inside and
the outside of the lens causes the fog. This is
not a malfunction. If large drops of water collect
inside the lens, it is recommended you visit a
NISSAN dealer for this service.
Replacing
LED headlight:
If replacement is required, it is recommended
you visit a NISSAN dealer for this service.
Halogen headlight bulb:
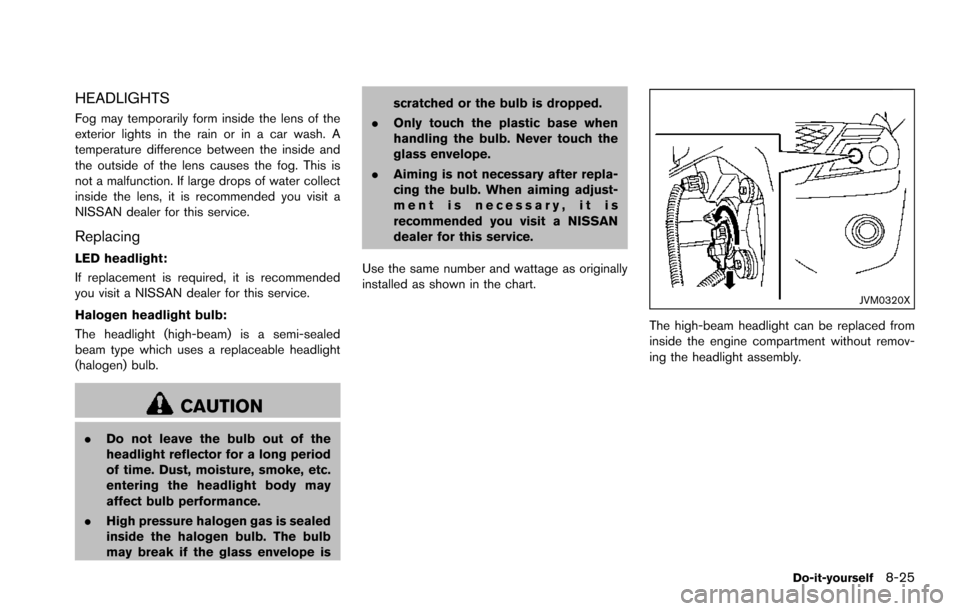
The headlight (high-beam) is a semi-sealed
beam type which uses a replaceable headlight
(halogen) bulb.
CAUTION
.Do not leave the bulb out of the
headlight reflector for a long period
of time. Dust, moisture, smoke, etc.
entering the headlight body may
affect bulb performance.
. High pressure halogen gas is sealed
inside the halogen bulb. The bulb
may break if the glass envelope is scratched or the bulb is dropped.
. Only touch the plastic base when
handling the bulb. Never touch the
glass envelope.
. Aiming is not necessary after repla-
cing the bulb. When aiming adjust-
ment is necessary, it is
recommended you visit a NISSAN
dealer for this service.
Use the same number and wattage as originally
installed as shown in the chart.
JVM0320X
The high-beam headlight can be replaced from
inside the engine compartment without remov-
ing the headlight assembly.
Do-it-yourself8-25
Page 541 of 614
8-26Do-it-yourself
EXTERIOR AND INTERIOR LIGHTS
ItemWattage (W)Bulb No.
Headlight
High-beam (Halogen) 65H9
Low-beam* LED—
Front turn signal light 28/87444NA
Fog light (if so equipped) 35H8
Front parking light* LED—
Front side marker light* LED—
Side turn signal light* LED—
Rear combination light tail* LED—
back-up 16W16W
stop 21W21W
side marker* LED—
turn signal 21WY21W
License plate light 5W5W
Puddle light* (if so equipped) LED—
Front armrest light* (if so equipped) LED—
Map light 8—
Rear personal light 8—
Cargo light 8—
Vanity mirror light 1.8—
Step light (if so equipped) 5—
Footwell light* (if so equipped) 1.4—
Glove box light* 1.4—
High-mounted stop light* LED—
*: It is recommended you visit a NISSAN dealer for replacement. NOTE: Always check with the Parts Department at a
NISSAN dealer for the latest information
about parts.
Page 542 of 614
Replacement procedures
All other lights are either type A, B, C, D, E or F.
When replacing a bulb, first remove the lens
and/or cover.
SDI1679
JVM0321XFront turn signal light
Do-it-yourself8-27
Page 543 of 614
8-28Do-it-yourself
SDI2628Front fog light (if so equipped)1. Remove the screws*Aand the bolts*Busing a suitable tool.
2. Remove the clips
*Cand remove the wheel
house inner cover*D.
JVM0335XRear combination light (turn signal and stop)1. Remove the cover*Aby pulling it backward.
2. Remove the bolts
*B, and gradually pry the
rear combination light whole unit*Coutward.
SDI2524Back-up light
Remove the cover*Aon the inside of the
liftgate.
Page 544 of 614
SDI2525License plate light
SDI2030Front map light
SDI2031Rear personal light
SDI1729Cargo light
SDI2277Step light (if so equipped)
SDI2032Vanity mirror light
Do-it-yourself8-29
Page 545 of 614

8-30Do-it-yourself
If you have a flat tire, see “Flat tire” (P.6-3) .
TIRE PRESSURE
Tire Pressure Monitoring System (TPMS)
This vehicle is equipped with the Tire Pressure
Monitoring System (TPMS) . It monitors tire
pressure of all tires except the spare. When
the low tire pressure warning light is lit and the
CHECK TIRE PRESSURE warning appears in
the vehicle information display, one or more of
your tires is significantly under-inflated.
The TPMS will activate only when the vehicle is
driven at speeds above 16 MPH (25 km/h) .
Also, this system may not detect a sudden drop
in tire pressure (for example, a flat tire while
driving) .
For more details, see “Low tire pressure warning
light” (P.2-15) , “Tire Pressure Monitoring Sys-
tem (TPMS)” (P.5-5) and “Tire Pressure Mon-
itoring System (TPMS) ” (P.6-3).
Tire inflation pressure
Check the pressure of the tires (including
the spare) often and always prior to long
distance trips. The recommended tire
pressure specifications are shown on the
Tire and Loading Information label under
the “Cold Tire Pressure” heading. TheTire and Loading Information label is
affixed to the driver side center pillar.
Tire pressures should be checked reg-
ularly because:
.
Most tires naturally lose air over time.
. Tires can lose air suddenly when
driven over potholes or other objects
or if the vehicle strikes a curb while
parking.
The tire pressures should be checked
when the tires are cold. The tires are
considered COLD after the vehicle has
been parked for 3 or more hours, or
driven less than 1 mile (1.6 km) at
moderate speeds.
TPMS with Easy Fill Tire Alert provides
visual and audible signals outside the
vehicle for inflating the tires to the
recommended COLD tire pressure.
(See “TPMS with Easy Fill Tire Alert”
(P.5-8) .)
Incorrect tire pressure, including
under inflation, may adversely affect
tire life and vehicle handling.
WARNING
. Improperly inflated tires can
fail suddenly and cause an
accident.
. The Gross Vehicle Weight rat-
ing (GVWR) is located on the F.
M.V.S.S./C.M.V.S.S. certifica-
tion label. The vehicle weight
capacity is indicated on the
Tire and Loading Information
label. Do not load your vehicle
beyond this capacity. Over-
loading your vehicle may re-
sult in reduced tire life, unsafe
operating conditions due to
premature tire failure, or un-
favorable handling character-
istics and could also lead to a
serious accident. Loading be-
yond the specified capacity
may also result in failure of
other vehicle components.
. Before taking a long trip, or
WHEELS AND TIRES