2017 NISSAN ARMADA Push button
[x] Cancel search: Push buttonPage 15 of 614
0-8Illustrated table of contents
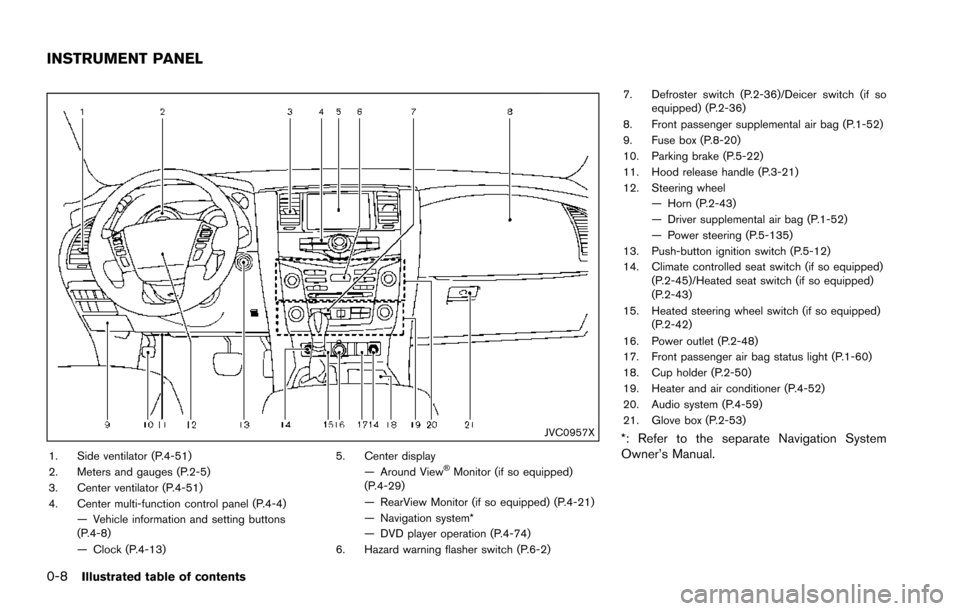
JVC0957X
1. Side ventilator (P.4-51)
2. Meters and gauges (P.2-5)
3. Center ventilator (P.4-51)
4. Center multi-function control panel (P.4-4)— Vehicle information and setting buttons
(P.4-8)
— Clock (P.4-13) 5. Center display
— Around View�ŠMonitor (if so equipped)
(P.4-29)
— RearView Monitor (if so equipped) (P.4-21)
— Navigation system*
— DVD player operation (P.4-74)
6. Hazard warning flasher switch (P.6-2) 7. Defroster switch (P.2-36)/Deicer switch (if so
equipped) (P.2-36)
8. Front passenger supplemental air bag (P.1-52)
9. Fuse box (P.8-20)
10. Parking brake (P.5-22)
11. Hood release handle (P.3-21)
12. Steering wheel — Horn (P.2-43)
— Driver supplemental air bag (P.1-52)
— Power steering (P.5-135)
13. Push-button ignition switch (P.5-12)
14. Climate controlled seat switch (if so equipped) (P.2-45)/Heated seat switch (if so equipped)
(P.2-43)
15. Heated steering wheel switch (if so equipped) (P.2-42)
16. Power outlet (P.2-48)
17. Front passenger air bag status light (P.1-60)
18. Cup holder (P.2-50)
19. Heater and air conditioner (P.4-52)
20. Audio system (P.4-59)
21. Glove box (P.2-53)
*: Refer to the separate Navigation System
Owner’s Manual.
INSTRUMENT PANEL
Page 42 of 614
belt when the vehicle slows down rapidly or
during impacts.
The Automatic Locking Retractor (ALR) mode
(child restraint mode) locks the seat belt for
child restraint installation.
When the ALR mode is activated the seat belt
cannot be extended again until the seat belt
tongue is detached from the buckle and fully
retracted. The seat belt returns to the ELR mode
after the seat belt fully retracts. For additional
information, see “Child restraints” (P.1-31) .
The ALR mode should be used only for
child restraint installation. During normal
seat belt use by an occupant, the ALR
mode should not be activated. If it is
activated, it may cause uncomfortable seat
belt tension.
WARNING
When fastening the seat belts, be
certain that seatbacks are completely
secured in the latched position. If they
are not completely secured, passengers
may be injured in an accident or sudden
stop.
SSS0326
Unfastening the seat belts
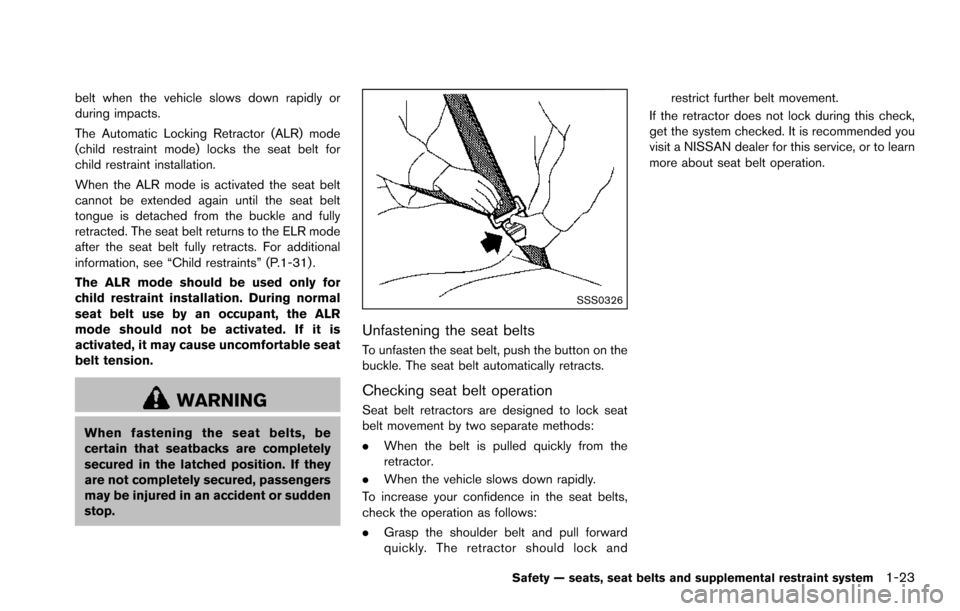
To unfasten the seat belt, push the button on the
buckle. The seat belt automatically retracts.
Checking seat belt operation
Seat belt retractors are designed to lock seat
belt movement by two separate methods:
.When the belt is pulled quickly from the
retractor.
. When the vehicle slows down rapidly.
To increase your confidence in the seat belts,
check the operation as follows:
. Grasp the shoulder belt and pull forward
quickly. The retractor should lock and restrict further belt movement.
If the retractor does not lock during this check,
get the system checked. It is recommended you
visit a NISSAN dealer for this service, or to learn
more about seat belt operation.
Safety — seats, seat belts and supplemental restraint system1-23
Page 46 of 614
SSS0896
Shoulder belt height adjustment (for front
seats and 2nd row seats)
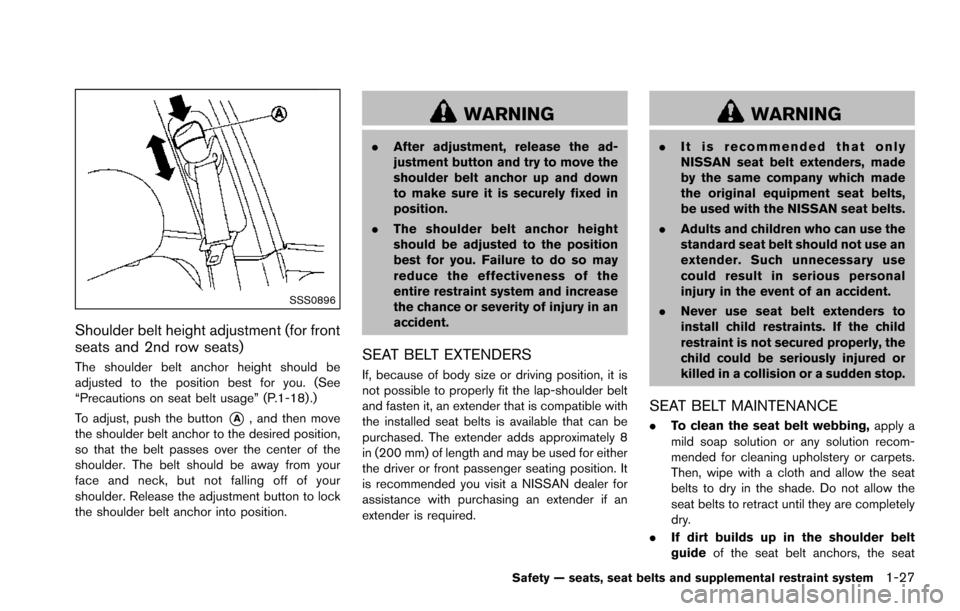
The shoulder belt anchor height should be
adjusted to the position best for you. (See
“Precautions on seat belt usage” (P.1-18) .)
To adjust, push the button
*A, and then move
the shoulder belt anchor to the desired position,
so that the belt passes over the center of the
shoulder. The belt should be away from your
face and neck, but not falling off of your
shoulder. Release the adjustment button to lock
the shoulder belt anchor into position.
WARNING
. After adjustment, release the ad-
justment button and try to move the
shoulder belt anchor up and down
to make sure it is securely fixed in
position.
. The shoulder belt anchor height
should be adjusted to the position
best for you. Failure to do so may
reduce the effectiveness of the
entire restraint system and increase
the chance or severity of injury in an
accident.
SEAT BELT EXTENDERS
If, because of body size or driving position, it is
not possible to properly fit the lap-shoulder belt
and fasten it, an extender that is compatible with
the installed seat belts is available that can be
purchased. The extender adds approximately 8
in (200 mm) of length and may be used for either
the driver or front passenger seating position. It
is recommended you visit a NISSAN dealer for
assistance with purchasing an extender if an
extender is required.
WARNING
.It is recommended that only
NISSAN seat belt extenders, made
by the same company which made
the original equipment seat belts,
be used with the NISSAN seat belts.
. Adults and children who can use the
standard seat belt should not use an
extender. Such unnecessary use
could result in serious personal
injury in the event of an accident.
. Never use seat belt extenders to
install child restraints. If the child
restraint is not secured properly, the
child could be seriously injured or
killed in a collision or a sudden stop.
SEAT BELT MAINTENANCE
.To clean the seat belt webbing, apply a
mild soap solution or any solution recom-
mended for cleaning upholstery or carpets.
Then, wipe with a cloth and allow the seat
belts to dry in the shade. Do not allow the
seat belts to retract until they are completely
dry.
. If dirt builds up in the shoulder belt
guide of the seat belt anchors, the seat
Safety — seats, seat belts and supplemental restraint system1-27
Page 93 of 614
2-4Instruments and controls
JVC0957X
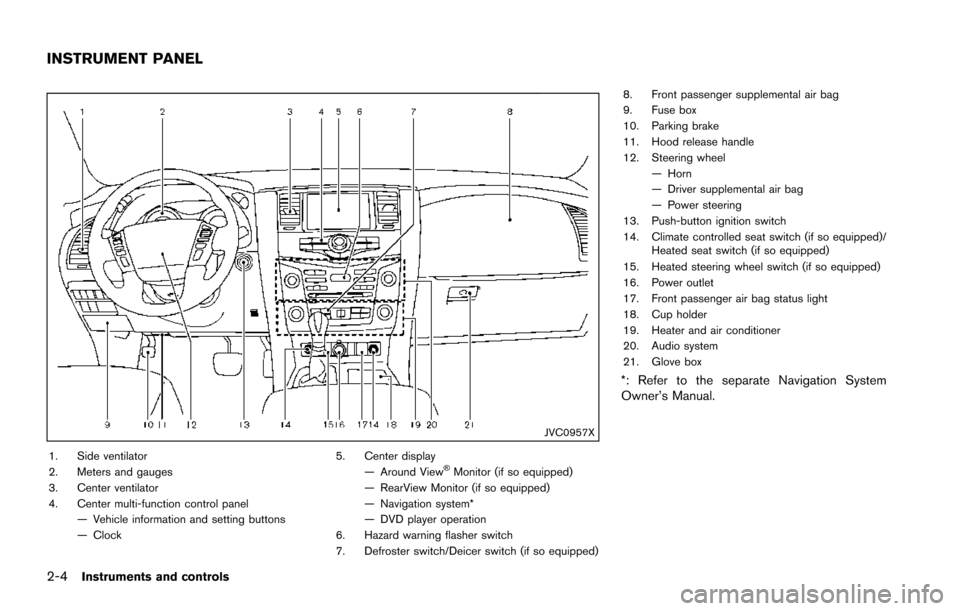
1. Side ventilator
2. Meters and gauges
3. Center ventilator
4. Center multi-function control panel— Vehicle information and setting buttons
— Clock 5. Center display
— Around View�ŠMonitor (if so equipped)
— RearView Monitor (if so equipped)
— Navigation system*
— DVD player operation
6. Hazard warning flasher switch
7. Defroster switch/Deicer switch (if so equipped) 8. Front passenger supplemental air bag
9. Fuse box
10. Parking brake
11. Hood release handle
12. Steering wheel
— Horn
— Driver supplemental air bag
— Power steering
13. Push-button ignition switch
14. Climate controlled seat switch (if so equipped)/ Heated seat switch (if so equipped)
15. Heated steering wheel switch (if so equipped)
16. Power outlet
17. Front passenger air bag status light
18. Cup holder
19. Heater and air conditioner
20. Audio system
21. Glove box
*: Refer to the separate Navigation System
Owner’s Manual.
INSTRUMENT PANEL
Page 110 of 614
.Back-up Collision Intervention (BCI)
— “Back-up Collision Intervention (BCI)”
(P.5-56) .
. Cruise control
— “Cruise control” (P.5-67) .
. Intelligent Cruise Control (ICC)
— “Intelligent Cruise Control (ICC)” (P.5-
69) .
. Distance Control Assist (DCA)
— “Distance Control Assist (DCA)” (P.5-
91) .
. Intelligent Key system
— “Intelligent Key system” (P.3-7).
— “Push-button ignition switch” (P.5-12) .
. Forward Emergency Braking (FEB)
— “Forward Emergency Braking (FEB)”
(P.5-105) .
. Predictive Forward Collision Warning
(PFCW)
— “Predictive Forward Collision Warning
(PFCW)” (P.5-112) .
Instruments and controls2-21
Page 120 of 614
about 30 seconds the vehicle security
system automatically shifts into the armed
phase. The security light begins to flash
once every approximately 3 seconds. If,
during this 30-second pre-arm time period,
the door is unlocked, or the ignition switch is
pushed to ACC or ON, the system will not
arm.
Even when the driver and/or passengers
are in the vehicle, the system will activate
with all doors, hood, and liftgate locked
with the ignition switch in the LOCK
position. When pushing the ignition switch
to the ACC or ON position, the system will
be released.
Vehicle security system activation
The vehicle security system will give the follow-
ing alarm:
. The headlights blink and the horn sounds
intermittently.
. The alarm automatically turns off after
approximately 50 seconds. However, the
alarm reactivates if the vehicle is tampered
with again.
The alarm is activated by:
. Unlocking the door or opening the liftgate
without using the button on the Intelligent
Key, the door handle request switch or the mechanical key. (Even if the door is opened
by releasing the door inside lock knob, the
alarm will activate.)
. Opening the hood.
How to stop an activated alarm
The alarm will stop when a door is unlocked by
pushing the unlock button on the Intelligent Key,
the door handle request switch or using the
mechanical key, or when the ignition switch is
pushed to the ACC or ON position.
If the system does not operate as de-
scribed above, it is recommended you have
it checked by a NISSAN dealer.
NISSAN VEHICLE IMMOBILIZER SYS-
TEM
The NISSAN Vehicle Immobilizer System will not
allow the engine to start without the use of the
registered Intelligent Key. Never leave these
keys in the vehicle.
FCC Notice:
For USA:
This device complies with Part 15 of the
FCC Rules. Operation is subject to the
following two conditions: (1) This device
may not cause harmful interference, and
(2) this device must accept any interfer-
ence received, including interference that may cause undesired operation.
NOTE:
Changes or modifications not expressly
approved by the party responsible for
compliance could void the user’s authority
to operate the equipment.
For Canada:
This device complies with Industry Canada
licence-exempt RSS standard(s) . Opera-
tion is subject to the following two condi-
tions: (1) this device may not cause
interference, and (2) this device must
accept any interference, including interfer-
ence that may cause undesired operation
of the device.
Instruments and controls2-31
Page 122 of 614
reservoir tank. Do not use the
window washer reservoir tank to
mix the washer fluid concentrate
and water.
If the wiper operation is interrupted by
snow or ice, the wiper may stop moving to
protect its motor. If this occurs, turn the
wiper switch to the OFF position and
remove the snow or ice that is on and
around the wiper arms. In approximately 1
minute, turn the switch on again to operate
the wiper.
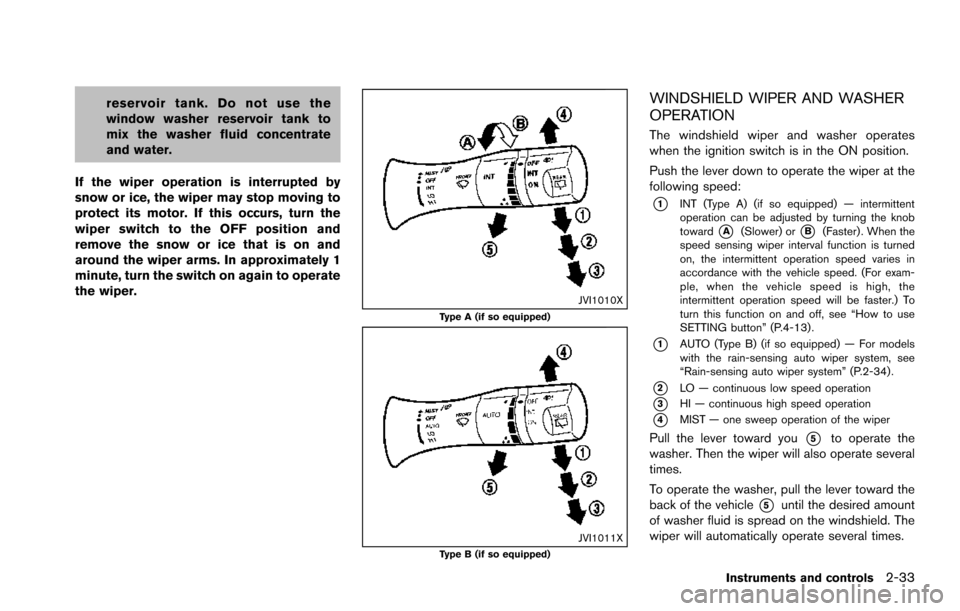
JVI1010XType A (if so equipped)
JVI1011XType B (if so equipped)
WINDSHIELD WIPER AND WASHER
OPERATION
The windshield wiper and washer operates
when the ignition switch is in the ON position.
Push the lever down to operate the wiper at the
following speed:
*1INT (Type A) (if so equipped) — intermittent
operation can be adjusted by turning the knob
toward
*A(Slower) or*B(Faster) . When the
speed sensing wiper interval function is turned
on, the intermittent operation speed varies in
accordance with the vehicle speed. (For exam-
ple, when the vehicle speed is high, the
intermittent operation speed will be faster.) To
turn this function on and off, see “How to use
SETTING button” (P.4-13) .
*1AUTO (Type B) (if so equipped) — For models
with the rain-sensing auto wiper system, see
“Rain-sensing auto wiper system” (P.2-34) .
*2LO — continuous low speed operation
*3HI — continuous high speed operation
*4MIST — one sweep operation of the wiper
Pull the lever toward you*5to operate the
washer. Then the wiper will also operate several
times.
To operate the washer, pull the lever toward the
back of the vehicle
*5until the desired amount
of washer fluid is spread on the windshield. The
wiper will automatically operate several times.
Instruments and controls2-33
Page 127 of 614
2-38Instruments and controls
headlights when it is light.
The headlights will also be turned on automa-
tically at twilight or in rainy weather (when the
windshield wiper is operated continuously) .
If the ignition switch is placed in the OFF
position and one of the doors is opened and this
condition is continued, the headlights remain on
for 5 minutes.
Automatic headlights off delay:
You can keep the headlights on for up to 180
seconds after you place the ignition switch in the
OFF position and open any door then close all
the doors.
You can adjust the period of the automatic
headlights off delay from 0 seconds (OFF) to
180 seconds. The factory default setting is 45
seconds.
For automatic headlights off delay setting, see
“How to use SETTING button” (P.4-13) .
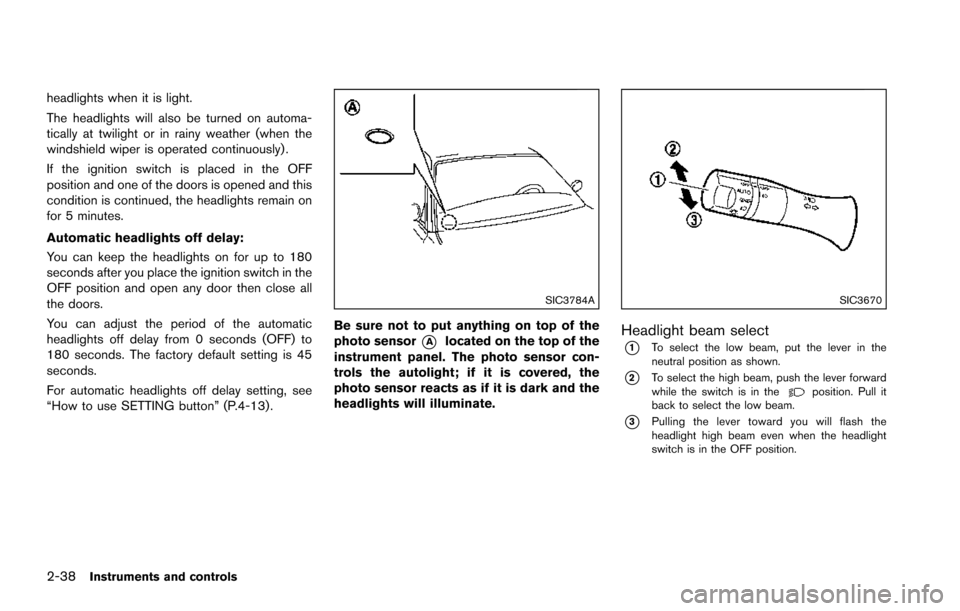
SIC3784A
Be sure not to put anything on top of the
photo sensor
*Alocated on the top of the
instrument panel. The photo sensor con-
trols the autolight; if it is covered, the
photo sensor reacts as if it is dark and the
headlights will illuminate.
SIC3670
Headlight beam select
*1To select the low beam, put the lever in the
neutral position as shown.
*2To select the high beam, push the lever forward
while the switch is in theposition. Pull it
back to select the low beam.
*3Pulling the lever toward you will flash the
headlight high beam even when the headlight
switch is in the OFF position.