Page 12 of 614

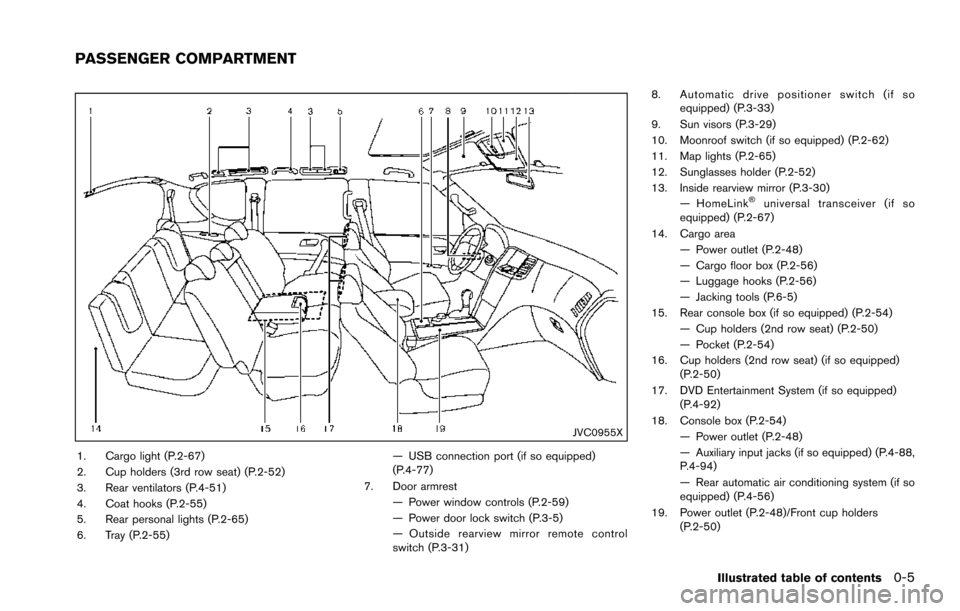
JVC0955X
1. Cargo light (P.2-67)
2. Cup holders (3rd row seat) (P.2-52)
3. Rear ventilators (P.4-51)
4. Coat hooks (P.2-55)
5. Rear personal lights (P.2-65)
6. Tray (P.2-55)— USB connection port (if so equipped)
(P.4-77)
7. Door armrest — Power window controls (P.2-59)
— Power door lock switch (P.3-5)
— Outside rearview mirror remote control
switch (P.3-31) 8. Automatic drive positioner switch (if so
equipped) (P.3-33)
9. Sun visors (P.3-29)
10. Moonroof switch (if so equipped) (P.2-62)
11. Map lights (P.2-65)
12. Sunglasses holder (P.2-52)
13. Inside rearview mirror (P.3-30) — HomeLink
�Šuniversal transceiver (if so
equipped) (P.2-67)
14. Cargo area — Power outlet (P.2-48)
— Cargo floor box (P.2-56)
— Luggage hooks (P.2-56)
— Jacking tools (P.6-5)
15. Rear console box (if so equipped) (P.2-54) — Cup holders (2nd row seat) (P.2-50)
— Pocket (P.2-54)
16. Cup holders (2nd row seat) (if so equipped) (P.2-50)
17. DVD Entertainment System (if so equipped) (P.4-92)
18. Console box (P.2-54) — Power outlet (P.2-48)
— Auxiliary input jacks (if so equipped) (P.4-88,
P.4-94)
— Rear automatic air conditioning system (if so
equipped) (P.4-56)
19. Power outlet (P.2-48)/Front cup holders (P.2-50)
Illustrated table of contents0-5
PASSENGER COMPARTMENT
Page 488 of 614
JVE0219X
Getting the spare tire and tools
1. Open the liftgate.
2. Raise the cargo floor board using the handle
*A.
JVE0343X
WARNING
When removing jacking tools, be sure
the rubber sound suppressor*1, used
to control jack stand from rattling
against metal, is not attached to the jacking tool. If rubber sound suppressor
remains on jack when vehicle is being
jacked up, the vehicle will be unstable
and may fall off jack stand causing
serious injury of death.
3. Remove the cargo floor cover.
4. Remove the jacking tools.
In case of emergency6-5
Page 491 of 614

6-8In case of emergency
dropping of the wheel while driving.
Lower the wheel on the ground again,
and make sure that the hanging plate is
properly set. Hang the wheel again and
make sure that the wheel is held
horizontally, then store the wheel.
Jacking up the vehicle and removing the
damaged tire
WARNING
.Never get under the vehicle while it
is supported only by the jack. If it is
necessary to work under the vehicle,
support it with safety stands.
. Use only the jack provided with your
vehicle to lift the vehicle. Do not use
the jack provided with your vehicle
on other vehicles. The jack is de-
signed for lifting only your vehicle
during a tire change.
. Use the correct jack-up points.
Never use any other part of the
vehicle for jack support.
. Never jack up the vehicle more than
necessary. .
Never use blocks on or under the
jack.
. Do not start or run the engine while
vehicle is on the jack, as it may
cause the vehicle to move.
. Do not allow passengers to stay in
the vehicle while it is on the jack.
Carefully read the caution label attached
to the jack body and the following instruc-
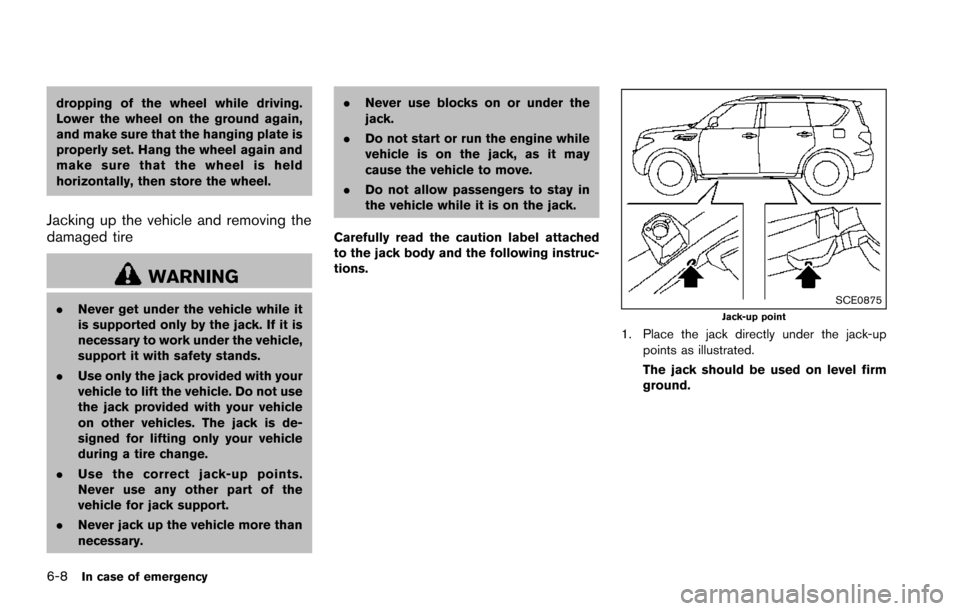
tions.SCE0875Jack-up point
1. Place the jack directly under the jack-up points as illustrated.
The jack should be used on level firm
ground.
Page 492 of 614
SCE0876
2. Loosen each wheel nut one or two turns byturning counterclockwise with the wheel nut
wrench. Do not remove the wheel nuts
until the tire is off the ground.
NCE130
3. Install the assembled jack rod into the jack
as shown.
4. Carefully raise the vehicle until the clearance between the tire and ground is achieved.
5. To lift the vehicle, securely hold the jack lever and rod with both hands and turn the jack
lever.
NOTE:
Before jacking up the vehicle, make sure
the ignition switch is placed in the OFF
position. If the vehicle is lifted up with the
engine running, the auto-leveling suspen-
sion will become disabled after 120 sec-
onds. To reset the auto-leveling
In case of emergency6-9
Page 494 of 614
COLD pressure:
After the vehicle has been parked
for three hours or more or driven
less than 1 mile (1.6 km) .
COLD tire pressures are shown on
the Tire and Loading Information
label affixed to the driver side center
pillar.
After adjusting tire pressure to the COLD tire
pressure, the display of the tire pressure
information may show higher pressure than the
COLD tire pressure after the vehicle has been
driven more than 1 mile (1.6 km). This is
because the tire pressurizes as the tire tem-
perature rises. This does not indicate a system
malfunction.
Stowing the damaged tire and tools
1. Securely store the damaged tire, jack and tools in the storage area.
2. Close the cargo floor cover.
3. Replace the cargo floor board.
4. Close the liftgate.
WARNING
Always make sure that the spare tire
and jacking equipment are properly
secured after use. Such items can
become dangerous projectiles in an
accident or sudden stop.
In case of emergency6-11