2017 NISSAN ARMADA brake light
[x] Cancel search: brake lightPage 109 of 614
2-20Instruments and controls
Vehicle Dynamic Control (VDC) off
indicator light
When the ignition switch is in the ON position,
the Vehicle Dynamic Control (VDC) off indicator
light illuminates and then turns off.
The light comes on when the VDC off switch is
pushed to OFF. This indicates that the VDC
system is not operating.
When the 4L position is selected with the Four-
Wheel Drive (4WD) shift switch, the VDC
system is disabled and the VDC off indicator
light illuminates. (4WD models)
For additional information, see “Vehicle Dynamic
Control (VDC) system” (P.5-138) .
AUDIBLE REMINDERS
Key reminder chime
A chime will sound if the driver side door is
opened while the ignition switch is placed in the
ACC position. Make sure the ignition switch is
placed in the OFF position, and take the
Intelligent Key with you when leaving the vehicle.
Light reminder chime
A chime will sound when the driver side door is
opened with the light switch in theorposition and the ignition switch in the ACC, OFF
or LOCK position.
Turn the light switch off when you leave the
vehicle.
Parking brake reminder chime
The chime will sound if the vehicle is driven at
more than 4 MPH (7 km/h) with the parking
brake applied. Stop the vehicle and release the
parking brake.
Brake pad wear warning
The disc brake pads have audible wear warn-
ings. When a brake pad requires replacement, it
will make a high pitched scraping sound when
the vehicle is in motion. This scraping sound will
first occur only when the brake pedal is
depressed. After more wear of the brake pad,
the sound will always be heard even if the brake
pedal is not depressed. Have the brakes
checked as soon as possible if the warning
sound is heard.
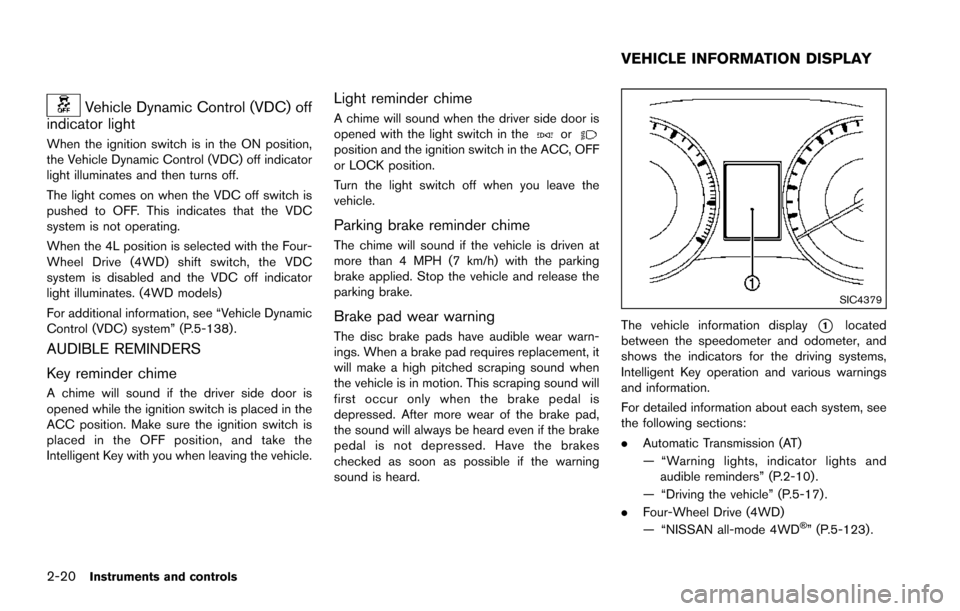
SIC4379
The vehicle information display*1located
between the speedometer and odometer, and
shows the indicators for the driving systems,
Intelligent Key operation and various warnings
and information.
For detailed information about each system, see
the following sections:
. Automatic Transmission (AT)
— “Warning lights, indicator lights and
audible reminders” (P.2-10) .
— “Driving the vehicle” (P.5-17) .
. Four-Wheel Drive (4WD)
— “NISSAN all-mode 4WD
�Š” (P.5-123).
VEHICLE INFORMATION DISPLAY
Page 113 of 614
2-24Instruments and controls
8. Parking brake release warning
This warning appears when the vehicle speed is
above 4 MPH (7 km/h) and the parking brake is
applied.
9. Low fuel warning
This warning appears when the fuel level in the
tank is getting low. Refuel as soon as it is
convenient, preferably before the fuel gauge
reaches the 0 (Empty) position.
There is a small reserve of fuel remaining
in the tank when the fuel gauge reaches
the 0 (Empty) position.
10. Low washer fluid warning
This warning appears when the washer tank fluid
is at a low level. Add washer fluid as necessary.
(See “Window washer fluid” (P.8-10).)
11. Door/liftgate open warning (ignition
switch is in the ON position)
This warning appears if any of the doors and/or
the liftgate are open or not closed securely. The
vehicle icon indicates which door or the liftgate
is open on the display.
12. Loose fuel cap warning
This warning appears when the fuel-filler cap is
not tightened correctly after the vehicle has
been refueled. (See “Fuel-filler cap” (P.3-27) .)
13. Check tire pressure warning
This warning appears when the low tire pressure
warning light in the meter illuminates and low tire
pressure is detected. The warning appears each
time the ignition switch is placed in the ON
position as long as the low tire pressure warning
light remains illuminated. If this warning appears,
stop the vehicle and adjust the tire pressure to
the recommended COLD tire pressure shown
on the Tire and Loading Information label. (See
“Low tire pressure warning light” (P.2-15) and
“Tire Pressure Monitoring System (TPMS)” (P.5-
5) .)
14. Extended storage fuse warning (if so
equipped)
This warning may appear if the extended storage
fuse switch is not pushed in (switched on) .
When this warning appears, push in (switch on)
the extended storage fuse switch to turn off the
warning. For more information, see “Extended
storage fuse switch” (P.8-21) .
15. Back-up Collision Intervention (BCI)
not available warning (if so equipped)
This warning appears when the Back-up Colli-
sion Intervention (BCI) system is temporarily not
available.
For more details, see “Back-up Collision Inter-
vention (BCI)” (P.5-56) .
16. Back-up Collision Intervention (BCI)
malfunction warning (if so equipped)
This warning appears when the Back-up Colli-
sion Intervention (BCI) system is not functioning
properly.
For more details, see “Back-up Collision Inter-
vention (BCI)” (P.5-56) .
17. Headlight warning
This warning appears if the LED headlights are
malfunctioning. It is recommended you have the
system checked by a NISSAN dealer.
18. Front radar obstruction warning (if so
equipped)
This warning appears when the sensor area of
the front bumper is covered with dirt or is
obstructed, making it impossible to detect a
vehicle ahead.
The following systems will be automatically
canceled.
Page 129 of 614
2-40Instruments and controls
Daytime running light system
The daytime running lights automatically illumi-
nate when the engine is started with the parking
brake released. The daytime running lights
operate with the headlight switch in the OFF
position or in the
position. Turn the head-
light switch to theposition for full illumina-
tion when driving at night.
If the parking brake is applied before the engine
is started, the daytime running lights do not
illuminate. The daytime running lights illuminate
once the parking brake is released. The daytime
running lights will remain on until the ignition
switch is pushed to the OFF position.
WARNING
When the daytime running light system
is active, tail lights on your vehicle are
not on. It is necessary at dusk to turn on
your headlights. Failure to do so could
cause an accident injuring yourself and
others.
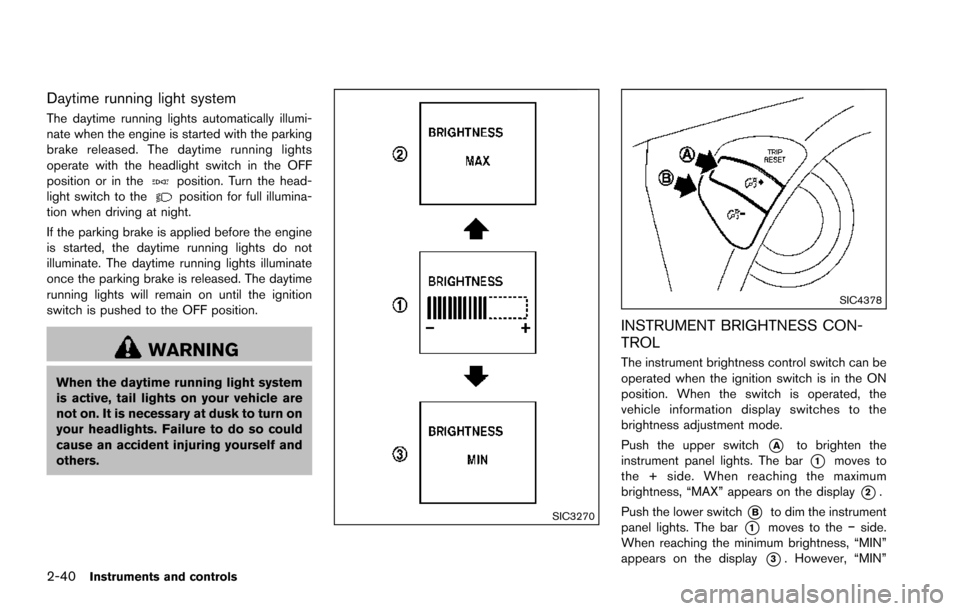
SIC3270
SIC4378
INSTRUMENT BRIGHTNESS CON-
TROL
The instrument brightness control switch can be
operated when the ignition switch is in the ON
position. When the switch is operated, the
vehicle information display switches to the
brightness adjustment mode.
Push the upper switch
*Ato brighten the
instrument panel lights. The bar
*1moves to
the + side. When reaching the maximum
brightness, “MAX” appears on the display
*2.
Push the lower switch
*Bto dim the instrument
panel lights. The bar
*1moves to the �íside.
When reaching the minimum brightness, “MIN”
appears on the display
*3. However, “MIN”
Page 181 of 614
3-20Pre-driving checks and adjustments
seconds.
The following events will occur when the engine
starts:
. The front parking lights will turn on and
remain on as long as the engine is running.
. The doors will be locked and the air
conditioner system may turn on.
. The engine will continue to run for about 10
minutes. Repeat the steps to extend the time
for an additional 10 minutes. See “Extending
engine run time” (P.3-20) .
Depress and hold the brake pedal, then place
the ignition switch in the ON position before
driving. For further instructions, see “Driving the
vehicle” (P.5-17) .
EXTENDING ENGINE RUN TIME
The remote engine start function can be
extended one time by performing the steps
listed in “Remote starting the engine” (P.3-19) .
Run time will be calculated as follows:
. The first 10 minute run time will start when
the remote engine start function is per-
formed.
. The second 10 minutes will start immedi-
ately when the remote engine start function
is performed. For example, if the engine has
been running for 5 minutes, and 10 minutes
are added, the engine will run for a total of 15 minutes.
. Extending engine run time will count to-
wards the two remote start limit.
A maximum of two remote starts, or a single start
with an extension, are allowed between ignition
cycles.
The ignition switch must be cycled to the ON
position and then back to the OFF position
before the remote engine start procedure can be
used again.
CANCELING A REMOTE START
To cancel a remote start, perform one of the
following:
. Aim the Intelligent Key at the vehicle and
push and hold the remote engine start
button until the front parking lights turn off.
. Turn on the hazard indicator flashers.
. Cycle the ignition switch ON and then OFF.
. The extended engine run time has expired.
. The first 10 minute timer has expired.
. The engine hood has been opened.
. The shift lever is moved out of the P (Park)
position.
. The theft alarm sounds due to illegal entry
into the vehicle.
. The ignition switch is pushed without an
Intelligent Key in the vehicle. .
The ignition switch is pushed with an
Intelligent Key in the vehicle but the brake
pedal is not depressed.
CONDITIONS THE REMOTE ENGINE
START WILL NOT WORK
The remote engine start will not operate if any of
the following conditions are present:
.The ignition switch is placed in the ON
position.
. The hood is not securely closed.
. The hazard indicator flashers are on.
. The engine is still running. The engine must
be completely stopped. Wait at least 6
seconds if the engine goes from running to
off. This is not applicable when extending
engine run time.
. The remote engine start
button is not
pushed and held for at least 2 seconds.
. The remote engine start
button is not
pushed and held within 5 seconds of
pushing the “LOCK”
button.
. The brake pedal is depressed.
. The doors are not closed and locked.
. The liftgate is open.
. The Intelligent Key system warning light
remains on in the vehicle information display.
. An Intelligent Key is left inside the vehicle.
Page 215 of 614
4-18Monitor, heater, air conditioner, audio, phone and voice recognition systems
Lift Steering Wheel on Exit (if so
equipped):
When this item is turned to ON, the steering
wheel moves upward for easy exit if the ignition
switch is in the LOCK position and the driver’s
door is opened. After getting into the vehicle and
pushing the ignition switch to the ACC position,
the steering wheel moves to the previous
position.
Slide Driver Seat Back on Exit (if so
equipped):
When this item is turned to ON, the driver’s seat
moves backward for easy exit if the ignition
switch is in the OFF position and the driver’s
door is opened. After getting into the vehicle and
pushing the ignition switch to the ACC position,
the driver’s seat moves to the previous position.
Return All Settings to Default:
Select this item and then select “YES” to return
all settings to the default.
SAA2487
Clock settings
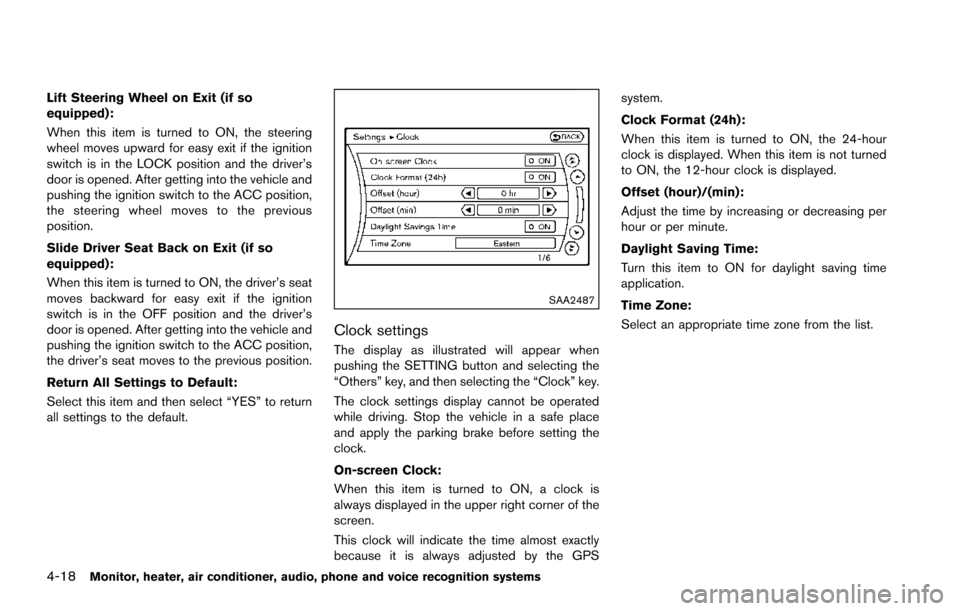
The display as illustrated will appear when
pushing the SETTING button and selecting the
“Others” key, and then selecting the “Clock” key.
The clock settings display cannot be operated
while driving. Stop the vehicle in a safe place
and apply the parking brake before setting the
clock.
On-screen Clock:
When this item is turned to ON, a clock is
always displayed in the upper right corner of the
screen.
This clock will indicate the time almost exactly
because it is always adjusted by the GPSsystem.
Clock Format (24h):
When this item is turned to ON, the 24-hour
clock is displayed. When this item is not turned
to ON, the 12-hour clock is displayed.
Offset (hour)/(min):
Adjust the time by increasing or decreasing per
hour or per minute.
Daylight Saving Time:
Turn this item to ON for daylight saving time
application.
Time Zone:
Select an appropriate time zone from the list.
Page 235 of 614
4-38Monitor, heater, air conditioner, audio, phone and voice recognition systems
2. Select the “Display” key.
3. Select an item you wish to adjust.
4. Adjust the level of the setting item using themulti-function controller.
NOTE:
Do not adjust any of the display settings of
the Around View
�ŠMonitor while the vehi-
cle is moving. Make sure the parking brake
is firmly applied.
JVH1303X
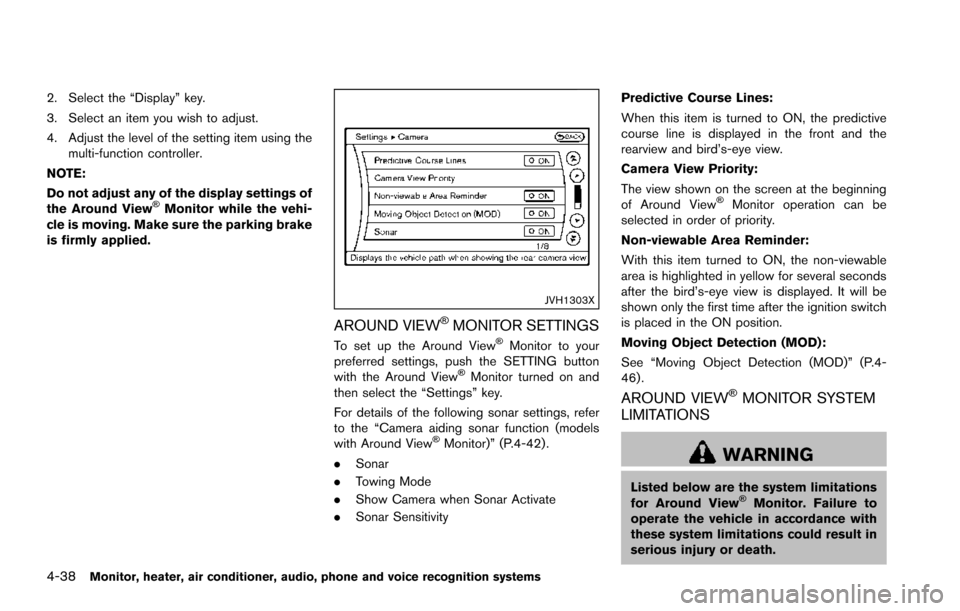
AROUND VIEW�ŠMONITOR SETTINGS
To set up the Around View�ŠMonitor to your
preferred settings, push the SETTING button
with the Around View
�ŠMonitor turned on and
then select the “Settings” key.
For details of the following sonar settings, refer
to the “Camera aiding sonar function (models
with Around View
�ŠMonitor)” (P.4-42) .
. Sonar
. Towing Mode
. Show Camera when Sonar Activate
. Sonar Sensitivity Predictive Course Lines:
When this item is turned to ON, the predictive
course line is displayed in the front and the
rearview and bird’s-eye view.
Camera View Priority:
The view shown on the screen at the beginning
of Around View
�ŠMonitor operation can be
selected in order of priority.
Non-viewable Area Reminder:
With this item turned to ON, the non-viewable
area is highlighted in yellow for several seconds
after the bird’s-eye view is displayed. It will be
shown only the first time after the ignition switch
is placed in the ON position.
Moving Object Detection (MOD):
See “Moving Object Detection (MOD)” (P.4-
46) .
AROUND VIEW�ŠMONITOR SYSTEM
LIMITATIONS
WARNING
Listed below are the system limitations
for Around View�ŠMonitor. Failure to
operate the vehicle in accordance with
these system limitations could result in
serious injury or death.
Page 289 of 614
4-92Monitor, heater, air conditioner, audio, phone and voice recognition systems
ANTENNA
Window antenna
The antenna pattern is printed inside the rear
side glass.
CAUTION
.Do not place metalized film near the
3rd row seat window or attach any
metal parts to it. This may cause
poor reception or noise.
. When cleaning the inside of the rear
side window, be careful not to
scratch or damage the rear side
window antenna. Lightly wipe along
the antenna with a dampened soft
cloth.
SAA3602
Satellite antenna
There is a satellite antenna on the rear part of the
vehicle roof. If your vehicle is equipped with the DVD
Entertainment System, you can enjoy playing
video files via a DVD, CD or USB memory that
provides images and sound both from the front
and rear display screens.
You can also enjoy compatible auxiliary devices
such as video games, camcorders or portable
video players through the auxiliary jacks.
The front and right/left rear displays can show
different sources individually. The maximum of 3
sources, such as an iPod
�Š, DVD and auxiliary
device, can be enjoyed at the same time.
WARNING
The driver must not attempt to operate
the DVD Entertainment System while
driving so full attention may be given to
vehicle operation.
Park the vehicle in a safe location and
apply the parking brake to view the
images on the front center display
screen using the DVD player.
DVD ENTERTAINMENT SYSTEM (if
so equipped)
Page 297 of 614
4-100Monitor, heater, air conditioner, audio, phone and voice recognition systems
Available sources
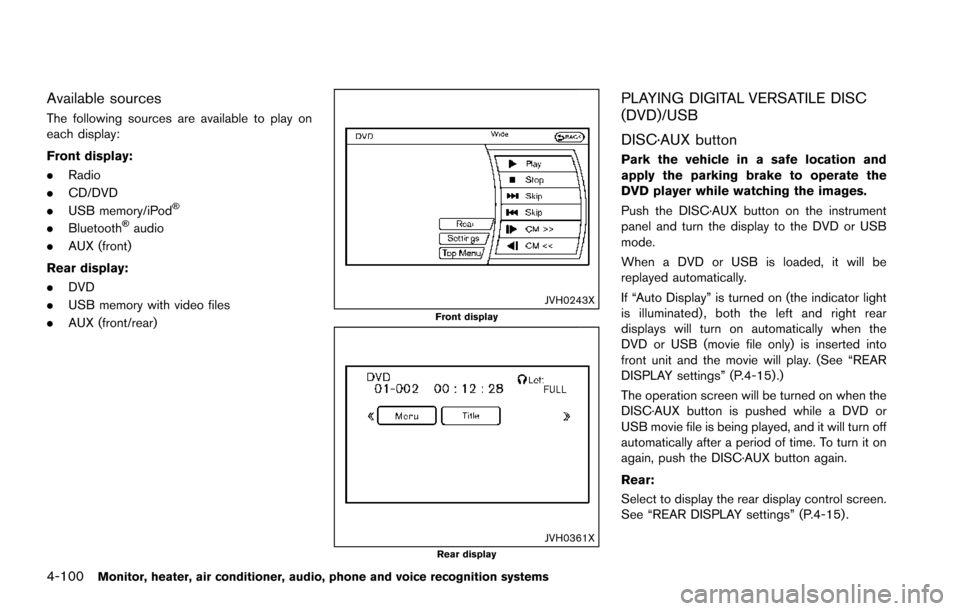
The following sources are available to play on
each display:
Front display:
.Radio
. CD/DVD
. USB memory/iPod
�Š
.Bluetooth�Šaudio
. AUX (front)
Rear display:
. DVD
. USB memory with video files
. AUX (front/rear)
JVH0243XFront display
JVH0361XRear display
PLAYING DIGITAL VERSATILE DISC
(DVD)/USB
DISC·AUX button
Park the vehicle in a safe location and
apply the parking brake to operate the
DVD player while watching the images.
Push the DISC·AUX button on the instrument
panel and turn the display to the DVD or USB
mode.
When a DVD or USB is loaded, it will be
replayed automatically.
If “Auto Display” is turned on (the indicator light
is illuminated) , both the left and right rear
displays will turn on automatically when the
DVD or USB (movie file only) is inserted into
front unit and the movie will play. (See “REAR
DISPLAY settings” (P.4-15) .)
The operation screen will be turned on when the
DISC·AUX button is pushed while a DVD or
USB movie file is being played, and it will turn off
automatically after a period of time. To turn it on
again, push the DISC·AUX button again.
Rear:
Select to display the rear display control screen.
See “REAR DISPLAY settings” (P.4-15) .