2017 NISSAN ARMADA engine
[x] Cancel search: enginePage 369 of 614
5-28Starting and driving
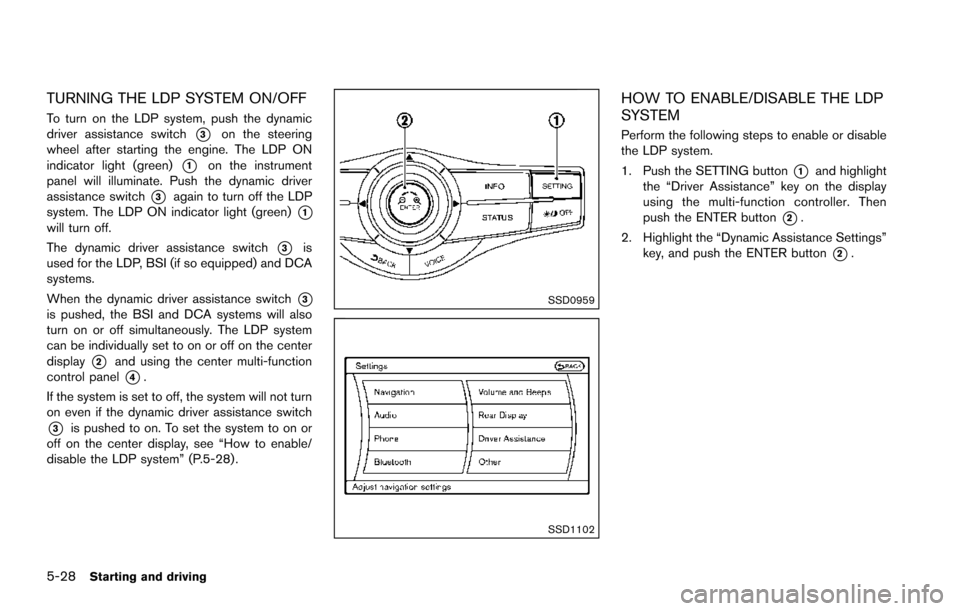
TURNING THE LDP SYSTEM ON/OFF
To turn on the LDP system, push the dynamic
driver assistance switch
*3on the steering
wheel after starting the engine. The LDP ON
indicator light (green)
*1on the instrument
panel will illuminate. Push the dynamic driver
assistance switch
*3again to turn off the LDP
system. The LDP ON indicator light (green)
*1will turn off.
The dynamic driver assistance switch
*3is
used for the LDP, BSI (if so equipped) and DCA
systems.
When the dynamic driver assistance switch
*3is pushed, the BSI and DCA systems will also
turn on or off simultaneously. The LDP system
can be individually set to on or off on the center
display
*2and using the center multi-function
control panel
*4.
If the system is set to off, the system will not turn
on even if the dynamic driver assistance switch
*3is pushed to on. To set the system to on or
off on the center display, see “How to enable/
disable the LDP system” (P.5-28) .
SSD0959
SSD1102
HOW TO ENABLE/DISABLE THE LDP
SYSTEM
Perform the following steps to enable or disable
the LDP system.
1. Push the SETTING button
*1and highlight
the “Driver Assistance” key on the display
using the multi-function controller. Then
push the ENTER button
*2.
2. Highlight the “Dynamic Assistance Settings” key, and push the ENTER button
*2.
Page 373 of 614
5-32Starting and driving
LDP system:If the vehicle is parked in direct
sunlight under high temperature conditions (over
approximately 1048F (408C)) and then the LDP
system is turned on, the LDP system will be
turned off automatically, a beep will sound and
the LDP ON indicator light (green)
*1will blink.
The LDW and LDP systems are not available
until the conditions no longer exist.
Action to take:
When the above conditions no longer exist, the
LDW system will resume automatically.
For the LDP system, push the dynamic driver
assistance switch
*3again to turn the LDP
system back on.
SYSTEM MALFUNCTION
LDW system: When the LDW system malfunc-
tions, it will cancel automatically, and the LDW
indicator light (orange) will illuminate.
LDP system: When the LDP system malfunc-
tions, it will be turned off automatically, a beep
will sound, and the LDW indicator light (orange)
will illuminate.
Action to take:
Stop the vehicle in a safe location, place the
vehicle in the P (Park) position, turn the engine
off and restart the engine. If the LDW indicator
light (orange) continues to illuminate, have the
system checked. It is recommended you visit a NISSAN dealer for this service.
SSD0453
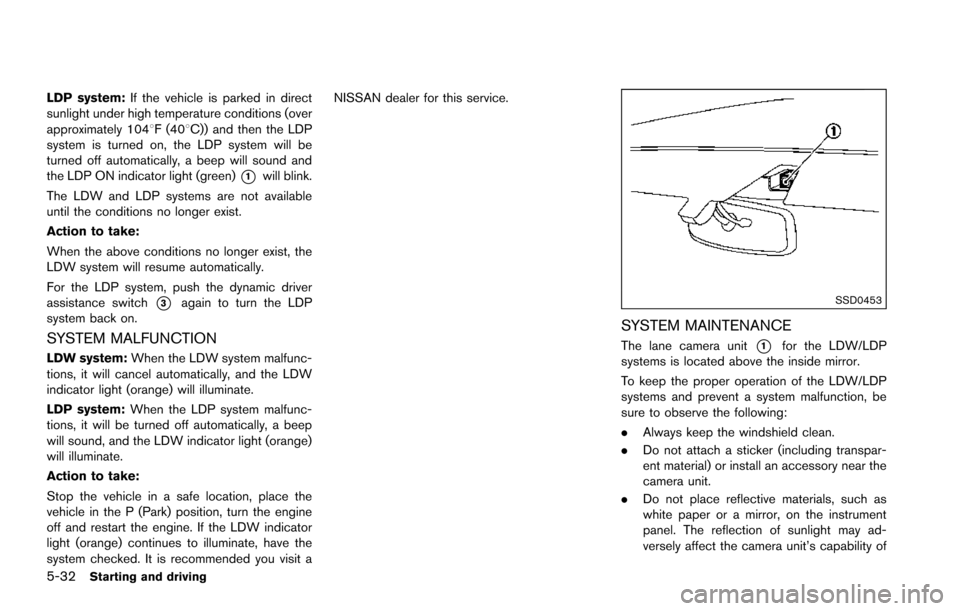
SYSTEM MAINTENANCE
The lane camera unit*1for the LDW/LDP
systems is located above the inside mirror.
To keep the proper operation of the LDW/LDP
systems and prevent a system malfunction, be
sure to observe the following:
. Always keep the windshield clean.
. Do not attach a sticker (including transpar-
ent material) or install an accessory near the
camera unit.
. Do not place reflective materials, such as
white paper or a mirror, on the instrument
panel. The reflection of sunlight may ad-
versely affect the camera unit’s capability of
Page 383 of 614
5-42Starting and driving
Action to take:
Stop the vehicle in a safe location, place the
vehicle in the P (Park) position, turn the engine
off and restart the engine.
If the BSW system warning light continues to
illuminate, have the system checked. It is
recommended you visit a NISSAN dealer for
this service.
JVS0908X
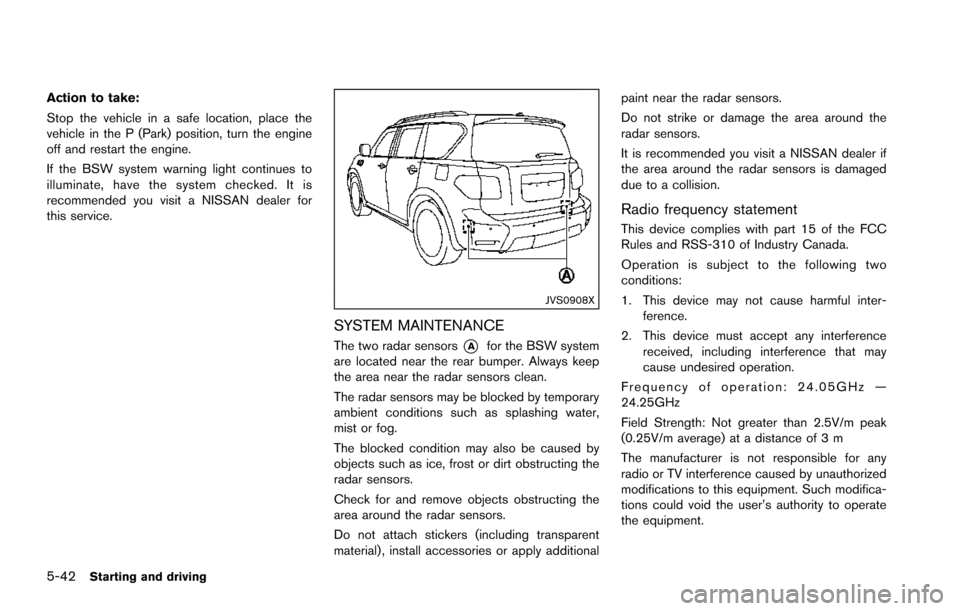
SYSTEM MAINTENANCE
The two radar sensors*Afor the BSW system
are located near the rear bumper. Always keep
the area near the radar sensors clean.
The radar sensors may be blocked by temporary
ambient conditions such as splashing water,
mist or fog.
The blocked condition may also be caused by
objects such as ice, frost or dirt obstructing the
radar sensors.
Check for and remove objects obstructing the
area around the radar sensors.
Do not attach stickers (including transparent
material) , install accessories or apply additional paint near the radar sensors.
Do not strike or damage the area around the
radar sensors.
It is recommended you visit a NISSAN dealer if
the area around the radar sensors is damaged
due to a collision.
Radio frequency statement
This device complies with part 15 of the FCC
Rules and RSS-310 of Industry Canada.
Operation is subject to the following two
conditions:
1. This device may not cause harmful inter-
ference.
2. This device must accept any interference received, including interference that may
cause undesired operation.
Frequency of operation: 24.05GHz —
24.25GHz
Field Strength: Not greater than 2.5V/m peak
(0.25V/m average) at a distance of 3 m
The manufacturer is not responsible for any
radio or TV interference caused by unauthorized
modifications to this equipment. Such modifica-
tions could void the user’s authority to operate
the equipment.
Page 387 of 614
5-46Starting and driving
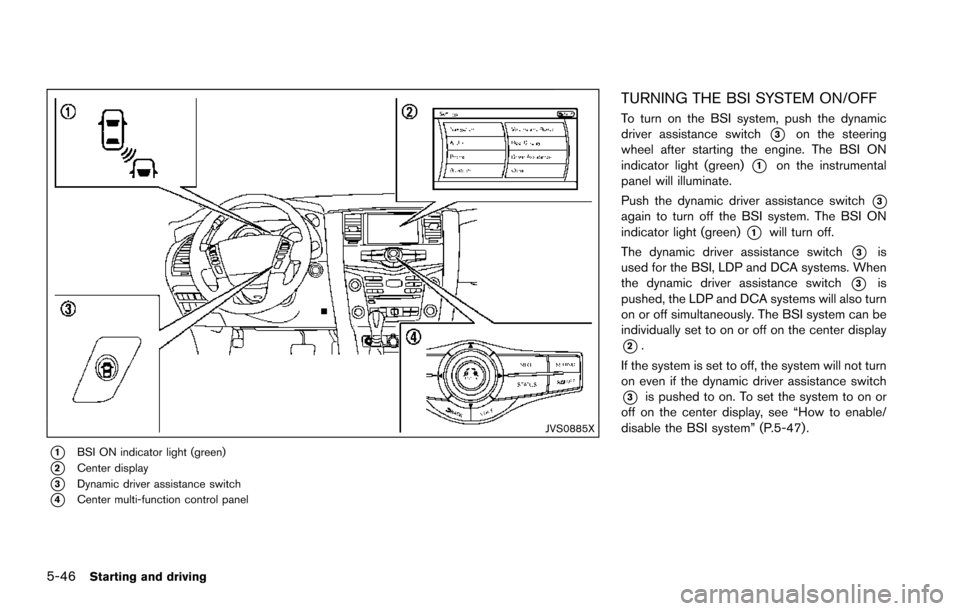
JVS0885X
*1BSI ON indicator light (green)
*2Center display
*3Dynamic driver assistance switch
*4Center multi-function control panel
TURNING THE BSI SYSTEM ON/OFF
To turn on the BSI system, push the dynamic
driver assistance switch
*3on the steering
wheel after starting the engine. The BSI ON
indicator light (green)
*1on the instrumental
panel will illuminate.
Push the dynamic driver assistance switch
*3again to turn off the BSI system. The BSI ON
indicator light (green)
*1will turn off.
The dynamic driver assistance switch
*3is
used for the BSI, LDP and DCA systems. When
the dynamic driver assistance switch
*3is
pushed, the LDP and DCA systems will also turn
on or off simultaneously. The BSI system can be
individually set to on or off on the center display
*2.
If the system is set to off, the system will not turn
on even if the dynamic driver assistance switch
*3is pushed to on. To set the system to on or
off on the center display, see “How to enable/
disable the BSI system” (P.5-47).
Page 396 of 614
Action to take:
When the above conditions no longer exist, turn
the BSI system off and turn it on again. If the BSI
system warning light (orange)
*1continues to
blink even after the BSI system is turned on
again, stop the vehicle in a safe location, place
the shift lever in the P (Park) position and turn
the engine off. Check for and remove objects
obscuring the radar sensors on the rear bumper,
and restart the engine.
If the BSI system warning light (orange)
*1continues to blink, have the BSI system
checked. It is recommended you visit a NISSAN
dealer for this service.
SYSTEM MALFUNCTION
When the BSI system malfunctions, it will be
turned off automatically, a chime will sound and
the BSI system warning light (orange) will
illuminate.
Action to take:
Stop the vehicle in a safe location, place the shift
lever in the P (Park) position, turn the engine off
and restart the engine.
If the warning light (orange) continues to
illuminate, have the BSI system checked. It is
recommended you visit a NISSAN dealer for this
service.
JVS0910X
SYSTEM MAINTENANCE
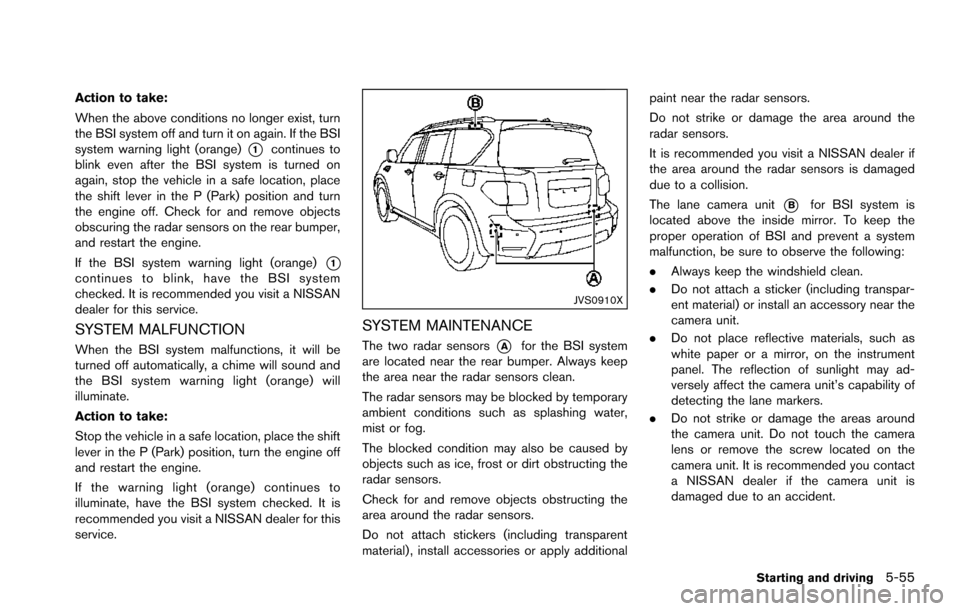
The two radar sensors*Afor the BSI system
are located near the rear bumper. Always keep
the area near the radar sensors clean.
The radar sensors may be blocked by temporary
ambient conditions such as splashing water,
mist or fog.
The blocked condition may also be caused by
objects such as ice, frost or dirt obstructing the
radar sensors.
Check for and remove objects obstructing the
area around the radar sensors.
Do not attach stickers (including transparent
material) , install accessories or apply additional paint near the radar sensors.
Do not strike or damage the area around the
radar sensors.
It is recommended you visit a NISSAN dealer if
the area around the radar sensors is damaged
due to a collision.
The lane camera unit
*Bfor BSI system is
located above the inside mirror. To keep the
proper operation of BSI and prevent a system
malfunction, be sure to observe the following:
. Always keep the windshield clean.
. Do not attach a sticker (including transpar-
ent material) or install an accessory near the
camera unit.
. Do not place reflective materials, such as
white paper or a mirror, on the instrument
panel. The reflection of sunlight may ad-
versely affect the camera unit’s capability of
detecting the lane markers.
. Do not strike or damage the areas around
the camera unit. Do not touch the camera
lens or remove the screw located on the
camera unit. It is recommended you contact
a NISSAN dealer if the camera unit is
damaged due to an accident.
Starting and driving5-55
Page 403 of 614
5-62Starting and driving
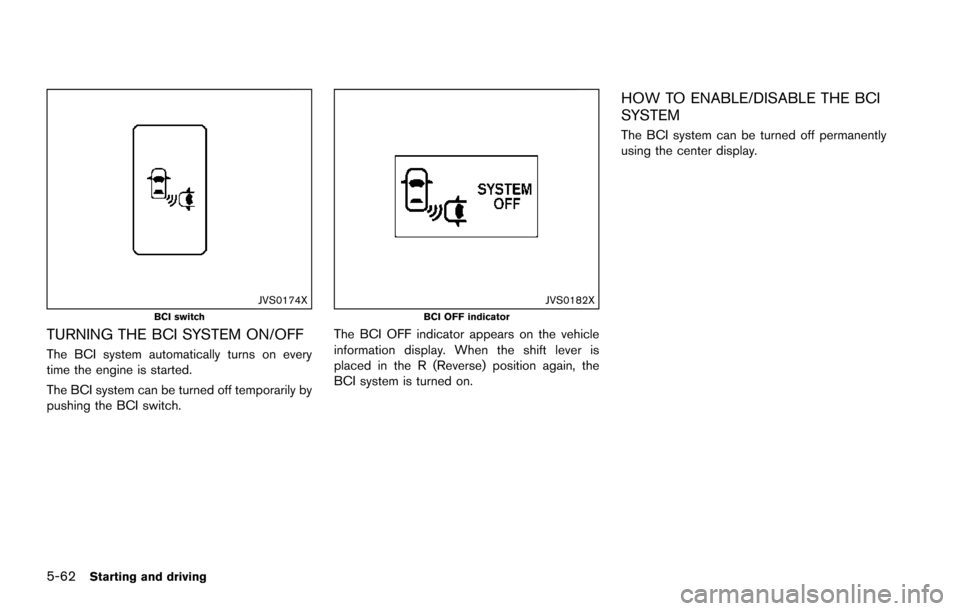
JVS0174XBCI switch
TURNING THE BCI SYSTEM ON/OFF
The BCI system automatically turns on every
time the engine is started.
The BCI system can be turned off temporarily by
pushing the BCI switch.
JVS0182XBCI OFF indicator
The BCI OFF indicator appears on the vehicle
information display. When the shift lever is
placed in the R (Reverse) position again, the
BCI system is turned on.
HOW TO ENABLE/DISABLE THE BCI
SYSTEM
The BCI system can be turned off permanently
using the center display.
Page 404 of 614
SSD0959
SSD1102Example
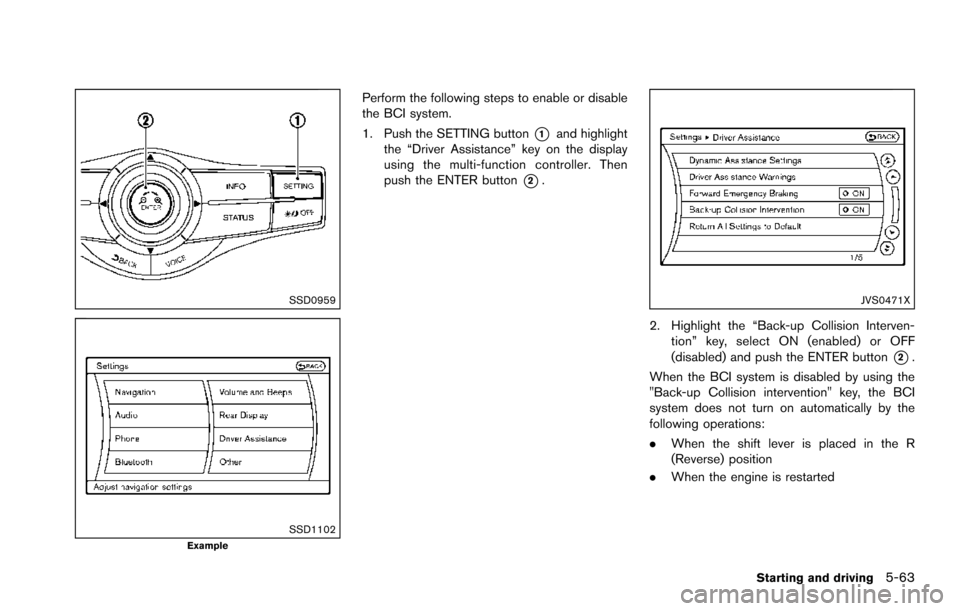
Perform the following steps to enable or disable
the BCI system.
1. Push the SETTING button
*1and highlight
the “Driver Assistance” key on the display
using the multi-function controller. Then
push the ENTER button
*2.
JVS0471X
2. Highlight the “Back-up Collision Interven-
tion” key, select ON (enabled) or OFF
(disabled) and push the ENTER button
*2.
When the BCI system is disabled by using the
"Back-up Collision intervention" key, the BCI
system does not turn on automatically by the
following operations:
. When the shift lever is placed in the R
(Reverse) position
. When the engine is restarted
Starting and driving5-63
Page 407 of 614
5-66Starting and driving
SYSTEM MALFUNCTION
If the BCI system malfunctions, it will turn off
automatically, a chime will sound and “BCI
MALFUNCTION” warning will appear in the
vehicle information display
*1.
Action to take
Stop the vehicle in a safe location and place the
shift lever in the P (Park) position. Turn the
engine off and restart the engine. If the warning
message continues to appear, have the system
checked. It is recommended you visit a NISSAN
dealer for this service.
JVS0908X
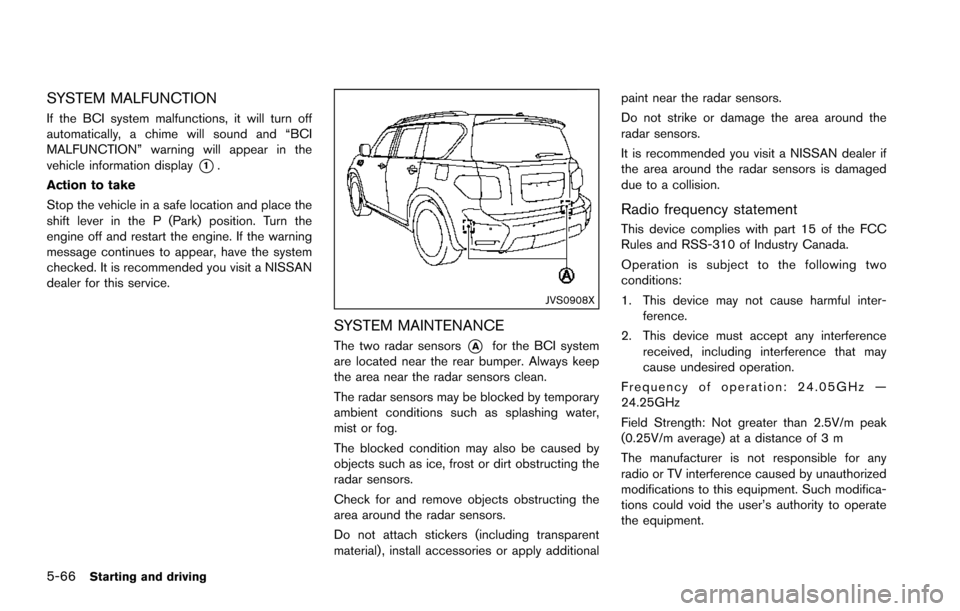
SYSTEM MAINTENANCE
The two radar sensors*Afor the BCI system
are located near the rear bumper. Always keep
the area near the radar sensors clean.
The radar sensors may be blocked by temporary
ambient conditions such as splashing water,
mist or fog.
The blocked condition may also be caused by
objects such as ice, frost or dirt obstructing the
radar sensors.
Check for and remove objects obstructing the
area around the radar sensors.
Do not attach stickers (including transparent
material) , install accessories or apply additional paint near the radar sensors.
Do not strike or damage the area around the
radar sensors.
It is recommended you visit a NISSAN dealer if
the area around the radar sensors is damaged
due to a collision.
Radio frequency statement
This device complies with part 15 of the FCC
Rules and RSS-310 of Industry Canada.
Operation is subject to the following two
conditions:
1. This device may not cause harmful inter-
ference.
2. This device must accept any interference received, including interference that may
cause undesired operation.
Frequency of operation: 24.05GHz —
24.25GHz
Field Strength: Not greater than 2.5V/m peak
(0.25V/m average) at a distance of 3 m
The manufacturer is not responsible for any
radio or TV interference caused by unauthorized
modifications to this equipment. Such modifica-
tions could void the user’s authority to operate
the equipment.