Page 186 of 497
Touch-screen maintenance
If you clean the display screen, use a dry, soft
cloth. If additional cleaning is necessary, use a
small amount of neutral detergent with a soft
cloth. Never spray the screen with water or de-
tergent. Dampen the cloth first and then wipe the
screen.
HOW TO USE THEBACK
BUTTON
Press theBACK button to return to the
previous screen.
HOW TO USE THE [] BUTTON
For additional information about the “SiriusXM
Travel Link”, and “Traffic” features, refer to the
separate Navigation System Owner’s Manual.
For additional information about the “My Apps”
key, refer to “NissanConnect
SMMobile Apps” in
this section.
For additional information about the “Voice Com-
mands” key, refer to “NISSAN Voice Recognition
System” in this section. To select and/or adjust several functions, fea-
tures and modes that are available for your ve-
hicle:
1. Press the [
] button.
2. Touch the “Settings” key.
3. Touch the desired item.
LHA3711LHA3712
Monitor, climate, audio, phone and voice recognition systems4-7
Page 187 of 497
Menu itemResult
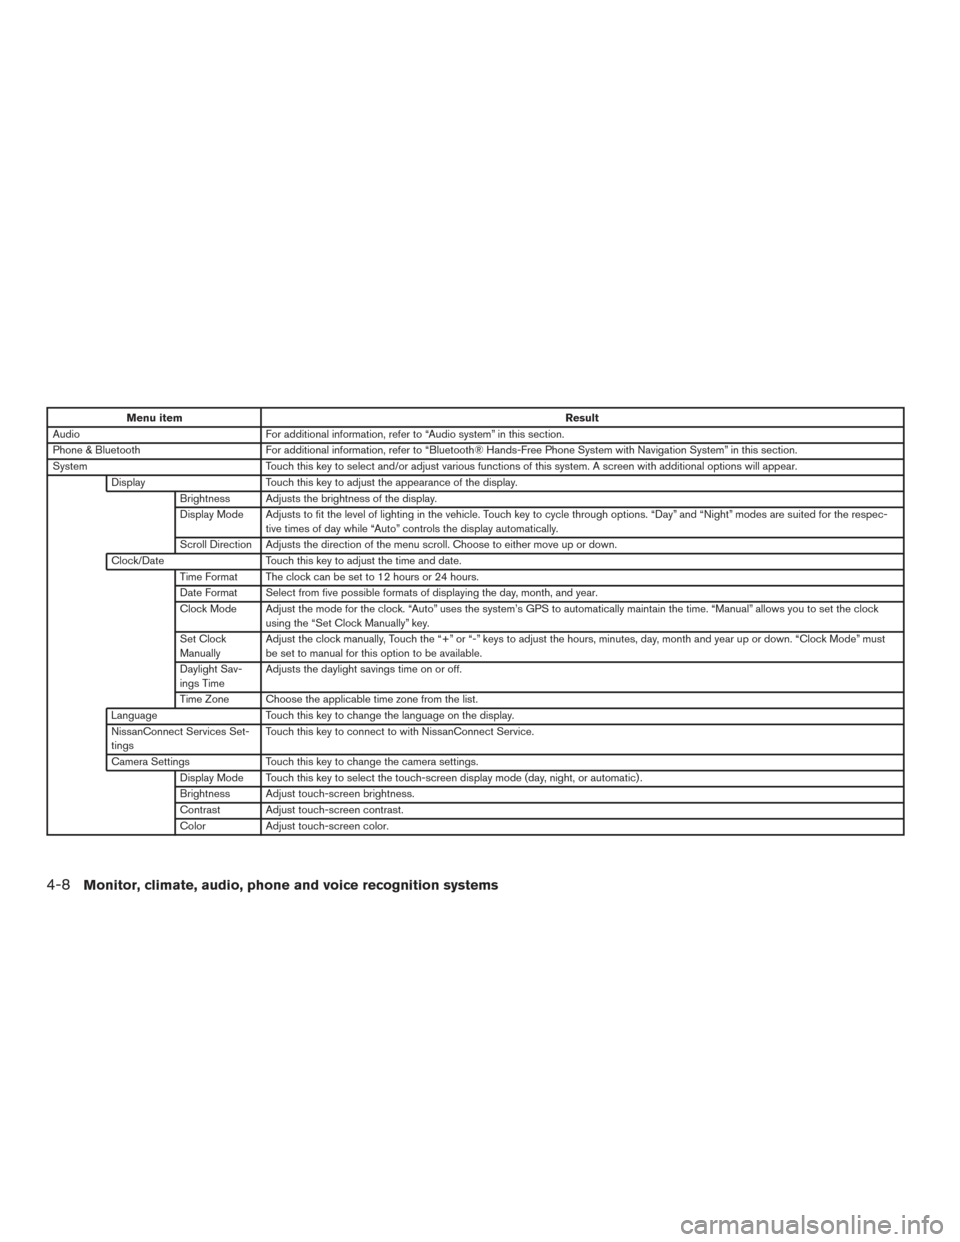
Audio For additional information, refer to “Audio system” in this section.
Phone & Bluetooth For additional information, refer to “Bluetooth® Hands-Free Phone System with Navigation System” in this section.
System Touch this key to select and/or adjust various functions of this system. A screen with additional options will appear.
Display Touch this key to adjust the appearance of the display.
Brightness Adjusts the brightness of the display.
Display Mode Adjusts to fit the level of lighting in the vehicle. Touch key to cycle through options. “Day” and “Night” modes are suited for the respec- tive times of day while “Auto” controls the display automatically.
Scroll Direction Adjusts the direction of the menu scroll. Choose to either move up or down.
Clock/Date Touch this key to adjust the time and date.
Time Format The clock can be set to 12 hours or 24 hours.
Date Format Select from five possible formats of displaying the day, month, and year.
Clock Mode Adjust the mode for the clock. “Auto” uses the system’s GPS to automatically maintain the time. “Manual” allows you to set the clock using the “Set Clock Manually” key.
Set Clock
Manually Adjust the clock manually, Touch the “+” or “-” keys to adjust the hours, minutes, day, month and year up or down. “Clock Mode” must
be set to manual for this option to be available.
Daylight Sav-
ings Time Adjusts the daylight savings time on or off.
Time Zone Choose the applicable time zone from the list.
Language Touch this key to change the language on the display.
NissanConnect Services Set-
tings Touch this key to connect to with NissanConnect Service.
Camera Settings Touch this key to change the camera settings.
Display Mode Touch this key to select the touch-screen display mode (day, night, or automatic) .
Brightness Adjust touch-screen brightness.
Contrast Adjust touch-screen contrast.
Color Adjust touch-screen color.
4-8Monitor, climate, audio, phone and voice recognition systems
Page 188 of 497
Menu itemResult
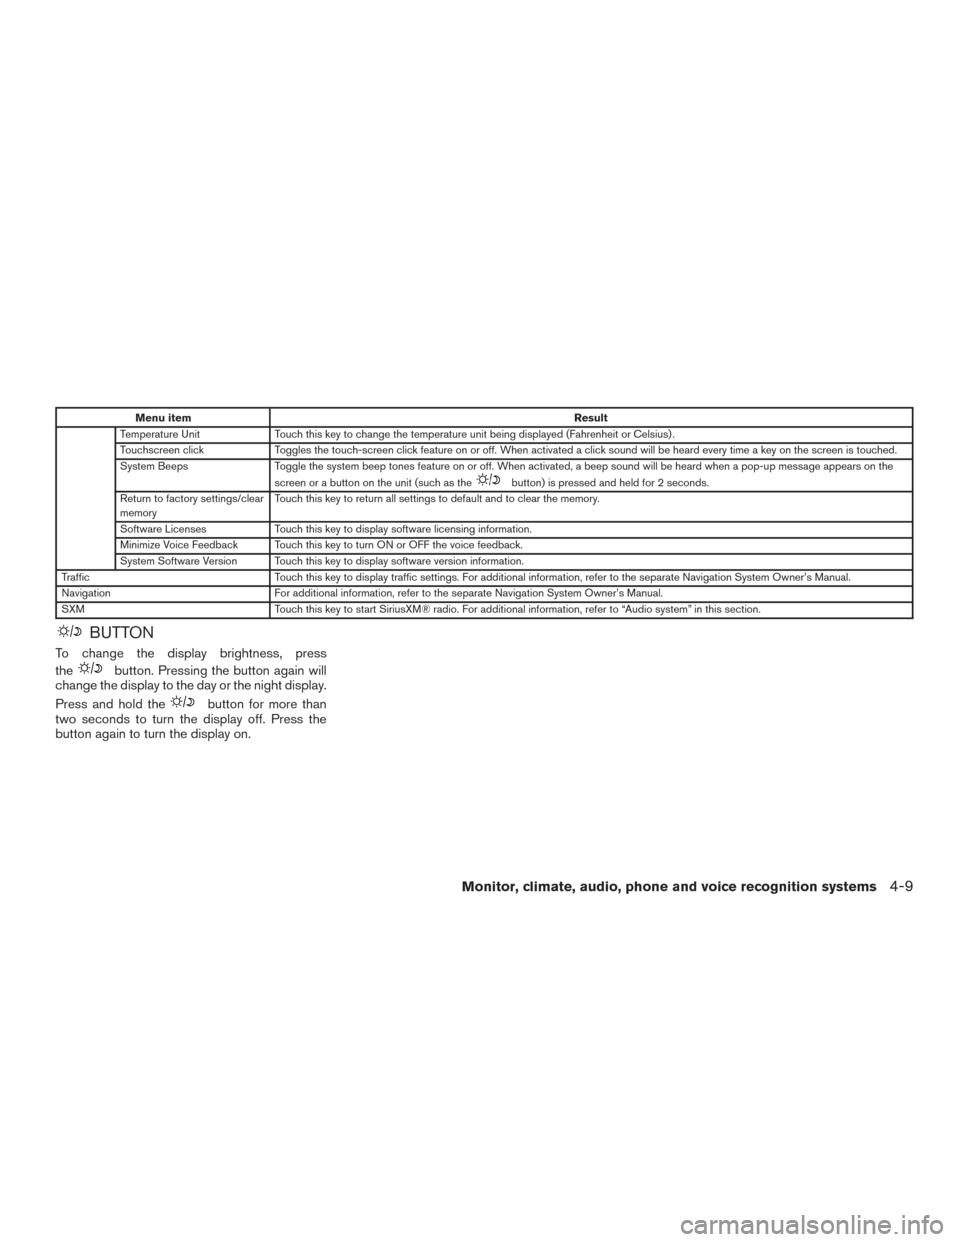
Temperature Unit Touch this key to change the temperature unit being displayed (Fahrenheit or Celsius) .
Touchscreen click Toggles the touch-screen click feature on or off. When activated a click sound will be heard every time a key on the screen is touched.
System Beeps Toggle the system beep tones feature on or off. When activated, a beep sound will be heard when a pop-up message appears on the
screen or a button on the unit (such as the
button) is pressed and held for 2 seconds.
Return to factory settings/clear
memory Touch this key to return all settings to default and to clear the memory.
Software Licenses Touch this key to display software licensing information.
Minimize Voice Feedback Touch this key to turn ON or OFF the voice feedback.
System Software Version Touch this key to display software version information.
Traffic Touch this key to display traffic settings. For additional information, refer to the separate Navigation System Owner’s Manual.
Navigation For additional information, refer to the separate Navigation System Owner’s Manual.
SXM Touch this key to start SiriusXM® radio. For additional information, refer to “Audio system” in this section.
BUTTON
To change the display brightness, press
the
button. Pressing the button again will
change the display to the day or the night display.
Press and hold the
button for more than
two seconds to turn the display off. Press the
button again to turn the display on.
Monitor, climate, audio, phone and voice recognition systems4-9
Page 189 of 497
1. CAMERA button (if so equipped)WARNING
●Failure to follow the warnings and in-
structions for proper use of the Rear-
View Monitor system could result in se-
rious injury or death. ●
RearView Monitor is a convenience fea-
ture and is not a substitute for proper
backing. Always turn and look out the
windows and check mirrors to be sure
that it is safe to move before operating
the vehicle. Always back up slowly.
LHA3877
REARVIEW MONITOR (if so
equipped)
4-10Monitor, climate, audio, phone and voice recognition systems
Page 190 of 497
●The system is designed as an aid to the
driver in showing large stationary ob-
jects directly behind the vehicle, to help
avoid damaging the vehicle.
● The distance guide lines and the vehicle
width lines should be used as a refer-
ence only when the vehicle is on a level
paved surface. The distance viewed on
the monitor is for reference only and
may be different than the actual dis-
tance between the vehicle and dis-
played objects.
CAUTION
Do not scratch the camera lens when
cleaning dirt or snow from the front of the
camera.
The RearView Monitor system automatically
shows a rear view of the vehicle when the shift
lever is shifted into the R (Reverse) position. The
radio can still be heard while the RearView Moni-
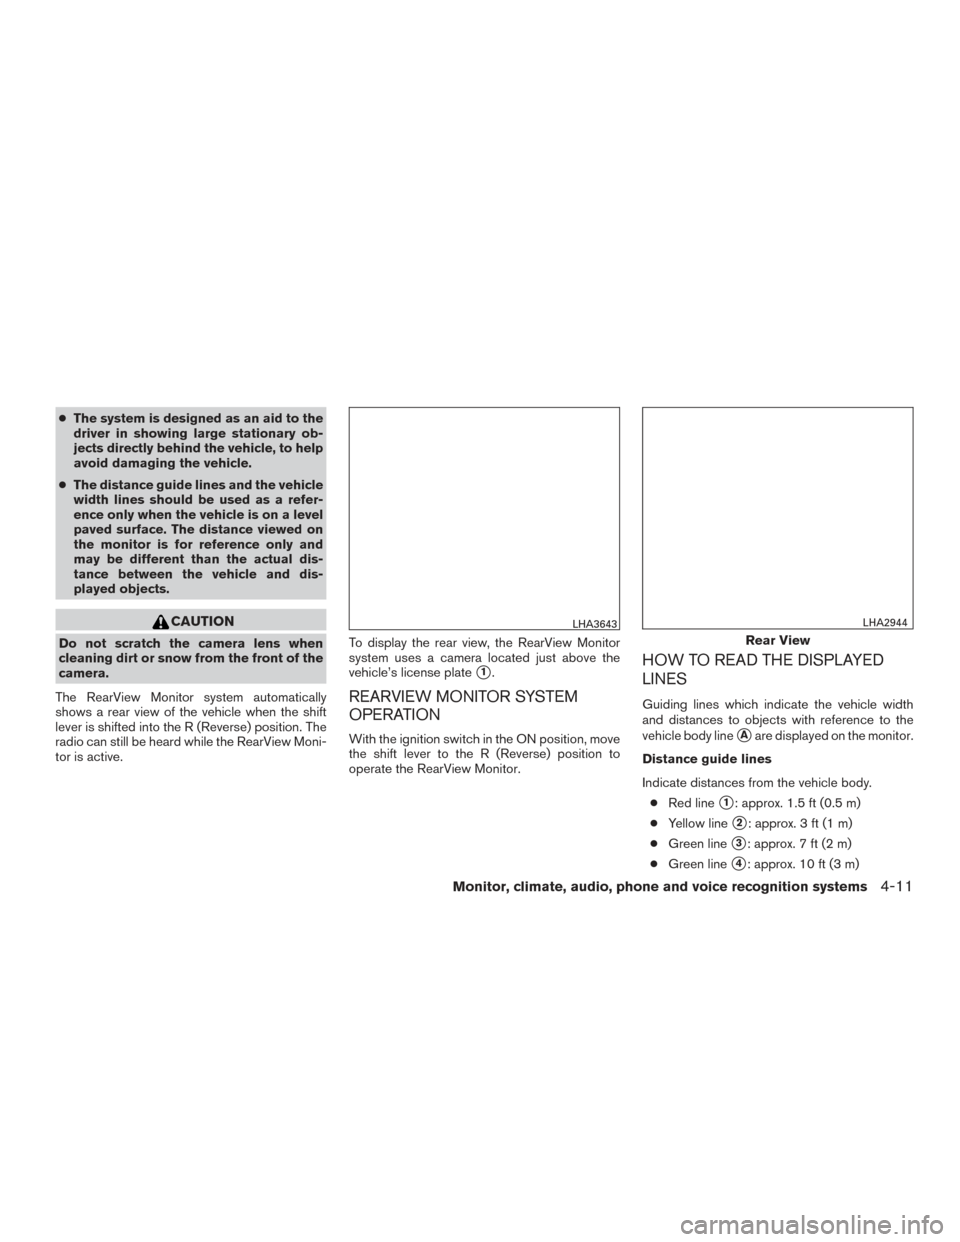
tor is active. To display the rear view, the RearView Monitor
system uses a camera located just above the
vehicle’s license plate
�1.
REARVIEW MONITOR SYSTEM
OPERATION
With the ignition switch in the ON position, move
the shift lever to the R (Reverse) position to
operate the RearView Monitor.
HOW TO READ THE DISPLAYED
LINES
Guiding lines which indicate the vehicle width
and distances to objects with reference to the
vehicle body line
�Aare displayed on the monitor.
Distance guide lines
Indicate distances from the vehicle body. ● Red line
�1: approx. 1.5 ft (0.5 m)
● Yellow line
�2: approx. 3 ft (1 m)
● Green line
�3: approx. 7 ft (2 m)
● Green line
�4: approx. 10 ft (3 m)
LHA3643
Rear View
LHA2944
Monitor, climate, audio, phone and voice recognition systems4-11
Page 191 of 497
Vehicle width guide lines�5
Indicate the vehicle width when backing up.
DIFFERENCE BETWEEN
PREDICTED AND ACTUAL
DISTANCES
The displayed guidelines and their locations on
the ground are for approximate reference only.
Objects on uphill or downhill surfaces or project-
ing objects will be actually located at distances
different from those displayed in the monitor rela-
tive to the guidelines (refer to illustrations) . When
in doubt, turn around and view the objects as you
are backing up, or park and exit the vehicle to
view the positioning of objects behind the ve-
hicle.
Backing up on a steep uphill
When backing up the vehicle up a hill, the dis-
tance guide lines and the vehicle width guide
lines are shown closer than the actual distance.
Note that any object on the hill is further than it
appears on the monitor.
Backing up on a steep downhill
When backing up the vehicle down a hill, the
distance guide lines and the vehicle width guide
lines are shown farther than the actual distance.
Note that any object on the hill is closer than it
appears on the monitor.
LHA4011LHA4012
4-12Monitor, climate, audio, phone and voice recognition systems
Page 192 of 497
Backing up near a projecting object
The vehicle may seem to nearly clear the object in
the display. However, the vehicle may hit the
object if it projects over the actual backing up
course.
Backing up behind a projecting object
The position�Cis shown farther than the position
�Bin the display. However, the position�Cis
actually at the same distance as the position
�A.
The vehicle may hit the object when backing up to the position
�Aif the object projects over the
actual backing up course.
LHA2946LHA4013
Monitor, climate, audio, phone and voice recognition systems4-13
Page 193 of 497
ADJUSTING THE SCREEN
Models with navigation:1. Firmly apply the brake and place the shift lever in R (reverse) .
2. Press the
button on the control panel.
3. The screen will display the Night settings.
4. Turn the TUNE/SCROLL knob to adjust the setting up or down.
5. Press the
button again to access the
Auto settings. 6. Turn the TUNE/SCROLL knob to adjust the
setting up or down.
Models without navigation: 1. Firmly apply the brake and place the shift lever in R (reverse) .
2. Press the ENTER/SETTING button.
3. Turn the TUNE/FOLDER knob to highlight the “Brightness” or “Contrast” option.
4. Press the ENTER/SETTING button. 5. Adjust the level using the TUNE/FOLDER
knob and then press the ENTER/SETTING
button to apply the adjustment.
NOTE:
Do not adjust any of the display settings of
the RearView Monitor while the vehicle is
moving. Make sure the parking brake is
firmly applied.
REARVIEW MONITOR SYSTEM
LIMITATIONS
WARNING
Listed below are the system limitations for
RearView Monitor. Failure to operate the
vehicle in accordance with these system
limitations could result in serious injury or
death.
● The system cannot completely elimi-
nate blind spots and may not show ev-
ery object.
● Underneath the bumper and the corner
areas of the bumper cannot be viewed
on the RearView Monitor because of its
monitoring range limitation. The system
will not show small objects below the
bumper, and may not show objects
close to the bumper or on the ground.models with navigation
LHA3679
models without navigation
LHA3639
4-14Monitor, climate, audio, phone and voice recognition systems