Page 6 of 497
Table of
ContentsIllustrated table of contents
Safety—Seats, seat belts and supplemental restraint system
Instruments and controls
Pre-driving checks and adjustments
Monitor, climate, audio, phone and voice recognition systems
Starting and driving
In case of emergency
Appearance and care
Do-it-yourself
Maintenance and schedules
Technical and consumer information
Index
0
1
2
3
4
5
6
7
8
9
10
11
Page 14 of 497
17. Push-button ignition switch (P. 5-8)
18. Cruise control main/set switches(if so equipped) (P. 5-41)
Intelligent Cruise Control (ICC)
switches (if so equipped) (P. 5-41)
Bluetooth® Hands-free Phone System
(P. 4-27)
19. Tilt/telescopic steering wheel controls
(P. 3-35)
20. Vehicle information display controls
(P. 2-17)
Steering wheel switch for audio control
(P. 4-27)
21. Hood release (P. 3-30)
22. Trunk opener (P. 3-30) Vehicle Dynamic Control (VDC) OFF
switch (P. 2-41)
Heated steering wheel switch
(if so equipped) (P. 2-40)
*: Refer to the separate Navigation System Own-
er’s Manual (if so equipped) .
Refer to the page number indicated in pa-
rentheses for operating details.
Illustrated table of contents0-7
Page 82 of 497
17. Push-button ignition switch (P. 5-8)
18. Cruise control main/set switches(if so equipped) (P. 5-41)
Intelligent Cruise Control (ICC)
switches (if so equipped) (P. 5-41)
Bluetooth® Hands-free Phone System
(P. 4-27)
19. Tilt/telescopic steering wheel controls
(P. 3-35)
20. Vehicle information display controls
(P. 2-17)
Steering wheel switch for audio control
(P. 4-27)
21. Hood release (P. 3-30)
22. Trunk opener (P. 3-30) Vehicle Dynamic Control (VDC) OFF
switch (P. 2-41)
Heated steering wheel switch
(if so equipped) (P. 2-40)
*: Refer to the separate Navigation System Own-
er’s Manual (if so equipped) .
Refer to the page number indicated in pa-
rentheses for operating details.
1. Tachometer
2. Warning and indicator lights
3. Vehicle information displayOdometer
Twin trip odometer 4. Speedometer
5. Fuel gauge
6. Engine coolant temperature gauge
LIC3459
METERS AND GAUGES
Instruments and controls2-3
Page 97 of 497

●Audio information
● Navigation information (if so equipped)
HOW TO USE THE VEHICLE
INFORMATION DISPLAY
The vehicle information display can be changed
using the
,, ENTER andswitches located on the steering wheel.
�1— navigate through the items in the
vehicle information display
ENTER — change or select an item in the
vehicle information display
�2— go back to the previous menu
�3— select/enter the vehicle information
display menu items or to change from one
display screen to the next (i.e. trip, Fuel
economy)
The ENTER and
buttons also control audio
and control panel functions. For additional infor-
mation, refer to “Steering wheel switch for audio
control” in the “Monitor, climate, audio, phone
and voice recognition systems” section of this
manual.
STARTUP DISPLAY
When the vehicle in placed in the ON or ACC
position the screens that display in the vehicle
information include:
● Active system status
● Tire pressures
● Trip computer
● Audio
● Navigation (if so equipped)
● Driver Assistance (if so equipped)
● Fuel economy
● Warnings
LIC2322
2-18Instruments and controls
Page 100 of 497
Main Menu Selection
The main menu selection menu allows the user to
customize the information that appears in the
vehicle information display.
Menu itemResult
Tire Pressures Allows user to turn the tire pressures display on or off
Trip Computer Allows user to turn the trip computer display on or off
Audio Allows user to turn the audio display on or off
Navigation (if so equipped) Allows user to turn the navigation display on or off
Driver Assistance (if so equipped) Allows user turn the driver assistance display on or off
Fuel Economy Allows user to turn the fuel economy display on or off
Body Color
The body color menu allows the user to custom-
ize the information that appears in the vehicle
information display.
Menu item Result
Body Color Allows user to select the color of the vehicle that appears in the vehicle information display
Instruments and controls2-21
Page 113 of 497
NOTE:
The top and bottom few rows of wires on
the rear window are not part of the rear
window defroster system. These wires
make up the antenna for the audio system.HEADLIGHT CONTROL SWITCH
Lighting
�1Rotate the switch to theposition, and
the front parking, tail, license plate, and in-
strument panel lights will come on.
�2Rotate the switch to theposition, and
the headlights will come on and all the other
lights remain on.
CAUTION
Use the headlights with the engine run-
ning to avoid discharging the vehicle
battery.
Type B (if so equipped)
LIC2325
Type A (if so equipped)
LIC3240
Type B (if so equipped)
LIC3241
HEADLIGHT AND TURN SIGNAL
SWITCH
2-34Instruments and controls
Page 142 of 497

●Do not place the Intelligent Key for an
extended period in an area where tem-
peratures exceed 140°F (60°C) .
● Do not attach the Intelligent Key with a
key holder that contains a magnet.
● Do not place the Intelligent Key near
equipment that produces a magnetic
field, such as a TV, audio equipment and
personal computers.
If an Intelligent Key is lost or stolen, NISSAN
recommends erasing the ID code of that Intelli-
gent Key from the vehicle. This may prevent the
unauthorized use of the Intelligent Key to operate
the vehicle. For information regarding the erasing
procedure, it is recommended that you visit a
NISSAN dealer.
Mechanical key
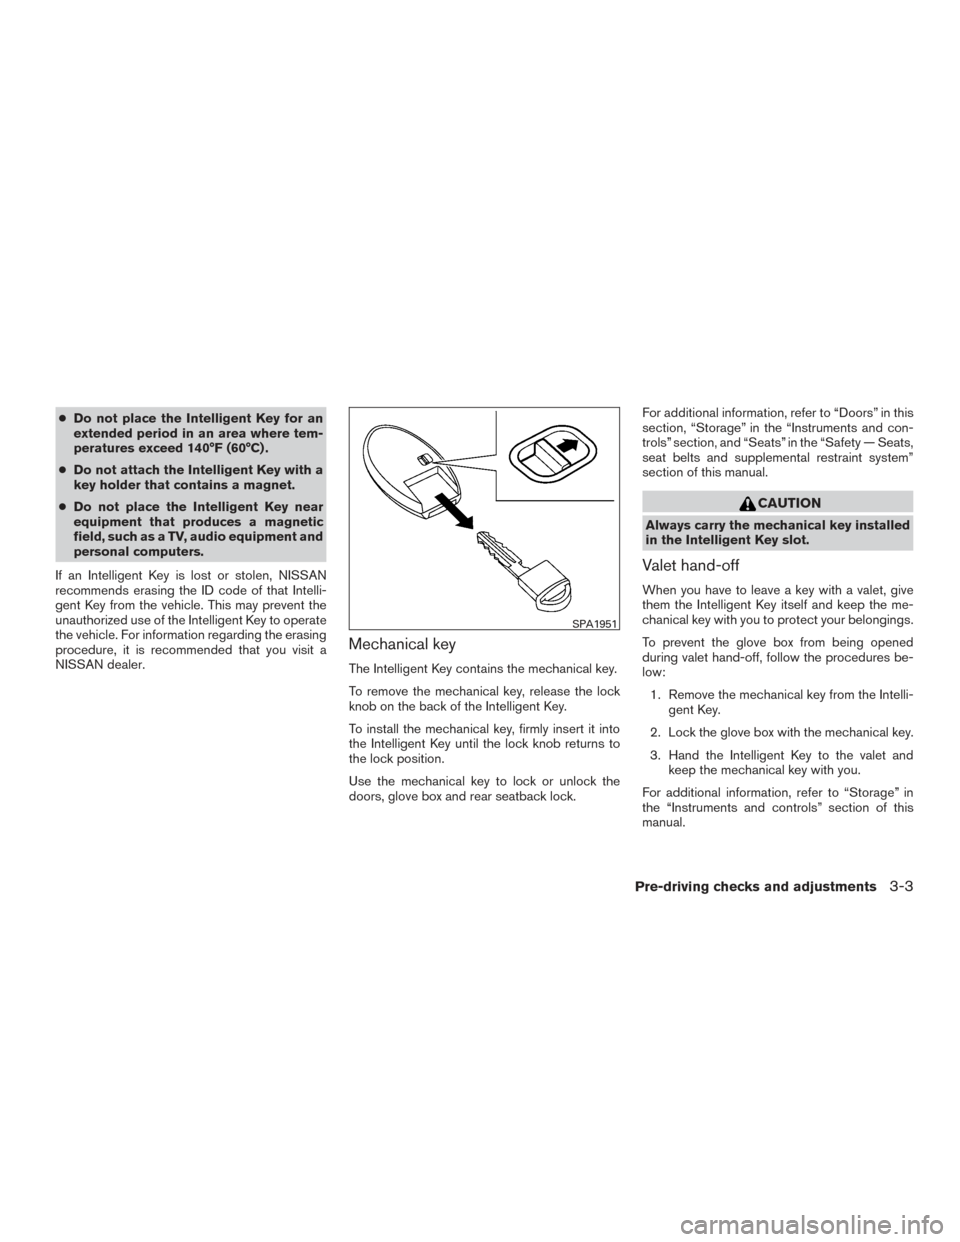
The Intelligent Key contains the mechanical key.
To remove the mechanical key, release the lock
knob on the back of the Intelligent Key.
To install the mechanical key, firmly insert it into
the Intelligent Key until the lock knob returns to
the lock position.
Use the mechanical key to lock or unlock the
doors, glove box and rear seatback lock. For additional information, refer to “Doors” in this
section, “Storage” in the “Instruments and con-
trols” section, and “Seats” in the “Safety — Seats,
seat belts and supplemental restraint system”
section of this manual.
CAUTION
Always carry the mechanical key installed
in the Intelligent Key slot.
Valet hand-off
When you have to leave a key with a valet, give
them the Intelligent Key itself and keep the me-
chanical key with you to protect your belongings.
To prevent the glove box from being opened
during valet hand-off, follow the procedures be-
low:
1. Remove the mechanical key from the Intelli- gent Key.
2. Lock the glove box with the mechanical key.
3. Hand the Intelligent Key to the valet and keep the mechanical key with you.
For additional information, refer to “Storage” in
the “Instruments and controls” section of this
manual.
SPA1951
Pre-driving checks and adjustments3-3
Page 147 of 497

●When the vehicle is parked near a parking
meter.
In such cases, correct the operating conditions
before using the Intelligent Key function or use
the mechanical key.
Although the life of the battery varies depending
on the operating conditions, the battery’s life is
approximately two years. If the battery is dis-
charged, replace it with a new one.
When the Intelligent Key battery is low, an indi-
cator illuminates in the vehicle information dis-
play. For additional information, refer to “Vehicle
information display” in the “Instruments and con-
trols” section of this manual.
Since the Intelligent Key is continuously receiving
radio waves, if the key is left near equipment
which transmits strong radio waves, such as sig-
nals from a TV and personal computer, the bat-
tery life may become shorter.
For additional information, refer to “Battery re-
placement” in the “Do-it-yourself” section of this
manual.
As many as four Intelligent Keys can be regis-
tered and used with one vehicle. For information
about the purchase and use of additional Intelli-
gent Keys, it is recommended that you visit a
NISSAN dealer.CAUTION
Listed below are conditions or occur-
rences which will damage the Intelligent
Key:
● Do not allow the Intelligent Key, which
contains electrical components, to
come into contact with water or salt
water. This could affect the system
function.
● Do not drop the Intelligent Key.
● Do not strike the Intelligent Key sharply
against another object.
● Do not change or modify the Intelligent
Key.
● Wetting may damage the Intelligent
Key. If the Intelligent Key gets wet, im-
mediately wipe until it is completely dry.
● Do not place the Intelligent Key for an
extended period in an area where tem-
peratures exceed 140°F (60°C) .
● Do not attach the Intelligent Key with a
key holder that contains a magnet.
● Do not place the Intelligent Key near
equipment that produces a magnetic
field, such as a TV, audio equipment and
personal computers. If an Intelligent Key is lost or stolen, NISSAN
recommends erasing the ID code of that Intelli-
gent Key from the vehicle. This may prevent the
unauthorized use of the Intelligent Key to operate
the vehicle. For information regarding the erasing
procedure, it is recommended that you visit a
NISSAN dealer.
3-8Pre-driving checks and adjustments