2017 MITSUBISHI OUTLANDER SPORT lights
[x] Cancel search: lightsPage 371 of 399
Replacement of light bulbs 9-34 Vehicle care and maintenance
9
N00900300099
Do not attempt to disassemble or repair head- lights, and do not attempt to replace their bulbs.
N00943200121
The alignment of the headlights should bechecked by an authorized Mitsubishi Motorsdealer or a repair facility of your choice.
N00917301737
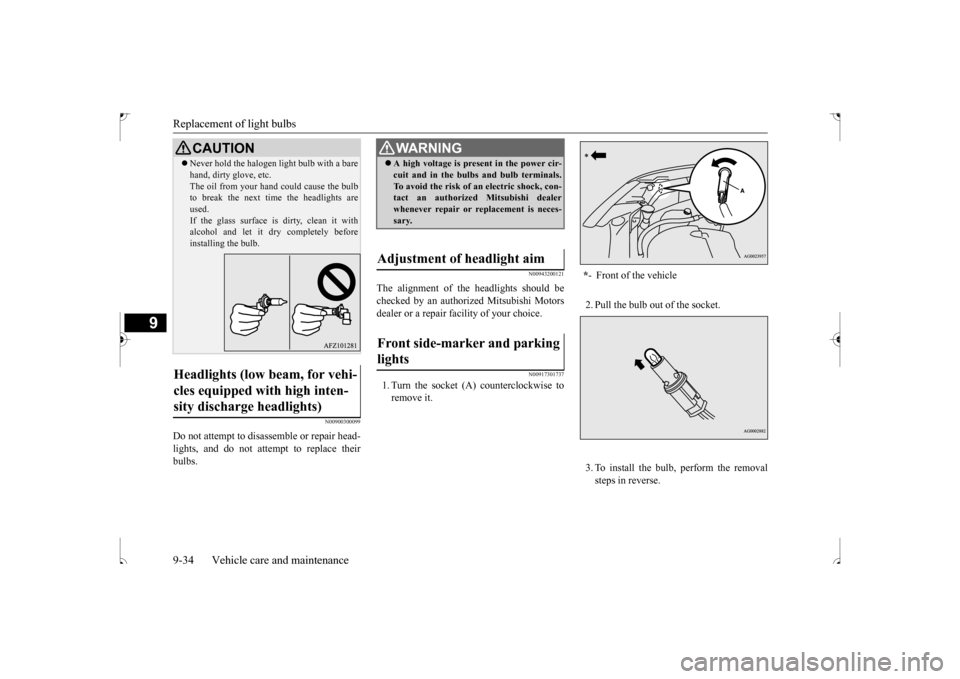
1. Turn the socket (A) counterclockwise to remove it.
2. Pull the bulb out of the socket. 3. To install the bulb, perform the removal steps in reverse.
Never hold the halogen light bulb with a bare hand, dirty glove, etc. The oil from your hand could cause the bulb to break the next time the headlights are used.If the glass surface is dirty, clean it with alcohol and let it dry completely before installing the bulb.
Headlights (low beam, for vehi- cles equipped with high inten- sity discharge headlights)
CAUTION
WA R N I N G A high voltage is present in the power cir- cuit and in the bulbs and bulb terminals. To avoid the risk of an electric shock, con- tact an authorized Mitsubishi dealer whenever repair or replacement is neces-sary.
Adjustment of headlight aim Front side-marker and parking lights
* - Front of the vehicle
BK0239500US.bo
ok 34 ページ 2016年5月13日 金曜日 午前8時53分
Page 372 of 399
Replacement of light bulbs
Vehicle care and maintenance 9-35
9
N00943401452
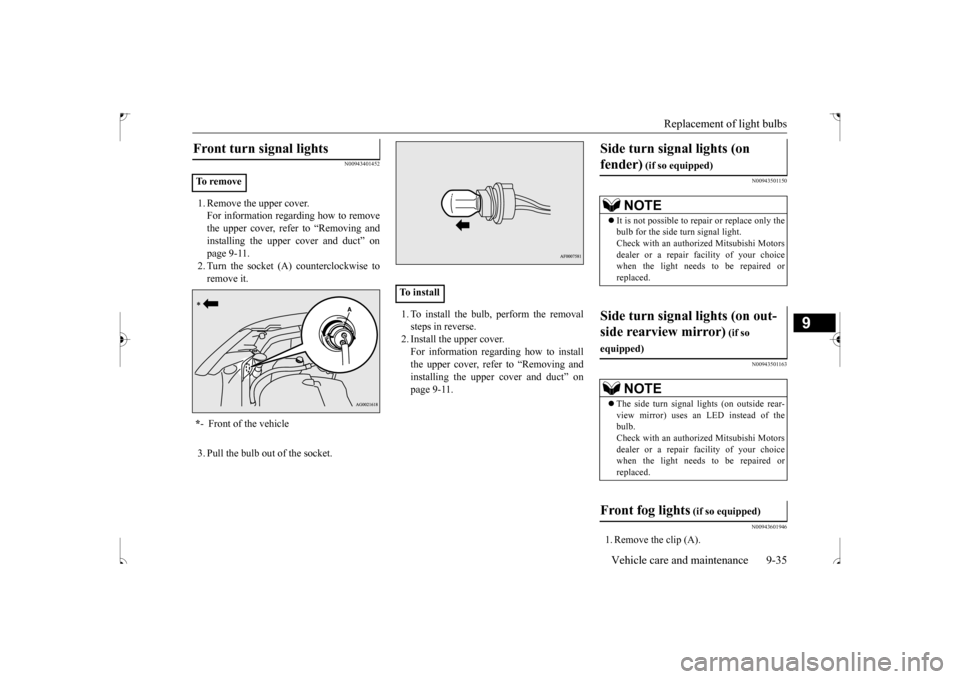
1. Remove the upper cover. For information regarding how to remove the upper cover, refer to “Removing andinstalling the upper cover and duct” on page 9-11. 2. Turn the socket (A) counterclockwise toremove it. 3. Pull the bulb out of the socket.
1. To install the bulb, perform the removal steps in reverse.2. Install the upper cover. For information regarding how to install the upper cover, refer to “Removing andinstalling the upper cover and duct” onpage 9-11.
N00943501150 N00943501163 N00943601946
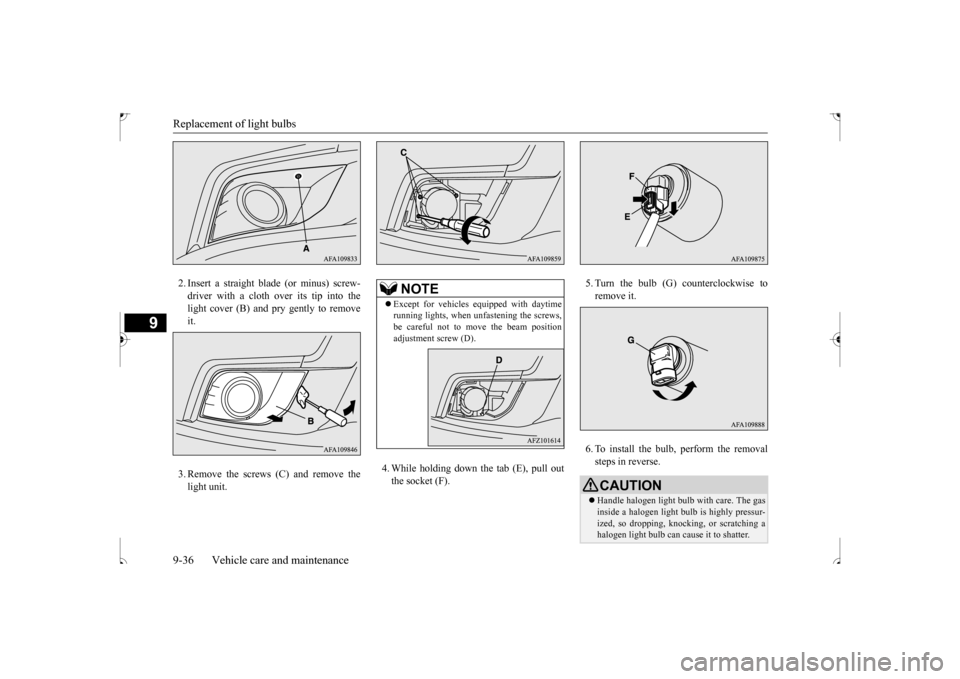
1. Remove the clip (A).
Front turn signal lights To r e m o v e * - Front of the vehicle
To install
Side turn signal lights (on fender)
(if so equipped)
NOTE
It is not possible to re
pair or replace only the
bulb for the side turn signal light. Check with an authorized Mitsubishi Motorsdealer or a repair facility of your choice when the light needs to be repaired or replaced.
Side turn signal lights (on out- side rearview mirror)
(if so
equipped)
NOTE
The side turn signal lights (on outside rear- view mirror) uses an LED instead of the bulb.Check with an authorized Mitsubishi Motors dealer or a repair facility of your choice when the light needs to be repaired or replaced.
Front fog lights
(if so equipped)
BK0239500US.bo
ok 35 ページ 2016年5月13日 金曜日 午前8時53分
Page 373 of 399
Replacement of light bulbs 9-36 Vehicle care and maintenance
9
2. Insert a straight blade (or minus) screw- driver with a cloth over its tip into thelight cover (B) and pry gently to remove it. 3. Remove the screws (C) and remove the light unit.
4. While holding down the tab (E), pull out the socket (F).
5. Turn the bulb (G) counterclockwise to remove it. 6. To install the bulb, perform the removal steps in reverse.
NOTE
Except for vehicles equipped with daytime running lights, when unfastening the screws, be careful not to move the beam position adjustment screw (D).
CAUTION Handle halogen light bulb with care. The gas inside a halogen light bulb is highly pressur- ized, so dropping, knocking, or scratching ahalogen light bulb can cause it to shatter.
BK0239500US.bo
ok 36 ページ 2016年5月13日 金曜日 午前8時53分
Page 374 of 399
Replacement of light bulbs
Vehicle care and maintenance 9-37
9
N00900301184
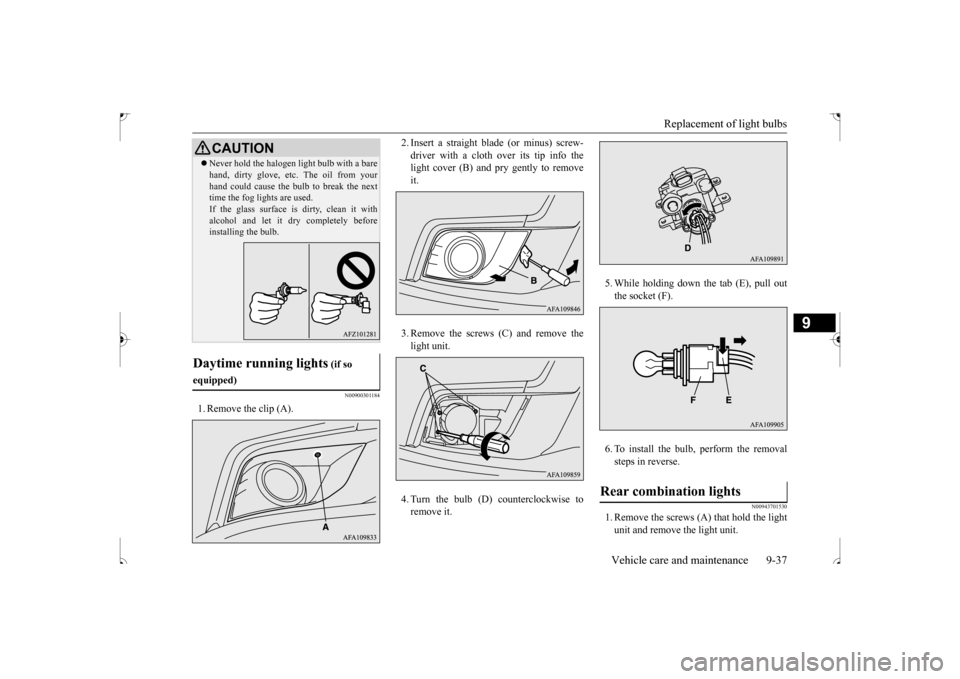
1. Remove the clip (A).
2. Insert a straight blade (or minus) screw- driver with a cloth over its tip info the light cover (B) and pry gently to remove it. 3. Remove the screws (C) and remove the light unit. 4. Turn the bulb (D) counterclockwise to remove it.
5. While holding down the tab (E), pull out the socket (F). 6. To install the bulb, perform the removal steps in reverse.
N00943701530
1. Remove the screws (A) that hold the light unit and remove the light unit.
Never hold the halogen light bulb with a bare hand, dirty glove, etc. The oil from your hand could cause the bulb to break the next time the fog lights are used. If the glass surface is dirty, clean it withalcohol and let it dry completely before installing the bulb.
Daytime running lights
(if so
equipped)
CAUTION
Rear combination lights
BK0239500US.bo
ok 37 ページ 2016年5月13日 金曜日 午前8時53分
Page 375 of 399
Replacement of light bulbs 9-38 Vehicle care and maintenance
9
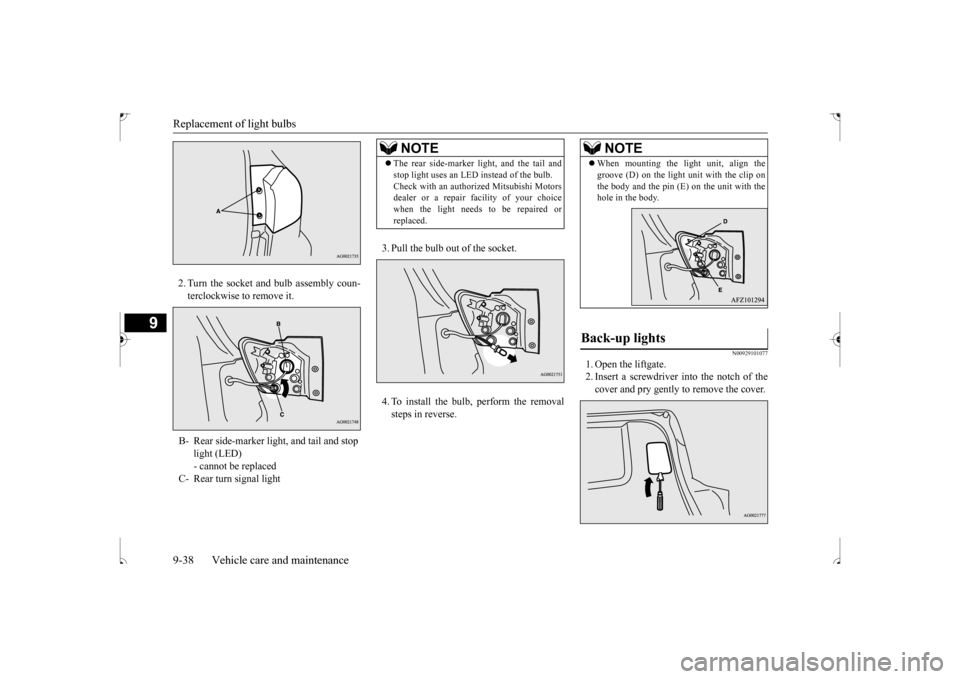
2. Turn the socket and bulb assembly coun- terclockwise to remove it.
3. Pull the bulb out of the socket. 4. To install the bulb, perform the removal steps in reverse.
N00929101077
1. Open the liftgate. 2. Insert a screwdriver into the notch of the cover and pry gently to remove the cover.
B- Rear side-marker light, and tail and stop
light (LED) - cannot be replaced
C- Rear turn signal light
NOTE
The rear side-marker light, and the tail and stop light uses an LED instead of the bulb. Check with an authorized Mitsubishi Motors dealer or a repair
facility of your choice
when the light needs to be repaired orreplaced.
NOTE
When mounting the light unit, align the groove (D) on the light unit with the clip on the body and the pin (E) on the unit with the hole in the body.
Back-up lights
BK0239500US.bo
ok 38 ページ 2016年5月13日 金曜日 午前8時53分
Page 376 of 399
Replacement of light bulbs
Vehicle care and maintenance 9-39
9
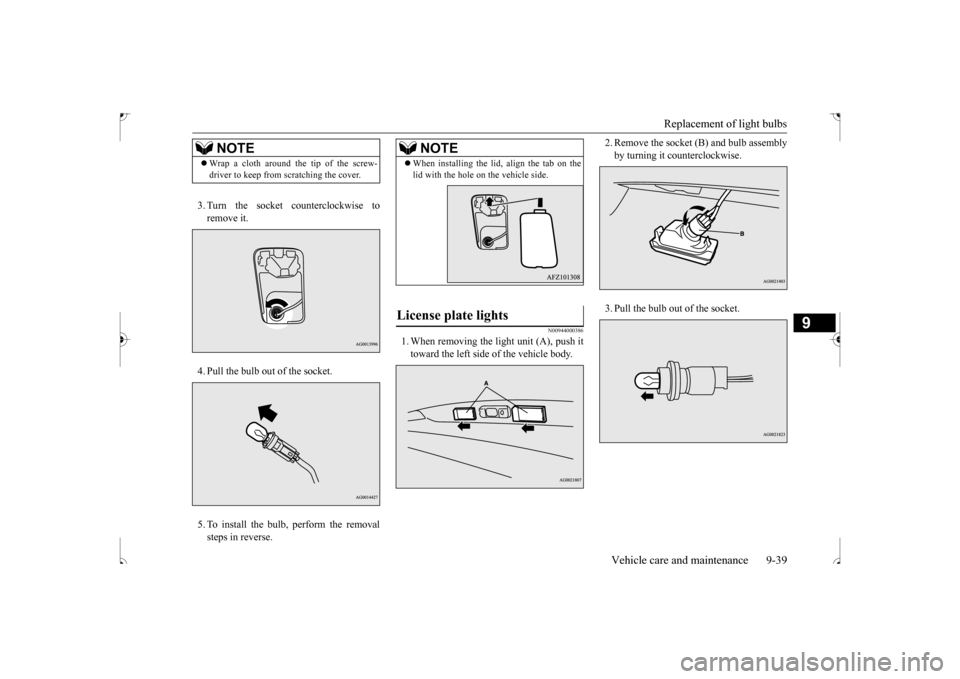
3. Turn the socket counterclockwise to remove it. 4. Pull the bulb out of the socket. 5. To install the bulb, perform the removal steps in reverse.
N00944000386
1. When removing the light unit (A), push ittoward the left side of the vehicle body.
2. Remove the socket (B) and bulb assembly by turning it counterclockwise. 3. Pull the bulb out of the socket.
NOTE
Wrap a cloth around the tip of the screw- driver to keep from scratching the cover.
NOTE
When installing the lid, align the tab on the lid with the hole on the vehicle side.
License plate lights
BK0239500US.bo
ok 39 ページ 2016年5月13日 金曜日 午前8時53分
Page 380 of 399
Cleaning the outside of your vehicle Vehicle care and maintenance 9-43
9
N00946000234
Wax your vehicle once or twice a year, or when water does not bead up on the paint. Use a soft cloth to put a small amount of wax on the painted surfaces. After the wax hasdried, polish with a dry soft cloth. Do not wax your vehicle in direct sunlight. You should wax when the painted surfacesare cool.
N00946100046
If painted surfaces have been severely dam- aged and lost their original luster and color tone, polish the surface lightly with a finepolishing compound. Avoid limiting your polishing to the damaged surface only; polish a somewhat wider area, moving the polishingcloth in one direction. After polishing, flush the compound from the surface and apply a coat of wax to regain a beautiful luster.
N00946200047
Small cracks and scratches in the paint coatshould be touched up as soon as possible withtouch-up paint to prevent corrosion. Check body areas facing the road or the tires carefully for damage to the paint caused byflying stones, etc. The paint code number for your vehicle can be found on the vehicle
information code plate in the engine compart- ment.
N00946300194
Use a sponge or chamois to clean these parts.If a vehicle wax sticks to a gray or black rough surface of the bumper, molding or lights, the surface may appear white in color.In this case, wipe it
off using lukewarm water
and a soft cloth or chamois.
NOTE
When the door is frozen, opening it by force may tear off or crack the rubber gasket installed around the door. Pour warm water to melt the ice. Be sure to thoroughly wipe off the water after opening the door. To pre-vent freezing of the weatherstripping on the doors, hood, etc., treat
with silicone lubri-
cant.
Waxing
CAUTION Waxes containing high abrasive compounds should not be used. These waxes remove rust and stain effectively from the paintwork, butare harmful to the finish of the paint, because they also remove paint/clearcoat. They are also harmful to other glossy sur-faces such as the grill
e, trim, moldings, etc.
Do not use gasoline, benzine, kerosene or paint thinners to remove road tar or other dirt from the vehicle surface. Do not put wax on the areas having black matte coating because it can cause uneven discoloration, patches, blurs, etc. If these get wax on them, wipe the wax off right awaywith a soft cloth and warm water.
Polishing Damaged paint
CAUTION
Cleaning plastic parts
CAUTION Do not use a scrubbing brush or other rough scrubber as these may damage the plastic surface. Do not use wax containing compounds (pol- ishing powder) which may damage the plas- tic surface. Do not let plastic parts get soiled with gaso- line, oil, brake fluids
, engine oils, greases,
paint thinner, and sulfuric acid (battery elec- trolyte), as such substances will cause stains, cracks, or discoloration.If any of these get on a plastic part, wipe them up with a soft cloth or chamois and a mild solution of soap and water. Then rinse them immediately with water.
BK0239500US.bo
ok 43 ページ 2016年5月13日 金曜日 午前8時53分
Page 394 of 399
Alphabetical index
12-1
12
Numerics
4-wheel drive operation
.......................
5-60
A
Accessory (installation)
.........................
3-6
Active stability control (ASC)
..............
5-70
Air bag
......................
........................
4-26
Air cleaner filter
...................
................
9-8
Air conditioning
Automatic air conditioning
.....
7-14
, 7-19
Important air conditioning operating tips
..
7-24Manual air conditioning
.............
7-4
, 7-9
Air purifier
....................
.....................
7-25
Aluminum wheels
...............................
9-44
AM/FM radio
....................
.................
7-25
Anti-lock braking system
.....................
5-67
Arm rest
........................
.......................
4-7
Assist grip
.....................
...................
5-178
Audio
AM/FM radio
................
.................
7-25
CD player
.....................
.................
7-25
Troubleshooting
.............................
7-60
Automatic air conditioning
.........
7-14
, 7-19
Automatic transaxle
Fluid
......................
........................
11-5
B
Back-up light
Bulb capacity
..................
...............
9-30
Replacement
...................
...............
9-38
Ball joint, steering linkage seals and drive shaft boots
.....................
..................
9-24
Battery
........................
......................
9-11
Charging system warning light
.......
5-121
Disconnection and connection
.........
9-13
During cold weather
.......................
9-13
Specification
...................
...............
11-4
Bluetooth 2.0 interface
.......................
5-137
Bottle holders
...................
.................
5-177
Brake
Fluid
.......................
......................
11-5
Brake assist system
.............................
5-66
Braking
.......................
........................
6-5
Anti-lock braking system
................
5-67
Hose
.......................
......................
9-23
Pad wear alarm
...............
...............
5-65
Parking brake
..................
...............
5-40
Pedal
.......................
......................
5-64
Pedal free play
................
...............
9-21
Power brakes
..................
...............
5-64
Service brake
..................
...............
5-64
Warning lights
..............................
5-120
Break-in recommendations
....................
5-3
Bulb capacity
...................
..................
9-30
C
California Perchlorate Materials Requirements
.....................
................
3-6
Capacities
.....................
.....................
11-5
Card holder
...................
...................
5-164
Cargo area cover
................
...............
5-177
Cargo loads
...................
.....................
6-10
Cargo room light
Bulb capacity
................
.................
9-32
Catalytic converter
................
................
9-2
Cautions on the handling of all-wheel drive vehicles
.......................
.....................
5-63
CD player
......................
.....................
7-25
Certification label
...............................
11-3
Charging system warning light
...........
5-121
Child restraint systems
........................
4-19
Child safety locks for rear door
............
5-31
Cleaning
Inside of your vehicle
......................
9-40
Outside of your vehicle
...................
9-41
Clutch
Pedal free play
...............
.................
9-21
Coat hook
......................
...................
5-178
Consumer information
.........................
10-2
Continuously variable transmission (CVT)
...
5-51
BK0239500US.bo
ok 1 ページ 2016年5月13日 金曜日 午前8時53分