2017 MITSUBISHI OUTLANDER SPORT lights
[x] Cancel search: lightsPage 247 of 399
Vehicle preparation before driving 6-4 Driving safety
6
N00629000669
For a safer and more enjoyable trip, always check for the following: Before starting the vehicle, make certain that you and all passengers are seated and wearing their seat belts properly (with children in the rear seat, in appropriaterestraints), and that all the doors and lift- gate are locked. Move the driver’s seat as far backward as possible, while still keeping good visibil- ity, and good control of the steering wheel, brakes, accelerator, and controls.Check the instrument panel indicators and multi-information display for any possible problem. In the same way, the front passenger seat should also be moved as far back as possi- ble. Make sure that infants and small children are properly restrained in accordance with all laws and regulations.
Check these by selecting the defroster mode, and set the blower switch on high. Youshould be able to feel the air blowing against the windshield. Refer to “Defrosting or defogging (wind-shield, door windows)” on page 7-8, 7-13, 7-18, 7-24. Check all the tires for heavy tread wear or uneven wear patterns. Look for stones, nails, glass, or other objects stuck in the tread. Look for any tread cuts or sidewall cracks. Checkthe wheel nuts for tightness, and the tires (including spare tire) for proper pressure. Replace your tires before they are heavilyworn out. As your vehicle is equipped with a tire pres- sure monitoring system, there is a risk ofdamage to the tire inflation pressure sensors when the tire is replaced on the rim. Tire replacement should, therefore, be performedonly by an authorized Mitsubishi Motors dealer.
Have someone watch while you turn all the exterior lights on and off. Also check the turnsignal indicators and high-beam indicators on the instrument panel. Check the ground under the vehicle after parking overnight, for fuel, water, oil, or other leaks. Make sure all the fluid levels are correct. Also, if you can smell fuel, you needto find out why immediately and have it fixed.
N00629200094
Even this vehicle’s safety equipment, andyour safest driving, cannot guarantee that you can avoid an accident or injury. However, ifyou give extra attention to the following areas, you can better protect yourself and your passengers: Drive defensively. Be aware of traffic, road and weather conditions. Leave plenty of stopping distance between your vehicle and the vehicle ahead.
Vehicle preparation before driving Seat belts and seats
Defrosters Tires
Lights Fluid leaks Safe driving techniques
BK0239500US.bo
ok 4 ページ 2016年5月13日 金曜日 午前8時53分
Page 248 of 399
Driving during cold weather
Driving safety 6-5
6
Before changing lanes, check your mir- rors and use your turn-signal light. While driving, watch the behavior of other drivers, bicyclists, and pedestrians. Always obey applicable laws and regula- tions. Be a polite and alert driver. Always leave room for unexpected events, such assudden braking. If you plan to drive in another country, obey their vehicle registration laws andmake sure you will be able to get the rightfuel.
N00629400461
Check the battery. At the same time, check the terminals and wiring. During extremely cold weather, the battery will not be as strong. Also, the battery powerlevel may drop because more power is used for cold starting and driving. Before driving the vehicle, check to see ifthe engine runs at the proper speed and if the headlights are as bright as normally. Charge or replace the battery if necessary.During extreme cold weather, it is possi- ble that a very low battery could freeze.
Warm the engine sufficiently. After start- ing the engine, allow a short warm-up time to distribute oil to all cylinders. Then drive your vehicle slowly. Stay at low speeds at first so that the transaxle, transfer case and rear axle oil have time to spread to all the lubricationpoints. Manual transaxle can be harder to shift in cold weather conditions. This is normaland shifting will get easier as the transaxle warms up. Check the engine antifreeze. If there is not enough coolant because of a leak or from engine overheating, add Mitsubishi Motors Genuine Super LongLife Coolant Premium or equivalent. Please read this section in conjunction with the “Engine coolant” on page 9-7.
N00629500491
All the parts of the brake system are criticalto safety. Have the vehicle serviced by anauthorized Mitsubishi Motors dealer or a repair facility of your choice at regular inter- vals according to the “WARRANTY ANDMAINTENANCE MANUAL”. Check the brake system while driving at a low speed immediately after starting, espe- cially when the brakes are wet, to confirm they work normally.A film of water can be formed on the brake discs and prevent normal braking after driv- ing in heavy rain or through large puddles, orafter the vehicle is wash
ed. If this occurs, dry
the brakes out by driving slowly while lightly depressing the brake pedal.
Driving during cold weather
WA R N I N G The battery gives off explosive hydrogen gas. Any spark or flame can cause the bat- tery to explode, which could cause serious injury or death. Always wear protective clothes and a facemask when working with your battery, or let a skilled mechanic do it.
WA R N I N G Never open the radiator cap when the radiator is hot. You could be seriously burned.
Braking When brakes are wet
BK0239500US.bo
ok 5 ページ 2016年5月13日 金曜日 午前8時53分
Page 323 of 399
If the vehicle breaks down 8-2 For emergencies
8
N00836300187
If your vehicle breaks down on the road, move to the shoulder and turn on the hazardwarning flashers. If there is no shoulder, or the shoulder is not safe, drive in the right lane slowly, with the hazard lights flashing, untilyou come to a safe stopping place. Keep the flashers flashing. If the engine stops, there will be no power assist to the steering and brakes, making these difficult to use. The brake booster will not work, so the brakes will not grip well. The brake pedalwill be harder to press than usual. Since there is no power steering assist, the steering wheel will be hard to turn.
Get help from your passengers, bystanders, etc. to push the vehicl
e and move it to a safe
zone.
N00836401824
If the engine cannot be started because the battery is weak or dead, you can start it withthe battery from another vehicle using jumper cables. 1. Take off any metal jewelry such as watch bands or bracelets that might make an accidental electrical contact.2. Position the vehicles close enough together so that the jumper cables can reach, but be sure the vehicles aren’ttouching each other.
3. You could be injured if the vehicles move. Set the parking brake firmly oneach vehicle. Put an automatic transaxle or CVT in “P” (PARK) or a manual trans- axle in “N” (Neutral).4. Turn the ignition switch to the “OFF”position or put the operation mode in OFF. 5. Make sure your battery electrolyte is at the proper level.(Refer to “Battery” on page 9-11.)
If the vehicle breaks down If the engine stops/fails When the engine fails at the intersection
Jump-starting the engine
WA R N I N G When using jumper cables to start a vehi- cle, follow the procedures and be very cau- tious.CAUTION Do not try to start your vehicle by pushing or towing. Vehicles with automatic transaxles cannot be started this way. Also, there is more risk of an accident when a vehicle isbeing pushed or towed.
CAUTION Check the other vehicle. It must have a 12- volt battery. If the other system isn’t 12-volt, both systems can be damaged.WA R N I N G Perform step 4 on both vehicles before- hand. Make sure that the cables or your clothes cannot be ca
ught by the fan or
drive belt. Personal injury could result.NOTE
Turn off all lights, heater, and other electrical loads. This will avoid sparks and help save both batteries.
BK0239500US.bo
ok 2 ページ 2016年5月13日 金曜日 午前8時53分
Page 363 of 399
Fuses 9-26 Vehicle care and maintenance
9
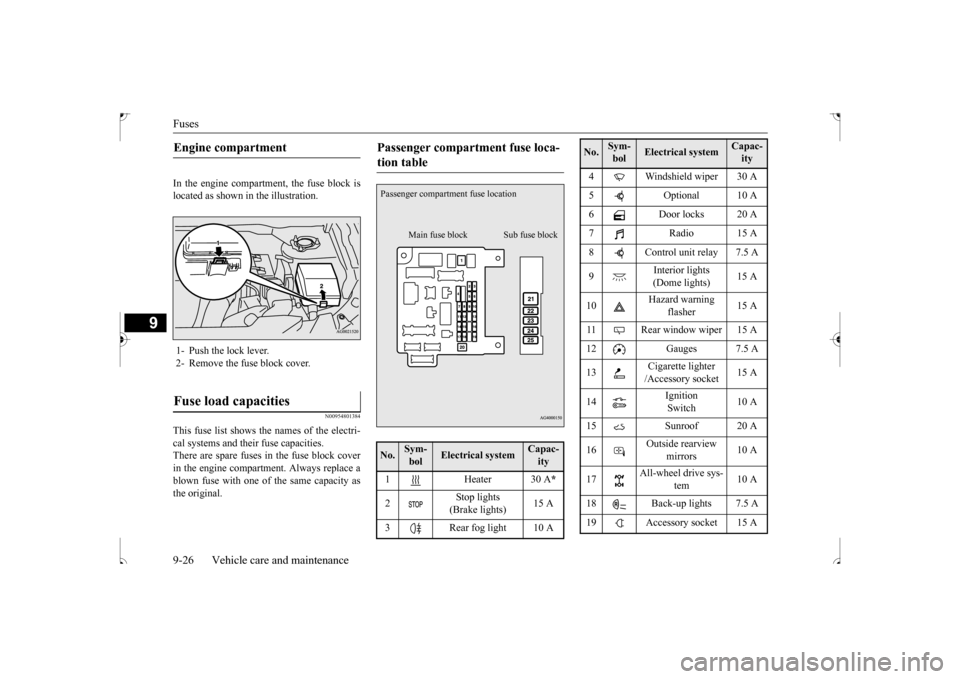
In the engine compartment, the fuse block is located as shown in the illustration.
N00954801384
This fuse list shows the names of the electri-cal systems and their fuse capacities. There are spare fuses in the fuse block cover in the engine compartment. Always replace ablown fuse with one of the same capacity as the original.Engine compartment 1- Push the lock lever. 2- Remove the fuse block cover.Fuse load capacities
Passenger compartment fuse loca- tion table No.
Sym- bol
Electrical system
Capac-ity
1 Heater 30 A
*
2
Stop lights (Brake lights)
15 A
3 Rear fog light 10 APassenger compartment fuse location
Main fuse block Sub fuse block
4 Windshield wiper 30 A 5 Optional 10 A 6 Door locks 20 A 7 Radio 15 A8 Control unit relay 7.5 A 9
Interior lights (Dome lights)
15 A
10
Hazard warning
flasher
15 A
11 Rear window wiper 15 A 12 Gauges 7.5 A 13
Cigarette lighter /Accessory socket
15 A
14
Ignition Switch
10 A
15 Sunroof 20 A16
Outside rearview
mirrors
10 A
17
All-wheel drive sys-
tem
10 A
18 Back-up lights 7.5 A 19 Accessory socket 15 ANo.
Sym- bol
Electrical system
Capac-ity
BK0239500US.bo
ok 26 ページ 2016年5月13日 金曜日 午前8時53分
Page 364 of 399
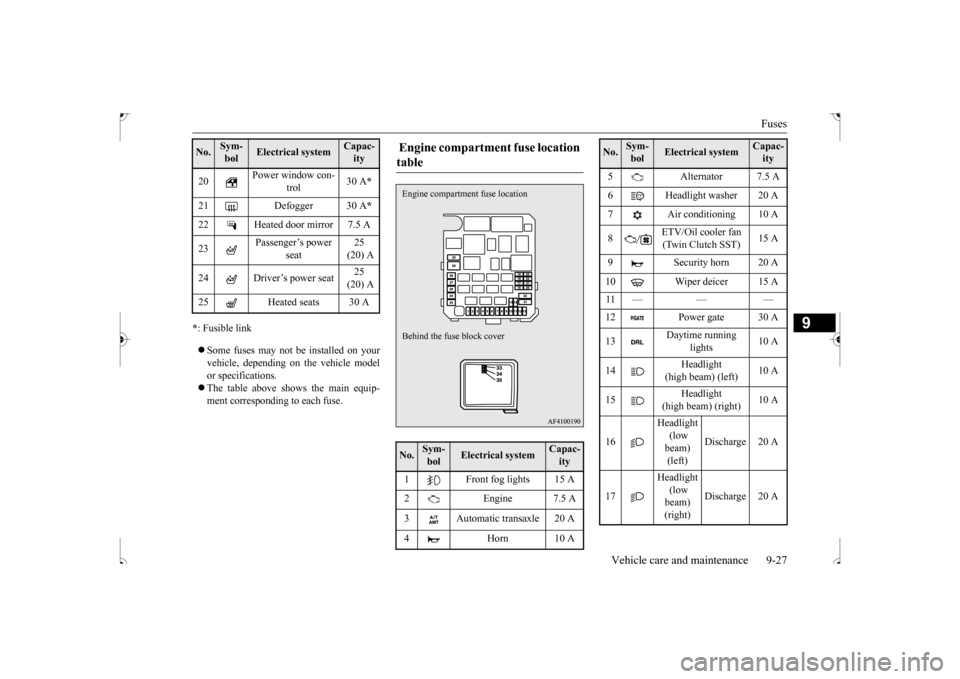
Fuses
Vehicle care and maintenance 9-27
9
* : Fusible link Some fuses may not be installed on your vehicle, depending on the vehicle model or specifications. The table above shows the main equip- ment corresponding to each fuse. 20
Power window con-
trol
30 A
*
21 Defogger 30 A
*
22 Heated door mirror 7.5 A 23
Passenger’s power
seat
25 (20) A
24 Driver’s power seat
25 (20) A
25 Heated seats 30 ANo.
Sym- bol
Electrical system
Capac-ity
Engine compartment fuse location table No.
Sym- bol
Electrical system
Capac-ity
1 Front fog lights 15 A 2 Engine 7.5 A 3 Automatic transaxle 20 A 4 Horn 10 AEngine compartment
fuse location
Behind the fuse block cover
5 Alternator 7.5 A 6 Headlight washer 20 A 7 Air conditioning 10 A 8
ETV/Oil cooler fan (Twin Clutch SST)
15 A
9 Security horn 20 A 10 Wiper deicer 15 A 11 — — — 12 Power gate 30 A 13
Daytime running
lights
10 A
14
Headlight
(high beam) (left)
10 A
15
Headlight
(high beam) (right)
10 A
16
Headlight (low beam) (left)
Discharge 20 A
17
Headlight (low beam) (right)
Discharge 20 A
No.
Sym- bol
Electrical system
Capac-ity
BK0239500US.bo
ok 27 ページ 2016年5月13日 金曜日 午前8時53分
Page 366 of 399
Replacement of light bulbs
Vehicle care and maintenance 9-29
9
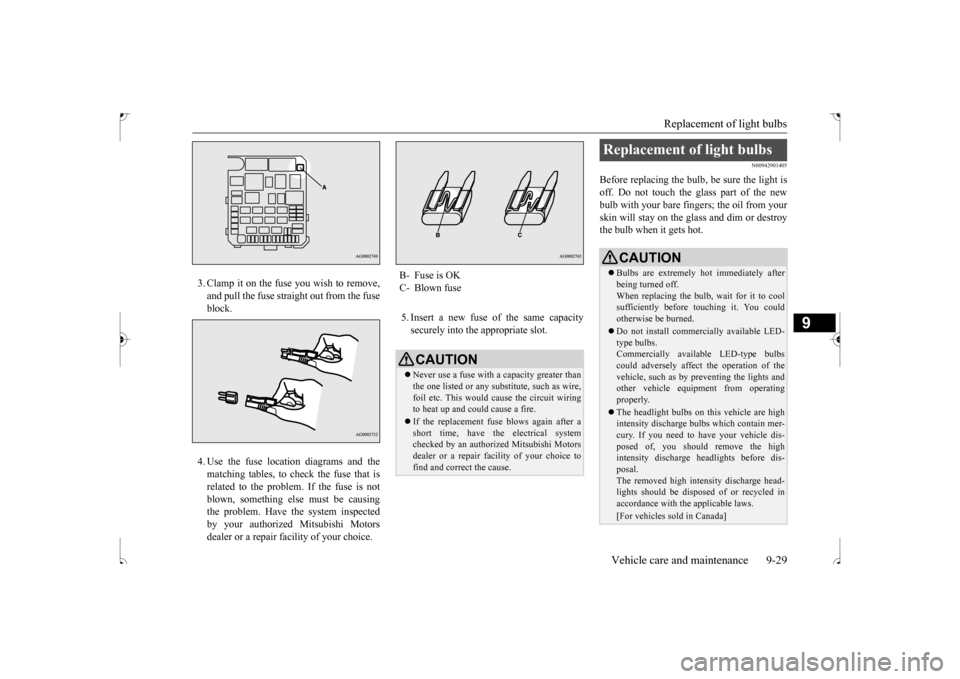
3. Clamp it on the fuse you wish to remove, and pull the fuse straight out from the fuse block. 4. Use the fuse location diagrams and the matching tables, to check the fuse that isrelated to the problem. If the fuse is notblown, something else must be causing the problem. Have the system inspected by your authorized Mitsubishi Motorsdealer or a repair facility of your choice.
5. Insert a new fuse of the same capacity securely into the appropriate slot.
N00942901405
Before replacing the bulb, be sure the light is off. Do not touch the glass part of the newbulb with your bare fingers; the oil from your skin will stay on the glass and dim or destroy the bulb when it gets hot.
B- Fuse is OKC- Blown fuse
CAUTION Never use a fuse with a capacity greater than the one listed or any substitute, such as wire, foil etc. This would cause the circuit wiring to heat up and could cause a fire. If the replacement fuse blows again after a short time, have the electrical systemchecked by an authorized Mitsubishi Motors dealer or a repair facility of your choice to find and correct the cause.
Replacement of light bulbs
CAUTION Bulbs are extremely hot immediately after being turned off.When replacing the bulb, wait for it to cool sufficiently before touching it. You could otherwise be burned. Do not install commercially available LED- type bulbs.Commercially available LED-type bulbs could adversely affect the operation of the vehicle, such as by preventing the lights andother vehicle equipment from operating properly. The headlight bulbs on this vehicle are high intensity discharge bulbs which contain mer- cury. If you need to have your vehicle dis-posed of, you should remove the high intensity discharge headlights before dis- posal. The removed high intensity discharge head- lights should be disposed of or recycled inaccordance with the applicable laws.[For vehicles sold in Canada]
BK0239500US.bo
ok 29 ページ 2016年5月13日 金曜日 午前8時53分
Page 369 of 399
Replacement of light bulbs 9-32 Vehicle care and maintenance
9
N00950401744
* : If so equipped
N00901801144
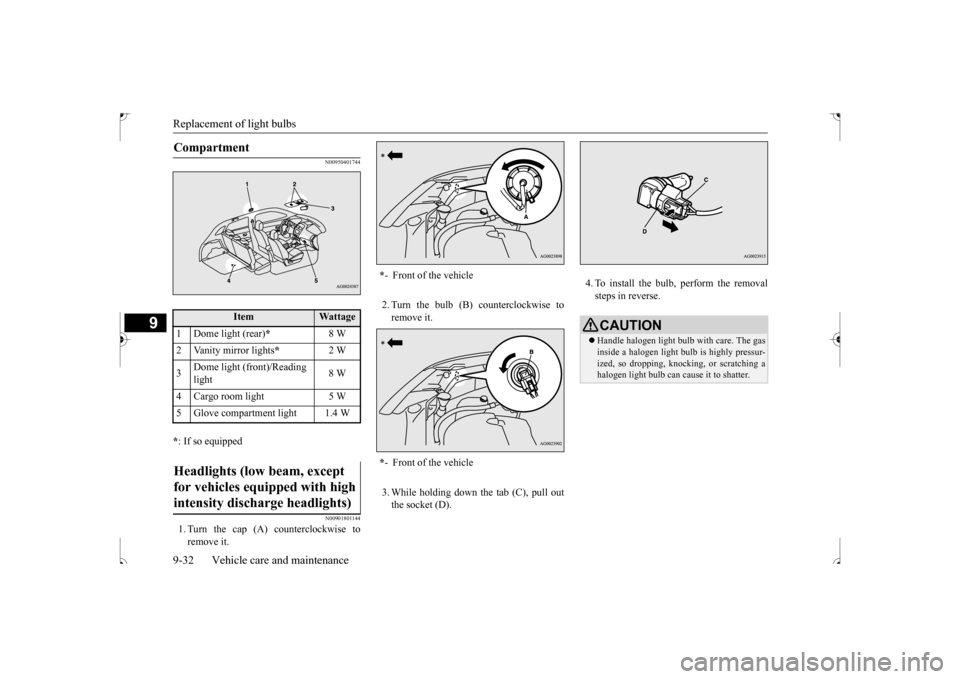
1. Turn the cap (A) counterclockwise to remove it.
2. Turn the bulb (B) counterclockwise to remove it. 3. While holding down the tab (C), pull out the socket (D).
4. To install the bulb, perform the removal steps in reverse.
Compartment
Item
Wattage
1 Dome light (rear)
*
8 W
2 Vanity mirror lights
*
2 W
3
Dome light (front)/Reading light
8 W
4 Cargo room light 5 W 5 Glove compartment light 1.4 WHeadlights (low beam, except for vehicles equipped with high intensity discharge headlights)
* - Front of the vehicle * - Front of the vehicle
CAUTIONHandle halogen light bulb with care. The gas inside a halogen light bulb is highly pressur- ized, so dropping, knocking, or scratching a halogen light bulb can cause it to shatter.
BK0239500US.bo
ok 32 ページ 2016年5月13日 金曜日 午前8時53分
Page 370 of 399
Replacement of light bulbs
Vehicle care and maintenance 9-33
9
N00901901103
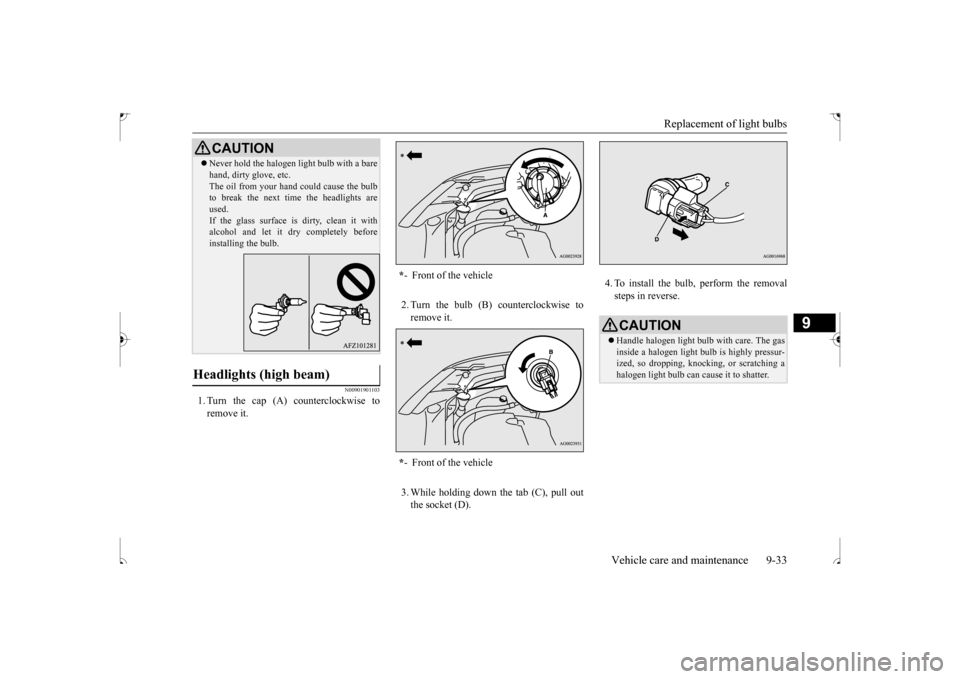
1. Turn the cap (A) counterclockwise to remove it.
2. Turn the bulb (B) counterclockwise to remove it. 3. While holding down the tab (C), pull out the socket (D).
4. To install the bulb, perform the removal steps in reverse.
Never hold the halogen light bulb with a bare hand, dirty glove, etc. The oil from your hand could cause the bulb to break the next time the headlights are used.If the glass surface is dirty, clean it with alcohol and let it dry completely before installing the bulb.
Headlights (high beam)
CAUTION
* - Front of the vehicle * - Front of the vehicle
CAUTIONHandle halogen light bulb with care. The gas inside a halogen light bulb is highly pressur-ized, so dropping, knocking, or scratching a halogen light bulb can cause it to shatter.
BK0239500US.bo
ok 33 ページ 2016年5月13日 金曜日 午前8時53分