2017 MITSUBISHI OUTLANDER Car seat
[x] Cancel search: Car seatPage 374 of 521
Loading information Driving safety 6-9
6
NOTE
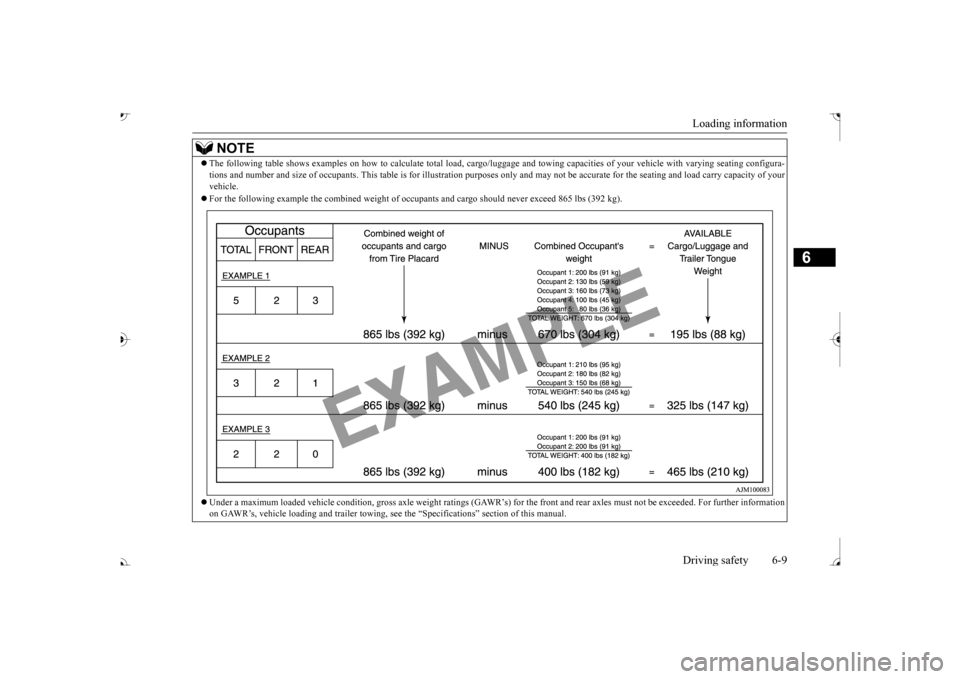
The following table shows examples on how to
calculate tota
l load, cargo/luggage and towing capa
cities of your vehicle with var
ying seating configura-
tions and number and size of occ
upants. This table is for illu
stration purposes only and may not
be accurate for the seating an
d load carry capacity of your
vehicle. For the following example the combined weight of oc
cupants and cargo should ne
ver exceed 865 lbs (392 kg).
Under a maximum loaded vehicle c
ondition, gross axle weight ratings (GAWR’s) for
the front and rear axles must not be exceeded.
For further information
on GAWR’s, vehicle loading and tr
ailer towing, see the “Specifica
tions” section of this manual.
BK0239700US.book 9 ページ 2016年6月16日 木曜日 午前10時58分
Page 375 of 521
Cargo loads 6-10 Driving safety
6
N00629700435 N00630301092
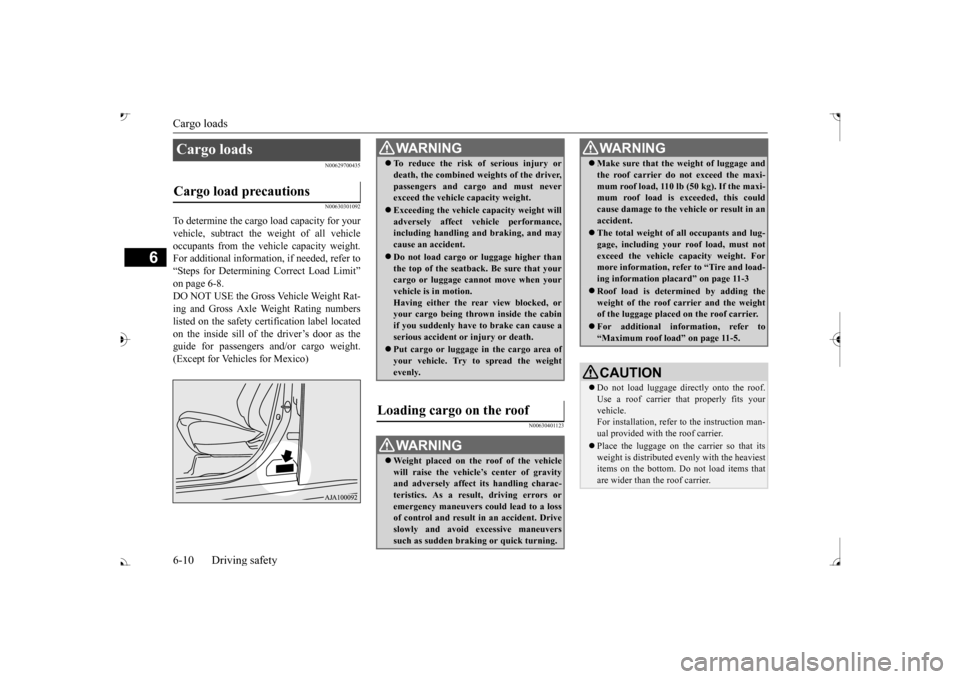
To determine the cargo load capacity for your vehicle, subtract the
weight of all vehicle
occupants from the vehi
cle capacity weight.
For additional information, if needed, refer to “Steps for Determining Correct Load Limit” on page 6-8. DO NOT USE the Gross Vehicle Weight Rat- ing and Gross Axle Weight Rating numberslisted on the safety certification label located on the inside sill of the driver’s door as the guide for passengers and/or cargo weight.(Except for Vehicles for Mexico)
N00630401123
Cargo loads Cargo load precautions
WA R N I N G To reduce the risk of serious injury or death, the combined weights of the driver,passengers and cargo and must neverexceed the vehicle capacity weight. Exceeding the vehicle capacity weight will adversely affect ve
hicle performance,
including handling and braking, and may cause an accident. Do not load cargo or luggage higher than the top of the seatback. Be sure that yourcargo or luggage cann
ot move when your
vehicle is in motion. Having either the re
ar view blocked, or
your cargo being thrown
inside the cabin
if you suddenly have to brake can cause a serious accident or
injury or death.
Put cargo or luggage in the cargo area of your vehicle. Try to spread the weightevenly.
Loading cargo on the roof
WA R N I N G Weight placed on the
roof of the vehicle
will raise the vehicle’ and adversely affect
its handling charac-
teristics. As a result, driving errors oremergency maneuvers could lead to a loss of control and result in an accident. Drive slowly and avoid excessive maneuverssuch as sudden brak
ing or quick turning.
Make sure that the
weight of luggage and
the roof carrier do not exceed the maxi-mum roof load, 110 lb (50 kg). If the maxi-mum roof load is ex
ceeded, this could
cause damage to the ve
hicle or result in an
accident. The total weight of all occupants and lug- gage, including your r
oof load, must not
exceed the vehicle capacity weight. For more information, refer to “Tire and load- ing information placard” on page 11-3 Roof load is determined by adding the weight of the roof
carrier and the weight
of the luggage placed
on the roof carrier.
For additional information, refer to “Maximum roof load” on page 11-5.CAUTION Do not load luggage directly onto the roof. Use a roof carrier that properly fits your vehicle. For installation, refer to the instruction man-ual provided with the roof carrier. Place the luggage on the carrier so that its weight is distri
buted evenly with the heaviest
items on the bottom. Do not load items that are wider than the roof carrier.WA R N I N G
BK0239700US.book 10 ページ 2016年6月16日 木曜日 午前10時58分
Page 445 of 521

How to change a tire 8-10 For emergencies
8
5. Remove the wheel nuts with the wheel nut wrench, then take the wheel off. 6. Clean out any mud, etc. on the hub sur- face (F), hub bolts (G)
or in the installa-
tion holes (H) in the wheel, and then mount the spare tire.
7. Turn the wheel nut clockwise by hand to initially tighten them. [Type 1: On vehicles
with steel wheels]
Temporarily tighten the wheel nuts by hand until the tapered parts of the wheel nuts make light contac
t with the seats of
the wheel holes and the wheel is not loose. [Type 2: On vehicles with aluminiumwheels] Temporarily tighten the wheel nuts by hand until the flange parts of the wheelnuts make light cont
act with the wheel
and the wheel is not loose.
CAUTION Handle the wheel carefully when changing the tire, to avoid scratching the wheel sur- face.WA R N I N G Mount the spare wheel with the valve stem (I) facing outward. If
you cannot see the
valve stem (I), you
have installed the
wheel backwards.Operating the vehicle with the spare wheel installed backwards can cause vehicle damage and result
in an ac
cident.
NOTE
Flange nuts can be te
mporarily used on the
compact spare wheel as shown in the illustra- tion, but return to the original wheel and tire as soon as possible.CAUTION Never apply oil to either the wheel bolts or the nuts or they will tighten too much.
Type 1 Type 2
BK0239700US.book 10 ページ 2016年6月16日 木曜日 午前10時58分
Page 468 of 521
Tires
Vehicle care and maintenance 9-15
9
N00939201648
It is important to famil
iarize yourself with the
following terms: Cold tire pressure: • The measured pressu
re after the vehicle
has been parked for at least three hours, or• The measured pressure when the vehicle is driven less than 1 mile (1.6 km) after having been parked for three hours.
Maximum pressure: the maximum per- missible cold tire inflation pressure for this tire.
Recommended inflation pressure: the inflation pressure for optimum tire perfor-mance. Intended outboard sidewall: • The sidewall that
contains a whitewall,
bears white lettering or bears manufac- turer, brand, and/or model name molding that is higher or deeper than the samemolding on the other sidewall of the tire, or • The outward facing sidewall of an asym- metrical tire that has a particular side that must always face outward whenmounted on a vehicle.
Passenger car tire: a tire intended for use on passenger cars,
multipurpose passen-
ger vehicles, and trucks
that have a gross
vehicle weight rating (GVWR) of 10,000 pounds or less. Light truck (LT) tire
: a tire designated by
its manufacturer as primarily intended for use on lightweight tr
ucks or multipurpose
passenger vehicles. Tread: portion of a tire that comes into contact with the road. Tread rib: a tread se
ction running circum-
ferentially around a tire. Tread separation: pulling away of the tread from the tire carcass. Carcass: the tire structure, except tread and sidewall rubber which, when inflated,bears the load.
Sidewall: portion of
a tire between the
tread and bead. Section width: the lin
ear distance between
the exteriors of th
e sidewalls of an
inflated tire, excluding elevations due tolabeling, decoration,
or protective bands.
Bead: the part of the tire that is made of steel wires, wrapped or reinforced by plycords and that is shaped to fit the rim. Ply: a layer of r
ubber-coated parallel
cords. Cord: the strands forming the plies in the tire. Rim: a metal support for a tire or a tire and tube assembly upon which the tire beads are seated. Rim diameter: nominal diameter of the bead seat. Groove: the space between two adjacent tread ribs.
Tires
WA R N I N G Driving with tires that are worn, damaged or improperly infl
ated is dangerous.
These type tire conditions will adversely affect vehicle performance. These type tire conditions can also cause atread separation or blowout which may result in an accident causing serious injury or death. Tires, including spar
e tire, degrade over
time with age even when they are notbeing used. It is recommended that tires over 6 years generally be replaced
even if damage is
not obvious.
BK0239700US.book 15 ページ 2016年6月16日 木曜日 午前10時58分
Page 479 of 521
Fuses 9-26 Vehicle care and maintenance
9
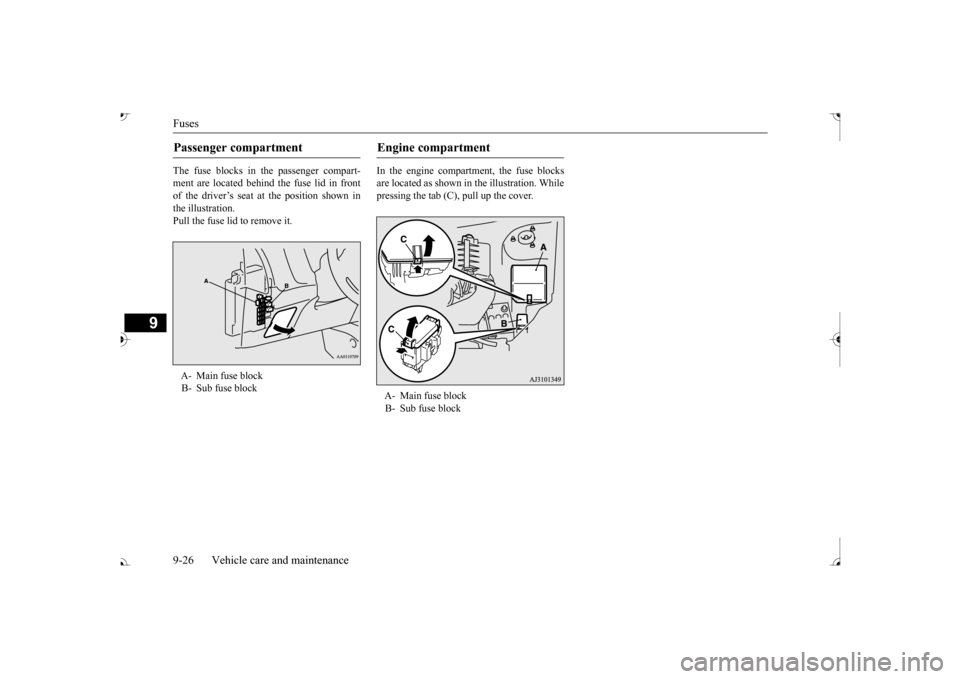
The fuse blocks in the passenger compart- ment are located behind the fuse lid in front of the driver’s seat at the position shown in the illustration.Pull the fuse lid to remove it.
In the engine compartment, the fuse blocks are located as shown in the illustration. While pressing the tab (C), pull up the cover.
Passenger compartment A- Main fuse block B- Sub fuse block
Engine compartment A- Main fuse block B- Sub fuse block
BK0239700US.book 26 ページ 2016年6月16日 木曜日 午前10時58分
Page 481 of 521

Fuses 9-28 Vehicle care and maintenance
9
*: Fusible link Some fuses may not be installed on your vehicle, depending on
the vehicle model
or specifications. The table above show
s the main equip-
ment corresponding to each fuse.
7 12 V power outlet 15 A 8 Rear window wiper 15 A 9 Sunroof 20 A 10 Ignition switch 10 A11 Option 10 A 12
Hazard warning
flasher
15 A
13 4-wheel drive system 10 A 14
Stop lights (Brake lights)
15 A
15 Gauges 10 A 16 SRS airbag 7.5 A 17 Radio 15 A18 Control unit relay 7.5 A 19
Interior lights (Room lights)
15 A
20 Back-up lights 7.5 A 21
Heated outside rearview mirrors
7.5 A
22
Outside rearview
mirrors
10 A
No.
Sym- bol
Electrical system
Capacity
23
Cigarette lighter/ 12 V power outlet
15 A
24
Charge 7.5 A
Heated steering
wheel
15 A
25
Power seat (Driver seat)
30 A*
26 Heated seats 30 A 27
Power seat (Passenger seat)
No.
Sym- bol
Electrical system
Capacity
Engine compartment fuse location table No.
Sym- bol
Electrical sys-
tem
Capacity
SBF1
Air condition- ing condenser fan motor
30 A*
VLC 40 A*
Behind the fuse block cover Main fuse block
BK0239700US.book 28 ページ 2016年6月16日 木曜日 午前10時58分
Page 493 of 521
Cleaning the inside of your vehicle 9-40 Vehicle care and maintenance
9
These can all be dangerous, and they all can damage your vehicle.
N00945200095
After washing the inside of your vehicle withany cleaner, wipe it dry in a shady, well venti- lated area.
N00945300155
1. Lightly wipe these off with a soft clothsoaked in a 3% solution of gentle soap and water. 2. To rinse, dip the cloth in fresh water,wring it out well, and wipe off all the soap.
N00945500128
1. To maintain the value of your new vehi- cle, maintain the upholstery carefully andkeep the interior clean. Use a vacuum cleaner
and brush to clean
the seats. If stained,
vinyl and synthetic
leather should be cleaned with an appro- priate cleaner. Cloth fabrics can be cleaned with either upholstery cleaner or a3% solution of gentle soap in lukewarm water. 2. Clean the carpeting with a vacuumcleaner and remove any stains with carpet cleaner. Oil and grea
se can be removed by
lightly dabbing with
a clean white cloth
and spot remover.
CAUTION Cleaning products can be dangerous. Some are poisonous and othe
rs are highly flamma-
ble. Some are dangerous if you breathe theirfumes in a closed space. When you use any- thing in a container to
clean your vehicle, be
sure to follow the instructions. Always openyour vehicle doors or windows when you’re cleaning the inside. Never use the following chemicals to clean your vehicle:• Gasoline• Carbon Tetrachloride• Benzine• Kerosene• Naphtha• Acetone• Turpentine• Paint Thinner• Lacquer Thinner• Nail Polish Remover
Cleaning the inside of your vehicle
CAUTION Do not use organic s
ubstances (solvents,
benzine, kerosene, alc
ohol, gasoline, etc.) or
alkaline or acidic solutions.These chemicals can
cause discoloring,
staining or cracki
ng of the surface.
If you use cleaners or polishing agents, makesure their ingredients do not include the sub- stances mentioned above.NOTE
Always read the instru
ctions on the cleaner
label.
Plastic, vinyl leat
her, fabric and
flocked parts
NOTE
Do not use cleaners,
conditioners, and pro-
tectants containing
silicones or wax.
Such products, when applied to the instru-ment panels or other pa
rts, may cause reflec-
tions on the windshiel
d and obscure vision.
Also, if such products get on the switches ofthe electrical accessories, it may lead to fail- ure of these accessories.
Upholstery
BK0239700US.book 40 ページ 2016年6月16日 木曜日 午前10時58分
Page 494 of 521

Cleaning the outside of your vehicle Vehicle care and maintenance 9-41
9
N00945600187
1. To clean, lightly wi
pe the leather with a
soft cloth soaked in a 5% solution of gen- tle soap and water.2. To rinse, dip the cloth in fresh water, wring it out well, and wipe off all the soap.3. To preserve and protect, use a leather pro- tecting agent on the genuine leather sur- face.
N00945700058
To protect your vehicle’s
finish, wash it often
and thoroughly. If desired, you may wax your vehicle using a nonabrasive automobile wax.
N00945800033
Industrial pollution, road tar, bird droppings,tree sap, insect remain
s, sea water and other
foreign matters can damage the finish on yourvehicle. Generally, the longer any foreign material stays on the finish, the worse the damage.Wash your vehicle as soon as possible when- ever the finish gets soiled.
N00945901679
Chemicals contained in the dirt and dustpicked up from air, rain, snow, or road sur- faces can damage the paint and body of yourvehicle if left on. Frequent washing and wa
xing is the best way
to protect your vehicle from this damage.Do not wash the vehicl
e in direct sunlight.
Park the vehicle in the shade and spray it with water to remove dust.
Next, using plenty of
clean water and a car
washing mitt or sponge,
wash the vehicle from top to bottom.Use a mild car washing soap if necessary. Rinse thoroughly and wipe
dry with a cham-
ois or soft cloth. Af
ter washing the vehicle,
carefully clean the join
ts and flanges of the
doors, hood, etc., wher
e dirt is likely to
remain.
NOTE
If fuzzing is difficult to remove from the seat upholstery, draw a suitable defuzzing brushover the surface in
one direction.
Genuine leather
(if so equipped)
NOTE
If genuine leather is we
t with water, wipe it
with a dry, soft cloth. If left damp, mildew may grow. The genuine leather su
rface can be damaged
if brushed with a nylon or synthetic fiberbrush. Organic solvents such as benzine, kerosene, alcohol, gasoline, or acid
or alkaline solvents
can discolor the genuine
leather surface and
should not be used. Genuine leather can
mildew if not kept
clean. Clean up any o
il stains immediately.
The genuine leather surface may harden and shrink if it is exposed to the direct sunlightfor long hours. When your vehicle is parked,place it in the shade as much as possible. When the temperature of the vehicle interior rises in summer, vinyl products left on the genuine leather seat
may deteriorate and
stick to the seat.
Cleaning the outside of your vehicle Foreign material
NOTE
Wa s h i n g
CAUTION When washing the underside of your vehicle or the wheels, wear a pair of gloves to pro- tect your hands. If your vehicle is equipped with the rain sen- sor, place the wiper switch lever in the“OFF” position to
deactivate the rain sensor
before washing the vehi
cle. Otherwise, the
wipers will operate in
the presence of water
spray on the windshield and may get dam- aged as a result.
BK0239700US.book 41 ページ 2016年6月16日 木曜日 午前10時58分