2017 MITSUBISHI OUTLANDER III change wheel
[x] Cancel search: change wheelPage 445 of 521
How to change a tire 8-10 For emergencies
8
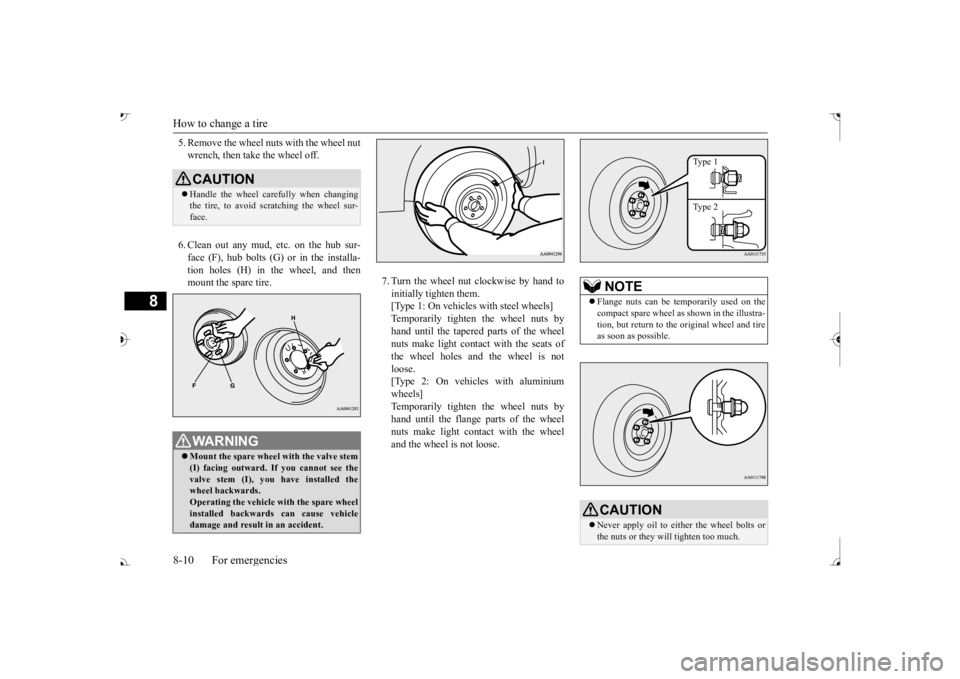
5. Remove the wheel nuts with the wheel nut wrench, then take the wheel off. 6. Clean out any mud, etc. on the hub sur- face (F), hub bolts (G)
or in the installa-
tion holes (H) in the wheel, and then mount the spare tire.
7. Turn the wheel nut clockwise by hand to initially tighten them. [Type 1: On vehicles
with steel wheels]
Temporarily tighten the wheel nuts by hand until the tapered parts of the wheel nuts make light contac
t with the seats of
the wheel holes and the wheel is not loose. [Type 2: On vehicles with aluminiumwheels] Temporarily tighten the wheel nuts by hand until the flange parts of the wheelnuts make light cont
act with the wheel
and the wheel is not loose.
CAUTION Handle the wheel carefully when changing the tire, to avoid scratching the wheel sur- face.WA R N I N G Mount the spare wheel with the valve stem (I) facing outward. If
you cannot see the
valve stem (I), you
have installed the
wheel backwards.Operating the vehicle with the spare wheel installed backwards can cause vehicle damage and result
in an ac
cident.
NOTE
Flange nuts can be te
mporarily used on the
compact spare wheel as shown in the illustra- tion, but return to the original wheel and tire as soon as possible.CAUTION Never apply oil to either the wheel bolts or the nuts or they will tighten too much.
Type 1 Type 2
BK0239700US.book 10 ページ 2016年6月16日 木曜日 午前10時58分
Page 446 of 521
How to change a tire
For emergencies 8-11
8
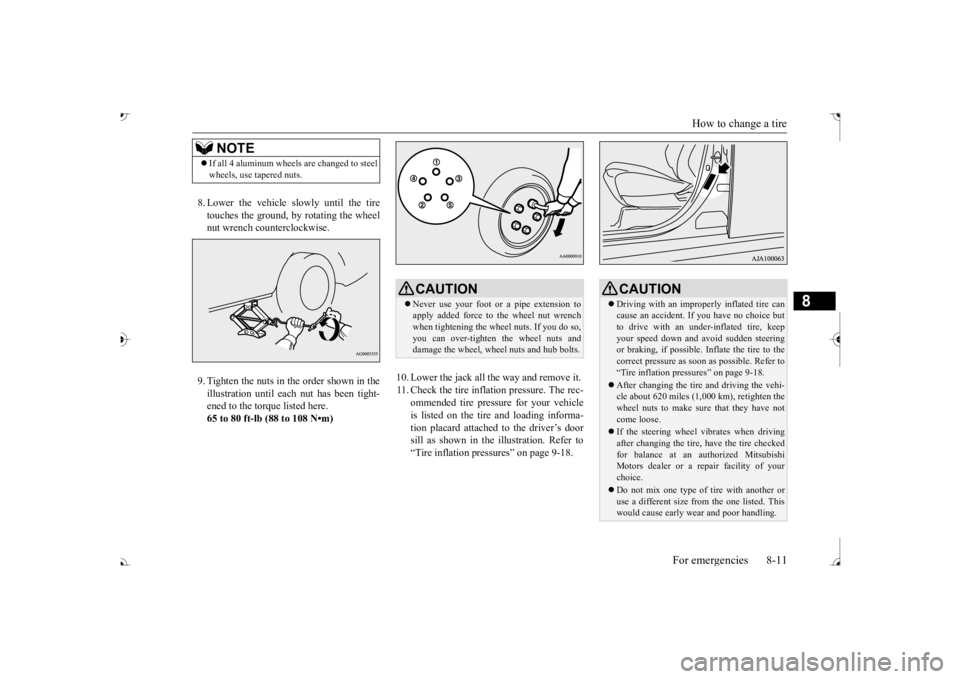
8. Lower the vehicle slowly until the tire touches the ground, by rotating the wheel nut wrench counterclockwise. 9. Tighten the nuts in the order shown in the illustration until each
nut has been tight-
ened to the torque listed here.65 to 80 ft-lb (88 to 108 N•m)
10. Lower the jack all the way and remove it. 11. Check the tire inflation pressure. The rec-
ommended tire pressure for your vehicleis listed on the tire
and loading informa-
tion placard attached to the driver’s door sill as shown in the illustration. Refer to“Tire inflation pressures” on page 9-18.
NOTE
If all 4 aluminum wheels are changed to steel wheels, use tapered nuts.
CAUTION Never use your foot or a pipe extension to apply added force to the wheel nut wrenchwhen tightening the wheel nuts. If you do so, you can over-tighten the wheel nuts and damage the wheel, wheel nuts and hub bolts.
CAUTION Driving with an imprope
rly inflated tire can
cause an accident. If
you have no choice but
to drive with an under-inflated tire, keep your speed down and avoid sudden steering or braking, if possible. Inflate the tire to thecorrect pressure as s
oon as possible. Refer to
“Tire inflation pressures” on page 9-18. After changing the tire
and driving the vehi-
cle about 620 miles (1,000 km), retighten the wheel nuts to make sure
that they have not
come loose. If the steering wheel vibrates when driving after changing the tire, have the tire checked for balance at an authorized Mitsubishi Motors dealer or a repair facility of yourchoice. Do not mix one type of tire with another or use a different size from the one listed. This would cause ea
rly wear and poor handling.
BK0239700US.book 11 ページ 2016年6月16日 木曜日 午前10時58分
Page 447 of 521
How to change a tire 8-12 For emergencies
8
N00832300020
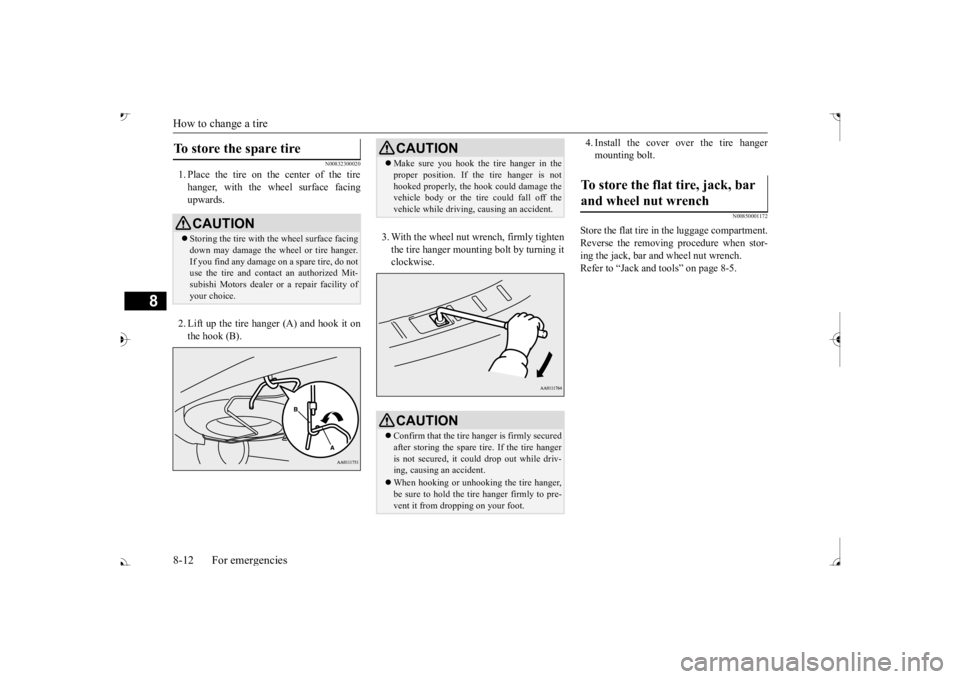
1. Place the tire on the center of the tire hanger, with the wheel surface facing upwards. 2. Lift up the tire hanger (A) and hook it on the hook (B).
3. With the wheel nut wrench, firmly tighten the tire hanger mounti
ng bolt by turning it
clockwise.
4. Install the cover over the tire hanger mounting bolt.
N00850001172
Store the flat tire in the luggage compartment.Reverse the removing procedure when stor- ing the jack, bar and wheel nut wrench. Refer to “Jack and t
ools” on page 8-5.
To store the spare tire
CAUTIONStoring the tire with the wheel surface facing down may damage the wheel or tire hanger. If you find any damage
on a spare tire, do not
use the tire and contact an authorized Mit- subishi Motors dealer or a repair facility of your choice.
CAUTION Make sure you hook the tire hanger in the proper position. If the tire hanger is nothooked properly, the hook
could damage the
vehicle body or the tire
could fall off the
vehicle while driving,
causing an accident.
CAUTIONConfirm that the tire hanger is firmly secured after storing the spare
tire. If the tire hanger
is not secured, it c
ould drop out while driv-
ing, causing
an accident.
When hooking or unhooking the tire hanger, be sure to hold the tire hanger firmly to pre-vent it from dropping on your foot.
To store the flat tire, jack, bar and wheel nut wrench
BK0239700US.book 12 ページ 2016年6月16日 木曜日 午前10時58分
Page 448 of 521
How to change a tire
For emergencies 8-13
8
N00849401235
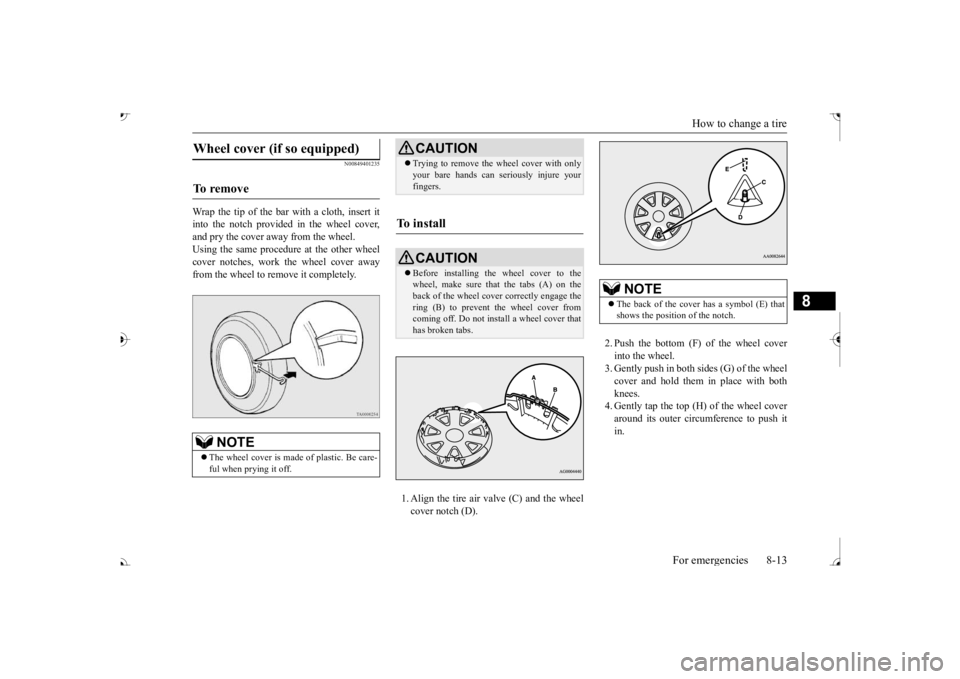
Wrap the tip of the bar with a cloth, insert it into the notch provided in the wheel cover, and pry the cover away from the wheel. Using the same procedur
e at the other wheel
cover notches, work the wheel cover away from the wheel to remove it completely.
1. Align the tire air valve (C) and the wheel cover notch (D).
2. Push the bottom (F) of the wheel cover into the wheel. 3. Gently push in both sides (G) of the wheel cover and hold them in place with both knees. 4. Gently tap the top (H) of the wheel coveraround its outer circumference to push it in.
Wheel cover (if so equipped) To remove
NOTE
The wheel cover is made
of plastic. Be care-
ful when prying it off.
CAUTION Trying to remove the
wheel cover with only
your bare hands can se
riously injure your
fingers.
To install
CAUTION Before installing the wheel cover to the wheel, make sure that the tabs (A) on the back of the wheel cove
r correctly engage the
ring (B) to prevent the wheel cover fromcoming off. Do not install a wheel cover that has broken tabs.
NOTE
The back of the cover has a symbol (E) that shows the position of the notch.
BK0239700US.book 13 ページ 2016年6月16日 木曜日 午前10時58分
Page 472 of 521

Tires
Vehicle care and maintenance 9-19
9
Tire pressures should be checked, and adjusted if necessary, at least once a month.Pressures should be checked more often whenever weather temperatures change severely, becaus
e tire pressures change with
outdoor temperatures. The pressures listed are always “cold inflation pressure”. Cold inflation pressure is measured after thevehicle has been parked
for at least three
hours or is driven less than 1 mile (1.6 km) after having been parked for three hours. Cold inflation pressure
must not go above the
maximum values molded into the tire side-wall. After driving se
veral miles, your tire
inflation pressure may increase 2 to 6 psi (14 to 41 kPa) from the cold inflation pressure.Do not let air out of the tires to get back to the specified cold pressure, or your tires will be too low.Check your tires each t
ime you refuel. If one
tire looks lower than the others, check the pressure for all of them.You should also take the following safety pre- cautions:
Keep your tires inflated to the recom- mended pressures. (See the tire and load-ing information placard attached to the driver’s door sill.) Stay within the recommended load limits. Make sure that the weight of any load in your vehicle is evenly distributed. Drive at safe speeds. After filling your tires to the correct pres- sure, check them for damage and air leaks. Be sure to reinstall the caps on the valve stems.
N00939601479
N00939700141
The following maintenance steps are recom- mended: Check tire pressures regularly. Have regular maintenance done on the wheel balance and front
and rear suspen-
sion alignment. Rotate your tires regul
arly as described in
the “Tire rotation” section on page 9-20.
Compact spare wheel
T155/90D16 T155/80D17
420 KPA, 60
PSI
Item
Tire size
Front
Rear
Replacing tires and wheels
CAUTION Avoid using different size tires from the one listed and the combined use of different types of tires, as this can affect driving safety.Refer to “Tires and wheels” on page 11-7. On all-wheel drive vehi
cles, always use tires
of the same size, same
type, and same brand,
and which have no wear differences. Using tires that differ in size, type, brand or thedegree of wear, will increase the differential oil temperature, resul
ting in possible damage
to the driving system. Further, the drive trainwill be subjected to ex
cessive loading, possi-
bly leading to oil leakage, component sei- zure, or other serious problems.
Only Mitsubishi Motors Authorized wheels should be used, beca
use your vehicle is
equipped with a tire pr
essure monitoring sys-
tem. Use of another type of wheel risks air leaks and sensor damage, as it
will not be possible
to install the tire pressure sensor properly.NOTE
On vehicles with Elec
tric parking brake, 16
inches steel wheel cannot be used on your vehicle because it interferes with brake parts. Additionally, 16 inches aluminum wheelmay not be used on your vehicle depending on its type, even if a Mitsubishi Motors Gen- uine wheels.Consult an authoriz
ed Mitsubishi Motors
dealer before using wh
eels that you have.
Tire maintenance
CAUTION
BK0239700US.book 19 ページ 2016年6月16日 木曜日 午前10時58分
Page 477 of 521
General maintenance 9-24 Vehicle care and maintenance
9
there are other parts which do not usually need regular maintenance.But, if any of these parts stops working prop- erly, your vehicle performance could suffer. Have these items ch
ecked if you notice a
problem with them. If you have any questions, see your autho- rized Mitsubishi Motors
dealer for assistance.
N00941600059
Good brakes are essential for safe driving. Check the brake pads for wear. For goodbraking performance, re
place the brake pads
with the same type pads as the originals.
N00941700076
Brake hoses and tubing should be checkedfor: Severe surface cracking, scuffing or worn spots. If the fabric casing of the hose isshowing through any cracks or worn spots in the rubber hose cover, the hose should be replaced. The brakes can fail if thehose wears through. Improper installation
may cause twisting,
or wheel, tire or chassis interference.
N00941800093
Check the following parts for damage andgrease leaks: Ball joint boots of the suspension and steering linkage Bellows on both ends of the drive shaft
N00942201118
The best way to keep carbon monoxide gas from entering inside your
vehicle is to have
the engine exhaust syst
em properly serviced.
Have a competent mechanic inspect the com- plete exhaust
system and nearby body areas
for broken, damaged, de
teriorated, or mispo-
sitioned parts if you not
ice any of the follow-
ing: A change in the sound of the exhaust sys- tem The smell of exhaust fumes inside the vehicle
The underside or rear of the vehicle is damaged
Also check the exhaust system each time the vehicle is raised for l
ubrication, oil changes,
or required service. Any open seams or loose connections could le
t dangerous exhaust
fumes seep into the luggage and passenger compartments. Check for holes or exhaust gas leaks caused by corrosion or damage. Check the joints and connections for looseness or exhaust gas leaks. Check the rubber hangers and brackets for damage.
N00942300079
The timing belt should
be replaced with a
new one at the mileage listed in the “WAR- RANTY AND MAINTENANCE MAN-UAL”.
Brake hoses
Ball joint, steering linkage seals, drive shaft boots Exhaust system
WA R N I N G Carbon monoxide gas
from your vehicle’s
exhaust is poisonous. Breathing thesefumes can cause unconsciousness or death.
Check for any of the following conditions: Timing belt
BK0239700US.book 24 ページ 2016年6月16日 木曜日 午前10時58分
Page 518 of 521
Alphabetical index
12-5
12
Side turn-signal light
Bulb capacity
.................................
9-32
Snow tires
..........................................
9-21
Spark plugs
........................................
9-23
Starting the engine
.....................
5-25
, 5-66
Steering
Steering wheel height
and reach adjustment
5-57Wheel lock
............................
5-24
, 5-65
Stop lights
Bulb capacity
.................................
9-32
Storage spaces
..................................
5-276
Sun visors
........................................
5-266
Sunglasses holder
.............................
5-279
Sunroof
..............................................
5-51
Super-all wheel control (S-AWC)
S-AWC drive mode display
.............
5-87
S-AWC drive mode-selector
............
5-86
S-AWC operation display
................
5-87
Supplemental Re
straint System
............
4-34
How the Supplemental Restraint System works
..........................................
4-37
Maintenance service
........................
4-49
T
Tail light
Bulb capacity
.................................
9-32
Tank capacity
.....................................
11-7
Theft-alarm system
.............................
5-46
Time Setting
......................................
7-46
Timing belt
........................................
9-24
Tire
...................................................
9-15
Inflation pressure
............................
9-18
Maintenance
..................................
9-19
Quality grading
..............................
10-2
Replacing tires and wheels
..............
9-19
Rotation
........................................
9-20
Size (tire and wheel)
.......................
11-7
Snow tires
.....................................
9-21
Tire and loading information placard 11-3 Tire chains
.....................................
9-21
To change a tire
................................
8-6
Tread wear indicator
.......................
9-20
Tire pressure monitoring system
.........
5-142
Tools
...................................................
8-6
Storage
............................................
8-5
Towing
..............................................
8-14
Trailer towing
....................................
6-11
Transfer oil
................................
9-12
, 11-7
Turn signal light
Indicators
.....................................
5-215
Lever
...........................................
5-230
U
Ultrasonic misacceleration Mitigation System 5-127 USB input terminal
............................
5-263
How to connect a USB memory device
....
5-263How to connect an iPod
.................
5-264
V
Vanity mirror
....................................
5-266
Vanity mirror lights
Bulb capacity
.................................
9-33
Vehicle care precautions
......................
9-39
Vehicle dimensions
.............................
11-4
Vehicle labeling
..................................
11-2
Vehicle preparation before driving
..........
6-4
Vehicle weights
..................................
11-5
Vents
...................................................
7-2
W
Warning lights
..................................
5-216
Washer
Fluid
.....................................
9-12
, 11-7
Rear window washer
.....................
5-236
Switch
.........................................
5-235
Washing
.............................................
9-41
Waxing
..............................................
9-42
Weights
.............................................
11-5
Wheel
Covers
...........................................
8-13
Specification
..................................
11-7
BK0239700US.book 5 ページ 2016年6月16日 木曜日 午前10時58分