2017 MITSUBISHI OUTLANDER III change wheel
[x] Cancel search: change wheelPage 257 of 521
Multi Information display - Type 1 5-176 Features and controls
5
N00578600024
While driving, the momentary fuel consump- tion is shown with a bar graph. The “ ” mark in the momentary fuel gauge shows the average fuel consumption. When the momentary fuel consumption sur- passes the average fuel consumption, themomentary fuel consumption is displayed with a green bar graph. Be conscious of maintaining the momentaryfuel consumption above the average fuel con- sumption, it can help you drive with the better fuel consumption.
N00568701032
This indicator will be displayed when fuel-efficient driving is achieved.
N00578700038
This function displays
how fuel-efficiently
you are driving under different driving condi- tions. The ECO drive assist display will change asfollows if you do fuel-efficient driving using the accelerator in a way well matched with the vehicle speed.
N00578800026
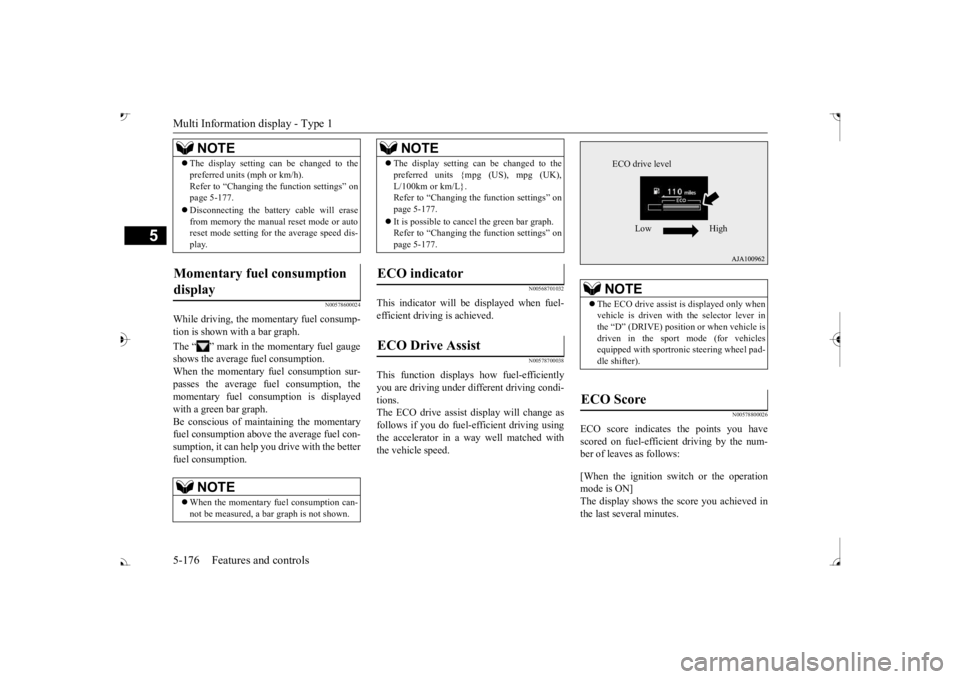
ECO score indicates the points you have scored on fuel-efficient driving by the num- ber of leaves as follows: [When the ignition switch or the operation mode is ON] The display shows the score you achieved in the last several minutes.
The display setting can be changed to the preferred units (mph or km/h).Refer to “Changing th
e function settings” on
page 5-177. Disconnecting the batt
ery cable will erase
from memory the manual reset mode or auto reset mode setting for the average speed dis- play.
Momentary fuel consumption display
NOTE
When the momentary fuel consumption can- not be measured, a ba
r graph is not shown.
NOTE
The display setting can be changed to the preferred units {mpg (US), mpg (UK),L/100km or km/L}.Refer to “Changing the
function settings” on
page 5-177. It is possible to cancel the green bar graph. Refer to “Changing the
function settings” on
page 5-177.
ECO indicator ECO Drive Assist
NOTE
NOTE
The ECO drive assist is displayed only when vehicle is driven with
the selector lever in
the “D” (DRIVE) positi
on or when vehicle is
driven in the sport mode (for vehicles equipped with sportroni
c steering wheel pad-
dle shifter).
ECO Score
ECO drive level
Low High
BK0239700US.book 176 ページ 2016年6月16日 木曜日 午前10時58分
Page 311 of 521
Turn signal lever 5-230 Features and controls
5
N00522601529
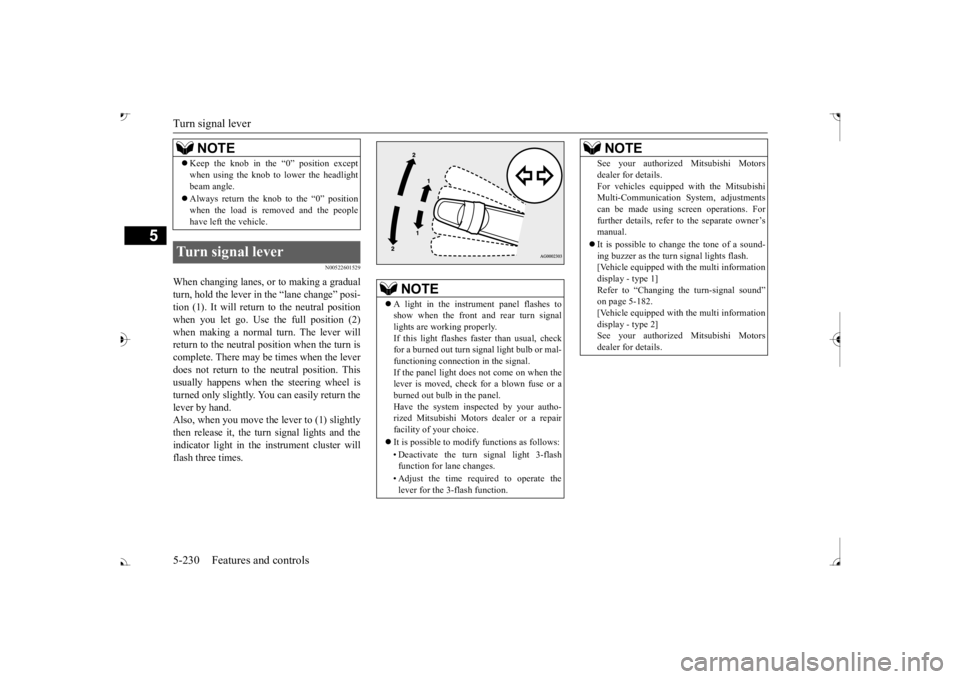
When changing lanes, or to making a gradual turn, hold the lever in the “lane change” posi-tion (1). It will return
to the neutral position
when you let go. Use the full position (2) when making a normal turn. The lever willreturn to the neutral position when the turn is complete. There may be times when the lever does not return to the neutral position. Thisusually happens when the steering wheel is turned only slightly. You can easily return the lever by hand.Also, when you move the lever to (1) slightly then release it, the turn signal lights and the indicator light in the instrument cluster willflash three times. Keep the knob in the “0” position except when using the knob to lower the headlightbeam angle. Always return the knob to the “0” position when the load is removed and the peoplehave left the vehicle.
Turn signal lever
NOTE
NOTE
A light in the instrument panel flashes to show when the front and rear turn signallights are working properly. If this light flashes fa
ster than usual, check
for a burned out turn signal light bulb or mal-functioning connect
ion in the signal.
If the panel light does not come on when the lever is moved, check for a blown fuse or aburned out bulb in the panel. Have the system inspected by your autho- rized Mitsubishi Motors dealer or a repairfacility of your choice. It is possible to modify functions as follows: • Deactivate the turn signal light 3-flash function for lane changes. • Adjust the time required to operate the lever for the 3-flash function.
See your authorized Mitsubishi Motorsdealer for details.For vehicles equipped
with the Mitsubishi
Multi-Communication System, adjustments can be made using sc
reen operations. For
further details, refer to the separate owner’smanual. It is possible to cha
nge the tone of a sound-
ing buzzer as the turn signal lights flash. [Vehicle equipped with the multi information display - type 1]Refer to “Changing the turn-signal sound” on page 5-182. [Vehicle equipped with the multi informationdisplay - type 2] See your authorized Mitsubishi Motors dealer for details.NOTE
BK0239700US.book 230 ページ 2016年6月16日 木曜日 午前10時58分
Page 320 of 521
Heated steering wheel switch (if so equipped)
Features and controls 5-239
5
N00589100032
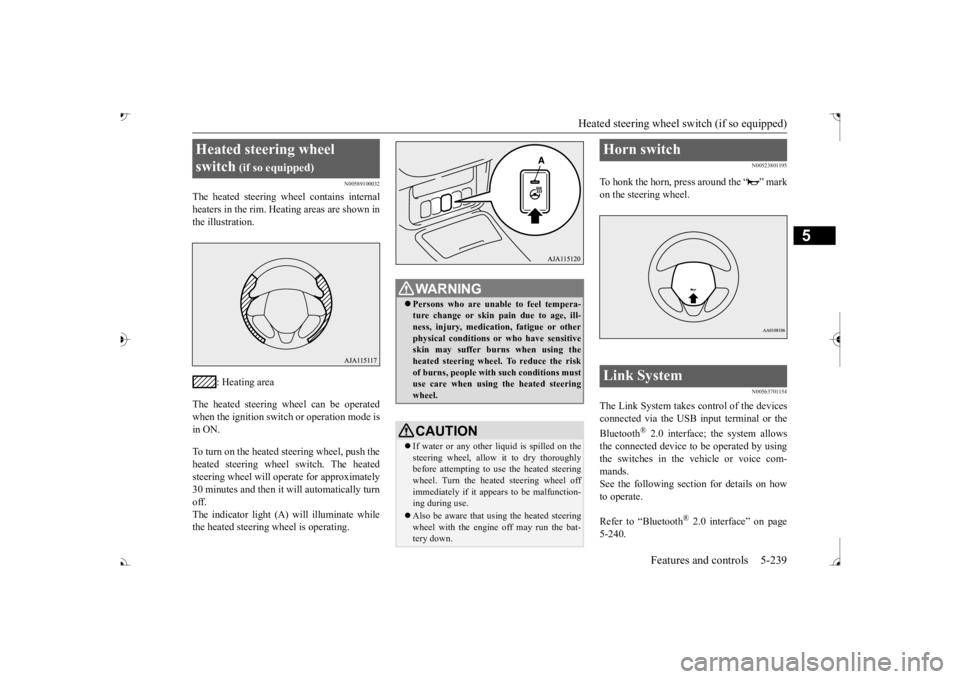
The heated steering wh
eel contains internal
heaters in the rim. Heating areas are shown in the illustration.
: Heating area
The heated steering wheel can be operated when the ignition switch or operation mode is in ON. To turn on the heated steering wheel, push the heated steering wheel switch. The heated steering wheel will ope
rate for approximately
30 minutes and then it
will automatically turn
off. The indicator light (A) will illuminate while the heated steering wheel is operating.
N00523801195
To honk the horn, press around the “ ” markon the steering wheel.
N00563701154
The Link System takes control of the devicesconnected via the USB input terminal or the Bluetooth
® 2.0 interface; the system allows
the connected device to be operated by using the switches in the vehicle or voice com-mands. See the following section for details on how to operate. Refer to “Bluetooth
® 2.0 interface” on page
5-240.
Heated steering wheel switch
(if so equipped)
Persons who are unable
to feel tempera-
ture change or skin
pain due to age, ill-
ness, injury, medicati
on, fatigue or other
physical conditions or
who have sensitive
skin may suffer burns when using theheated steering wheel. To reduce the risk of burns, people with such conditions must use care when using the heated steeringwheel.CAUTION If water or any other li
quid is spilled on the
steering wheel, allow it to dry thoroughly before attempting to use the heated steering wheel. Turn the heated steering wheel offimmediately if it appe
ars to be malfunction-
ing during use. Also be aware that us
ing the heated steering
wheel with the engine off may run the bat- tery down.
Horn switch Link System
BK0239700US.book 239 ページ 2016年6月16日 木曜日 午前10時58分
Page 411 of 521
Listen to Satellite Radio (if so equipped) 7-28 Comfort controls
7
During RBDS broadcast
reception,
select
CAT (category content) to perform a collec-tive search for stations. 1. During FM reception, press the CAT key. This switches to the CAT selection mode. 2. Press the CAT key to select CAT. 3. Press the SCAN key. When a broadcast station is received, thisis played for 5 seconds, then the product searches for the next station.
N00717000096
This section explains how to listen to satellite radio. Press the RADIO key to switch the band. Switches between SIR1, SIR2, SIR3, and SIR4 bands. The selected band is in
dicated on the display.
Press the key or key to select the sta- tion.
10 seconds after reception, CAT search mode will be cancelled. To receive a different station, press the key or key again.
CAT Scan
NOTE
Press this key again while receiving the sta- tion to return to normal reception.NOTE
Listen to Satellite Radio
(if so
equipped)
NOTE
A subscription is required to listen to satel- lite radio. Sate
llite radio cannot be received
after the free trial period has expired. If no subscription has been made when the free trial period expires, the display will alternate between
“CALL” and “888-539-
SIRI”.
NOTE
Bands switch in the order AM, FM1, FM2, SIR1, SIR2*, SIR3*, and SIR4*. Switch satellite radi
o bands by holding down
the button, button on the steering wheel audio remote control switch.
*:If no signal is received, bands will not be switched.
Select a Station
key
Go down one step from the channel being received.
key
Go up one step from the channel being received.
key
(Hold down)
While the key is held down, it will cycle down through the channels being received.
key
(Hold down)
While the key is held down, it will cycle up through the channels being received.
NOTE
When cycling up/down through channels, the channel number display
in the upper level of
the display changes. When channel number “
000” is selected, the
SIRIUS ID (12 digi
ts) is displayed.
BK0239700US.book 28 ページ 2016年6月16日 木曜日 午前10時58分
Page 441 of 521
How to change a tire 8-6 For emergencies
8
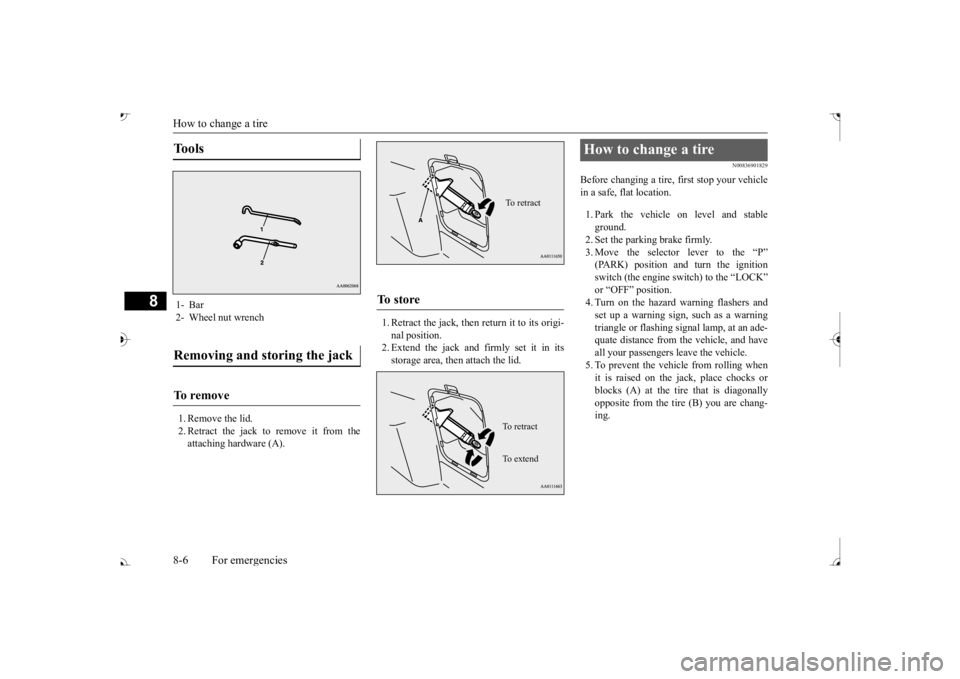
1. Remove the lid. 2. Retract the jack to remove it from theattaching hardware (A).
1. Retract the jack, then return it to its origi- nal position.2. Extend the jack and firmly set it in its storage area, then attach the lid.
N00836901829
Before changing a tire, first stop your vehiclein a safe, flat location. 1. Park the vehicle on level and stable ground.2. Set the parking brake firmly. 3. Move the selector
lever to the “P”
switch (the engine switch) to the “LOCK” or “OFF” position.4. Turn on the hazard warning flashers and set up a warning sign, such as a warning triangle or flashing signal lamp, at an ade-quate distance from the vehicle, and have all your passengers leave the vehicle. 5. To prevent the vehicle from rolling whenit is raised on the jack, place chocks or blocks (A) at the ti
re that is diagonally
opposite from the tire (B) you are chang-ing.
Tools 1- Bar 2- Wheel nut wrenchRemoving and storing the jack To r e m o v e
To s t o r e
To retractTo r e t r a c t To e x t e n d
How to change a tire
BK0239700US.book 6 ページ 2016年6月16日 木曜日 午前10時58分
Page 442 of 521
How to change a tire
For emergencies 8-7
8
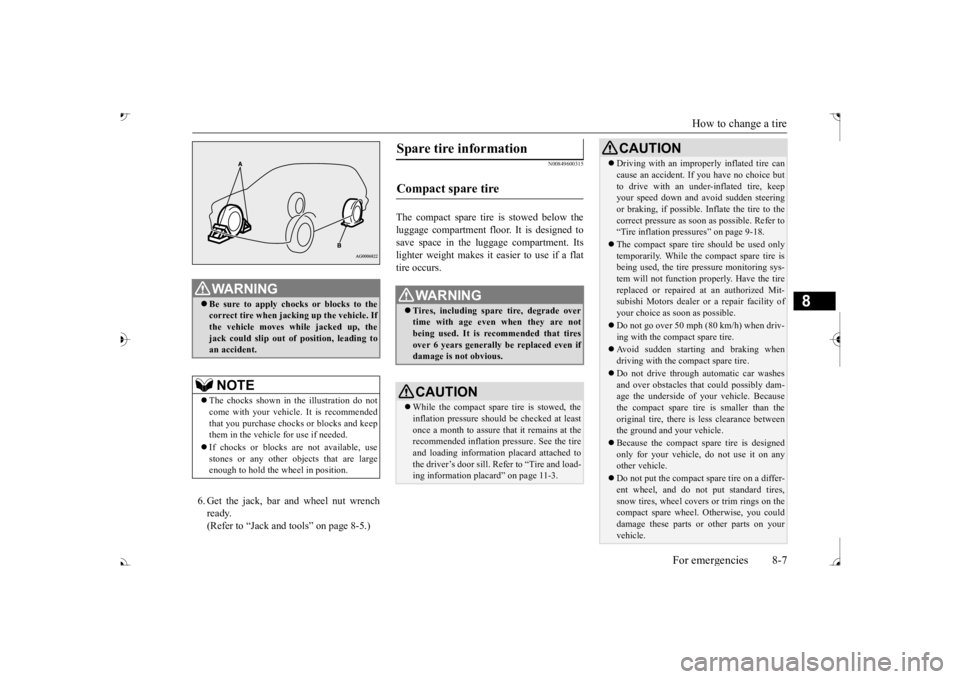
6. Get the jack, bar and wheel nut wrench ready.(Refer to “Jack and t
ools” on page 8-5.)
N00849600315
The compact spare tire is stowed below the luggage compartment fl
oor. It is designed to
save space in the luggage compartment. Itslighter weight makes it easier to use if a flat tire occurs.
WA R N I N G Be sure to apply choc
ks or blocks to the
correct tire when jacking up the vehicle. Ifthe vehicle moves while jacked up, the jack could slip out of
position, leading to
an accident.NOTE
The chocks shown in the illustration do not come with your vehicl
e. It is recommended
that you purchase chocks or blocks and keep them in the vehicle for use if needed. If chocks or blocks
are not available, use
stones or any other obj
ects that are large
enough to hold the wheel in position.
Spare tire information Compact spare tire
WA R N I N G Tires, including spar
e tire, degrade over
time with age even when they are not being used. It is recommended that tiresover 6 years generally
be replaced even if
damage is not obvious.CAUTION While the compact spare tire is stowed, the inflation pressure shoul
d be checked at least
once a month to assure that it remains at the recommended inflation pressure. See the tire and loading informati
on placard attached to
the driver’s door sill. Refer to “Tire and load-ing information placard” on page 11-3.
Driving with an imprope
rly inflated tire can
cause an accident. If
you have no choice but
to drive with an under-inflated tire, keepyour speed down and avoid sudden steering or braking, if possible. Inflate the tire to the correct pressure as s
oon as possible. Refer to
“Tire inflation pressures” on page 9-18. The compact spare tire should be used only temporarily. While the compact spare tire is being used, the tire pr
essure monitoring sys-
tem will not function pr
operly. Have the tire
replaced or repaired at an authorized Mit- subishi Motors dealer or
a repair facility of
your choice as soon as possible. Do not go over 50 mph (80 km/h) when driv- ing with the compact spare tire. Avoid sudden starting and braking when driving with the compact spare tire. Do not drive through automatic car washes and over obstacles that
could possibly dam-
age the underside of your vehicle. Because the compact spare tire is smaller than the original tire, there is less clearance betweenthe ground and your vehicle. Because the compact spare tire is designed only for your vehicle, do not use it on any other vehicle. Do not put the compact spare tire on a differ- ent wheel, and do not put standard tires, snow tires, wheel covers
or trim rings on the
compact spare wheel. Otherwise, you could damage these parts or other parts on your vehicle.CAUTION
BK0239700US.book 7 ページ 2016年6月16日 木曜日 午前10時58分
Page 443 of 521

How to change a tire 8-8 For emergencies
8
N00849701296
1. Open the liftgate and use the bar to remove the cover (A)
over the tire hanger
mounting bolt. 2. With the wheel nut wrench, loosen the tire hanger mounting bolt by turning it coun- terclockwise.
3. Lift up the section of the tire hanger (B) that is marked with the arrow in the illus-tration and remove it from the hook (C). Then lower it and remove the tire.
N00849801457
1. On vehicles with
wheel covers, first
remove the covers (re
fer to “Wheel cov-
ers” on page 8-13). Then, loosen thewheel nuts with the wheel nut wrench. Do not remove the wheel nuts yet. 2. Place the jack under one of the jacking points (A) shown in the illustration. Use the jacking point closest to the tire you wish to change.
Do not use tire chains with your compact spare tire. Using a ch
ain could cause damage
to your vehicle and loss of the chains.
To remove the spare tire
CAUTION
CAUTION While checking the tir
e hanger, carefully
loosen the tire hanger mounting bolt. Loos-ening it too much could pull out the hook and cause the compact spare tire to drop.
CAUTION When hooking or unhooking the tire hanger, be sure to hold the tire hanger firmly to pre-vent it from dropping on your foot.
To change a tire
BK0239700US.book 8 ページ 2016年6月16日 木曜日 午前10時58分
Page 444 of 521
How to change a tire
For emergencies 8-9
8
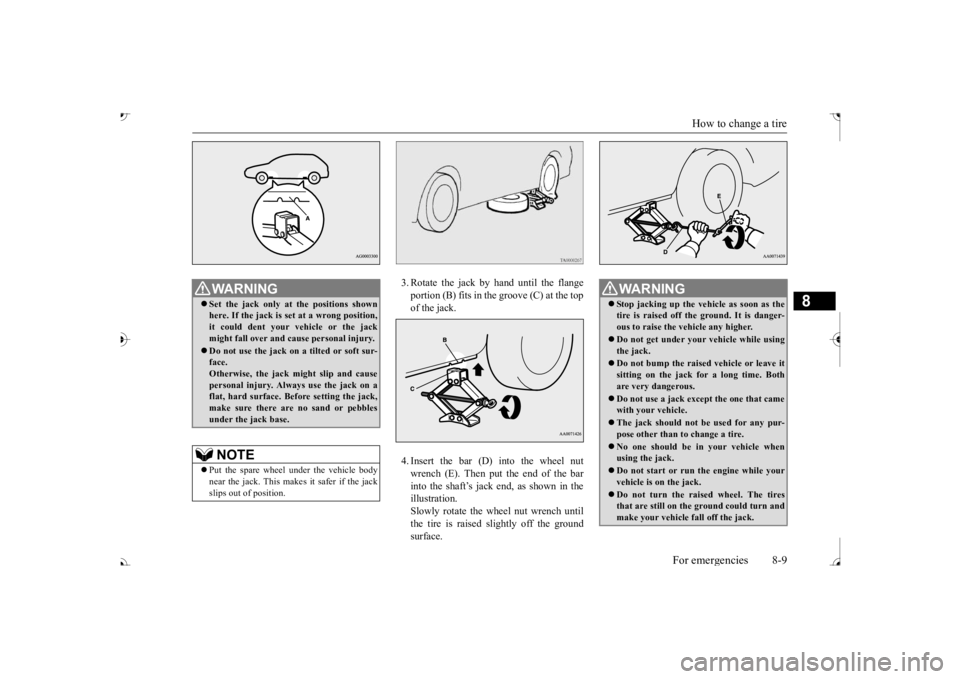
3. Rotate the jack by hand until the flange portion (B) fits in the groove (C) at the top of the jack. 4. Insert the bar (D) into the wheel nut wrench (E). Then put the end of the bar into the shaft’s jack end, as shown in the illustration.Slowly rotate the wheel nut wrench until the tire is raised slightly off the ground surface.
WA R N I N G Set the jack only at
the positions shown
here. If the jack is se
t at a wrong position,
it could dent your vehicle or the jack might fall over and ca
use personal injury.
Do not use the jack on a tilted or soft sur- face. Otherwise, the jack might slip and causepersonal injury. Always
use the jack on a
flat, hard surface. Before setting the jack, make sure there are no sand or pebblesunder the jack base.NOTE
Put the spare wheel under the vehicle body near the jack. This makes it safer if the jack slips out of position.
WA R N I N G Stop jacking up the ve
hicle as soon as the
tire is raised off the ground. It is danger-ous to raise the ve
hicle any higher.
Do not get under your vehicle while using the jack. Do not bump the raised
vehicle or leave it
sitting on the jack for a long time. Both are very dangerous. Do not use a jack except the one that came with your vehicle. The jack should not
be used for any pur-
pose other than to change a tire. No one should be
in your vehicle when
using the jack. Do not start or run
the engine while your
vehicle is on the jack. Do not turn the raised wheel. The tires that are still on the ground could turn and make your vehicle fall off the jack.
BK0239700US.book 9 ページ 2016年6月16日 木曜日 午前10時58分