2017 MITSUBISHI OUTLANDER III clock
[x] Cancel search: clockPage 429 of 521
System Settings 7-46 Comfort controls
7
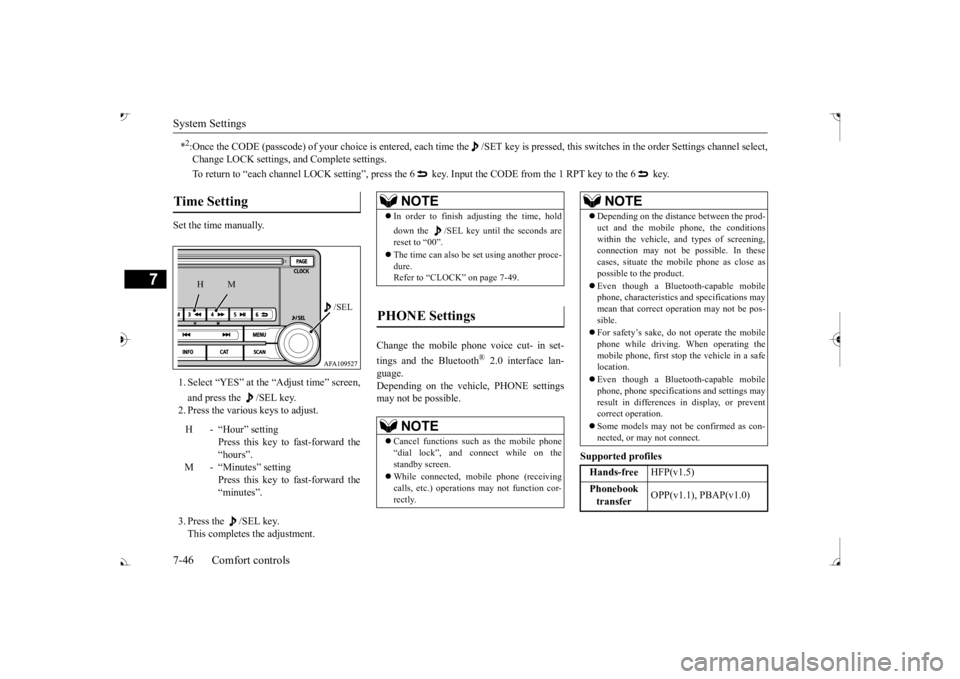
Set the time manually. 1. Select “YES” at the “Adjust time” screen, and press the /SEL key. 2. Press the various keys to adjust. 3. Press the /SEL key. This completes the adjustment.
Change the mobile phone voice cut- in set- tings and the Bluetooth
® 2.0 interface lan-
guage. Depending on the vehi
cle, PHONE settings
may not be possible.
Supported profiles
*2:Once the CODE (passcode) of your
choice is entered, each time th
e /SET key is pressed, this swit
ches in the order Settings chan
nel select,
Change LOCK settings, a
nd Complete settings.
To return to “each channel LOCK setting”, press the
6 key. Input the CODE from the 1 RPT key to the 6 key.
Time Setting
H - “Hour” setting
Press this key to fast-forward the “hours”.
M - “Minutes” setting
Press this key to fast-forward the “minutes”.
/SEL
M
H
NOTE
In order to finish adjusting the time, hold down the /SEL key until
the seconds are
reset to “00”. The time can also be
set using another proce-
dure. Refer to “CLOCK” on page 7-49.
PHONE Settings
NOTE
Cancel functions such as the mobile phone “dial lock”, and connect while on the standby screen. While connected, mobile phone (receiving calls, etc.) operations
may not function cor-
rectly.
Depending on the distance between the prod- uct and the mobile phone, the conditions within the vehicle, a
nd types of screening,
connection may not be
possible. In these
cases, situate the mobile phone as close as possible to the product. Even though a Bluet
ooth-capable mobile
phone, characteristics a
nd specifications may
mean that correct operation may not be pos-sible. For safety’s sake, do not operate the mobile phone while driving.
When operating the
mobile phone, first stop the vehicle in a safe location. Even though a Bluet
ooth-capable mobile
phone, phone specifications
and settings may
result in differences in display, or prevent correct operation. Some models may not
be confirmed as con-
nected, or may not connect.Hands-free
HFP(v1.5)
Phonebook transfer
OPP(v1.1), PBAP(v1.0)
NOTE
BK0239700US.book 46 ページ 2016年6月16日 木曜日 午前10時58分
Page 432 of 521
Clock (if so equipped)
Comfort controls 7-49
7
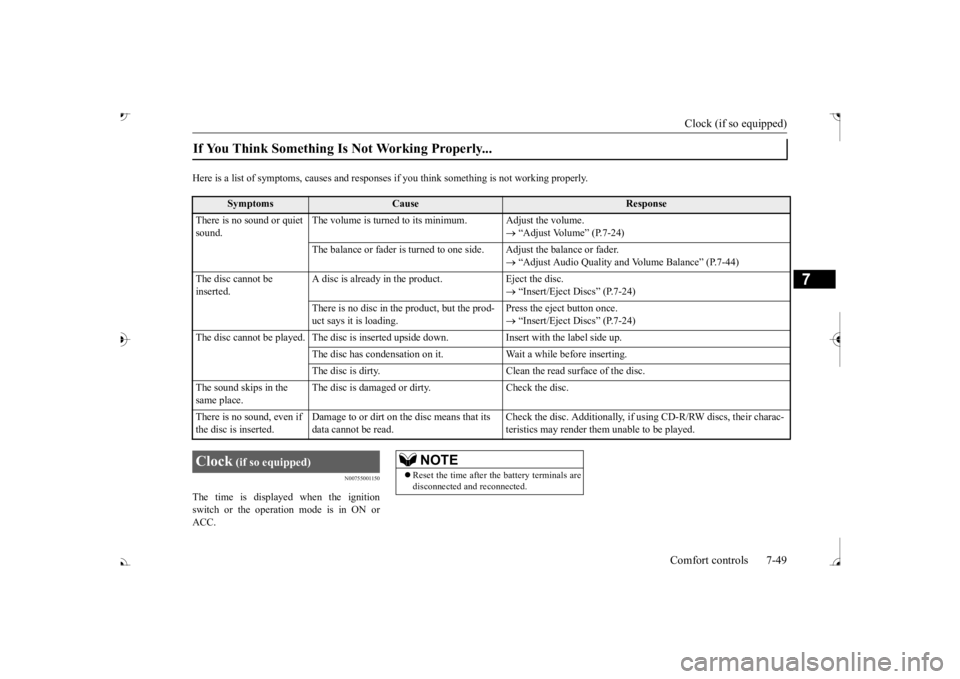
Here is a list of symptoms, causes and respons
es if you think something
is not working properly.
N00755001150
The time is displayed when the ignition switch or the operation mode is in ON or ACC.If You Think Something Is Not Working Properly...
Symptoms
Cause
Response
There is no sound or quiet sound.
The volume is turned to its minimum. Adjust the volume.
Page 433 of 521
General information about your radio 7-50 Comfort controls
7
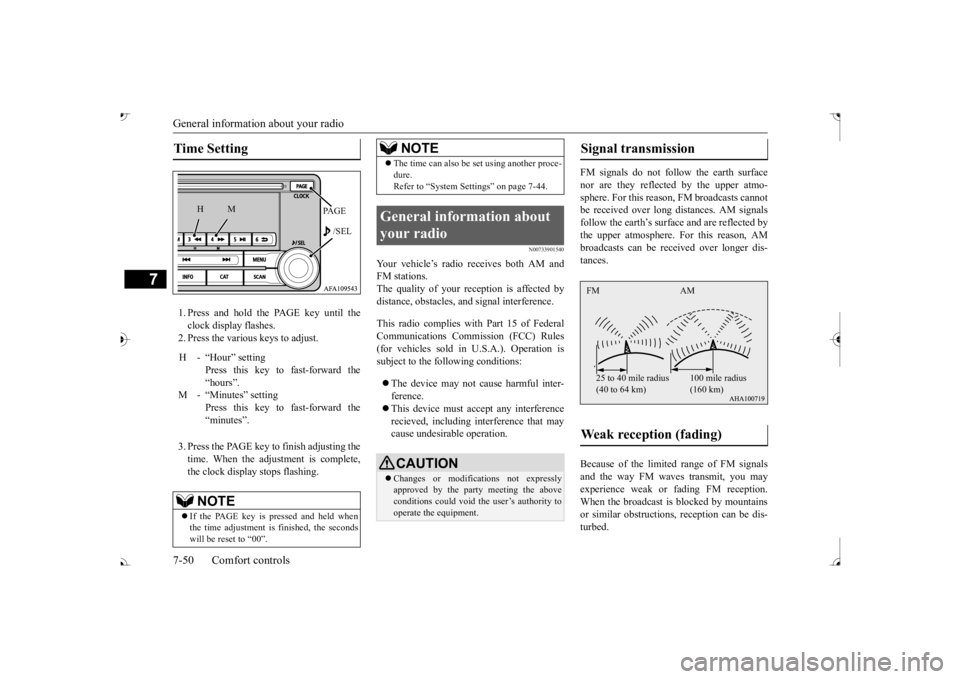
1. Press and hold the PAGE key until the clock display flashes. 2. Press the various keys to adjust. 3. Press the PAGE key to finish adjusting the time. When the adjustment is complete, the clock displa
y stops flashing.
N00733901540
Your vehicle’s radio receives both AM and FM stations. The quality of your reception is affected by distance, obstacles, a
nd signal interference.
This radio complies with
Part 15 of Federal
Communications Comm
ission (FCC) Rules
(for vehicles sold in U.S.A.). Operation is subject to the following conditions: The device may not cause harmful inter- ference. This device must ac
cept any interference
recieved, including interference that maycause undesirable operation.
FM signals do not foll
ow the earth surface
nor are they reflected by the upper atmo- sphere. For this reason,
FM broadcasts cannot
be received over long di
stances. AM signals
follow the earth’s surfa
ce and are reflected by
the upper atmosphere. For this reason, AM broadcasts can be rece
ived over longer dis-
tances. Because of the limite
d range of FM signals
and the way FM waves transmit, you may experience weak or fading FM reception.When the broadcast is blocked by mountains or similar obstructions,
reception ca
n be dis-
turbed.
Time Setting
H - “Hour” setting
Press this key to fast-forward the “hours”.
M - “Minutes” setting
Press this key to fast-forward the “minutes”.NOTE
If the PAGE key is pressed and held when the time adjustment is
finished, the seconds
will be reset to “00”.
PAGE /SEL
M
H
The time can also be
set using another proce-
dure.Refer to “System Se
ttings” on page 7-44.
General information about your radio
CAUTION Changes or modifica
tions not expressly
approved by the party meeting the aboveconditions could void th
e user’s authority to
operate the equipment.NOTE
Signal transmission Weak reception (fading) FM AM 25 to 40 mile radius (40 to 64 km)
100 mile radius (160 km)
BK0239700US.book 50 ページ 2016年6月16日 木曜日 午前10時58分
Page 440 of 521
Jack and tools
For emergencies 8-5
8
6. When you do not see any more steam or spray, open the hood. Look for obviousleaks, such as a split radiator hose. Be careful as components will be hot. Any leak source must be repaired.7. If there is no obvious leak source, check the coolant level in the engine coolant reserve tank. If there is
none, or if it is too
low, slowly add coolant. 8. If the engine coolant reserve tank needs coolant, you will probably also need toadd coolant to the radiator. Do not loosen or remove the radiator cap until the engine has cooled down.
9. Start the engine, a
nd slowly add coolant,
up to the bottom of the filler neck. Use plain water if you have to (and replace itwith the right coolant as soon as possible).
10. Replace the radiator cap and tighten it
fully. Check the engine coolant tempera-ture display on the mu
lti information dis-
play (Color liquid crystal display type) or the high coolant temperature warninglight (Mono-color liqui
d crystal display
type). You can start driving again when the high coolant temperature warningdoes not come on.
11. Have the system inspected by your autho-
rized Mitsubishi Motors
dealer or a repair
facility of your choice.
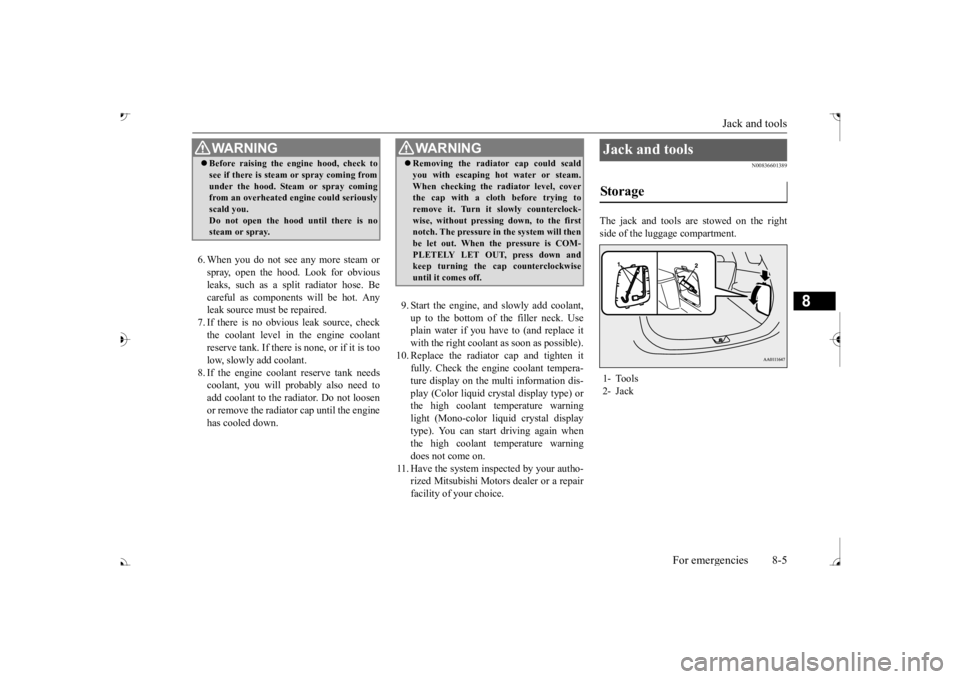
N00836601389
The jack and tools are stowed on the right side of the luggage compartment.
WA R N I N G Before raising the en
gine hood, check to
see if there is steam or spray coming fromunder the hood. Steam or spray comingfrom an overheated en
gine could seriously
scald you. Do not open the hood until there is nosteam or spray.
WA R N I N G Removing the radiat
or cap could scald
you with escaping hot water or steam.When checking the radiator level, coverthe cap with a cloth before trying to remove it. Turn it slowly counterclock- wise, without pressing down, to the firstnotch. The pressure in the system will then be let out. When the pressure is COM- PLETELY LET OUT, press down andkeep turning the cap counterclockwise until it comes off.
Jack and tools Storage 1- Tools 2- Jack
BK0239700US.book 5 ページ 2016年6月16日 木曜日 午前10時58分
Page 443 of 521

How to change a tire 8-8 For emergencies
8
N00849701296
1. Open the liftgate and use the bar to remove the cover (A)
over the tire hanger
mounting bolt. 2. With the wheel nut wrench, loosen the tire hanger mounting bolt by turning it coun- terclockwise.
3. Lift up the section of the tire hanger (B) that is marked with the arrow in the illus-tration and remove it from the hook (C). Then lower it and remove the tire.
N00849801457
1. On vehicles with
wheel covers, first
remove the covers (re
fer to “Wheel cov-
ers” on page 8-13). Then, loosen thewheel nuts with the wheel nut wrench. Do not remove the wheel nuts yet. 2. Place the jack under one of the jacking points (A) shown in the illustration. Use the jacking point closest to the tire you wish to change.
Do not use tire chains with your compact spare tire. Using a ch
ain could cause damage
to your vehicle and loss of the chains.
To remove the spare tire
CAUTION
CAUTION While checking the tir
e hanger, carefully
loosen the tire hanger mounting bolt. Loos-ening it too much could pull out the hook and cause the compact spare tire to drop.
CAUTION When hooking or unhooking the tire hanger, be sure to hold the tire hanger firmly to pre-vent it from dropping on your foot.
To change a tire
BK0239700US.book 8 ページ 2016年6月16日 木曜日 午前10時58分
Page 445 of 521
How to change a tire 8-10 For emergencies
8
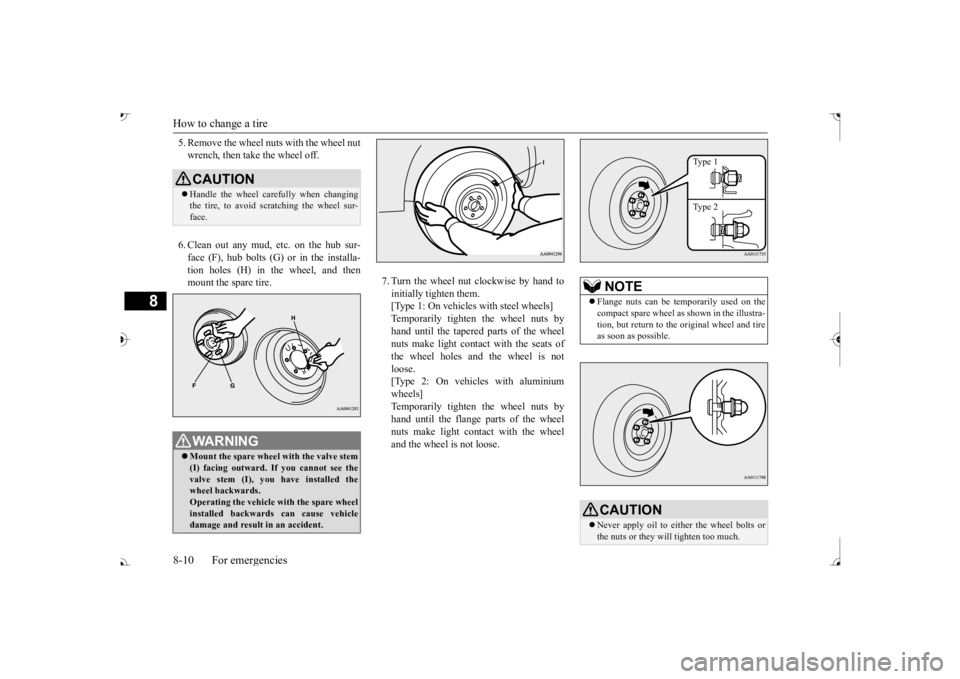
5. Remove the wheel nuts with the wheel nut wrench, then take the wheel off. 6. Clean out any mud, etc. on the hub sur- face (F), hub bolts (G)
or in the installa-
tion holes (H) in the wheel, and then mount the spare tire.
7. Turn the wheel nut clockwise by hand to initially tighten them. [Type 1: On vehicles
with steel wheels]
Temporarily tighten the wheel nuts by hand until the tapered parts of the wheel nuts make light contac
t with the seats of
the wheel holes and the wheel is not loose. [Type 2: On vehicles with aluminiumwheels] Temporarily tighten the wheel nuts by hand until the flange parts of the wheelnuts make light cont
act with the wheel
and the wheel is not loose.
CAUTION Handle the wheel carefully when changing the tire, to avoid scratching the wheel sur- face.WA R N I N G Mount the spare wheel with the valve stem (I) facing outward. If
you cannot see the
valve stem (I), you
have installed the
wheel backwards.Operating the vehicle with the spare wheel installed backwards can cause vehicle damage and result
in an ac
cident.
NOTE
Flange nuts can be te
mporarily used on the
compact spare wheel as shown in the illustra- tion, but return to the original wheel and tire as soon as possible.CAUTION Never apply oil to either the wheel bolts or the nuts or they will tighten too much.
Type 1 Type 2
BK0239700US.book 10 ページ 2016年6月16日 木曜日 午前10時58分
Page 446 of 521
How to change a tire
For emergencies 8-11
8
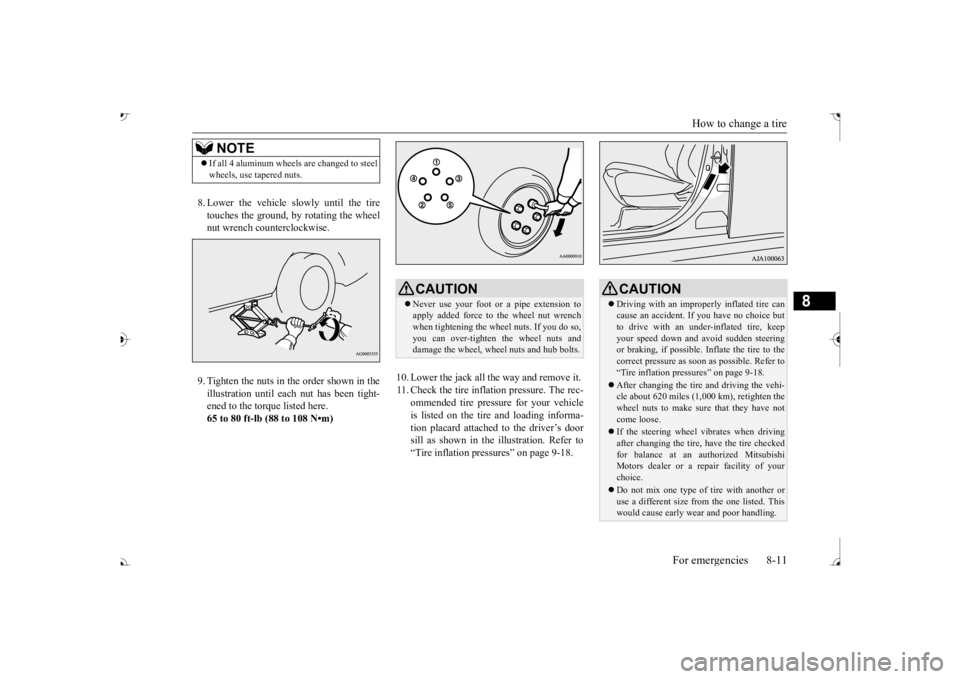
8. Lower the vehicle slowly until the tire touches the ground, by rotating the wheel nut wrench counterclockwise. 9. Tighten the nuts in the order shown in the illustration until each
nut has been tight-
ened to the torque listed here.65 to 80 ft-lb (88 to 108 N•m)
10. Lower the jack all the way and remove it. 11. Check the tire inflation pressure. The rec-
ommended tire pressure for your vehicleis listed on the tire
and loading informa-
tion placard attached to the driver’s door sill as shown in the illustration. Refer to“Tire inflation pressures” on page 9-18.
NOTE
If all 4 aluminum wheels are changed to steel wheels, use tapered nuts.
CAUTION Never use your foot or a pipe extension to apply added force to the wheel nut wrenchwhen tightening the wheel nuts. If you do so, you can over-tighten the wheel nuts and damage the wheel, wheel nuts and hub bolts.
CAUTION Driving with an imprope
rly inflated tire can
cause an accident. If
you have no choice but
to drive with an under-inflated tire, keep your speed down and avoid sudden steering or braking, if possible. Inflate the tire to thecorrect pressure as s
oon as possible. Refer to
“Tire inflation pressures” on page 9-18. After changing the tire
and driving the vehi-
cle about 620 miles (1,000 km), retighten the wheel nuts to make sure
that they have not
come loose. If the steering wheel vibrates when driving after changing the tire, have the tire checked for balance at an authorized Mitsubishi Motors dealer or a repair facility of yourchoice. Do not mix one type of tire with another or use a different size from the one listed. This would cause ea
rly wear and poor handling.
BK0239700US.book 11 ページ 2016年6月16日 木曜日 午前10時58分
Page 447 of 521
How to change a tire 8-12 For emergencies
8
N00832300020
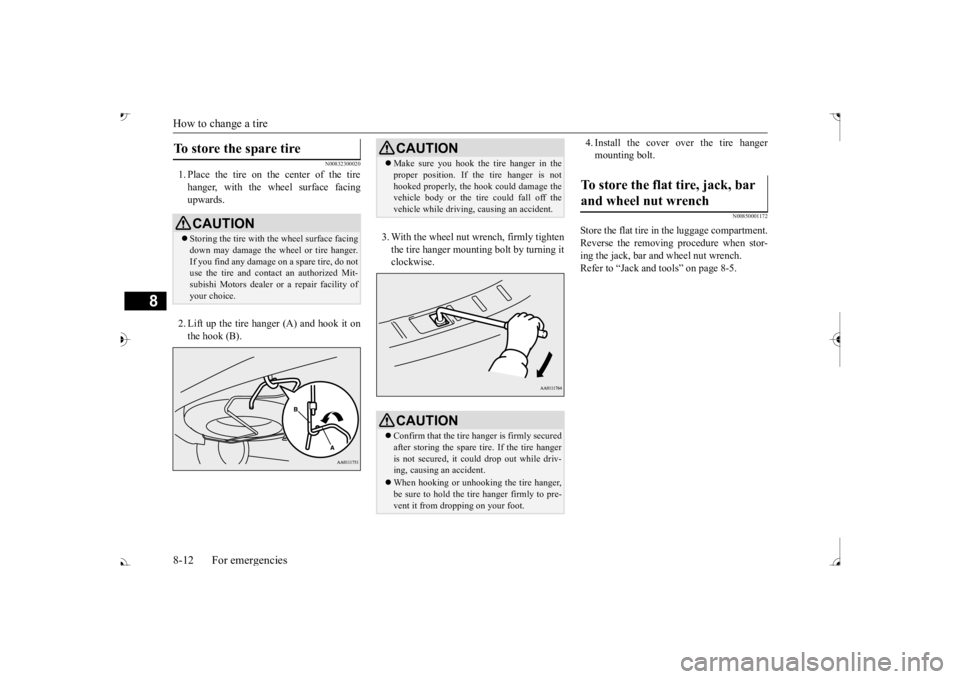
1. Place the tire on the center of the tire hanger, with the wheel surface facing upwards. 2. Lift up the tire hanger (A) and hook it on the hook (B).
3. With the wheel nut wrench, firmly tighten the tire hanger mounti
ng bolt by turning it
clockwise.
4. Install the cover over the tire hanger mounting bolt.
N00850001172
Store the flat tire in the luggage compartment.Reverse the removing procedure when stor- ing the jack, bar and wheel nut wrench. Refer to “Jack and t
ools” on page 8-5.
To store the spare tire
CAUTIONStoring the tire with the wheel surface facing down may damage the wheel or tire hanger. If you find any damage
on a spare tire, do not
use the tire and contact an authorized Mit- subishi Motors dealer or a repair facility of your choice.
CAUTION Make sure you hook the tire hanger in the proper position. If the tire hanger is nothooked properly, the hook
could damage the
vehicle body or the tire
could fall off the
vehicle while driving,
causing an accident.
CAUTIONConfirm that the tire hanger is firmly secured after storing the spare
tire. If the tire hanger
is not secured, it c
ould drop out while driv-
ing, causing
an accident.
When hooking or unhooking the tire hanger, be sure to hold the tire hanger firmly to pre-vent it from dropping on your foot.
To store the flat tire, jack, bar and wheel nut wrench
BK0239700US.book 12 ページ 2016年6月16日 木曜日 午前10時58分