2017 MITSUBISHI iMiEV stop start
[x] Cancel search: stop startPage 221 of 296

AM/FM electronically tuned radio with CD player (if so equipped)
Comfort controls 7-19
7
N00771900017
Press the SCAN button.
“SCAN” will appear
on the display and the CD player will playback the first 10 second
s of each track on the
selected disc (music
CDs only) or the cur-
rently selected folder (MP3 CDs only).The track number will blink while the scan mode is selected. To stop the scan mode, press the SCAN button again.
N00752100166
This audio system can
display CD text and
MP3 titles including ID3 tag information. The audio system can di
splay disc and track
titles for discs with converted disc and track title information. Press the DISP button repeatedly to make selections in the following sequence: disc name
track name
normal
display mode. The audio system can display folder and track titles for discs wi
th converted folder and track
information. Press the DISP button repeat- edly to make selections in the followingsequence: folder name
track name
nor-
mal display mode.
The audio system can
display ID3 tag infor-
mation for files that ha
ve been recorded with
ID3 tag information. 1. Press the DISP button for 2 seconds or longer to switch to the ID3 tag informa- tion. “TAG” will appear on the display.2. Press the DISP button repeatedly to make selections in th
e following sequence:
album name
track name
artist name
normal display mode.
NOTE
With a disc that contains both CD-DA and MP3 files, the random
mode causes only
files of the same format (CD-DA only orMP3 files only) to be repeated.
To find the start of each track on a disc for playback
NOTE
Once all tracks on the
disc (music CDs only)
or the currently selected folder (MP3 CDs only) have been scanne
d, playback of the
disc will restart from
the beginning of the
track that was play
ing when scanning
started. With a disc that contains both CD-DA and MP3 files, the scan m
ode causes only files of
the same format (CD-DA only or MP3 filesonly) to be played.
CD text and MP3 title display
CD text
NOTE
The display can show up to 11 characters. If a disc name or track
name has more than 11
characters, press the PAGE button to viewthe next 11 characters. When there is no title information to be dis- played, the display shows “NO TITLE”. Characters that the a
udio system cannot dis-
play are shown as “ ”.
ID3 tag information
NOTE
To return from ID3 tag information to the folder name, press the DISP button again for2 seconds or longer. When there is no title information to be dis- played, the display
shows “NO TITLE”.
a folder name, track name
, or item of ID3 tag
information has more than 11 characters, press the PAGE button to view the next 11characters. Folder names, trac
k names and ID3 tag
information can each be displayed up to a length of 32 characters. Characters that the a
udio system cannot dis-
play are shown as “ ”.
BK0220401US.book 19 ページ 2015年6月3日 水曜日 午前7時42分
Page 228 of 296
Handling of compact discs 7-26 Comfort controls
7
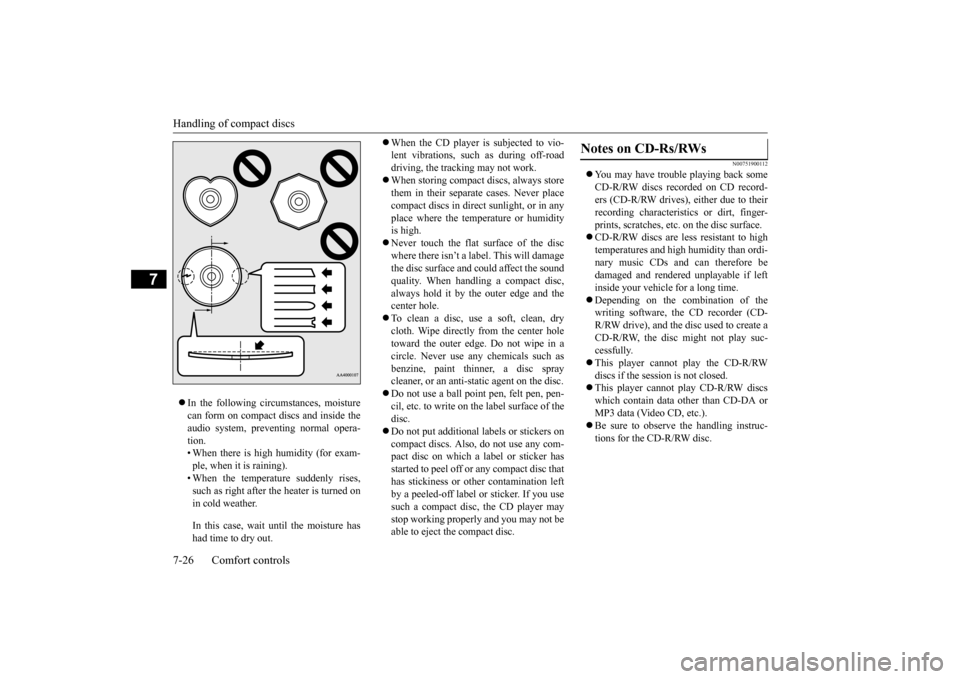
In the following circumstances, moisture can form on compact discs and inside theaudio system, preventing normal opera- tion. • When there is high humidity (for exam-ple, when it is raining). • When the temperature suddenly rises, such as right after the heater is turned onin cold weather. In this case, wait until the moisture has had time to dry out.
When the CD player is subjected to vio- lent vibrations, such as during off-roaddriving, the tracking may not work. When storing compact discs, always store them in their separate
cases. Never place
compact discs in direct sunlight, or in any place where the temperature or humidity is high. Never touch the flat surface of the disc where there isn’t a label. This will damage the disc surface and could affect the sound quality. When handli
ng a compact disc,
always hold it by the outer edge and thecenter hole. To clean a disc, use a soft, clean, dry cloth. Wipe directly
from the center hole
toward the outer edge. Do not wipe in a circle. Never use any chemicals such as benzine, paint thi
nner, a disc spray
cleaner, or an anti-static agent on the disc. Do not use a ball point
pen, felt pen, pen-
cil, etc. to write on the label surface of thedisc. Do not put additional la
bels or stickers on
compact discs. Also, do not use any com-pact disc on which a label or sticker has started to peel off or any compact disc that has stickiness or ot
her contamination left
by a peeled-off label or sticker. If you use such a compact disc, the CD player may stop working properly and you may not beable to eject the compact disc.
N00751900112
You may have trouble playing back some CD-R/RW discs recorded on CD record- ers (CD-R/RW drives), either due to theirrecording characteristics or dirt, finger- prints, scratches, etc.
on the disc surface.
CD-R/RW discs are less resistant to high temperatures and high humidity than ordi- nary music CDs and can therefore be damaged and rendered unplayable if left inside your vehicle for a long time. Depending on the combination of the writing software, the CD recorder (CD- R/RW drive), and the disc used to create a CD-R/RW, the disc might not play suc-cessfully. This player cannot play the CD-R/RW discs if the sessi
on is not closed.
This player cannot play CD-R/RW discs which contain data other than CD-DA or MP3 data (Video CD, etc.). Be sure to observe the handling instruc- tions for the CD-R/RW disc.
Notes on CD-Rs/RWs
BK0220401US.book 26 ページ 2015年6月3日 水曜日 午前7時42分
Page 230 of 296
General information about your radio 7-28 Comfort controls
7
4. When the time is set, press the clock but- ton to stop the clock display from flash-ing.
N00733900439
Your vehicle’s radio receives both AM andFM stations. The quality of your reception is affected by distance, obstacles, an
d signal interference.
This radio complies with Part 15 of Federal Communications Commission (FCC) Rules (for vehicles sold in U.S.A.). Operation is subject to the following conditions: The device may not cause harmful inter- ference. This device must ac
cept any interference
recieved, including interference that maycause undesirable operation.
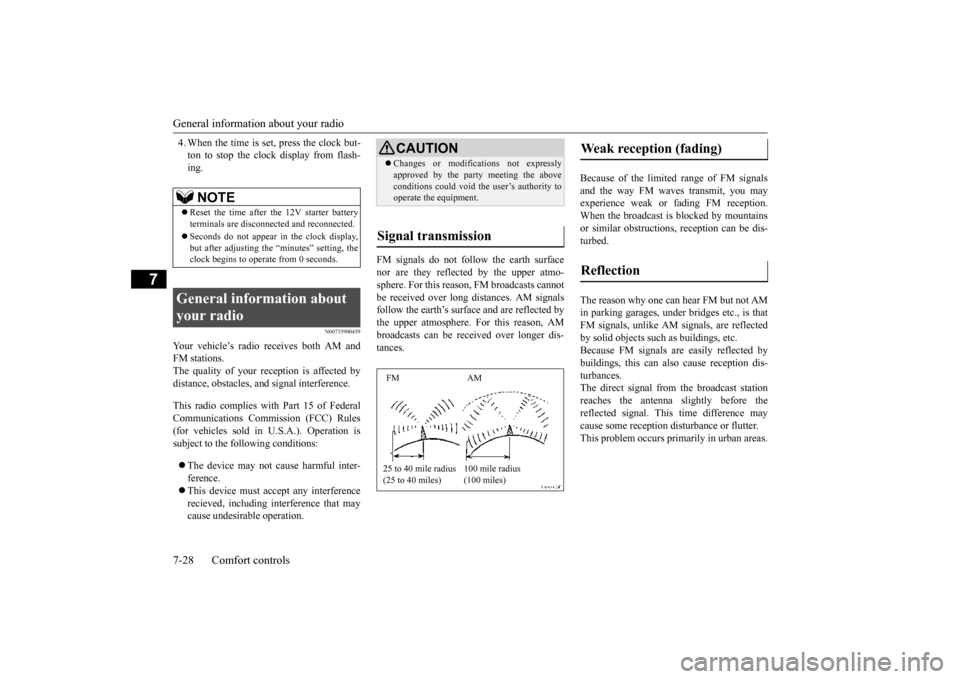
FM signals do not follow the earth surface nor are they reflected by the upper atmo-sphere. For this reason,
FM broadcasts cannot
be received over long distances. AM signals follow the earth’s surface and are reflected bythe upper atmosphere. For this reason, AM broadcasts can be received over longer dis- tances.
Because of the limite
d range of FM signals
and the way FM waves transmit, you may experience weak or fading FM reception.When the broadcast is blocked by mountains or similar obstructions,
reception ca
n be dis-
turbed. The reason why one can hear FM but not AM in parking garages, unde
r bridges etc., is that
FM signals, unlike AM
signals, are reflected
by solid objects such
as buildings, etc.
Because FM signals are easily reflected by buildings, this can also
cause reception dis-
turbances.The direct signal from
the broadcast station
reaches the antenna slightly before the reflected signal. This
time difference may
cause some reception di
sturbance or flutter.
This problem occurs primarily in urban areas.
NOTE
Reset the time after the 12V starter battery terminals are disconnect
ed and reconnected.
Seconds do not appear
in the clock display,
but after adjusting the
“minutes” setting, the
clock begins to opera
te from 0 seconds.
General information about your radio
CAUTION Changes or modifica
tions not expressly
approved by the party meeting the aboveconditions could void th
e user’s authority to
operate the equipment.
Signal transmission FM AM 25 to 40 mile radius (25 to 40 miles)
100 mile radius (100 miles)
Weak reception (fading) Reflection
BK0220401US.book 28 ページ 2015年6月3日 水曜日 午前7時42分
Page 234 of 296
If the vehicle breaks down 8-2 For emergencies
8
N00836301243
If your vehicle breaks down on the road, move to the shoulder and turn on the hazard warning flashers. If there is no shoulder, orthe shoulder is not safe, drive in the right lane slowly, with the hazard lights flashing, until you come to a safe stopping place. Keep theflashers flashing. If the ready indicator light goes out while driving, the brakes a
nd steering will continue
to work, but without power assist, so more effort will be required
for braking and steer-
ing. Stop the vehicle on the shoulder of the road and turn on the hazard warning flashers. If you need to push your vehicle, turn theelectric motor switch to the “ON” position, and place the selector lever in the “N” (NEU- TRAL) position.
N00836400742
If the electric motor unit cannot be energizedbecause the 12V starter battery is weak ordead, you can start it with the battery from another vehicle using jumper cables.
1. Take off any metal jewelry such as watch bands or bracelets
that might make an
accidental electrical contact. 2. Position the vehi
cles close enough
together so that the jumper cables can reach, but be sure the vehicles are nottouching each other.
3. Set the parking brake firmly on your vehi- cle and move the selector lever into the “P” (PARK) position. 4. Set the parking brake firmly on the othervehicle. Put the automatic transaxle in “P”5. Turn the ignition switch (the electric motor switch) on each vehicle to the “LOCK” position. 6. Remove the battery
cover, and then make
sure your 12V starter
battery electrolyte is
at the proper level. (Refer to “Checking 12V starter battery electrolyte level” onpage 9-8.)
If the vehicle breaks down Jump-starting
WA R N I N G To reduce the risk of igniting flammable gas that may be em
itted from the 12V
starter battery, carefully read this sectionbefore jump-starting the vehicle. Do not try to start the electric motor unit by pushing or towing the vehicle. This can cause an accident re
sulting in serious
injury or death and
can damage the vehi-
cle.CAUTION Do not attempt jump st
arting the 12V starter
battery while the main
drive lithium-ion bat-
tery is being charged. Doing so could dam-age the vehicle or charging equipment.NOTE
Do not use jumper cables if they have dam- age or corrosion.
CAUTION Check the other vehicle.
It must have a 12V
battery. If the other system is not 12V, bothsystems can be damaged.NOTE
Turn off all lights, heat
er, and othe
r electrical
loads. This will
help avoid sparks.
BK0220401US.book 2 ページ 2015年6月3日 水曜日 午前7時42分
Page 235 of 296
Jump-starting
For emergencies 8-3
8
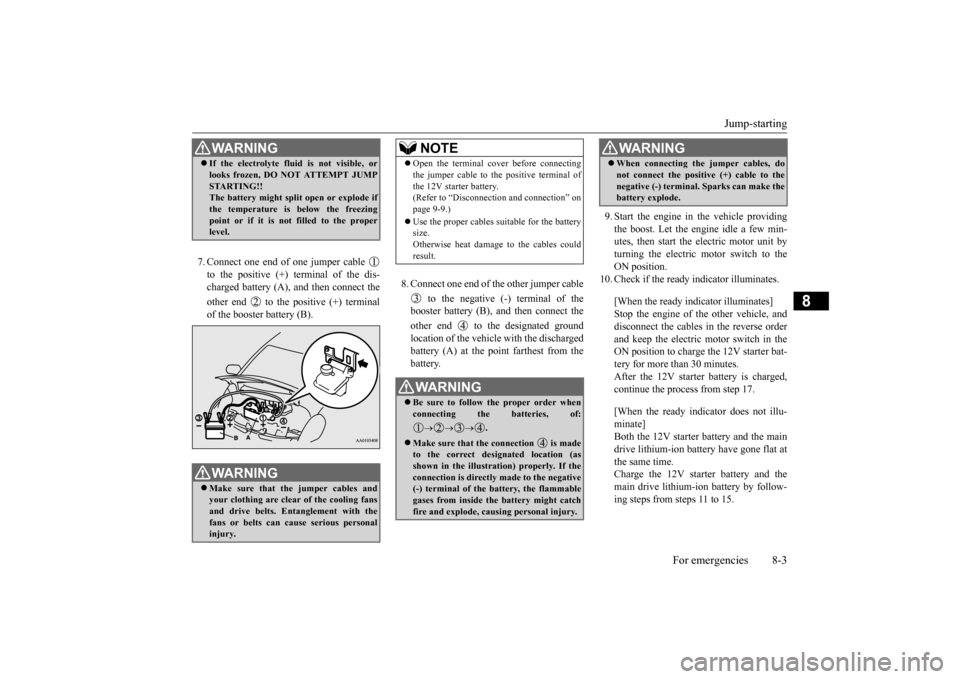
7. Connect one end of one jumper cable to the positive (+) terminal of the dis- charged battery (A),
and then connect the
other end to the positive (+) terminal of the booster battery (B).
8. Connect one end of the other jumper cable
to the negative (-) terminal of the booster battery (B), and then connect the other end to the designated ground location of the vehicle with the discharged battery (A) at the point farthest from the battery.
9. Start the engine in the vehicle providing the boost. Let the engine idle a few min- utes, then start the electric motor unit byturning the electric motor switch to the ON position.
10. Check if the ready
indicator illuminates.
[When the ready indicator illuminates] Stop the engine of the other vehicle, and disconnect the cables in the reverse order and keep the electric motor switch in theON position to charge the 12V starter bat- tery for more than 30 minutes. After the 12V starter battery is charged,continue the process from step 17. [When the ready indicator does not illu- minate] Both the 12V starter battery and the maindrive lithium-ion battery
have gone flat at
the same time. Charge the 12V starter battery and themain drive lithium-i
on battery by follow-
ing steps from steps 11 to 15.
WA R N I N G If the electrolyte flui
d is not visible, or
looks frozen, DO NOT ATTEMPT JUMPSTARTING!! The battery might split open or explode if the temperature is below the freezing point or if it is not filled to the properlevel. WA R N I N G Make sure that the jumper cables and your clothing are clear of the cooling fansand drive belts. Entanglement with the fans or belts can cause serious personal injury.
NOTE
Open the terminal cover before connecting the jumper cable to the positive terminal ofthe 12V starter battery. (Refer to “Disconnect
ion and connection” on
page 9-9.) Use the proper cables suitable for the battery size. Otherwise heat damage
to the cables could
result.WA R N I N G Be sure to follow the proper order when connecting the batteries, of:
.
Make sure that the connection is made to the correct designated location (as shown in the illustration) properly. If theconnection is directly made to the negative (-) terminal of the battery, the flammable gases from inside the battery might catchfire and explode, caus
ing personal injury.
When connecting the jumper cables, do not connect the positive (+) cable to thenegative (-) terminal. Sparks can make thebattery explode.WA R N I N G
BK0220401US.book 3 ページ 2015年6月3日 水曜日 午前7時42分
Page 236 of 296
Jump-starting 8-4 For emergencies
8
11. Keep the jumper cables to each vehicle
connected and turn
the electric motor
switch of your vehicle to the “LOCK”
12. Charge the main drive lithium-ion battery
by regular charging. The 12V starter bat-tery will automatically charge while the main drive lithium-ion battery is charging. (Refer to “Regular charging” on page3-16.)
13. When the charging indicator on the instru-
ment cluster is ill
uminated, stop the
engine of the other
vehicle and disconnect
the jumper cables in the reverse order.
14. Charge the main dr
ive lithium-ion battery
for more than 1 hour.
15. Disconnect the charging cable.
(Refer to “Regular charging” on page 3-16.)
16. Turn the electric motor switch to the
“START” position, make sure that the ready indicator on the instrument cluster is illuminated.If the ready indicator
does not illuminate,
perform the procedure again starting from step 5. If charging
cannot be performed,
consult a certified i-MiEV dealer.
17. Refit the battery cover. (“Checking 12V
starter battery electr
olyte level” on page
9-8.)
NOTE
The jumper cables need to be connected to the 12V starter battery when you start charg-ing the main drive lithium-ion battery because the on board char
ger etc. operate uti-
lizing power from the
12V starter battery.
NOTE
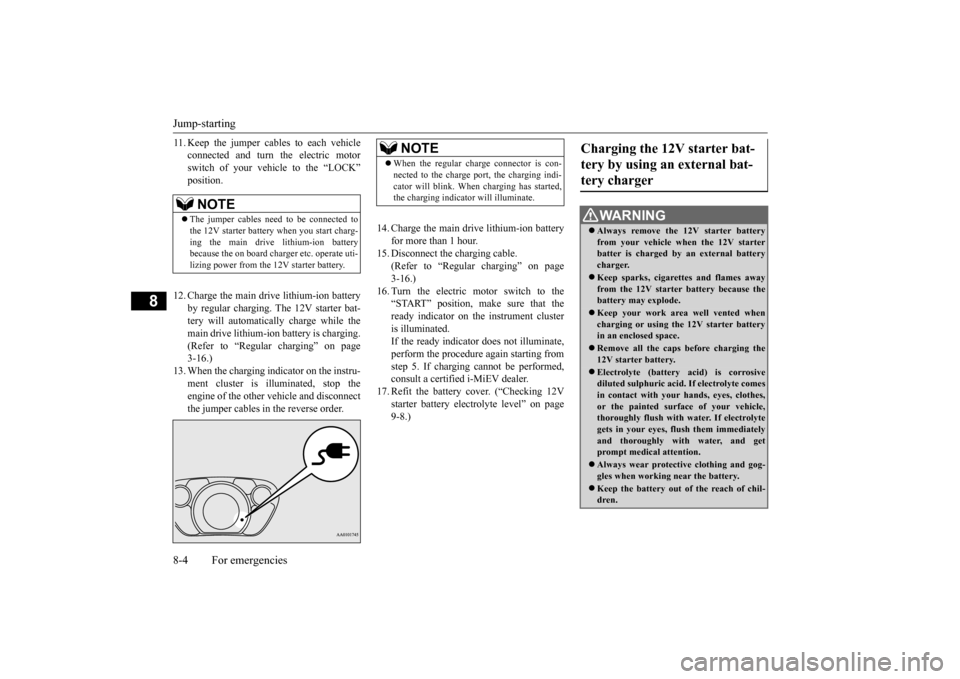
When the regular charge connector is con- nected to the charge port, the charging indi-cator will blink. When charging has started,the charging indicator will illuminate.
Charging the 12V starter bat- tery by using an external bat-tery charger
WA R N I N G Always remove the
12V starter battery
from your vehicle wh
en the 12V starter
batter is charged by an external battery charger. Keep sparks, cigare
ttes and flames away
from the 12V starter battery because thebattery may explode. Keep your work area well vented when charging or using the 12V starter battery in an enclosed space. Remove all the caps before charging the 12V starter battery. Electrolyte (battery acid) is corrosive diluted sulphuric acid.
If electrolyte comes
in contact with your hands, eyes, clothes,or the painted surf
ace of your vehicle,
thoroughly flush with water. If electrolyte gets in your eyes, flush them immediatelyand thoroughly with
water, and get
prompt medical attention. Always wear protective clothing and gog- gles when working near the battery. Keep the battery out of the reach of chil- dren.
BK0220401US.book 4 ページ 2015年6月3日 水曜日 午前7時42分
Page 237 of 296

Tire repair kit
For emergencies 8-5
8
If you drive your vehicle with a low battery charge, after the electric motor unit has beenstarted by using jumper
cables, it can cause
the anti-lock braking sy
stem warning light to
illuminate. This is only due to the low batteryvoltage. It is not a problem with the brake system. If this happens, fully charge the 12V starter battery and ensure the charging system is operating properly.
N00836600366
This vehicle is equipped
with a tire repair kit
which can be used to repair a minor puncture in tread area caused by
a nail, screw or simi-
lar object. A spare tire
is not provided with
this vehicle.
N00837701026
The tire repair kit is
stowed under the rear
seat cushion.
N00837800033
1. Pull forward the seat stoppers (A) underthe rear seat cushion (B). 2. Lift up the seat
cushion and pull it for-
ward to remove it. 3. Remove the screws (C) with a coin or the washer (D) at a position shown in the illustration, and re
move the cover (E).
As your vehicle has anti-lock brakes Tire repair kit
WA R N I N G The tire repair kit may not permanently seal a punctured tire. Using the tire repair
kit may damage the
wheel and/or the tire inflation pressuresensor for the tire. The vehicle must promptly be inspected and repaired by a certified i-MiEV dealer after using the tirerepair kit.
Use only the Mitsubishi genuine tire repair kit. Sealant in other repair kits maynot sufficiently seal the tire puncture.
Tire repair kit storage 1- Tire compressorWA R N I N G
2- Tire repair set: Items #3-#8 shown
above
3- Tire sealant bottle4- Filler hose 5- Valve insert (spare)7- Speed restriction sticker 8- Instruction manual for tire repairTo remove
BK0220401US.book 5 ページ 2015年6月3日 水曜日 午前7時42分
Page 245 of 296
Operation under adverse driving conditions
For emergencies 8-13
8
N00837200747
If your vehicle becomes stuck in snow, sand, or mud, it can often be moved by a rocking motion. Rock your vehicle back and forth tofree it. Do not spin the wheels. Constant efforts to free a stuck vehicle can cause transmissionfailure. If your vehicle is still
stuck after several rock-
ing attempts, call for a commercial tow truckservice.
When driving on a road covered with snow or ice, use snow tires. Tire chains cannot be used on your vehicle. Theremay be state or local regulations about using snow tires. Always check the regu- lations in your local area before usingthem. Refer to the section entitled “Snow tires” on page 9-15 and “Tire chains” on page 9-16. Drive slowly. Do not make sudden starts or stops, sharp turns, or slam on the brakes. Allow extra distance between your vehi- cle and the vehicle in front of you, and avoid sudden braking. If a skid occurs when the accelerator pedal is depressed, take your foot off the pedal. Steer gently in the direction of theskid. Your vehicle is equippe
d with an anti-lock
braking system (ABS), hold the brakepedal down firmly and
keep it depressed.
Do not pump the brake pedal which will result in reduced braking performance.
CAUTION If the transmission or the steering system has a problem or damage,
transport the vehicle
on a flatbed truck or to
w the vehicle with the
all wheels off the ground. If the electric motor switch is in the “ON”
lting in an accident.
Make sure the electric motor switch is in the“ACC” position before towing.
Operation under adverse driving conditions If your vehicle becomes stuck in sand, mud or snow
WA R N I N G When trying to rock
your vehicle out of a
stuck position, make sure that there are nopeople nearby. The
rocking motion can
make your vehicle suddenly lurch forward or backward, and inju
re any bystanders.
On wet roads
CAUTIONDo not drive on a flooded road. If you drive on a flooded road, not only the electric motorunit stops but also a fail
ure like electric leak-
age or short circuit may occur. If you inevitably had to run on a floodedroad and the vehicle was exposed to water, be sure to have your vehicle inspected by a certified i-MiEV dealer. When driving in rain, on water-covered roads, or through a car wash, water could getinto the brake discs and make them fail tem- porarily. In such cases, lightly press the brake pedal to see if they are working prop-erly. If they are not, press the pedal lightlyseveral times while driv
ing to dry the brake
pads or linings, then check them again. When driving in rain, a layer of water may form between the tires and the road surface (aquaplaning). This l
oosens your tires’ grip
on the road, making it difficult to steer or brake properly. When driving on a wet road:• Drive your vehicle at a safe speed.
• Do not drive on worn tires.• Always keep the tires at the correct infla- tion pressures.
On snowy or icy roads
CAUTION
BK0220401US.book 13 ページ 2015年6月3日 水曜日 午前7時42分