2017 MITSUBISHI iMiEV light
[x] Cancel search: lightPage 211 of 296
Air conditioning
Comfort controls 7-9
7
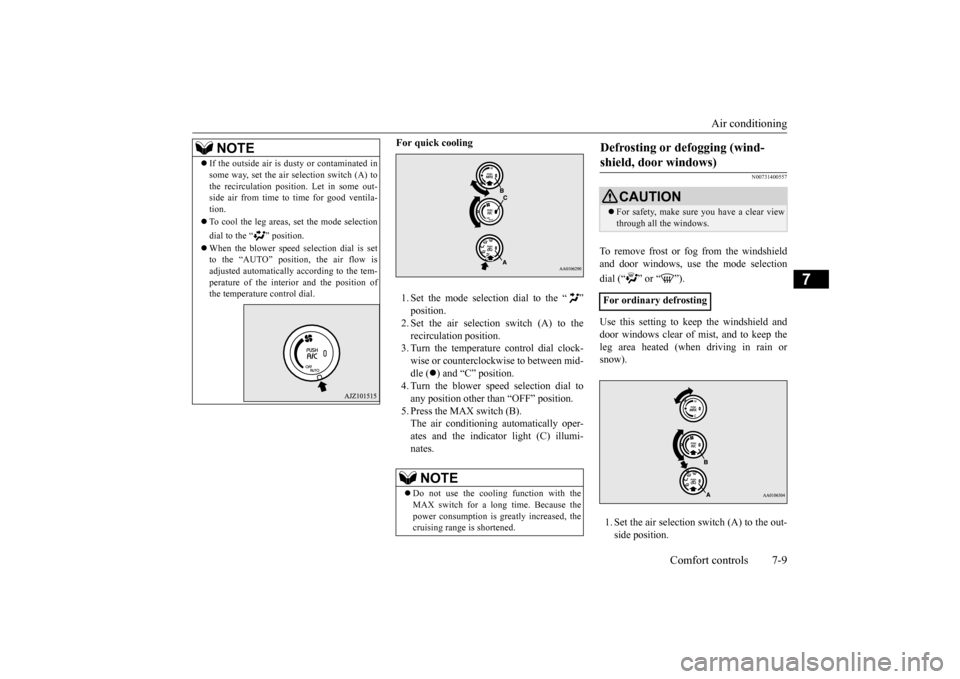
For quick cooling 1. Set the mode selection dial to the “ ”2. Set the air selection switch (A) to the recirculati
on position.
3. Turn the temperature control dial clock-wise or counterclockwise to between mid- dle (
) and “C” position.
4. Turn the blower speed selection dial toany position other than “OFF” position. 5. Press the MAX switch (B). The air conditioning automatically oper-ates and the indicator light (C) illumi- nates.
N00731400557
To remove frost or fog from the windshield and door windows, use
the mode selection
dial (“ ” or “ ”). Use this setting to ke
ep the windshield and
door windows clear of mist, and to keep the leg area heated (when driving in rain orsnow). 1. Set the air selection switch (A) to the out- side position.
NOTE
If the outside air is dus
ty or contaminated in
some way, set the air selection switch (A) tothe recirculation positi
on. Let in some out-
side air from time to time for good ventila- tion. To cool the leg areas,
set the mode selection
dial to the “ ” position. When the blower speed
selection dial is set
to the “AUTO” position, the air flow is adjusted automatically according to the tem-perature of the interior and the position of the temperature control dial.
NOTE
Do not use the cooling function with the MAX switch for a l
ong time. Because the
power consumption is gr
eatly increased, the
cruising range is shortened.
Defrosting or defogging (wind- shield, door windows)
CAUTION For safety, make sure you have a clear view through all the windows.
For ordinary defrosting
BK0220401US.book 9 ページ 2015年6月3日 水曜日 午前7時42分
Page 213 of 296
Air purifier
Comfort controls 7-11
7
The air conditioning should be operated for at least five minutes each week, even in cold weather. This includes the quick defrostingmode. Operating the
air condition system
weekly maintains lubrication of the compres- sor internal parts and maintains the air condi-tioning in the best operating condition.
N00733800177
The air conditioning system is equipped with an air filter to reduc
e pollen and dust entering
the cabin.The air filter’s ability to collect pollen and dust will be reduced as
it becomes dirty, so
replace it periodically. For the maintenanceinterval, refer to the “WARRANTY AND MAINTENANCE MANUAL”.
N00766601026
You can run the air conditioning in advanceof using the vehicle. For details, refer to “Remote Climate Cont
rol” on page 3-36,
3-47.
N00734301062
The audio system can only be used when theelectric motor switch is in the “ON” or“ACC” position.
CAUTION The air conditioning system in your vehicle must be charged with the refrigerant HFC-134a and the lubricant POE MA68EV.Use of any other refrigerant or lubricant will cause severe damage a
nd may require replac-
ing your vehicle’s en
tire air conditioning
system. The release of refrigerant into the atmo- sphere is not recommended.The new refrigerant HFC-134a in your vehi- cle is designed not to harm the earth’s ozone layer. However, it may contribute slightly toglobal warming. It is recommended that the old refrigerant be saved and recycled for future use.
During a long period of disuse
Air purifier
NOTE
Operation in certain conditions such as driv- ing on a dusty road or frequent use of the air conditioning can reduce
the service life of
the filter. When you feel that the air flow is lower than normal or when the windshield or windows start to fog up easily, replace the airfilter. Contact a certified i-MiEV dealer for assis- tance.
Remote Climate Control
AM/FM electronically tuned radio with CD player
(if so
equipped)
NOTE
To listen to the audio system while the elec- tric motor unit is not running, turn the elec-tric motor switch to the “ACC” position. If the electric motor switch is in the “ACC”cally turn off after a certain period of time and you will no longer be able to use the audio system. The accessory power comeson again if the electric motor switch is turned from the “ACC” position. Refer to “ACC power auto-cutout f
unction” on page 5-19.
If a cellular phone is
used inside the vehicle,
it may create noise in the audio equipment.This does not mean that anything is wrong with your audio equipment. In such a case, use the cellular phone at
a place as
far away
as possible from the audio equipment.
BK0220401US.book 11 ページ 2015年6月3日 水曜日 午前7時42分
Page 228 of 296
Handling of compact discs 7-26 Comfort controls
7
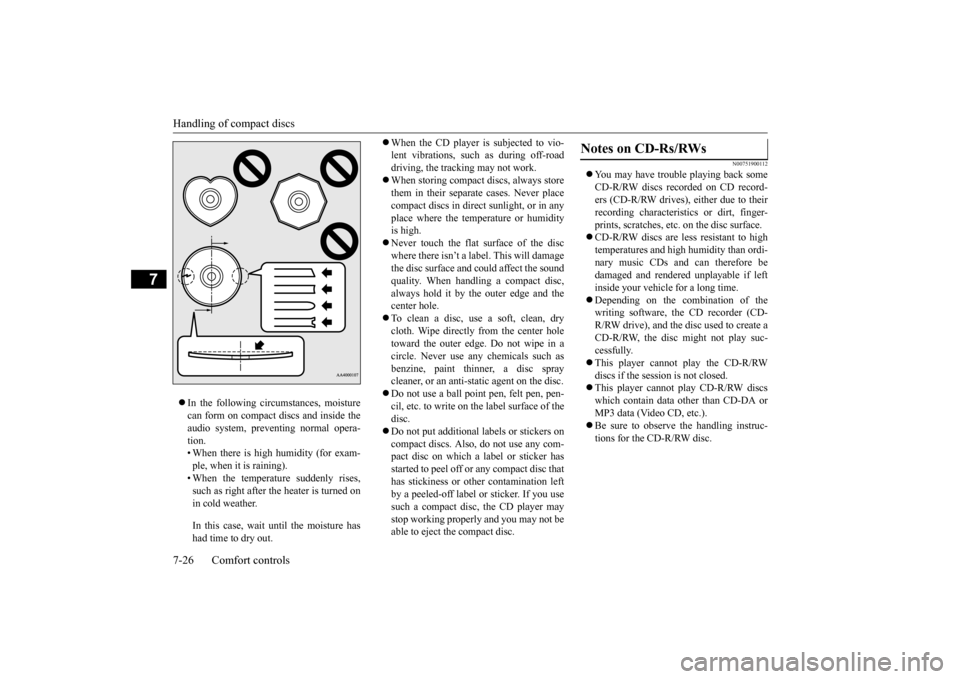
In the following circumstances, moisture can form on compact discs and inside theaudio system, preventing normal opera- tion. • When there is high humidity (for exam-ple, when it is raining). • When the temperature suddenly rises, such as right after the heater is turned onin cold weather. In this case, wait until the moisture has had time to dry out.
When the CD player is subjected to vio- lent vibrations, such as during off-roaddriving, the tracking may not work. When storing compact discs, always store them in their separate
cases. Never place
compact discs in direct sunlight, or in any place where the temperature or humidity is high. Never touch the flat surface of the disc where there isn’t a label. This will damage the disc surface and could affect the sound quality. When handli
ng a compact disc,
always hold it by the outer edge and thecenter hole. To clean a disc, use a soft, clean, dry cloth. Wipe directly
from the center hole
toward the outer edge. Do not wipe in a circle. Never use any chemicals such as benzine, paint thi
nner, a disc spray
cleaner, or an anti-static agent on the disc. Do not use a ball point
pen, felt pen, pen-
cil, etc. to write on the label surface of thedisc. Do not put additional la
bels or stickers on
compact discs. Also, do not use any com-pact disc on which a label or sticker has started to peel off or any compact disc that has stickiness or ot
her contamination left
by a peeled-off label or sticker. If you use such a compact disc, the CD player may stop working properly and you may not beable to eject the compact disc.
N00751900112
You may have trouble playing back some CD-R/RW discs recorded on CD record- ers (CD-R/RW drives), either due to theirrecording characteristics or dirt, finger- prints, scratches, etc.
on the disc surface.
CD-R/RW discs are less resistant to high temperatures and high humidity than ordi- nary music CDs and can therefore be damaged and rendered unplayable if left inside your vehicle for a long time. Depending on the combination of the writing software, the CD recorder (CD- R/RW drive), and the disc used to create a CD-R/RW, the disc might not play suc-cessfully. This player cannot play the CD-R/RW discs if the sessi
on is not closed.
This player cannot play CD-R/RW discs which contain data other than CD-DA or MP3 data (Video CD, etc.). Be sure to observe the handling instruc- tions for the CD-R/RW disc.
Notes on CD-Rs/RWs
BK0220401US.book 26 ページ 2015年6月3日 水曜日 午前7時42分
Page 230 of 296
General information about your radio 7-28 Comfort controls
7
4. When the time is set, press the clock but- ton to stop the clock display from flash-ing.
N00733900439
Your vehicle’s radio receives both AM andFM stations. The quality of your reception is affected by distance, obstacles, an
d signal interference.
This radio complies with Part 15 of Federal Communications Commission (FCC) Rules (for vehicles sold in U.S.A.). Operation is subject to the following conditions: The device may not cause harmful inter- ference. This device must ac
cept any interference
recieved, including interference that maycause undesirable operation.
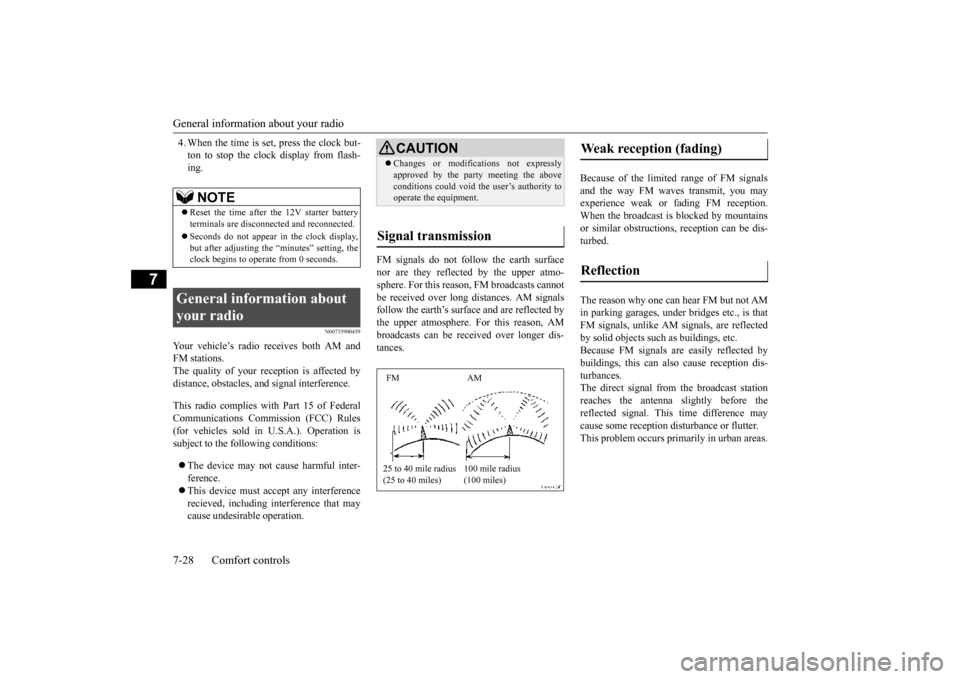
FM signals do not follow the earth surface nor are they reflected by the upper atmo-sphere. For this reason,
FM broadcasts cannot
be received over long distances. AM signals follow the earth’s surface and are reflected bythe upper atmosphere. For this reason, AM broadcasts can be received over longer dis- tances.
Because of the limite
d range of FM signals
and the way FM waves transmit, you may experience weak or fading FM reception.When the broadcast is blocked by mountains or similar obstructions,
reception ca
n be dis-
turbed. The reason why one can hear FM but not AM in parking garages, unde
r bridges etc., is that
FM signals, unlike AM
signals, are reflected
by solid objects such
as buildings, etc.
Because FM signals are easily reflected by buildings, this can also
cause reception dis-
turbances.The direct signal from
the broadcast station
reaches the antenna slightly before the reflected signal. This
time difference may
cause some reception di
sturbance or flutter.
This problem occurs primarily in urban areas.
NOTE
Reset the time after the 12V starter battery terminals are disconnect
ed and reconnected.
Seconds do not appear
in the clock display,
but after adjusting the
“minutes” setting, the
clock begins to opera
te from 0 seconds.
General information about your radio
CAUTION Changes or modifica
tions not expressly
approved by the party meeting the aboveconditions could void th
e user’s authority to
operate the equipment.
Signal transmission FM AM 25 to 40 mile radius (25 to 40 miles)
100 mile radius (100 miles)
Weak reception (fading) Reflection
BK0220401US.book 28 ページ 2015年6月3日 水曜日 午前7時42分
Page 231 of 296
General information about your radio
Comfort controls 7-29
7
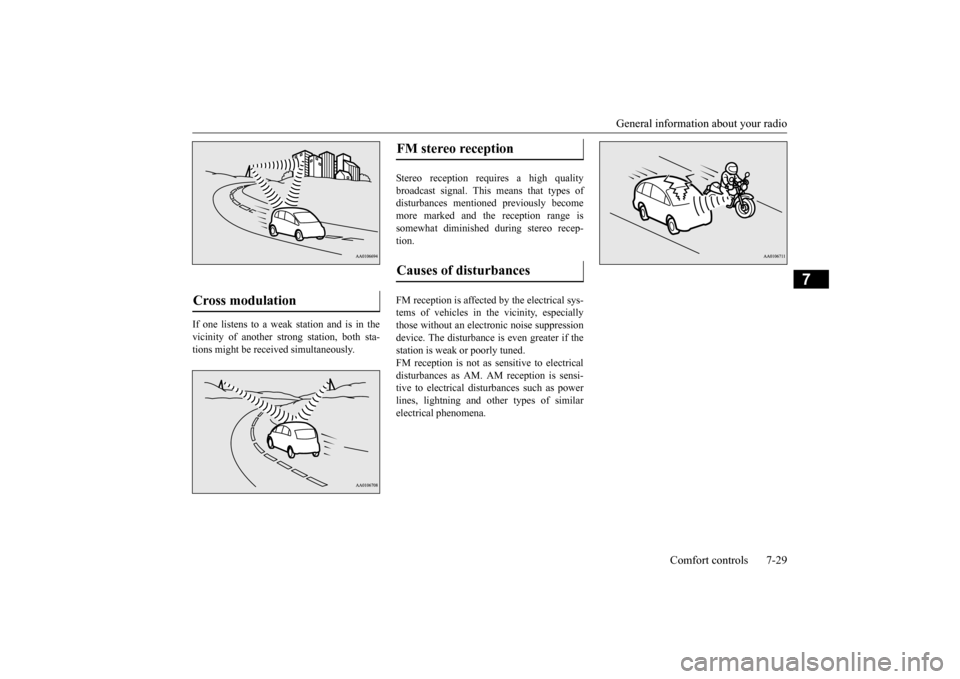
If one listens to a weak station and is in the vicinity of another st
rong station, both sta-
tions might be received simultaneously.
Stereo reception requires a high quality broadcast signal. This means that types of disturbances mentioned previously becomemore marked and the reception range is somewhat diminished during stereo recep- tion. FM reception is affected by the electrical sys- tems of vehicles in the vicinity, especially those without an electr
onic noise suppression
device. The disturbance is even greater if thestation is weak or poorly tuned. FM reception is not as sensitive to electrical disturbances as AM. AM
reception is sensi-
tive to electrical dist
urbances such as power
lines, lightning and ot
her types of similar
electrical phenomena.
Cross modulation
FM stereo reception Causes of disturbances
BK0220401US.book 29 ページ 2015年6月3日 水曜日 午前7時42分
Page 234 of 296
If the vehicle breaks down 8-2 For emergencies
8
N00836301243
If your vehicle breaks down on the road, move to the shoulder and turn on the hazard warning flashers. If there is no shoulder, orthe shoulder is not safe, drive in the right lane slowly, with the hazard lights flashing, until you come to a safe stopping place. Keep theflashers flashing. If the ready indicator light goes out while driving, the brakes a
nd steering will continue
to work, but without power assist, so more effort will be required
for braking and steer-
ing. Stop the vehicle on the shoulder of the road and turn on the hazard warning flashers. If you need to push your vehicle, turn theelectric motor switch to the “ON” position, and place the selector lever in the “N” (NEU- TRAL) position.
N00836400742
If the electric motor unit cannot be energizedbecause the 12V starter battery is weak ordead, you can start it with the battery from another vehicle using jumper cables.
1. Take off any metal jewelry such as watch bands or bracelets
that might make an
accidental electrical contact. 2. Position the vehi
cles close enough
together so that the jumper cables can reach, but be sure the vehicles are nottouching each other.
3. Set the parking brake firmly on your vehi- cle and move the selector lever into the “P” (PARK) position. 4. Set the parking brake firmly on the othervehicle. Put the automatic transaxle in “P”5. Turn the ignition switch (the electric motor switch) on each vehicle to the “LOCK” position. 6. Remove the battery
cover, and then make
sure your 12V starter
battery electrolyte is
at the proper level. (Refer to “Checking 12V starter battery electrolyte level” onpage 9-8.)
If the vehicle breaks down Jump-starting
WA R N I N G To reduce the risk of igniting flammable gas that may be em
itted from the 12V
starter battery, carefully read this sectionbefore jump-starting the vehicle. Do not try to start the electric motor unit by pushing or towing the vehicle. This can cause an accident re
sulting in serious
injury or death and
can damage the vehi-
cle.CAUTION Do not attempt jump st
arting the 12V starter
battery while the main
drive lithium-ion bat-
tery is being charged. Doing so could dam-age the vehicle or charging equipment.NOTE
Do not use jumper cables if they have dam- age or corrosion.
CAUTION Check the other vehicle.
It must have a 12V
battery. If the other system is not 12V, bothsystems can be damaged.NOTE
Turn off all lights, heat
er, and othe
r electrical
loads. This will
help avoid sparks.
BK0220401US.book 2 ページ 2015年6月3日 水曜日 午前7時42分
Page 237 of 296

Tire repair kit
For emergencies 8-5
8
If you drive your vehicle with a low battery charge, after the electric motor unit has beenstarted by using jumper
cables, it can cause
the anti-lock braking sy
stem warning light to
illuminate. This is only due to the low batteryvoltage. It is not a problem with the brake system. If this happens, fully charge the 12V starter battery and ensure the charging system is operating properly.
N00836600366
This vehicle is equipped
with a tire repair kit
which can be used to repair a minor puncture in tread area caused by
a nail, screw or simi-
lar object. A spare tire
is not provided with
this vehicle.
N00837701026
The tire repair kit is
stowed under the rear
seat cushion.
N00837800033
1. Pull forward the seat stoppers (A) underthe rear seat cushion (B). 2. Lift up the seat
cushion and pull it for-
ward to remove it. 3. Remove the screws (C) with a coin or the washer (D) at a position shown in the illustration, and re
move the cover (E).
As your vehicle has anti-lock brakes Tire repair kit
WA R N I N G The tire repair kit may not permanently seal a punctured tire. Using the tire repair
kit may damage the
wheel and/or the tire inflation pressuresensor for the tire. The vehicle must promptly be inspected and repaired by a certified i-MiEV dealer after using the tirerepair kit.
Use only the Mitsubishi genuine tire repair kit. Sealant in other repair kits maynot sufficiently seal the tire puncture.
Tire repair kit storage 1- Tire compressorWA R N I N G
2- Tire repair set: Items #3-#8 shown
above
3- Tire sealant bottle4- Filler hose 5- Valve insert (spare)7- Speed restriction sticker 8- Instruction manual for tire repairTo remove
BK0220401US.book 5 ページ 2015年6月3日 水曜日 午前7時42分
Page 238 of 296
Tire repair kit 8-6 For emergencies
8
4. Remove the tire repair kit.
N00837900018
1. Return the tire repair kit to its original place. Attach the cover and fasten the screws.2. Insert two wire tabs at
the rear edge of the
seat cushion under the seat back.
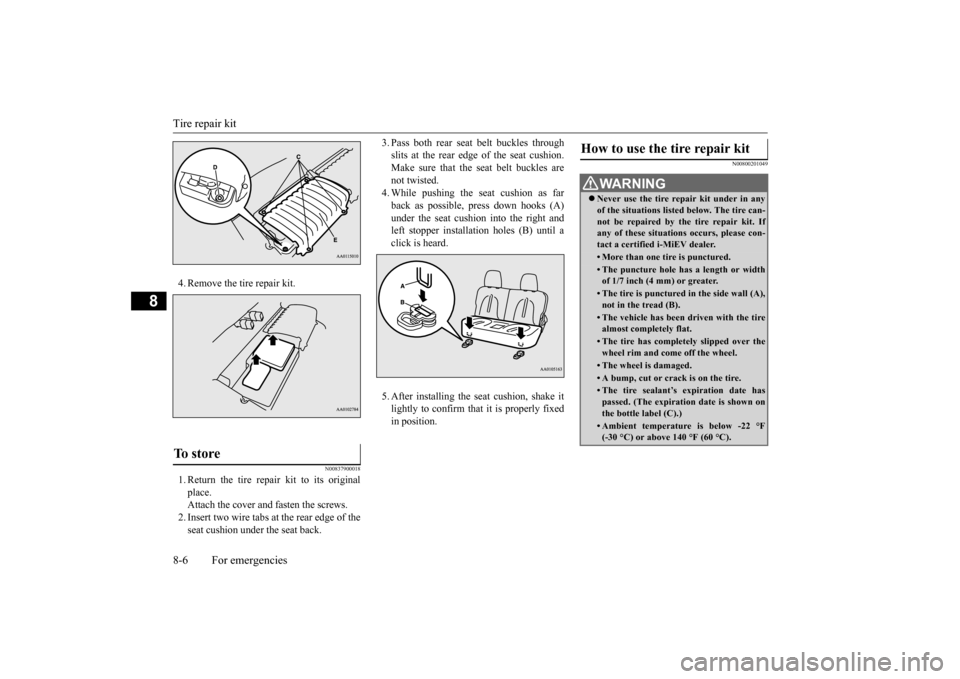
3. Pass both rear seat
belt buckles through
slits at the rear edge of the seat cushion.Make sure that the seat belt buckles are not twisted. 4. While pushing the seat cushion as farback as possible, press down hooks (A) under the seat cushion into the right and left stopper installa
tion holes (B) until a
click is heard. 5. After installing the seat cushion, shake it lightly to confirm that it is properly fixedin position.
N00800201049
To store
How to use the tire repair kit
WA R N I N G Never use the tire repair kit under in any of the situations listed below. The tire can-not be repaired by the tire repair kit. If any of these situations occurs, please con- tact a certified i-MiEV dealer.• More than one tire is punctured.• The puncture hole has a length or width of 1/7 inch (4 mm) or greater.• The tire is punctured in the side wall (A),not in the tread (B).• The vehicle has been driven with the tirealmost completely flat.• The tire has completely slipped over thewheel rim and come off the wheel.• The wheel is damaged.• A bump, cut or crack is on the tire.• The tire sealant’s expiration date has passed. (The expiration date is shown onthe bottle label (C).)(-30 °C) or above 140 °F (60 °C).
BK0220401US.book 6 ページ 2015年6月3日 水曜日 午前7時42分