2017 MERCEDES-BENZ S CLASS display
[x] Cancel search: displayPage 53 of 382
When using a child restraint system, always
ensure that the seat is correctly adjusted and
that the backrest is almost vertical.
If you install a child restraint system on the rear
reclining seat, always observe: R
the instructions and safety notes in "Children
in the vehicle" ( Y
page 59)R
the child restraint system manufacturer's
installation instructions
Occupant Classification System
(OCS)
Introduction The Occupant Classification System (OCS) cat-
egorizes the person in the front-passenger seat.
Depending on that result, the front-passenger
front air bag is either enabled or deactivated.
The system does not deactivate: R
the side impact air bag R
the window curtain air bag R
the Emergency Tensioning Devices
Requirements To be classified correctly, the front passenger
must sit: R
with the seat belt fastened correctly R
in an almost upright position with their back
against the seat backrest R
with their feet resting on the floor, if possible
If the front passenger does not observe these
conditions, OCS may produce a false classifica-
tion, e.g. because the front passenger: R
transfers their weight by supporting them-
selves on a vehicle armrest R
sits in such a way that their weight is raised
from the seat cushion
If it is absolutely necessary to install a child
restraint system on the front-passenger seat, be
sure to observe the correct positioning of the
child restraint system. Never place objects
under or behind the child restraint system, e.g. a
cushion. Fully retract the seat cushion length.
The entire base of the child restraint system
must always rest on the seat cushion of the
front-passenger seat. The backrest of the
forward-facing child restraint system must lie as flat as possible against the backrest of the front-
passenger seat.
The child restraint system must not touch the
roof or be subjected to a load by the head
restraint. Adjust the angle of the seat backrest
and the head restraint position accordingly.
Only then can OCS be guaranteed to function
correctly. Always observe the child restraint sys-
tem manufacturer's installation and operating
instructions.
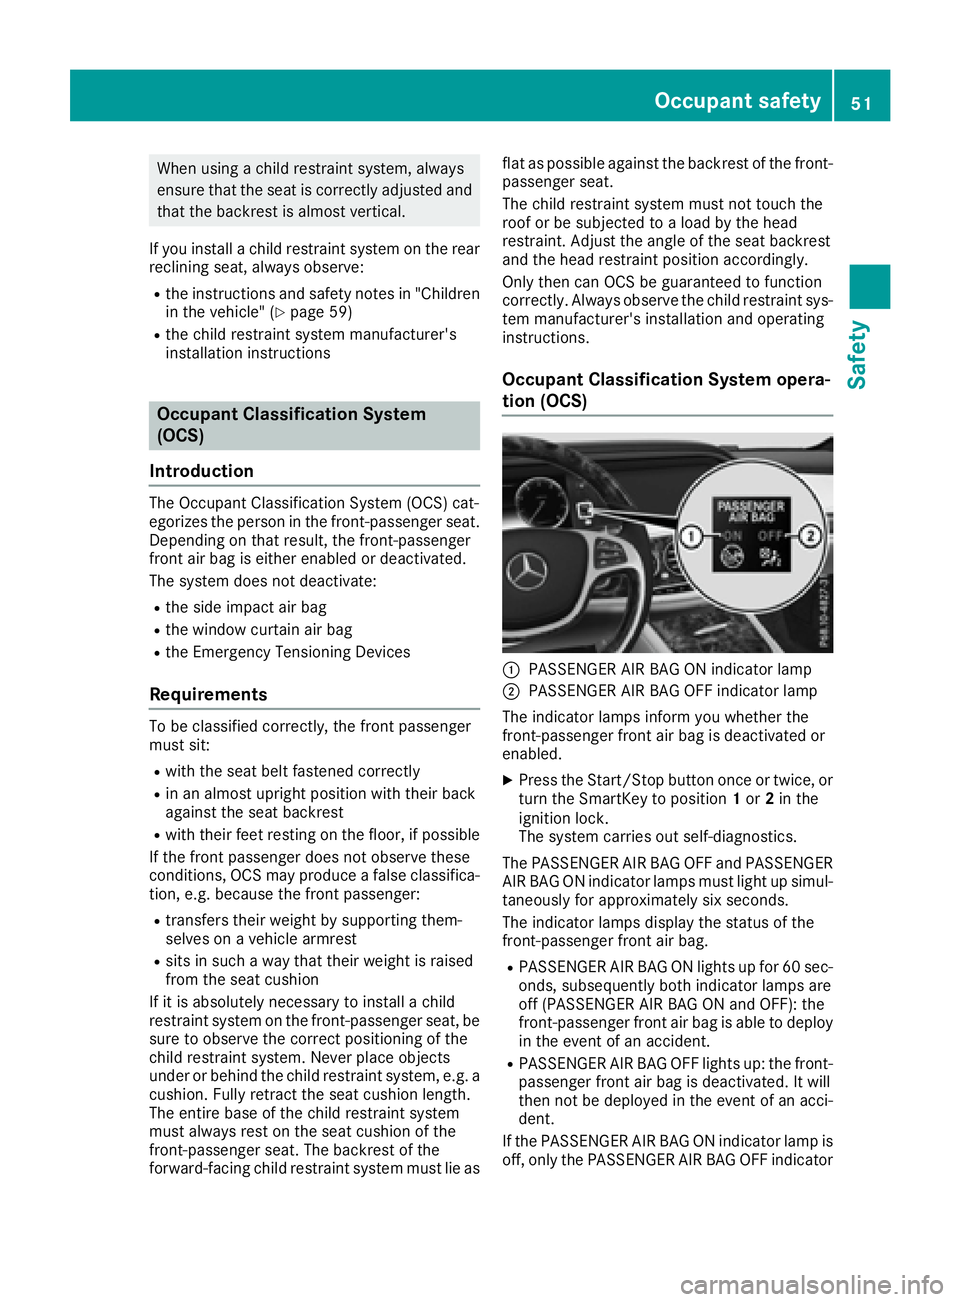
Occupant Classification System opera-
tion (OCS)
�C
PASSENGER AIR BAG ON indicator lamp �D
PASSENGER AIR BAG OFF indicator lamp
The indicator lamps inform you whether the
front-passenger front air bag is deactivated or
enabled. X
Press the Start/Stop button once or twice, or
turn the SmartKey to position 1 or 2 in the
ignition lock.
The system carries out self-diagnostics.
The PASSENGER AIR BAG OFF and PASSENGER
AIR BAG ON indicator lamps must light up simul-
taneously for approximately six seconds.
The indicator lamps display the status of the
front-passenger front air bag. R
PASSENGER AIR BAG ON lights up for 60 sec-
onds, subsequently both indicator lamps are
off (PASSENGER AIR BAG ON and OFF): the
front-passenger front air bag is able to deploy
in the event of an accident. R
PASSENGER AIR BAG OFF lights up: the front-
passenger front air bag is deactivated. It will
then not be deployed in the event of an acci-
dent.
If the PASSENGER AIR BAG ON indicator lamp is
off, only the PASSENGER AIR BAG OFF indicatorOccupant safety 51
Safety Z
Page 54 of 382
lamp shows the status of the front-passenger
front air bag. The PASSENGER AIR BAG OFF
indicator lamp may be lit continuously or be off.
If the status of the front-passenger front air bag
changes while the vehicle is in motion, an air bag
display message appears in the instrument clus-
ter ( Y
page 239). When the front-passenger
seat is occupied, always pay attention to the
PASSENGER AIR BAG OFF indicator lamp. Be
aware of the status of the front-passenger front
air bag both before and during the journey.
G WARNING
If the PASSENGER AIR BAG OFF indicator
lamp is lit, the front-passenger front air bag is
disabled. It will not be deployed in the event of
an accident and cannot perform its intended
protective function. A person in the front-
passenger seat could then, for example, come
into contact with the vehicle's interior, espe-
cially if the person is sitting too close to the
dashboard. This poses an increased risk of
injury or even fatal injury.
When the front-passenger seat is occupied,
always ensure that: R
the classification of the person in the front-
passenger seat is correct and the front-
passenger front air bag is enabled or disa-
bled in accordance with the person in the
front-passenger seat R
the front-passenger seat has been moved
back as far back as possible. R
the person is seated correctly.
Make sure, both before and during the jour-
ney, that the status of the front-passenger
front air bag is correct.
G WARNING
If you secure a child in a rearward-facing child
restraint system on the front-passenger seat
and the PASSENGER AIR BAG OFF indicator
lamp is off, the front-passenger front air bag
may deploy in the event of an accident. The
child could be struck by the air bag. This poses
an increased risk of injury or even fatal injury.
Make sure that the front-passenger front air
bag has been disabled. The PASSENGER AIR
BAG OFF indicator lamp must be lit. If the PASSENGER AIR BAG OFF indicator lamp
stays off, do not install a rearward-facing child
restraint system on the front-passenger seat.
You can find more information on OCS under
"Problems with the Occupant Classification Sys-
tem" ( Y
page 54).
G WARNING
If you secure a child in a forward-facing child
restraint system on the front-passenger seat
and you position the front-passenger seat too
close to the dashboard, in the event of an
accident, the child could: R
come into contact with the vehicle's inte-
rior if the PASSENGER AIR BAG OFF indi-
cator lamp is lit, for example R
be struck by the air bag if the PASSENGER
AIR BAG OFF indicator lamp is off
This poses an increased risk of injury or even
fatal injury.
Always move the front-passenger seat as far
back as possible and fully retract the seat
cushion length. Always make sure that the
shoulder belt strap is correctly routed from
the vehicle belt sash guide to the shoulder
belt guide on the child restraint system. The
shoulder belt strap must be routed forwards
and downwards from the vehicle belt sash
guide. If necessary, adjust the vehicle belt
sash guide and the front-passenger seat
accordingly. Always observe the child
restraint system manufacturer's installation
instructions.
If OCS determines that: R
the front-passenger seat is unoccupied, the
PASSENGER AIR BAG OFF indicator lamp
lights up after the system self-test and
remains lit. This indicates that the front-
passenger front air bag is deactivated. R
the front-passenger seat is occupied by a
child of up to twelve months old, in a standard
child restraint system, the PASSENGER AIR
BAG OFF indicator lamp lights up after the
system self-test and remains lit. This indi-
cates that the front-passenger front air bag is
deactivated.
But even in the case of a twelve-m onth- old
c
hild, in a standard child restraint system, the
PASSENGER AIR BAG OFF indicator lamp can52
Occupant safety
Safety
Page 56 of 382
bled in accordance with the person in the
front-passenger seat R
the person is seated properly with a cor-
rectly fastened seatbelt R
the front-passenger seat has been moved
as far back as possible
If the PASSENGER AIR BAG OFF indicator
lamp remains lit when it should not, the front-
passenger seat may not be used. Do not
install a child restraint system on the front-
passenger seat. Have the Occupant Classifi-
cation System (OCS) checked and repaired
immediately at a qualified specialist work-
shop.
G WARNING
Objects between the seat surface and the
child restraint system could affect OCS oper-
ation. This could result in the front-passenger
air bag not functioning as intended during an
accident. This poses an increased risk of
injury or even fatal injury.
Do not place any objects between the seat
surface and the child restraint system. The entire base of the child restraint system must
always rest on the seat cushion of the front-
passenger seat. The backrest of the forward-
facing child restraint system must, as far as
possible, be resting on the backrest of the
front-passenger seat. Always comply with the
child restraint system manufacturer's instal-
lation instructions.
After the system self-test, the PASSENGER AIR
BAG OFF or PASSENGER AIR BAG ON indicator
lamp displays the status of the front-passenger
front air bag ( Y
page 51). If the front-passenger
front air bag is enabled, the PASSENGER AIR
BAG ON indicator lamp lights up for 60 seconds
and then goes out.
If the PASSENGER AIR BAG ON indicator lamp is
off, only the PASSENGER AIR BAG OFF indicator
lamp shows the status of the front-passenger
front air bag. The PASSENGER AIR BAG OFF
indicator lamp may be lit continuously or be off.
For more information about the OCS, see "Prob-
lems with the Occupant Classification System"
( Y
page 54).
Problems with the Occupant Classification System (OCS) Be sure to observe the notes on "System self-test" ( Y
page 53).54
Occupant safety
Safety
Page 65 of 382
Never adjust the seat after installing the child
restraint system.
If the rear seat backrest is not engaged and
locked, this will be shown in the multifunction
display in the instrument cluster. A warning tone
also sounds.
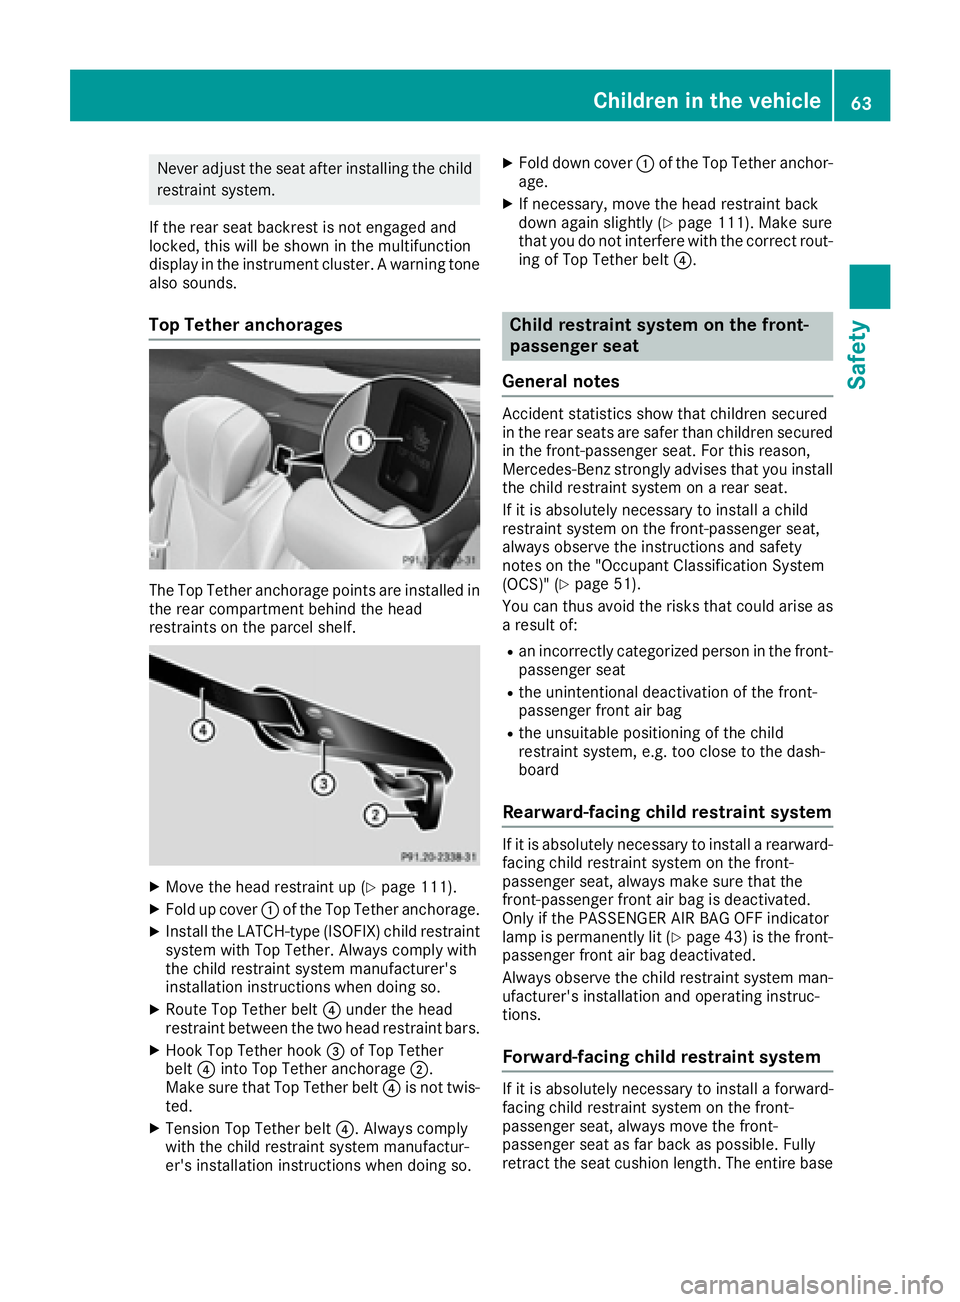
Top Tether anchorages
The Top Tether anchorage points are installed in
the rear compartment behind the head
restraints on the parcel shelf.
X
Move the head restraint up ( Y
page 111).X
Fold up cover �C of the Top Tether anchorage.X
Install the LATCH-type (ISOFIX) child restraint
system with Top Tether. Always comply with
the child restraint system manufacturer's
installation instructions when doing so. X
Route Top Tether belt �
Page 72 of 382

Due to the nature of the system, particularly
complicated but non-critical driving conditions
may also cause the system to display a warning.
Autonomous braking function If the driver does not react to the distance warn-
ing signal in a critical situation, COLLISION PRE-
VENTION ASSIST PLUS can assist with the
autonomous braking function.
The autonomous braking function is available in
the following speed ranges: R
from 4 mph (7 km/h) to approx. 65 mph
(105 km/h) for moving objects R
from 4 mph (7 km/h) to approx. 31 mph
(50 km/h) for stationary objects
Due to the nature of the system, particularly
complicated but non-critical driving conditions
may also cause the Autonomous Braking Func-
tion to intervene.
If the autonomous braking function requires a
particularly high braking force, preventative
passenger protection measures (PRE-SAFE ®
)
are activated simultaneously ( Y
page 57).
Adaptive Brake Assist
General information
i Observe the "Important safety notes" sec-
tion ( Y
page 66).
With the help of adaptive Brake Assist, the dis-
tance warning signal can detect obstacles that
are in the path of your vehicle for an extended
period of time.
If adaptive Brake Assist detects a risk of colli-
sion with the vehicle in front, it calculates the
braking force necessary to avoid a collision. If
you apply the brakes forcefully, adaptive Brake
Assist will automatically increase the braking
force to a level suitable for the traffic conditions.
Adaptive Brake Assist provides braking assis-
tance in hazardous situations at speeds above
4 mph (7 km/h). It uses radar sensor technology
to assess the traffic situation.
Up to a speed of approximately 155 mph
(250 km/h), Adaptive Brake Assist is capable of
reacting to moving objects that have already
been detected as such at least once over the
period of observation.
Up to a speed of approximately 44 mph
(70 km/h), Adaptive Brake Assist reacts to sta-
tionary obstacles. If adaptive Brake Assist demands particularly
high braking force, preventative passenger pro-
tection measures (PRE-SAFE ®
) are activated
simultaneou sly ( Y
page 57). X
Keep the brake pedal depressed until the
emergency braking situation is over.
ABS prevents the wheels from locking.
The brakes will work normally again if: R
you release the brake pedal. R
there is no longer any danger of a collision. R
no obstacle is detected in front of your vehi-
cle.
Adaptive Brake Assist is then deactivated.
Important safety notes
G WARNING
Adaptive Brake Assist cannot always clearly
identify objects and complex traffic situa-
tions.
In such cases, Adaptive Brake Assist can: R
intervene unnecessarily R
not intervene
There is a risk of an accident.
Always pay careful attention to the traffic sit-
uation and be ready to brake. Terminate the
intervention in a non-critical driving situation.
G WARNING
Adaptive Brake Assist does not react: R
to people or animals R
to oncoming vehicles R
to crossing traffic R
when cornering
As a result, the Adaptive Brake Assist may not
intervene in all critical conditions. There is a
risk of an accident.
Always pay careful attention to the traffic sit-
uation and be ready to brake.
Due to the nature of the system, particularly
complicated but non-critical driving conditions
may also cause Brake Assist to intervene.
If adaptive Brake Assist is not available due to a
malfunction in the radar sensor system, the
brake system remains available with full brake
boosting effect and BAS.70
Driving safet y system s
Sa fety
Page 75 of 382

Important safety notes Cros swin d Assist does not work if ESP ®
is
swit ched off or deactivated because of a mal-
function.
Crosswind Assist General information Veh icle s wit h MAGIC BODY CONTROL: informa-
tion on st abiliz ing the veh icle in the event of
cross win d ( Y
page 180).
St rong cross win d gusts can impair the abilit y of
your veh icle to driv e straight ahead. The cross-
win d driv ing assistance function integrated in
ESP ®
noticeably reduces these impairments.
ESP ®
intervenes automatical ly according to the
dire ction and intensity of the cross winds affect-
ing your veh icle .
ESP ®
intervenes wit h st abiliz ing braking to
assist you in ke epin g the veh icle in the lane.
Cros swin d Assist is active at veh icle spee ds
above 50 mph (80 km/h) when driv ing straight
ahead or cornering gently.
Important safety notes Cros swin d Assist does not work if ESP ®
is
swit ched off or deactivated because of a mal-
function.
EBD (electronic brake force distribu-
tion)
General information EBD monitors and controls the brake pressure
on the rear wheels to impr ove driv ing st abilit y
while braking.
Important safety notes
i Observe the "Im portant safety notes" sec-
tion ( Y
page 66).
G WAR NING
If EBD is malfunctioning, the rear wheels can
lock, e.g. under full braking. This increases the
risk of sk iddin g and an acc iden t.
You should therefore adapt your driv ing style
to the diff erent han dlin g characteristics. Have the brake system checked at a qualified spe-
cialist workshop.
Observe information regarding indicator and
warning lamps ( Y
page 261) as well as display
messages ( Y
page 230).
ADAPTIVE BRAKE ADAPTIVE BRAKE enhances braking safety and
offers increased braking comfort. In addition to
the braking function, ADAPTIVE BRAKE also has
the HOLD function ( Y
page 178) and hill start
assist ( Y
page 148).
PRE-SAFE ®
Brake
General information PRE-SAFE ®
Brake can help you to minimize the
risk of a collision with a vehicle ahead or a
pedestrian, and reduce the effects of such a
collision. If PRE-SAFE ®
Brake has detected a risk
of collision, you will be warned visually and
acoustically as well as by automatic braking.
i Pay attention to the important safety notes
in the "Driving safety systems" section
( Y
page 66).
PRE ‑ SA FE ®
Brake is only availab le in vehicles
with the Dr ivin g Assistance Plus package.
For PRE-SAFE ®
Brake to assist you when driving,
the radar sensor system and the camera system
must be swit ched on and be operational.
With the help of the radar sensor system and the
camera system, PRE-SAFE ®
Brake can detect
obstacles that are in front of your vehicle for an
extended period of time.
In addition, pedestrians in the path of your vehi-
cle can be detected.
PRE-SAFE ®
Brake detects pedestrians using
typical characteristics such as the body con-
tours and posture of a person standing upright.
i Observe the restrictions desc ribe d in the
"Important safety notes" section
( Y
page 74).Driving safety systems 73
Safety Z
Page 109 of 382

Adjusting fr om th e rear compar tm ent
You can use th e override butto n to disable this
function ( Y
page 65).
In order for th e front-passenger seat to be posi -
tione d in chauffeur mode:R
th e power suppl y or th e ignition must be
switched on ( Y
page 146)R
th e front-passenger seat may no t be occupiedR
th e front-passenger seat belt must no t be
inserted int o th e buckleX
To select th e fr ont-passenger seat : press
butto n �C repeatedly until th e indicator lamp
in th e butto n lights up.
The front-passenger seat is selected if th e
indicator lamp in th e butto n lights up.X
Press butto n �D forwards and hold it in this
position.
The seat moves forward.
The seat stops at th e threshold of th e area for
chauffeur mode. X
Releas e butto n �D .X
Press and hold butto n �D again until th e front-
passenger seat is in positio n for chauffeur
mode.
The head restraint on th e front-passenger
seat folds forward. The seat moves forward.
The To vie w the ext . mirror , adjust
front-passenger sea t or remove the
hea d restraint . message appear s in th e
multifunction display ( Y
page 256).
i If th e front-passenger seat is already at th e
threshold to th e area for th e chauffeur mode,
th e positio n for th e chauffeur mod e is set
immediately.
i The positio n for chauffeur mod e can be
saved or set usin g th e memory function of th e
rear seat ( Y
page 121). Fo r this th e indicator
lamp on butto n �C must be lit . Adjusting fr om th e driver's seat
In order for th e front-passenger seat to be posi -
tione d in chauffeur mode: R
th e power suppl y or th e ignition must be
switched on ( Y
page 146) R
th e front-passenger seat may no t be occupiedR
th e front-passenger seat belt must no t be
inserted int o th e buckle X
To select th e fr ont-passenger seat : press
butto n �C repeatedly until th e indicator lamp
in th e butto n lights up.
The front-passenger seat is selected if th e
indicator lamp in th e butto n lights up.X
Press butto n �D forwards and hold it in this
position.
The seat moves forward.
The seat stops at th e threshold of th e area for
chauffeur mode. X
Releas e butto n �D .X
Press and hold butto n �D again until th e front-
passenger seat is in positio n for chauffeur
mode.
The head restraint on th e front-passenger
seat folds forward. The seat moves forward.
The To vie w the ext . mirror , adjust
front-passenger sea t or remove the
hea d restraint . message appear s in th e
multifunction display ( Y
page 256).
i If th e front-passenger seat is already at th e
threshold to th e area for th e chauffeur mode,
th e positio n for th e chauffeur mod e is set
immediately.
i The positio n for chauffeur mod e canno t be
store d or set wit h th e driver' s seat memory
function .Seats 107
Seats, steering wheel and mirrors Z
Page 122 of 382
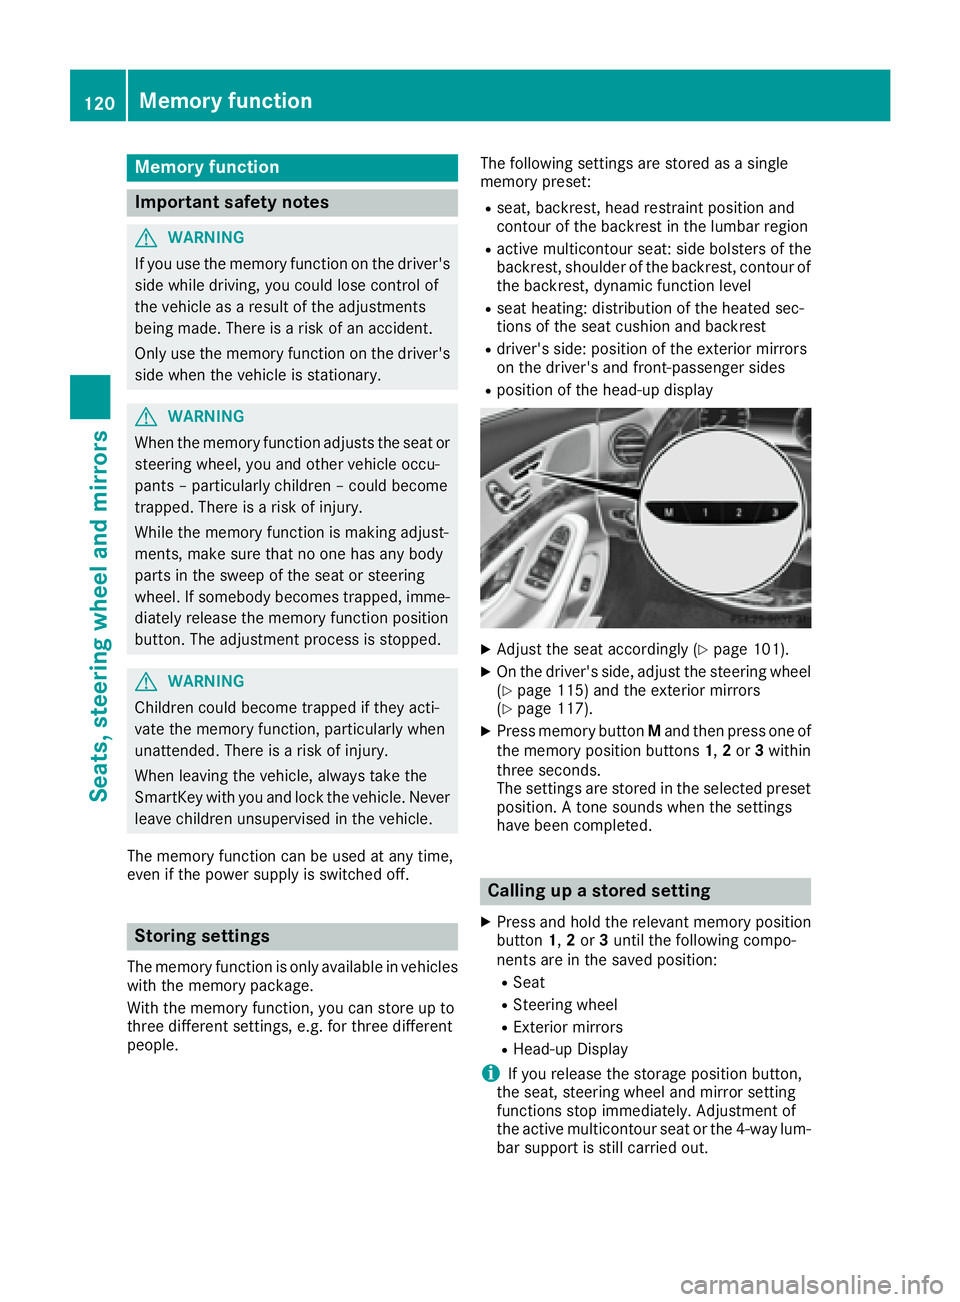
Memory function
Important safety notes
G WARNING
If you use the memory function on the driver's
side while driving, you could lose control of
the vehicle as a result of the adjustments
being made. There is a risk of an accident.
Only use the memory function on the driver's
side when the vehicle is stationary.
G WARNING
When the memory function adjusts the seat or
steering wheel, you and other vehicle occu-
pants – particularly children – could become
trapped. There is a risk of injury.
While the memory function is making adjust-
ments, make sure that no one has any body
parts in the sweep of the seat or steering
wheel. If somebody becomes trapped, imme-
diately release the memory function position
button. The adjustment process is stopped.
G WARNING
Children could become trapped if they acti-
vate the memory function, particularly when
unattended. There is a risk of injury.
When leaving the vehicle, always take the
SmartKey with you and lock the vehicle. Never
leave children unsupervised in the vehicle.
The memory function can be used at any time,
even if the power supply is switched off.
Storing settings The memory function is only available in vehicles
with the memory package.
With the memory function, you can store up to
three different settings, e.g. for three different
people. The following settings are stored as a single
memory preset: R
seat, backrest, head restraint position and
contour of the backrest in the lumbar region R
active multicontour seat: side bolsters of the
backrest, shoulder of the backrest, contour of
the backrest, dynamic function level R
seat heating: distribution of the heated sec-
tions of the seat cushion and backrest R
driver's side: position of the exterior mirrors
on the driver's and front-passenger sides R
position of the head-up display
X
Adjust the seat accordingly ( Y
page 101).X
On the driver's side, adjust the steering wheel
( Y
page 115) and the exterior mirrors
( Y
page 117). X
Press memory button M and then press one of
the memory position buttons 1 , 2 or 3 within
three seconds.
The settings are stored in the selected preset
position. A tone sounds when the settings
have been completed.
Calling up a stored setting X
Press and hold the relevant memory position
button 1 , 2 or 3 until the following compo-
nents are in the saved position: R
Seat R
Steering wheel R
Exterior mirrors R
Head-up Display
i If you release the storage position button,
the seat, steering wheel and mirror setting
functions stop immediately. Adjustment of
the active multicontour seat or the 4-way lum-
bar support is still carried out.120
Memory function
Seats, steering wheel and mirrors