2017 MERCEDES-BENZ S CLASS Front seats
[x] Cancel search: Front seatsPage 114 of 382
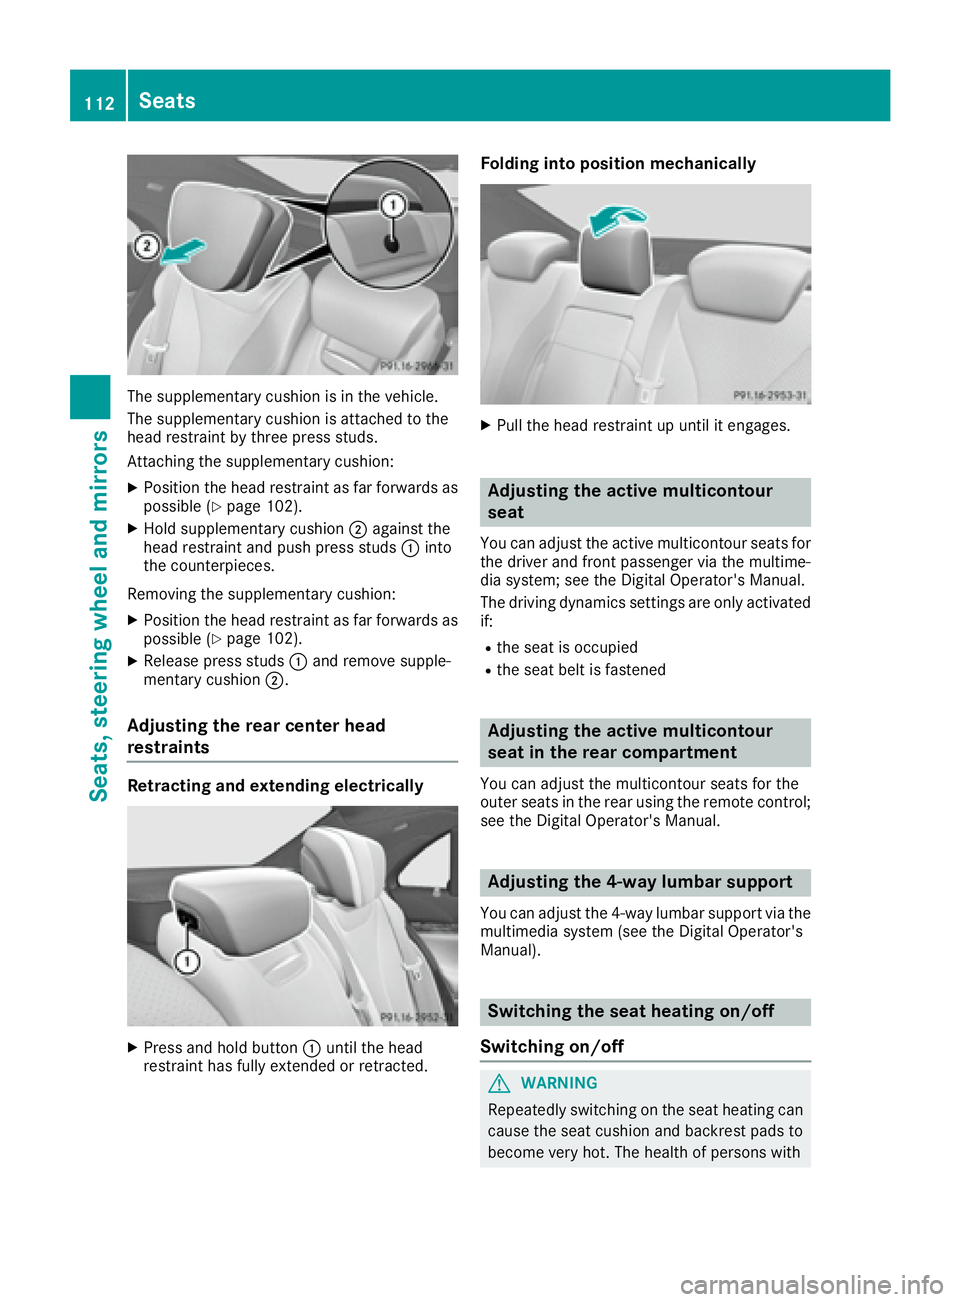
The supplementary cushion is in the vehicle.
The supplementary cushion is attached to the
head restraint by three press studs.
Attaching the supplementary cushion: X
Position the head restraint as far forwards as
possible ( Y
page 102).X
Hold supplementary cushion �D against the
head restraint and push press studs �C into
the counterpieces.
Removing the supplementary cushion: X
Position the head restraint as far forwards as
possible ( Y
page 102).X
Release press studs �C and remove supple-
mentary cushion �D .
Adjusting the rear center head
restraints
Retracting and extending electrically
X
Press and hold button �C until the head
restraint has fully extended or retracted. Folding into position mechanically X
Pull the head restraint up until it engages.
Adjusting the active multicontour
seat You can adjust the active multicontour seats for
the driver and front passenger via the multime-
dia system; see the Digital Operator's Manual.
The driving dynamics settings are only activated
if: R
the seat is occupied R
the seat belt is fastened
Adjusting the active multicontour
seat in the rear compartment You can adjust the multicontour seats for the
outer seats in the rear using the remote control;
see the Digital Operator's Manual.
Adjusting the 4-way lumbar support You can adjust the 4-way lumbar support via the
multimedia system (see the Digital Operator's
Manual).
Switching the seat heating on/off
Switching on/off
G WARNING
Repeatedly switching on the seat heating can
cause the seat cushion and backrest pads to
become very hot. The health of persons with112
Seats
Seats, steering wheel and mirrors
Page 115 of 382
limited temperature sensitivity or a limited
ability to react to excessively high tempera-
tures may be affected or they may even suffer
burn-like injuries. There is a risk of injury.
Therefore, do not switch the seat heating on
repeatedly.
For vehicles equipped with the Warmth Comfort
package: the armrest in the door and the center
console can also be heated when you switch on
the seat heating of one of the front seats. You
can set this via the multimedia system; see the
Digital Operator's Manual.
The three red indicator lamps in the button indi-
cate the heating level you have selected.
The system automatically switches down from
level 3 to level 2 after approximately eight
minutes.
The system automatically switches down from
level 2 to level 1 after approximately ten
minutes.
The system automatically switches off approx-
imately 20 minutes after it is set to level 1 .
Vehicles with the Seat Heating Plus package:
you can set the distribution of the heated sec-
tions of the seat cushion and backrest via the
multimedia system; see the Digital Operator's
Manual.
Vehicles with a Rear Seat Entertainment System
and electric seat adjustment: you can set the
distribution of the heated sections of the seat
cushions and backrests on the rear seats via the
Rear Seat Entertainment System; see the Digital
Operator's Manual.
Front seats X
Switch on the power supply or the ignition
( Y
page 146). X
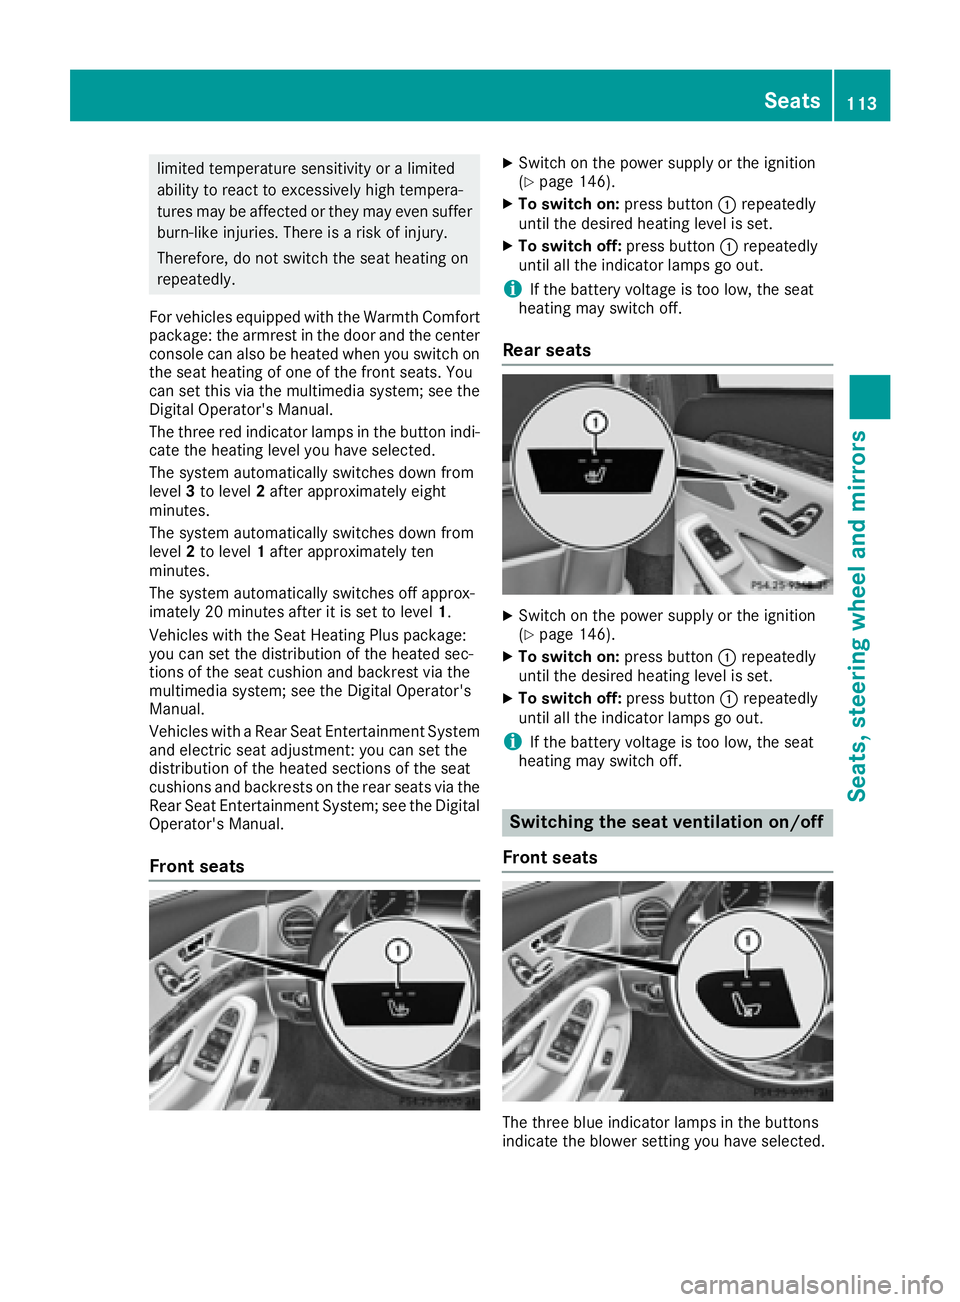
To switch on: press button �C repeatedly
until the desired heating level is set. X
To switch off: press button �C repeatedly
until all the indicator lamps go out.
i If the battery voltage is too low, the seat
heating may switch off.
Rear seats X
Switch on the power supply or the ignition
( Y
page 146). X
To switch on: press button �C repeatedly
until the desired heating level is set. X
To switch off: press button �C repeatedly
until all the indicator lamps go out.
i If the battery voltage is too low, the seat
heating may switch off.
Switching the seat ventilation on/off
Front seats
The three blue indicator lamps in the buttons
indicate the blower setting you have selected. Seats 113
Seats, steering wheel and mirrors Z
Page 122 of 382
Memory function
Important safety notes
G WARNING
If you use the memory function on the driver's
side while driving, you could lose control of
the vehicle as a result of the adjustments
being made. There is a risk of an accident.
Only use the memory function on the driver's
side when the vehicle is stationary.
G WARNING
When the memory function adjusts the seat or
steering wheel, you and other vehicle occu-
pants – particularly children – could become
trapped. There is a risk of injury.
While the memory function is making adjust-
ments, make sure that no one has any body
parts in the sweep of the seat or steering
wheel. If somebody becomes trapped, imme-
diately release the memory function position
button. The adjustment process is stopped.
G WARNING
Children could become trapped if they acti-
vate the memory function, particularly when
unattended. There is a risk of injury.
When leaving the vehicle, always take the
SmartKey with you and lock the vehicle. Never
leave children unsupervised in the vehicle.
The memory function can be used at any time,
even if the power supply is switched off.
Storing settings The memory function is only available in vehicles
with the memory package.
With the memory function, you can store up to
three different settings, e.g. for three different
people. The following settings are stored as a single
memory preset: R
seat, backrest, head restraint position and
contour of the backrest in the lumbar region R
active multicontour seat: side bolsters of the
backrest, shoulder of the backrest, contour of
the backrest, dynamic function level R
seat heating: distribution of the heated sec-
tions of the seat cushion and backrest R
driver's side: position of the exterior mirrors
on the driver's and front-passenger sides R
position of the head-up display
X
Adjust the seat accordingly ( Y
page 101).X
On the driver's side, adjust the steering wheel
( Y
page 115) and the exterior mirrors
( Y
page 117). X
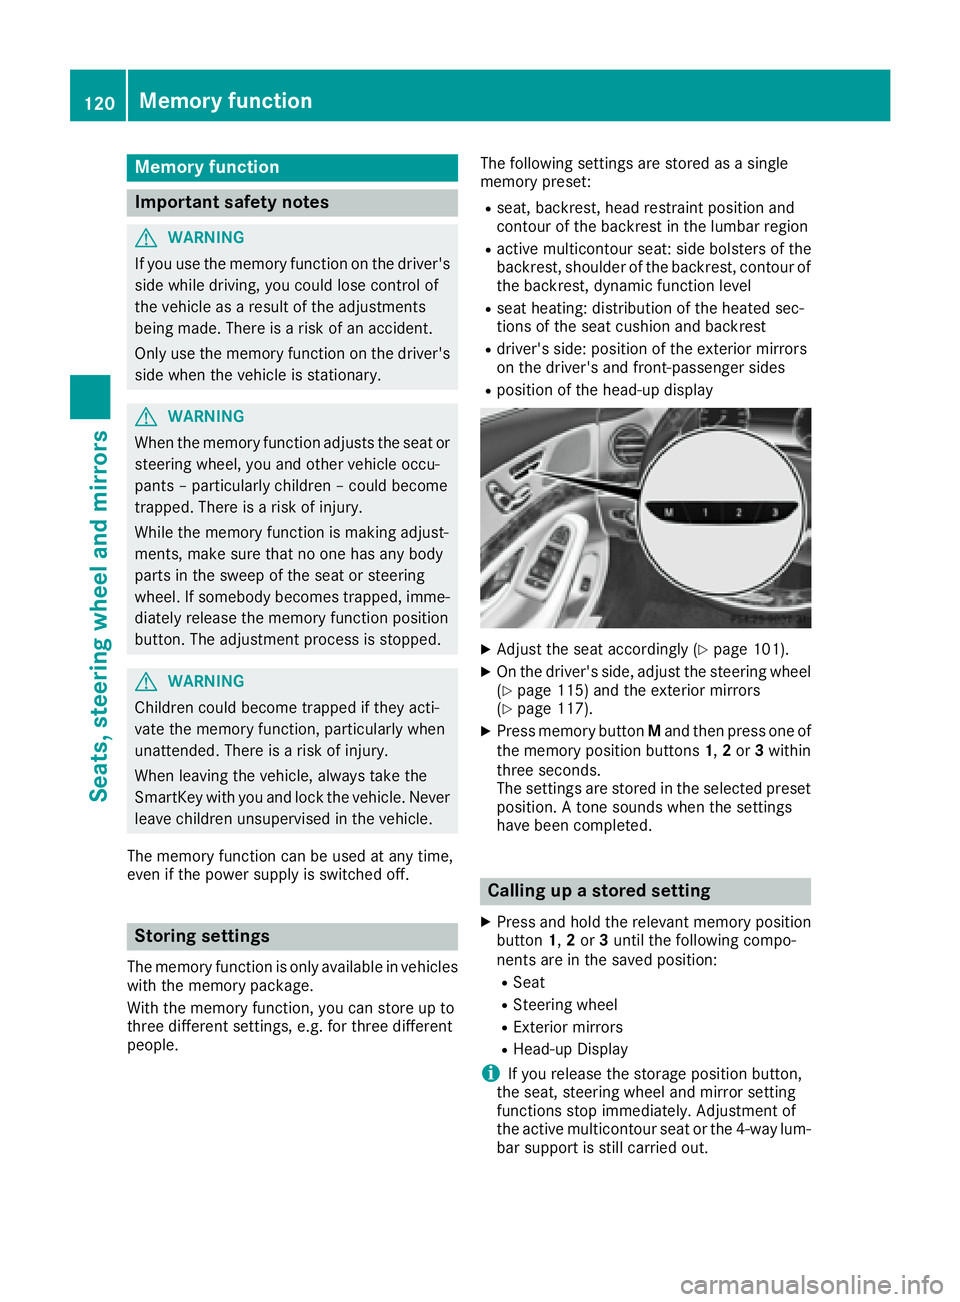
Press memory button M and then press one of
the memory position buttons 1 , 2 or 3 within
three seconds.
The settings are stored in the selected preset
position. A tone sounds when the settings
have been completed.
Calling up a stored setting X
Press and hold the relevant memory position
button 1 , 2 or 3 until the following compo-
nents are in the saved position: R
Seat R
Steering wheel R
Exterior mirrors R
Head-up Display
i If you release the storage position button,
the seat, steering wheel and mirror setting
functions stop immediately. Adjustment of
the active multicontour seat or the 4-way lum-
bar support is still carried out.120
Memory function
Seats, steering wheel and mirrors
Page 287 of 382
Stowage nets Stowage nets are located: R
in the front-passenger footwell R
on the back of the driver's and front-
passenger seat R
on the left and right-hand side in the trunk
Observe the loading guidelines ( Y
page 281)
and the safety notes regarding stowage spaces
( Y
page 281).
Skibag
Important safety notes
G WARNING
The skibag in conjunction with the lashing
straps cannot restrain any objects other than
skis.
Vehicle occupants could be struck in the
event of sudden braking or an accident, for
instance, if you: R
transport other heavy or sharp-edged
objects in the skibag R
do not secure the skibag with the lashing
straps
There is a risk of accident and injury.
Store only skis in the skibag. Always secure
the skibag with the lashing straps so that it
cannot move around.
Observe the following points when using the
skibag: R
do not transport more than three pairs of skis
in the skibag. R
when carefully sliding the skis into or remov-
ing them from the skibag, mind the sharp
edges and corners of the skis. R
stow the skis as described in the following: -
when sliding the skis in, position the run-
ning surfaces of the respective pair of skis
together. -
position one pair of skis at the bottom with
the tips of the skis pointing to the outside. -
position the two additional pairs of skis on
the left and right-hand sides above the
lower pair of skis. The tips of the skis being
offset by 90° to the tips of the skis below. Unfolding the skibag and loading skis
Vehicles with a rear bench seat
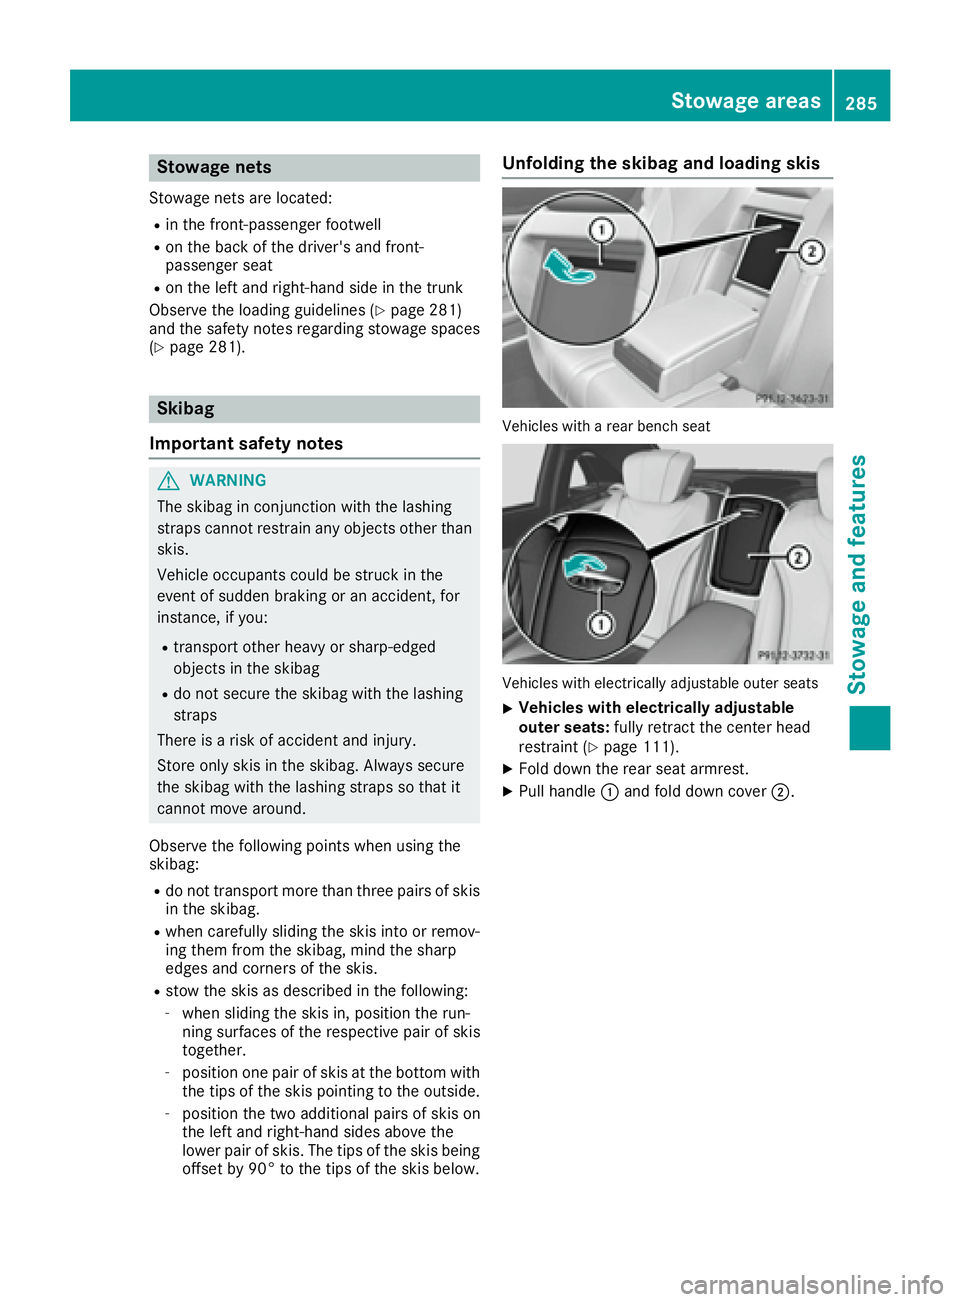
Vehicles with electrically adjustable outer seats X
Vehicles with electrically adjustable
outer seats: fully retract the center head
restraint ( Y
page 111). X
Fold down the rear seat armrest. X
Pull handle �C and fold down cover �D .Stowage areas 285
Stowage and features Z
Page 293 of 382
X
To open: open the stowage compartment
( Y
page 282). X
Open the protective flap if necessary. X
To remove: slide catch �C forwards and pull
the cup holder upwards. X
To insert: make sure that the protective flap
is closed. X
Insert the cup holder and slide catch �C back.
You can remove the cup holder and the rubber
mat for cleaning. Clean them with clean, luke-
warm water only.
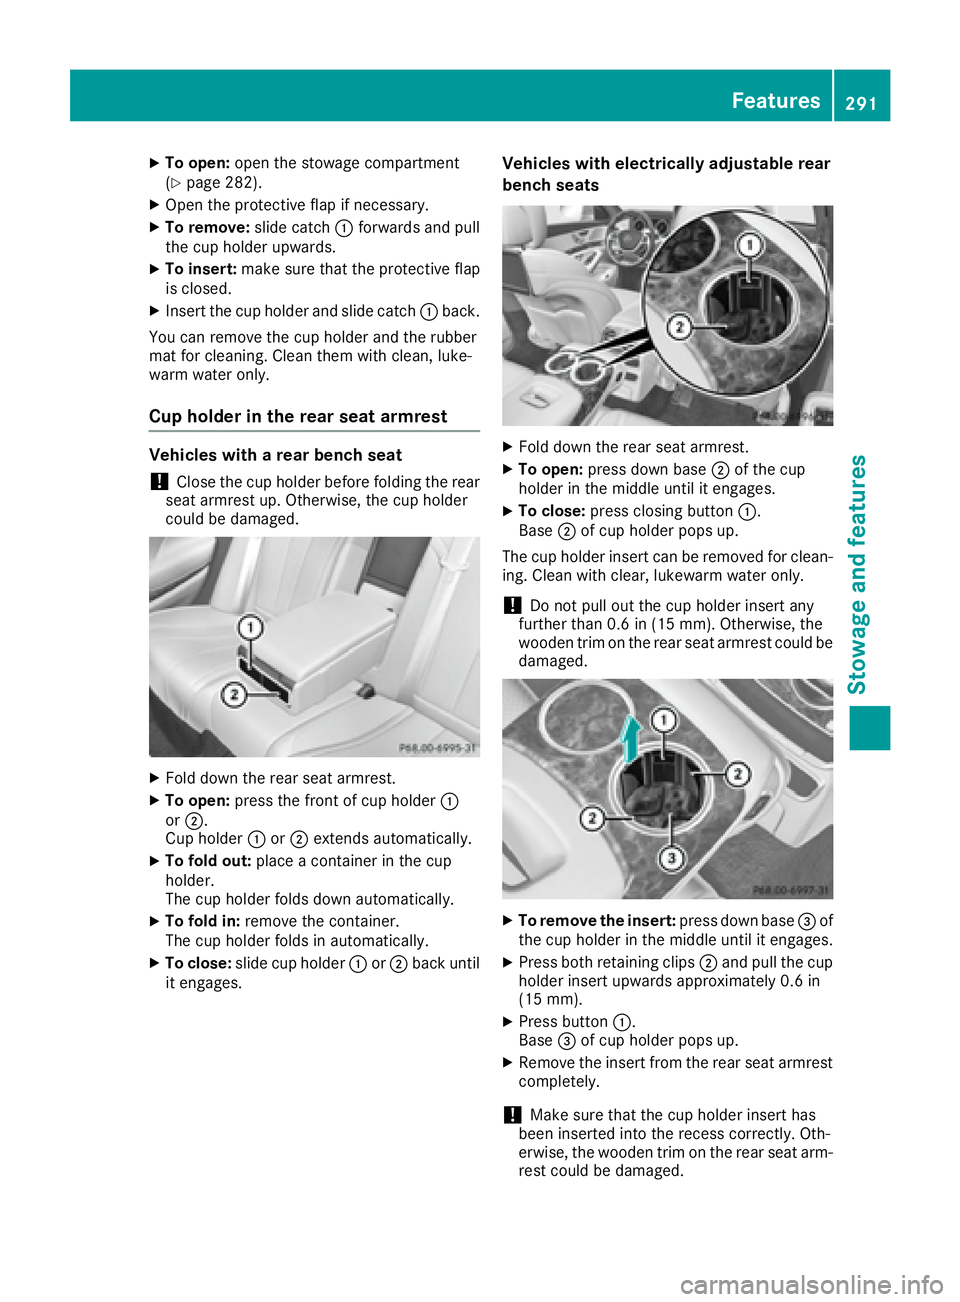
Cup holder in the rear seat armrest Vehicles with a rear bench seat
! Close the cup holder before folding the rear
seat armrest up. Otherwise, the cup holder
could be damaged.
X
Fold down the rear seat armrest. X
To open: press the front of cup holder �C
or �D .
Cup holder �C or �D extends automatically.X
To fold out: place a container in the cup
holder.
The cup holder folds down automatically. X
To fold in: remove the container.
The cup holder folds in automatically. X
To close: slide cup holder �C or �D back until
it engages. Vehicles with electrically adjustable rear
bench seats X
Fold down the rear seat armrest. X
To open: press down base �D of the cup
holder in the middle until it engages. X
To close: press closing button �C .
Base �D of cup holder pops up.
The cup holder insert can be removed for clean-
ing. Clean with clear, lukewarm water only.
! Do not pull out the cup holder insert any
further than 0.6 in (15 mm). Otherwise, the
wooden trim on the rear seat armrest could be
damaged.
X
To remove the insert: press down base �
Page 298 of 382
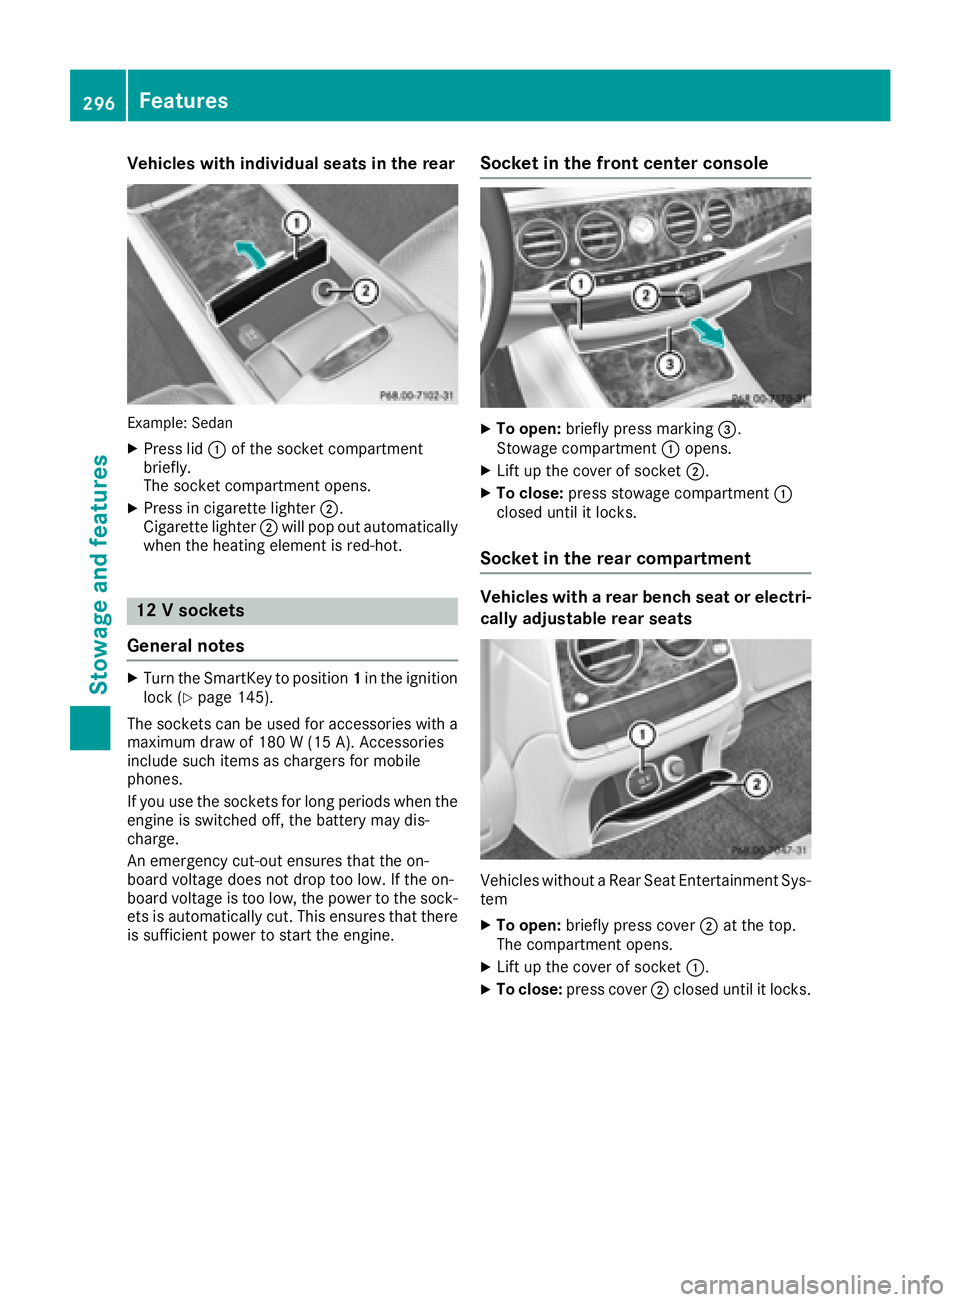
Vehicles with individual seats in the rear
Example: Sedan X
Press lid �C of the socket compartment
briefly.
The socket compartment opens. X
Press in cigarette lighter �D .
Cigarette lighter �D will pop out automatically
when the heating element is red-hot.
12 V sockets
General notes X
Turn the SmartKey to position 1 in the ignition
lock ( Y
page 145).
The sockets can be used for accessories with a
maximum draw of 180 W (15 A). Accessories
include such items as chargers for mobile
phones.
If you use the sockets for long periods when the
engine is switched off, the battery may dis-
charge.
An emergency cut-out ensures that the on-
board voltage does not drop too low. If the on-
board voltage is too low, the power to the sock-
ets is automatically cut. This ensures that there
is sufficient power to start the engine. Socket in the front center console X
To open: briefly press marking �
Page 300 of 382
! Note that work and repairs on the 115 V
power socket should only be carried out by
qualified specialist personnel.
General notes The 115 V power socket provides an alternating
voltage of 115 V so that small electronic devices
can be connected. These devices, such as
games consoles, chargers and laptops, must not
consume more than a maximum of 150 watts
altogether.
Requirements for operation of these devices: R
the electronic device that you connect has a
suitable connector and conforms to stand-
ards specific to the country you are in. R
the plug of the electronic device is plugged
correctly into 115 V power socket. R
the maximum wattage of the device to be
connected must not exceed 150 watts. R
the on-board power supply is within a permis-
sible voltage range. R
the 12 V sockets in the center console in the
front compartment ( Y
page 296) and in the
trunk are functional ( Y
page 297).
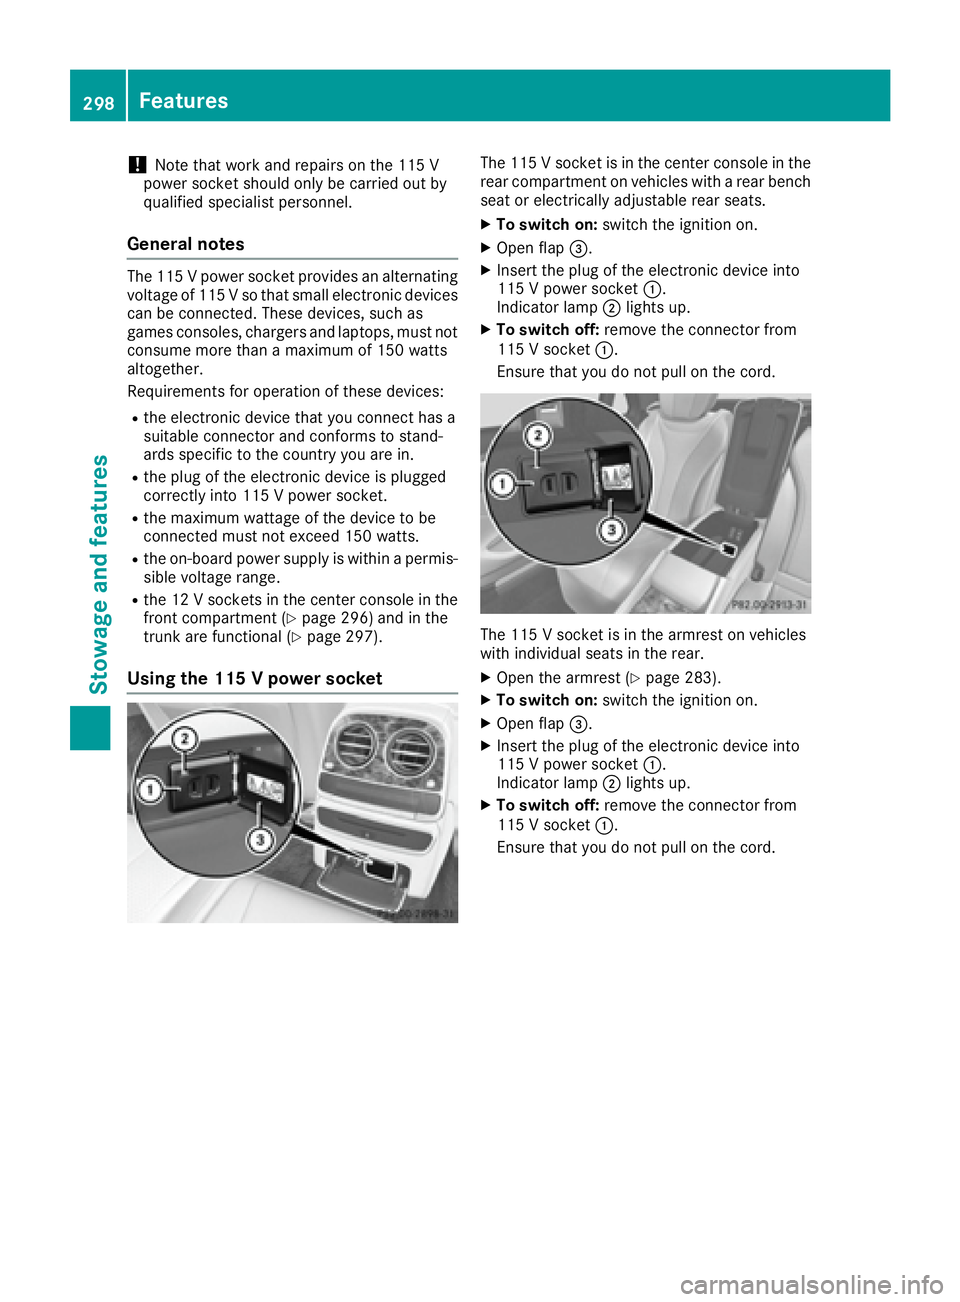
Using the 115 V power socket The 115 V socket is in the center console in the
rear compartment on vehicles with a rear bench
seat or electrically adjustable rear seats. X
To switch on: switch the ignition on. X
Open flap �
Page 356 of 382
You can find the valid maximum permissible
gross vehicle weight rating for your vehicle on
the Tire and Loading Information placard.
Number of seats
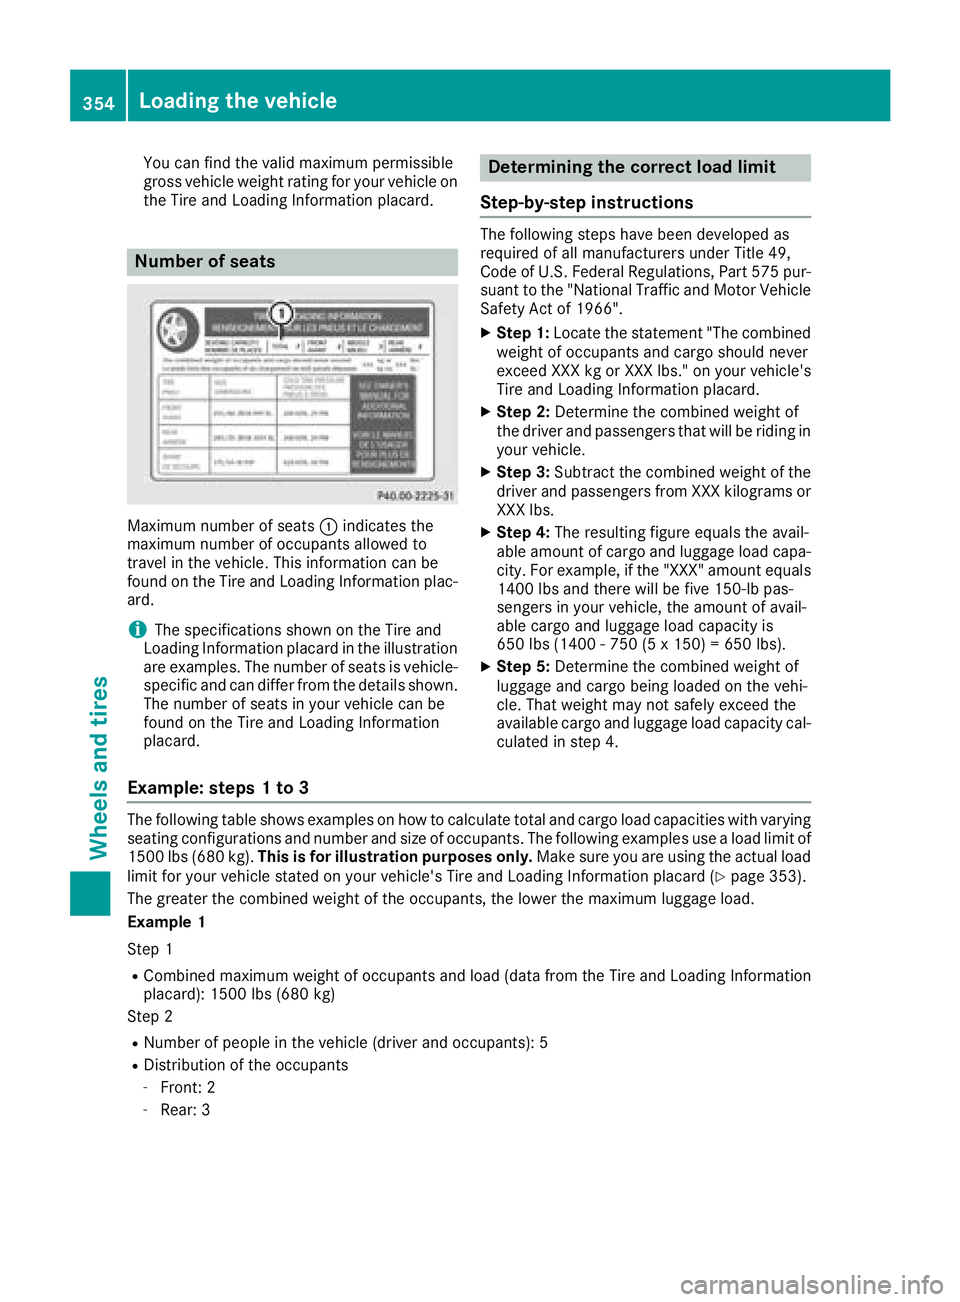
Maximum number of seats �C indicates the
maximum number of occupants allowed to
travel in the vehicle. This information can be
found on the Tire and Loading Information plac-
ard.
i The specifications shown on the Tire and
Loading Information placard in the illustration
are examples. The number of seats is vehicle-
specific and can differ from the details shown.
The number of seats in your vehicle can be
found on the Tire and Loading Information
placard. Determining the correct load limit
Step-by-step instructions The following steps have been developed as
required of all manufacturers under Title 49,
Code of U.S. Federal Regulations, Part 575 pur-
suant to the "National Traffic and Motor Vehicle
Safety Act of 1966". X
Step 1: Locate the statement "The combined
weight of occupants and cargo should never
exceed XXX kg or XXX lbs." on your vehicle's
Tire and Loading Information placard. X
Step 2: Determine the combined weight of
the driver and passengers that will be riding in
your vehicle. X
Step 3: Subtract the combined weight of the
driver and passengers from XXX kilograms or
XXX lbs. X
Step 4: The resulting figure equals the avail-
able amount of cargo and luggage load capa-
city. For example, if the "XXX" amount equals
1400 lbs and there will be five 150-lb pas-
sengers in your vehicle, the amount of avail-
able cargo and luggage load capacity is
650 lbs (1400 - 750 (5 x 150) = 650 lbs). X
Step 5: Determine the combined weight of
luggage and cargo being loaded on the vehi-
cle. That weight may not safely exceed the
available cargo and luggage load capacity cal-
culated in step 4.
Example: steps 1 to 3 The following table shows examples on how to calculate total and cargo load capacities with varying
seating configurations and number and size of occupants. The following examples use a load limit of
1500 lbs (680 kg). This is for illustration purposes only. Make sure you are using the actual load
limit for your vehicle stated on your vehicle's Tire and Loading Information placard ( Y
page 353).
The greater the combined weight of the occupants, the lower the maximum luggage load.
Example 1
Step 1 R
Combined maximum weight of occupants and load (data from the Tire and Loading Information
placard): 1500 lbs (680 kg)
Step 2 R
Number of people in the vehicle (driver and occupants): 5 R
Distribution of the occupants -
Front: 2 -
Rear: 3354
Loading the vehicle
Wheels and tires