2017 MERCEDES-BENZ S CLASS windshield wipers
[x] Cancel search: windshield wipersPage 4 of 382

Index ....................................................... 4
Digital Operator's Manual .................. 25
Introduction .......................................... .2 5
Operation ............................................... 25
Introduction ......................................... 26
Protecting the environment .................. .2 6
Genuine Mercedes-Benz parts .............. .2 6
Operator's Manual ................................. 27
Service and vehicle operation ............... .2 7
Operating safety .................................... 29
QR codes for the rescue card ............... .3 1
Data stored in the vehicle ...................... 31
Information on copyright ....................... 33
At a glance ........................................... 34
Cockpit .................................................. 34
Instrument cluster ................................. 35
Multifunction steering wheel ................. 36
Center console ...................................... 38
Overhead control panel ........................ .3 9
Door control panel ................................. 40
Rear seats ............................................. 41
Safety ................................................... 42
Panic alarm ............................................ 42
Occupant safety .................................... 42
Children in the vehicle ........................... 59
Pets in the vehicle ................................. 65
Driving safety systems ........................... 65
Protection against theft ........................ .7 5
Opening and closing ........................... 77
SmartKey ............................................... 77
Doors ..................................................... 83
Trunk ..................................................... 85
Side windows ......................................... 90
Panorama roof with power tilt/sliding
panel ...................................................... 94
Seats, steering wheel and mirrors .. 100
Correct driver's seat position .............. 100
Seats ................................................... 100 Steering wheel .................................... .1 15
Mirrors ................................................. 117
Memory function ................................. 120
Memory function in the rear compart-
ment .................................................... 121
Lights and windshield wipers .......... 124
Exterior lighting ................................... 124
Interior lighting ................................... .1 27
Replacing bulbs ................................... 128
Windshield wipers ................................ 128
Climate control ................................. 132
Overview of climate control systems ... 132
Operating the climate control sys-
tems .................................................... 135
Setting the air vents ............................ 143
Driving and parking .......................... 144
Notes on breaking-in a new vehicle ..... 144
Driving ................................................. 144
Automatic transmission ....................... 152
Refueling ............................................. 159
Parking ................................................ 162
Driving tips .......................................... 164
Driving systems ................................... 169
On-board computer and displays .... 210
Important safety notes ........................ 210
Displays and operation ........................ 210
Menus and submenus ......................... 214
Display messages ................................ 227
Warning and indicator lamps in the
instrument cluster ............................... 258
Multimedia system ........................... 269
General notes ...................................... 269
Important safety notes ........................ 269
Function restrictions ............................ 269
Operating system ................................ 270
Stowage and features ...................... 281
Stowage areas ..................................... 281
Features .............................................. 2902
Contents
Page 26 of 382

Snow chains .................................. 345
Storing ........................................... 363
Tightening torque ........................... 367
Wheel size/tire size ....................... 367
Window curtain air bag
Display message ............................ 238
Operation ......................................... 50
Windows
see Side windows
Windshield
Defrosting ...................................... 139
Infrared reflective .......................... 311
Windshield washer fluid
see Windshield washer system
Windshield washer system
Adding washer fluid ....................... 317
Important safety notes .................. 375
Notes ............................................. 375
Windshield wipers
Problem (malfunction) ................... 131
Replacing the wiper blades ............ 129
Switching on/off ........................... 128
Winter driving
Important safety notes .................. 345
Slippery road surfaces ................... 168
Snow chains .................................. 345
Winter operation
Radiator cover ............................... 313
Summer tires ................................. 345
Winter tires
M+S tires ....................................... 345
Wiper blades
Cleaning ......................................... 322
Important safety notes .................. 129
Replacing ....................................... 129
Wooden trim (cleaning instruc-
tions) .................................................. 325
Workshop
see Qualified specialist workshop24
Index
Page 126 of 382

Exterior lighting
General notes USA only: if you wish to drive during the daytime
without lights, switch off the Daytime Run‐
ning Lights function via the on-board com-
puter ( Y
page 225).
Setting the exterior lighting
Setting options Exterior lighting can be set using: R
the light switch ( Y
page 124)R
the combination switch ( Y
page 125)R
the on-board computer ( Y
page 225)
Light switch Operation
�G �c
Left-hand standing lamps�H �d
Right-hand standing lamps�I �`
Parking lamps, license plate and
instrument cluster lighting�J �X
Automatic headlamp mode, controlled
by the light sensor
�K �X
Low-beam/high-beam headlamps
If you hear a warning tone when you leave the
vehicle, the lights may still be switched on. X
Turn the light switch to the �X position.
The exterior lighting (except the parking/stand-
ing lamps) switches off automatically if you: R
remove the SmartKey from the ignition lock R
open the driver's door with the SmartKey in
position 0 in the ignition lock Automatic headlamp mode
G WARNING
When the light switch is set to �X , the low-
beam headlamps may not be switched on
automatically if there is fog, snow or other
causes of poor visibility due to the weather
conditions such as spray. There is a risk of an
accident.
In such situations, turn the light switch to
�X .
The automatic headlamp feature is only an aid.
The driver is responsible for the vehicle's light-
ing at all times.
�X is the favored light switch setting.
The light setting is automatically selected
according to the brightness of the ambient light,
but not in the event of poor visibility due to
weather conditions such as fog, snow or spray. R
With the SmartKey in position 1 in the ignition
lock, the parking lamps are switched on or off
automatically depending on the brightness of
the ambient light. R
USA only: if you have switched on the Day‐
time Running Lights function via the on-
board computer, and the engine is running,
the daytime running lamps or the parking
lamps and low-beam headlamps are switched
on or off automatically depending on the
ambient light. R
Canada only: depending on the ambient light,
the daytime running lamps or the parking and
low-beam headlamps are switched on/off
automatically when the engine is running. X
To switch on the automatic headlamps:
turn the light switch to the �X position.
USA only: The daytime running lamps improve
the visibility of your vehicle during the day. Here,
the Daytime Running Lights function must
be switched on via the on-board computer
( Y
page 225).
If the engine is running and you turn the light
switch to the �` or �X position, the manual
settings take precedence over the daytime run-
ning lamps.
Canada only: The daytime running lamps
improve the visibility of your vehicle during the
day. The daytime running lamps function is
required by law in Canada. It cannot therefore
be deactivated.124
Exterior lighting
Lights and windshield wipers
Page 131 of 382
If it is necessary to switch on the windshield
wipers in dry weather conditions, always use
washer fluid when operating the windshield
wipers.
! If the windshield wipers leave smears on the
windshield after the vehicle has been washed
in an automatic car wash, wax or other resi-
dues may be the reason for this. Clean the
windshield using washer fluid after washing
the vehicle in an automatic car wash.
! Intermittent wiping with rain sensor: due to
optical influences and the windshield becom-
ing dirty in dry weather conditions, the wind-
shield wipers may be activated inadvertently.
This could then damage the windshield wiper
blades or scratch the windshield.
For this reason, you should always switch off
the windshield wipers in dry weather.
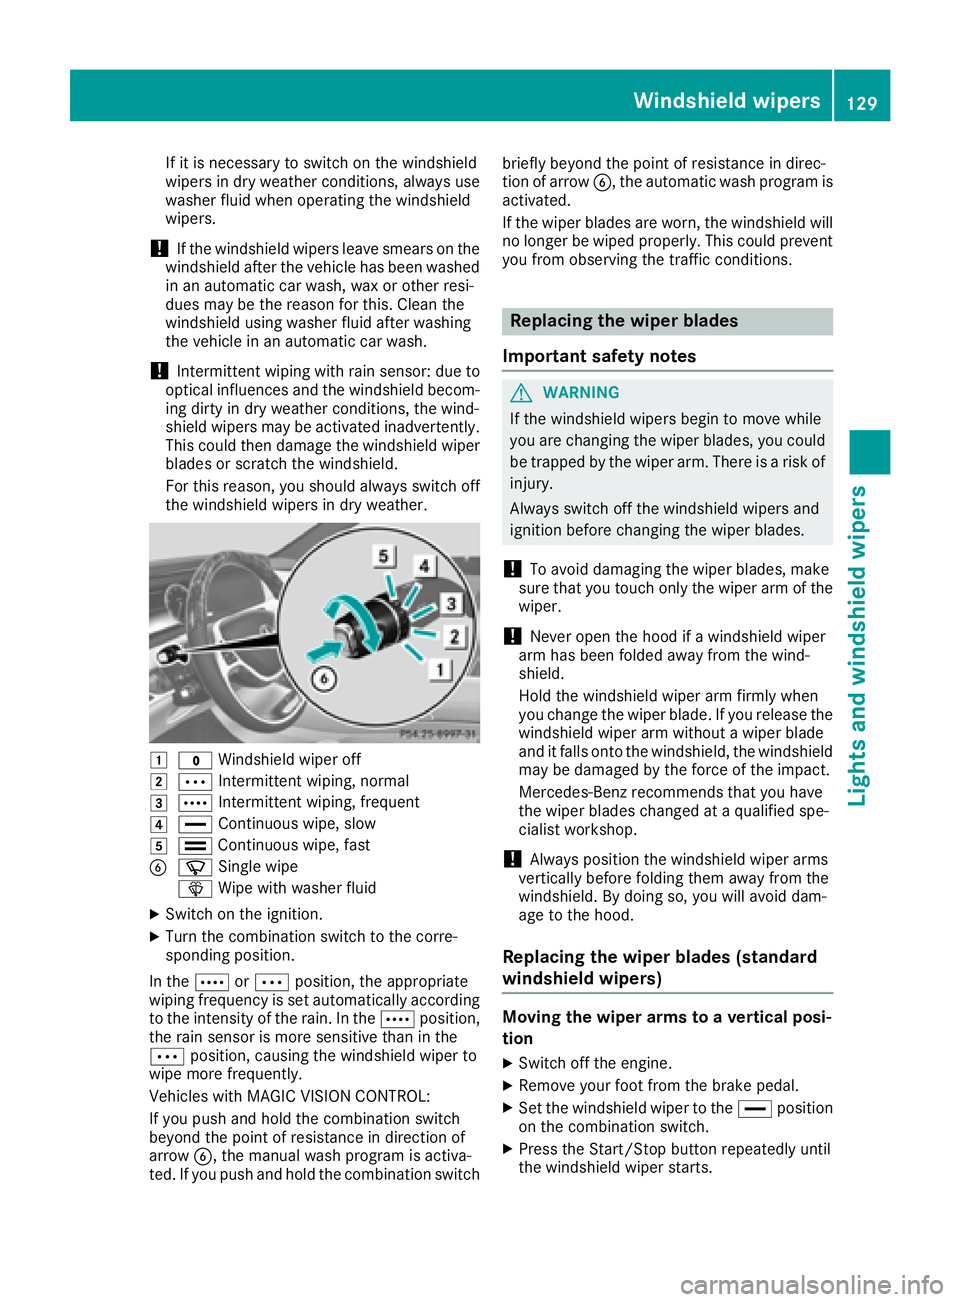
�G
�? Windshield wiper off�H
�b Intermittent wiping, normal�I
�c Intermittent wiping, frequent�J
�
Page 141 of 382
Defrosting th e windshield
General notes You can use this function to defrost th e wind-
shield or to clear a fogge d up windshield or fron t
sid e windows on th e inside.
Switc h of f th e "Windshield defrosting" function
as soo n as th e windshield is clear again .
Switchin g th e "Windshield defrosting"
function on or off X
Tur n th e SmartKey to position 2 in th e ignition
loc k ( Y
page 145).X
To activate : press th e �d rocker switch on
th e fron t contro l panel up or down .
The indicator lamp in th e �d rocker switch
lights up.
The climat e contro l syste m switches to th e
followin g functions:R
hig h airflowR
hig h temperatureR
air distribution to th e windshield and fron t
sid e windowsR
air-recirculation mode of fR
windshield heatin g onR
coolin g wit h air dehumidification onX
To deactivate : press th e �d rocker switch
up or down .
The indicator lamp in th e �d rocker switch
goe s out . The previously selecte d setting s are
restored . Air-recirculation mode remain s
deactivated.
Defrosting th e windows
Windows fogged up on th e insideX
Activat e th e "Coolin g wit h air dehumidifica-
tion " function wit h th e �V rocker switch .
or X
Activat e th e "Coolin g wit h air dehumidifica-
tion " function via th e multimedia system; see
th e Digital Operator's Manual. X
Switc h on automatic mode usin g th e �X
rocker switch . X
If th e windows continue to fo g up: activat e th e
"Windshield defrosting" function usin g th e
�d rocker switch . The windshield heatin g is
switched on .
i You should only selec t this setting until th e
windshield is clear again .
Windows fogged up on th e outsid eX
Activat e th e windshield wipers .X
Switc h on automatic mode usin g th e �X
rocker switch .
i If you clean th e windows regularly, they do
no t fo g up so quickly.
Rea r window defroster
General notes The rea r window defroster has a hig h curren t
draw. You should therefore switch it of f as soo n
as th e rea r window is clear . Otherwise , th e rea r
window defroster switches of f automatically
after severa l minutes.
If th e battery voltage is to o low, th e rea r window
defroster may switch off.
Activating or deactivating X
Tur n th e SmartKey to position 2 in th e ignition
loc k ( Y
page 145). X
Press th e �l rocker switch up or down .
The indicator lamp in th e �l rocker switch
lights up or goe s out .Operating the climate control systems 13 9
Climate control
Page 147 of 382
There is a risk of fire and an accident. Release
the parking brake fully before driving off.
! Do not warm up the engine with the vehicle
stationary. Drive off immediately. Avoid high
engine speeds and driving at full throttle until
the engine has reached its operating temper-
ature.
Only shift the automatic transmission to the
desired drive position when the vehicle is sta-
tionary.
Where possible, avoid spinning the drive
wheels when pulling away on slippery roads.
You could otherwise damage the drive train.
! At low engine oil temperatures under 68 ‡
(+20 †), the maximum engine speed is limi-
ted in order to protect the engine. To protect
the engine and maintain smooth engine oper-
ation, avoid driving at full throttle when the
engine is cold.
Hybrid vehicles: make sure that you read the
separate operating instructions. Otherwise, you
may not recognize dangers.
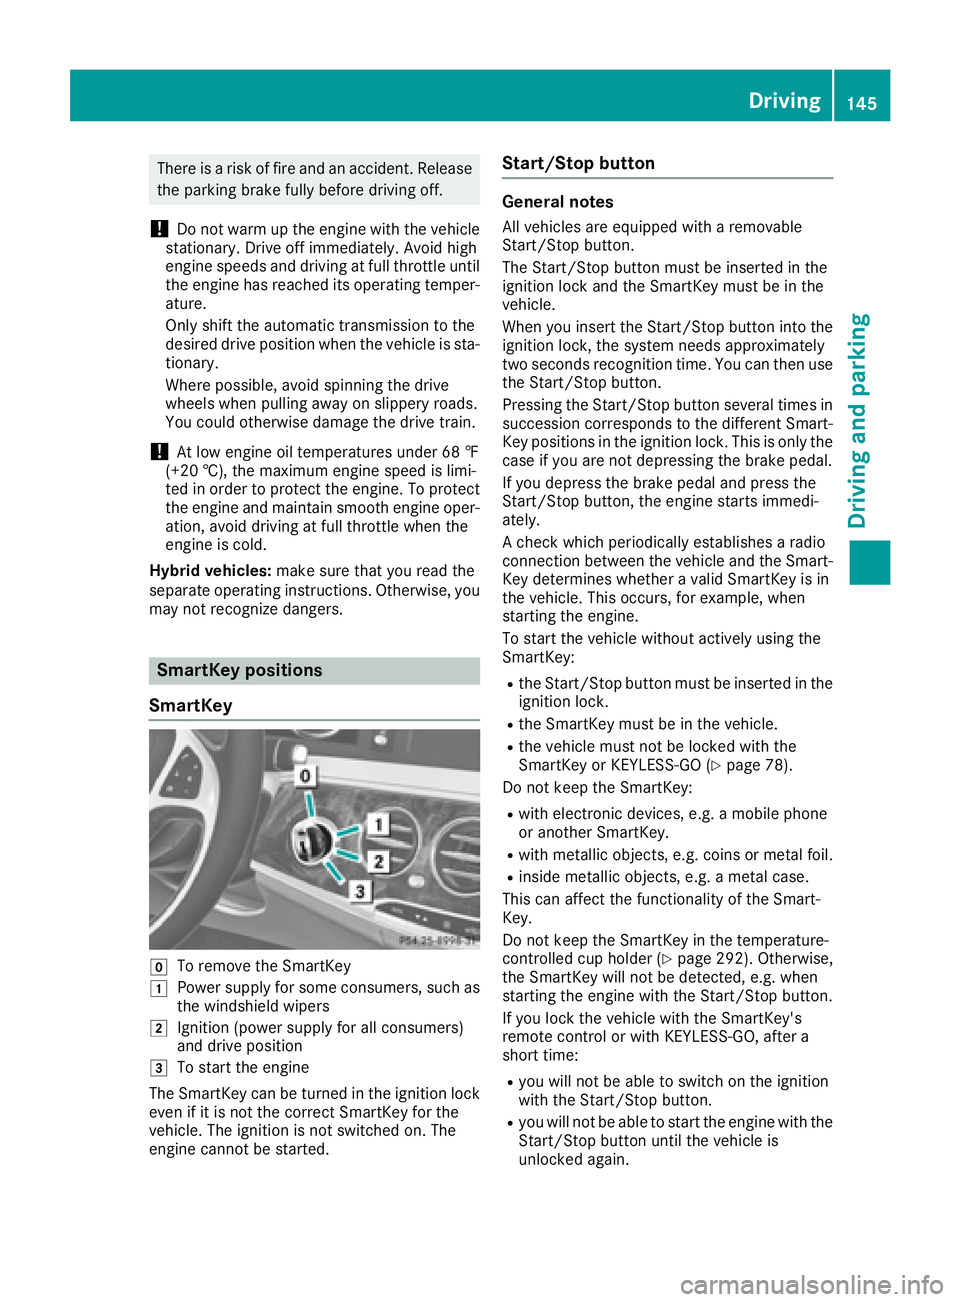
SmartKey positions
SmartKey
�Z
To remove the SmartKey
�G
Power supply for some consumers, such as
the windshield wipers
�H
Ignition (power supply for all consumers)
and drive position
�I
To start the engine
The SmartKey can be turned in the ignition lock
even if it is not the correct SmartKey for the
vehicle. The ignition is not switched on. The
engine cannot be started. Start/Stop button General notes All vehicles are equipped with a removable
Start/Stop button.
The Start/Stop button must be inserted in the
ignition lock and the SmartKey must be in the
vehicle.
When you insert the Start/Stop button into the
ignition lock, the system needs approximately
two seconds recognition time. You can then use
the Start/Stop button.
Pressing the Start/Stop button several times in
succession corresponds to the different Smart-
Key positions in the ignition lock. This is only the
case if you are not depressing the brake pedal.
If you depress the brake pedal and press the
Start/Stop button, the engine starts immedi-
ately.
A check which periodically establishes a radio
connection between the vehicle and the Smart-
Key determines whether a valid SmartKey is in
the vehicle. This occurs, for example, when
starting the engine.
To start the vehicle without actively using the
SmartKey: R
the Start/Stop button must be inserted in the
ignition lock. R
the SmartKey must be in the vehicle. R
the vehicle must not be locked with the
SmartKey or KEYLESS-GO ( Y
page 78).
Do not keep the SmartKey: R
with electronic devices, e.g. a mobile phone
or another SmartKey. R
with metallic objects, e.g. coins or metal foil. R
inside metallic objects, e.g. a metal case.
This can affect the functionality of the Smart-
Key.
Do not keep the SmartKey in the temperature-
controlled cup holder ( Y
page 292). Otherwise,
the SmartKey will not be detected, e.g. when
starting the engine with the Start/Stop button.
If you lock the vehicle with the SmartKey's
remote control or with KEYLESS-GO, after a
short time: R
you will not be able to switch on the ignition
with the Start/Stop button. R
you will not be able to start the engine with the
Start/Stop button until the vehicle is
unlocked again. Driving 145
Driving and parking Z
Page 148 of 382
If you lock the vehicle centrally using the button
on the front door ( Y
page 83), you can continue
to start the engine with the Start/Stop button.
The engine can be switched off while the vehicle
is in motion by pressing and holding the Start/
Stop button for three seconds. This function
operates independently of the ECO start/stop
automatic engine switch-off function.
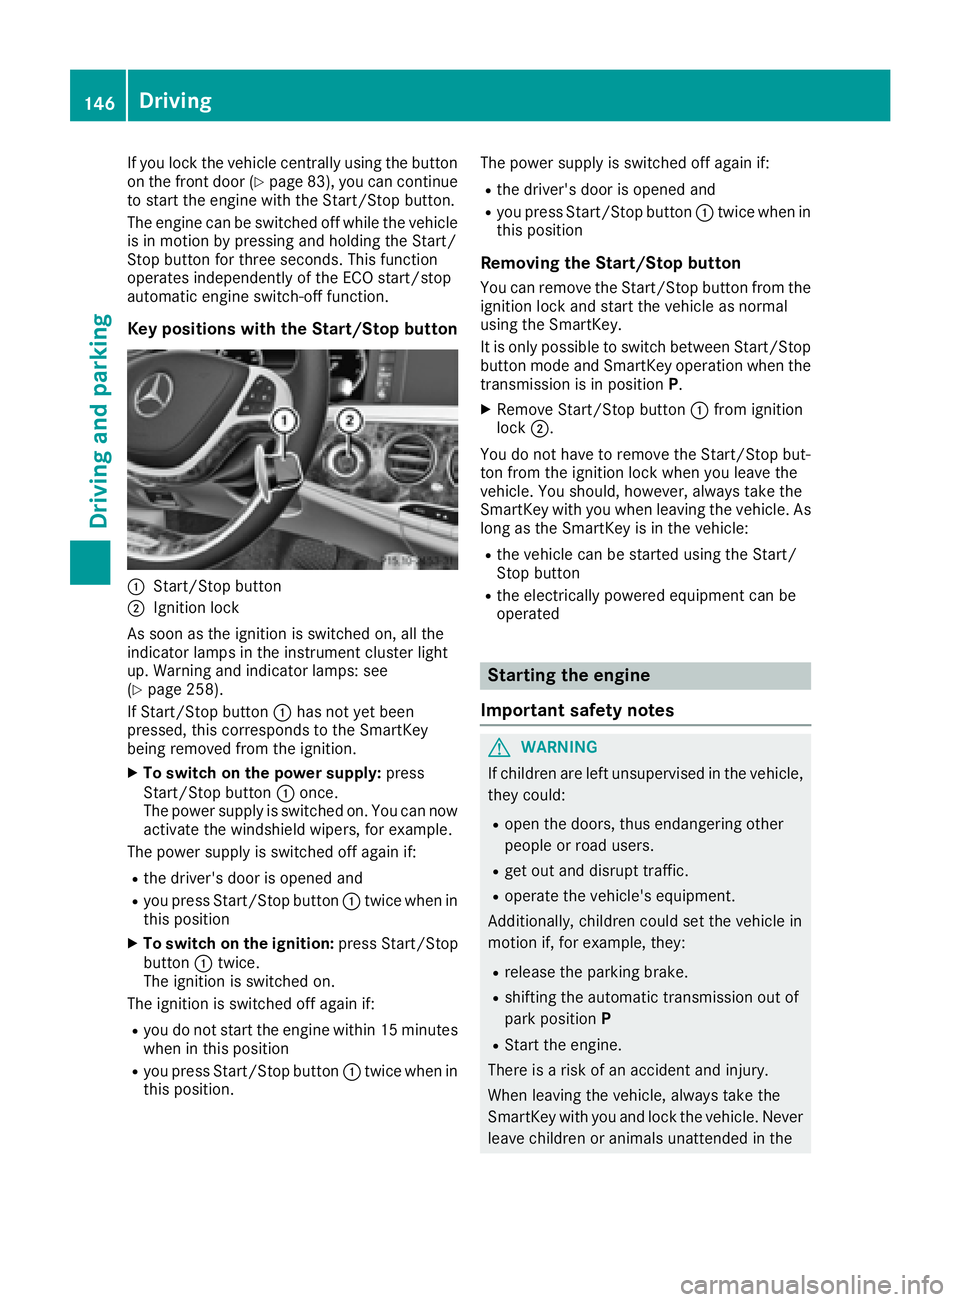
Key positions with the Start/Stop button
�C
Start/Stop button�D
Ignition lock
As soon as the ignition is switched on, all the
indicator lamps in the instrument cluster light
up. Warning and indicator lamps: see
( Y
page 258).
If Start/Stop button �C has not yet been
pressed, this corresponds to the SmartKey
being removed from the ignition. X
To switch on the power supply: press
Start/Stop button �C once.
The power supply is switched on. You can now
activate the windshield wipers, for example.
The power supply is switched off again if: R
the driver's door is opened and R
you press Start/Stop button �C twice when in
this position X
To switch on the ignition: press Start/Stop
button �C twice.
The ignition is switched on.
The ignition is switched off again if: R
you do not start the engine within 15 minutes
when in this position R
you press Start/Stop button �C twice when in
this position. The power supply is switched off again if: R
the driver's door is opened and R
you press Start/Stop button �C twice when in
this position
Removing the Start/Stop button You can remove the Start/Stop button from the
ignition lock and start the vehicle as normal
using the SmartKey.
It is only possible to switch between Start/Stop
button mode and SmartKey operation when the
transmission is in position P .X
Remove Start/Stop button �C from ignition
lock �D .
You do not have to remove the Start/Stop but-
ton from the ignition lock when you leave the
vehicle. You should, however, always take the
SmartKey with you when leaving the vehicle. As
long as the SmartKey is in the vehicle: R
the vehicle can be started using the Start/
Stop button R
the electrically powered equipment can be
operated
Starting the engine
Important safety notes
G WARNING
If children are left unsupervised in the vehicle,
they could: R
open the doors, thus endangering other
people or road users. R
get out and disrupt traffic. R
operate the vehicle's equipment.
Additionally, children could set the vehicle in
motion if, for example, they: R
release the parking brake. R
shifting the automatic transmission out of
park position P R
Start the engine.
There is a risk of an accident and injury.
When leaving the vehicle, always take the
SmartKey with you and lock the vehicle. Never
leave children or animals unattended in the146
Driving
Driving and parking
Page 205 of 382
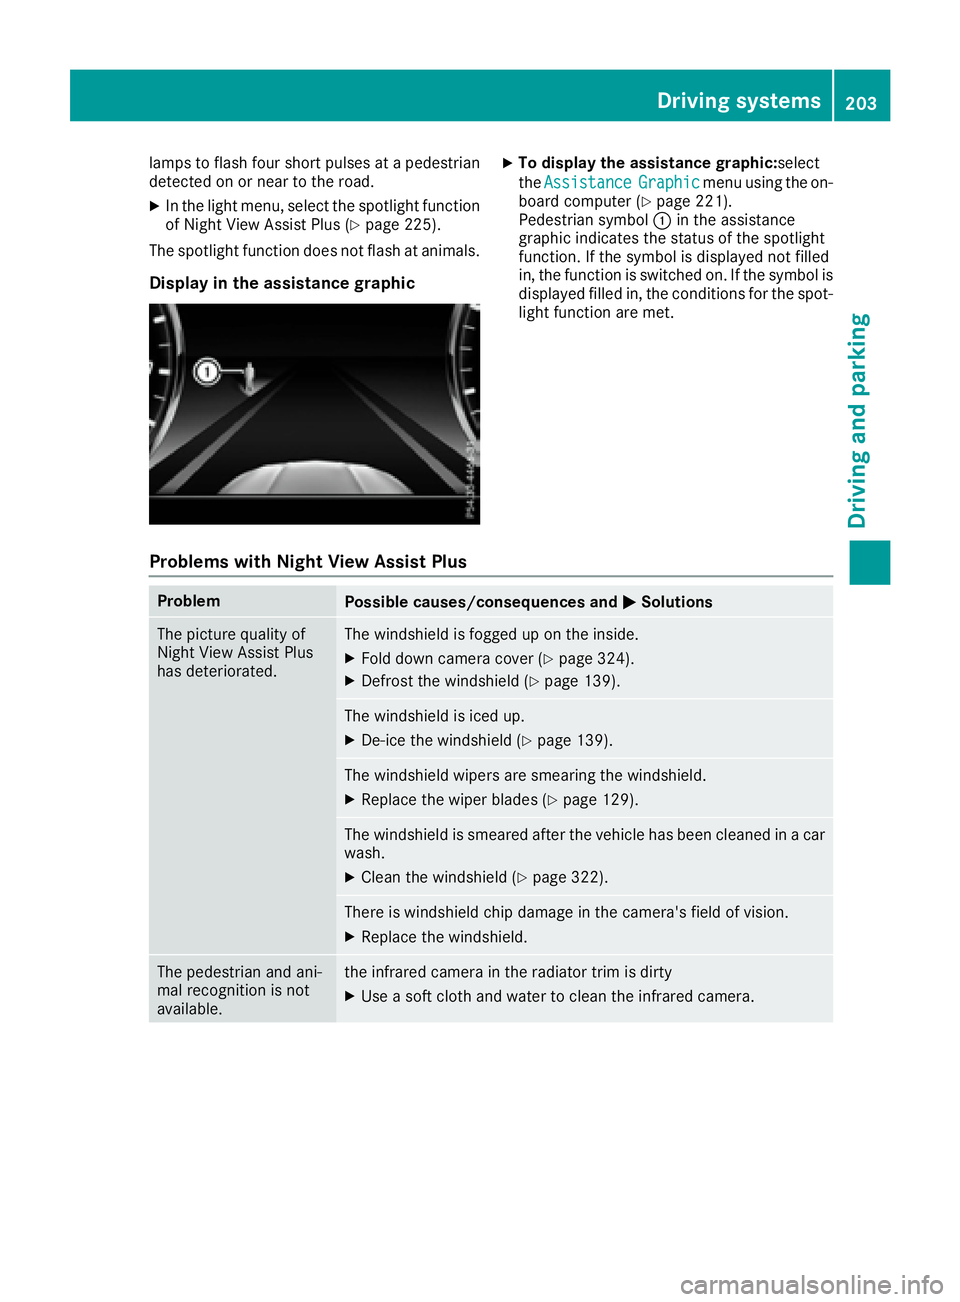
lamps to flash four short pulses at a pedestrian
detected on or near to the road. X
In the light menu, select the spotlight function
of Night View Assist Plus ( Y
page 225).
The spotlight function does not flash at animals.
Display in the assistance graphic X
To display the assistance graphic: select
the Assistance Graphic menu using the on-
board computer ( Y
page 221).
Pedestrian symbol �C in the assistance
graphic indicates the status of the spotlight
function. If the symbol is displayed not filled
in, the function is switched on. If the symbol is
displayed filled in, the conditions for the spot-
light function are met.
Problems with Night View Assist Plus Problem
Possible causes/consequences and �P Solutions
The picture quality of
Night View Assist Plus
has deteriorated. The windshield is fogged up on the inside. X
Fold down camera cover ( Y
page 324).X
Defrost the windshield ( Y
page 139).
The windshield is iced up. X
De-ice the windshield ( Y
page 139).
The windshield wipers are smearing the windshield. X
Replace the wiper blades ( Y
page 129).
The windshield is smeared after the vehicle has been cleaned in a car
wash. X
Clean the windshield ( Y
page 322).
There is windshield chip damage in the camera's field of vision. X
Replace the windshield.
The pedestrian and ani-
mal recognition is not
available. the infrared camera in the radiator trim is dirty X
Use a soft cloth and water to clean the infrared camera. Driving systems 203
Driving and parking Z