2017 MERCEDES-BENZ S CLASS buttons
[x] Cancel search: buttonsPage 8 of 382

Replacin g ........................................ .8 0
Battery (vehicle)
Charging ........................................ 334
Display message ............................ 243
Important safety notes .................. 332
Jump starting ................................. 335
Belt
see Seat belts
Belt bag ................................................ 46
Blind Spot Assist
see Active Blind Spot Assist
Blootooth ®
Connecting a different mobile
phone ............................................ 278
Bluetooth ®
Searching for a mobile phone ........ 277
see also Digital Operator's Man-
ual .................................................. 269
Telephony ...................................... 277
Box (trunk) ......................................... 287
Brake Assist
see BAS (Brake Assist System)
Brake fluid
Display message ............................ 233
Notes ............................................. 374
Brake force distribution
see EBD (electronic brake force
distribution)
Brakes
ABS .................................................. 66
Adaptive Brake Assist ...................... 70
BAS .................................................. 66
BAS PLUS with Cross-Traffic
Assist ............................................... 67
Brake fluid (notes) ......................... 374
Display message ............................ 228
EBD .................................................. 73
High-performance brake system .... 168
Hill start assist ............................... 148
HOLD function ............................... 178
Important safety notes .................. 166
Maintenance .................................. 167
Parking brake ................................ 163
Riding tips ...................................... 166
Warning lamp ................................. 260
Breakdown
Where will I find...? ........................ 327 see Flat tire
see Towing away
Brightness control (instrument
cluster lighting) ................................... 36
Buttons on the steering wheel ......... 211
C California
Important notice for retail cus-
tomers and lessees .......................... 27
Calling up a malfunction
see Display messages
Calling up the climate control bar
Multimedia system ........................ 274
Calling up the climate control
menu
Multimedia system ........................ 274
Camera
see Rear view camera
Car
see Vehicle
Care
360° camera ................................. 323
Car wash ........................................ 319
Carpets .......................................... 326
Display ........................................... 324
Exhaust pipe .................................. 323
Exterior lights ................................ 322
General notes ................................ 319
Interior ........................................... 324
Matte finish ................................... 321
Night View Assist Plus ................... 324
Paint .............................................. 321
Plastic trim .................................... 324
Power washer ................................ 320
Rear view camera .......................... 323
Roof lining ...................................... 326
Seat belt ........................................ 325
Seat cover ..................................... 325
Selector lever ................................ 325
Sensors ......................................... 323
Steering wheel ............................... 325
Trim pieces .................................... 325
Washing by hand ........................... 320
Wheels ........................................... 322
Windows ........................................ 322
Wiper blades .................................. 3226
Index
Page 22 of 382

Steering wheel
Adjusting (electrically) .................. .1 15
Button overview ............................... 36
Buttons (on-board computer) ......... 211
Cleaning ......................................... 325
EASY ENTRY/EXIT feature ............. 116
Important safety notes .................. 115
Paddle shifters ............................... 156
Steering wheel heating .................. 115
Storing settings (memory func-
tion) ............................................... 120
Steering wheel heating
Problem (malfunction) ................... 116
Switching on/off ........................... 115
Steering wheel paddle shifters ....... .1 56
Stop&Go Pilot
see DISTRONIC PLUS
Stowage areas ................................... 281
Stowage compartments
Armrest (under) ............................ .2 83
Center console .............................. 282
Center console in rear compart-
ment .............................................. 283
Cup holders ................................... 290
Door ............................................... 283
Eyeglasses compartment .............. .2 82
Glove box ....................................... 282
Important safety information ......... 281
Rear ............................................... 283
Rear seat backrest ......................... 284
Stowage net ................................... 285
see Stowage areas
Stowage net ....................................... 285
Stowage space
Bag hooks ...................................... 287
Folding table .................................. 284
Parcel net retainers ....................... 288
Securing a load .............................. 288
Stowage well beneath the trunk
floor .................................................... 289
Summer tires
In winter ........................................ 345
Sun visor ............................................ 292
Suspension mode
Active Body Control ABC .............. .1 80
Suspension setting
AIRMATIC ...................................... 182 Suspension settings
SETUP (on-board computer) .......... 226
Switching air-recirculation mode
on/off ................................................. 140
Sw i
tching on media mode
Via the device list .......................... 278
T Tachometer ........................................ 210
Tail lamps
Display message ............................ 241
Tank content
Fuel gauge ....................................... 35
Technical data
Capacities ...................................... 371
Information .................................... 369
Tires/wheels ................................. 367
Vehicle data ................................... 376
Telephone
Accepting a call (multifunction
steering wheel) .............................. 220
Authorizing a mobile phone (con-
necting) ......................................... 277
Connecting a mobile phone (gen-
eral information) ............................ 277
Display message ............................ 257
Introduction ................................... 219
Menu (on-board computer) ............ 219
Number from the phone book ........ 220
Redialing ........................................ 220
Rejecting/ending a call ................. 220
see also Digital Operator's Man-
ual .................................................. 269
Switching between mobile
phones ........................................... 278
Temperature
Coolant .......................................... 211
Engine oil (on-board computer,
Mercedes-AMG vehicles) ............... 226
Outside temperature ...................... 210
Setting (climate control) ................ 137
Transmission oil (on-board com-
puter, Mercedes-AMG vehicles) ..... 226
Tire pressure
Calling up (on-board computer) ..... 349
Checking manually ........................ 349
Display message ............................ 25220
Index
Page 67 of 382
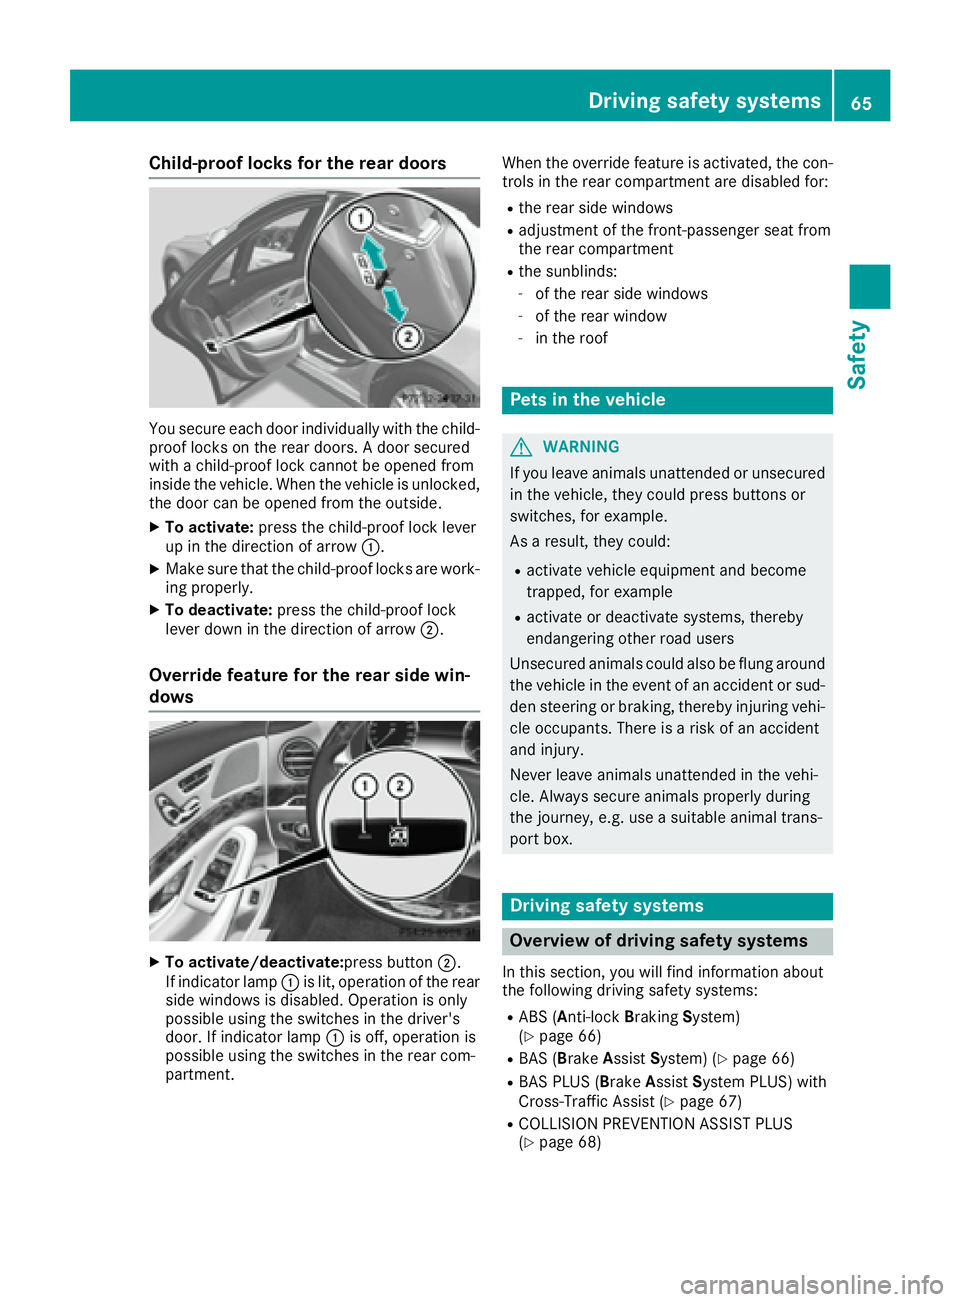
Child-proof locks for the rear doors
You secure each door individually with the child-
proof locks on the rear doors. A door secured
with a child-proof lock cannot be opened from
inside the vehicle. When the vehicle is unlocked,
the door can be opened from the outside. X
To activate: press the child-proof lock lever
up in the direction of arrow �C .X
Make sure that the child-proof locks are work-
ing properly. X
To deactivate: press the child-proof lock
lever down in the direction of arrow �D .
Override feature for the rear side win-
dows
X
To activate/deactivate: press button �D .
If indicator lamp �C is lit, operation of the rear
side windows is disabled. Operation is only
possible using the switches in the driver's
door. If indicator lamp �C is off, operation is
possible using the switches in the rear com-
partment. When the override feature is activated, the con-
trols in the rear compartment are disabled for: R
the rear side windows R
adjustment of the front-passenger seat from
the rear compartment R
the sunblinds: -
of the rear side windows -
of the rear window -
in the roof
Pets in the vehicle
G WARNING
If you leave animals unattended or unsecured
in the vehicle, they could press buttons or
switches, for example.
As a result, they could: R
activate vehicle equipment and become
trapped, for example R
activate or deactivate systems, thereby
endangering other road users
Unsecured animals could also be flung around
the vehicle in the event of an accident or sud-
den steering or braking, thereby injuring vehi-
cle occupants. There is a risk of an accident
and injury.
Never leave animals unattended in the vehi-
cle. Always secure animals properly during
the journey, e.g. use a suitable animal trans-
port box.
Driving safety systems
Overview of driving safety systems In this section, you will find information about
the following driving safety systems: R
ABS ( A nti-lock B raking S ystem)
( Y
page 66) R
BAS ( B rake A ssist S ystem) ( Y
page 66)R
BAS PLUS ( B rake A ssist S ystem PLUS) with
Cross-Traffic Assist ( Y
page 67)R
COLLISION PREVENTION ASSIST PLUS
( Y
page 68)Driving safety systems 65
Safety Z
Page 81 of 382

KEYLESS- GO start function
Gene ra l notesBear in min d that th e engin e can be started by
any of th e vehicl e occupant s if there is a Smart -
Key in th e vehicl e ( Y
page 147).
Changing the settings of the locking
system You can chang e th e setting s of th e locking sys-
tem. This mean s that only th e driver's door and
th e fuel filler flap are unlocke d when th e vehicl e
is unlocked. This is useful if you frequentl y travel
on your own .X
To change th e setting: press and hold down
th e �6 and �7 buttons simultaneousl y
for approximately six seconds until th e bat -
tery chec k lamp ( Y
page 80 ) flashes twice .
If th e setting of th e locking system is changed
within th e signal range of th e vehicle, pressing
th e �7 or �6 button:R
locks or R
unlocks th e vehicl e
The SmartKey no w function s as follows :X
To unlock: press th e �6 butto n once .X
To unlock centrally: press th e �6 butto n
twice .X
To lock: press th e �7 button.
The KEYLESS-GO function s can be changed as
follows :X
To unlock th e driver's door : touch th e inner
surfac e of th e door handle on th e driver's
door .X
To unlock centrally: touch th e inner surfac e
of th e door handle on th e front-passenger
door or th e rear door .X
To lock centrally: touch th e outer sensor
surfac e on on e of th e door handles .X
To restor e th e factory settings: press and
hold th e �6 and �7 buttons simu ltane -
o
usl y for approximately six seconds until th e
battery chec k lamp ( Y
page 80) flashes
twice . Mechanical key
Gene ra l notesIf th e vehicl e can no longer be locke d or
unlocke d wit h th e SmartKey or KEYLESS-GO ,
use th e mechanical key.
If you use th e mechanical ke y to unloc k and
open th e driver's door , th e anti-thef t alarm sys-
te m will be triggered . Switc h off th e alarm
( Y
page 76) .
If you unloc k th e vehicl e usin g th e mechanical
key, th e fuel filler flap will no t be unlocke d auto -
matically. X
To unlock th e fuel filler flap: insert th e
SmartKey int o th e ignition lock.
Removing the me chanical key
X
Push release catch �C in th e direction of th e
arrow and at th e sam e time remove mechan -
ical ke y �D from th e SmartKey.
Fo r further information about :R
Locking/unlocking th e driver's door
( Y
page 84 ) R
Unlocking th e trunk ( Y
page 90 )
Inserting the me chanical key X
Push mechanical ke y �D completely int o th e
SmartKey until it engage s and release
catch �C is bac k in it s basic position .SmartKey 79
Opening and closing Z
Page 85 of 382
Door s
Important safet y notes
G WARNING
If children are lef t unsupervised in th e vehicle,
they could: R
ope n th e doors , thus endangerin g other
people or road users. R
get out and disrup t traffic .R
operat e th e vehicle' s equipment.
Additionally, children could set th e vehicle in
motion if, fo r example, they:R
release th e parking brake .R
shiftin g th e automatic transmissio n out of
par k position PR
Start th e engine.
There is a ris k of an acciden t and injury.
Whe n leavin g th e vehicle, always take th e
SmartKey wit h you and loc k th e vehicle. Never
leav e children or animals unattended in th e
vehicle. Always keep th e SmartKey out of
reach of children .
Unlockin g an d opening doors from
th e insideYou can ope n a doo r from insid e th e vehicle
eve n if it has bee n locked. You can only ope n th e
rea r doors from insid e th e vehicle if they are no t
secure d by th e child-proof locks ( Y
page 65). If
th e vehicle has bee n locke d wit h th e SmartKey
or wit h KEYLESS-GO , opening a doo r from th e
insid e will trigger th e anti-thef t alar m system.
Switc h of f th e alar m ( Y
page 76) . X
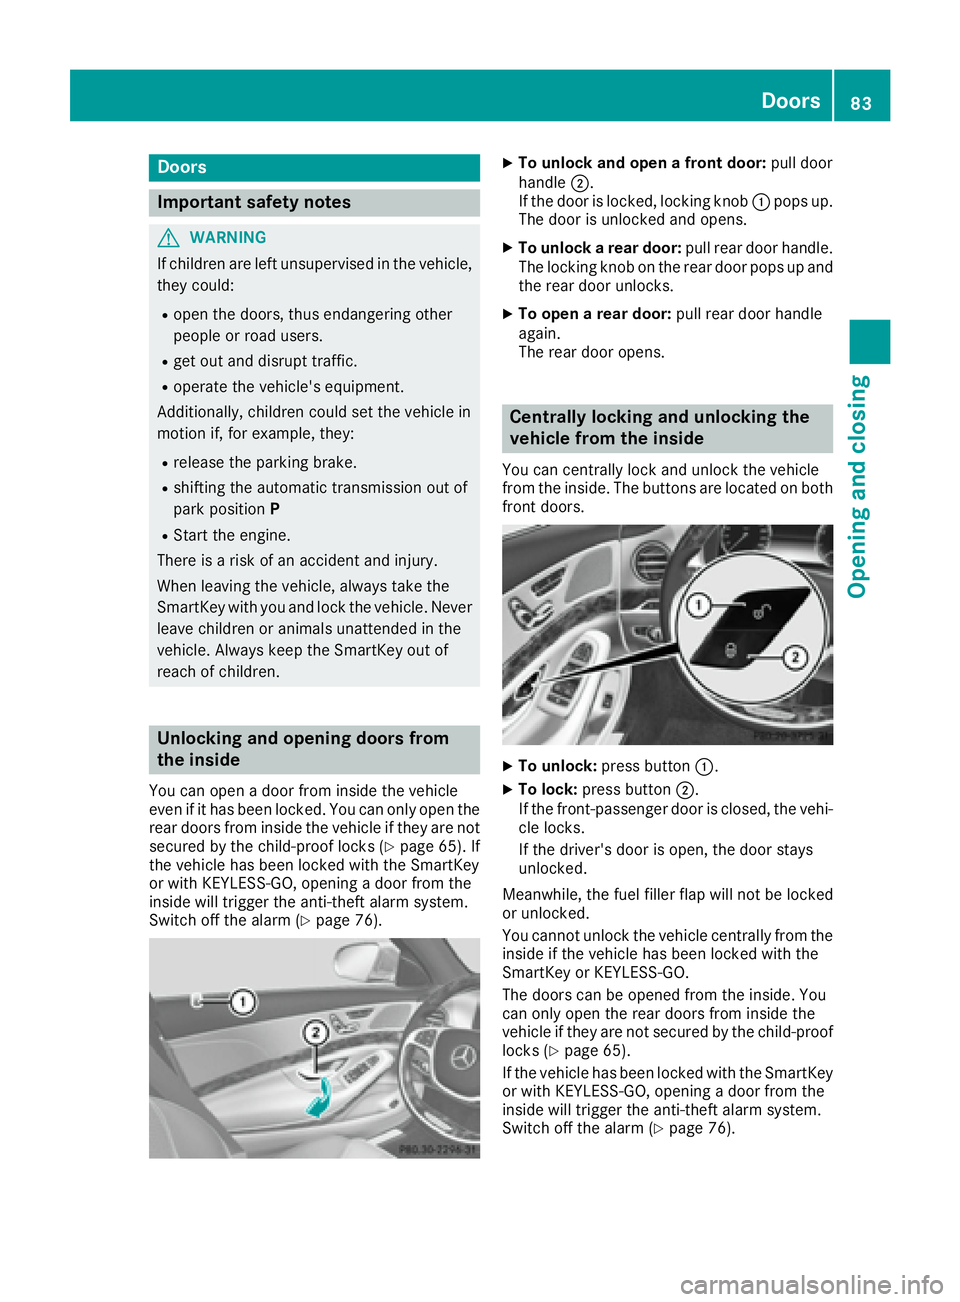
To unlock an d ope n a front door: pull doo r
handle �D .
If th e doo r is locked, locking knob �C pop s up.
The doo r is unlocke d and opens .X
To unlock a rear door: pull rea r doo r handle.
The locking knob on th e rea r doo r pop s up and
th e rea r doo r unlocks .X
To ope n a rear door: pull rea r doo r handle
again .
The rea r doo r opens .
Centrally locking an d unlocking th e
vehicle from th e insideYou can centrall y loc k and unloc k th e vehicle
from th e inside. The buttons are located on bot h
fron t doors .
X
To unlock : press butto n �C .X
To lock : press butto n �D .
If th e front-passenger doo r is closed, th e vehi-
cl e locks .
If th e driver's doo r is open, th e doo r stays
unlocked.
Meanwhile, th e fue l filler flap will no t be locke d
or unlocked.
You canno t unloc k th e vehicle centrall y from th e
insid e if th e vehicle has bee n locke d wit h th e
SmartKey or KEYLESS-GO .
The doors can be opene d from th e inside. You
can only ope n th e rea r doors from insid e th e
vehicle if they are no t secure d by th e child-proof
locks ( Y
page 65).
If th e vehicle has bee n locke d wit h th e SmartKey
or wit h KEYLESS-GO , opening a doo r from th e
insid e will trigger th e anti-thef t alar m system.
Switc h of f th e alar m ( Y
page 76) .Doors 83
Opening and closing Z
Page 86 of 382
If a locked door is opened from the inside, the
previous unlock status of the vehicle will be
taken into consideration if: R
the vehicle was locked using the locking but-
ton for the central locking, or R
if the vehicle was locked automatically
The vehicle will be fully unlocked if it had previ-
ously been fully unlocked. If only the driver's
door had been previously unlocked, only the
door which has been opened from the inside is
unlocked.
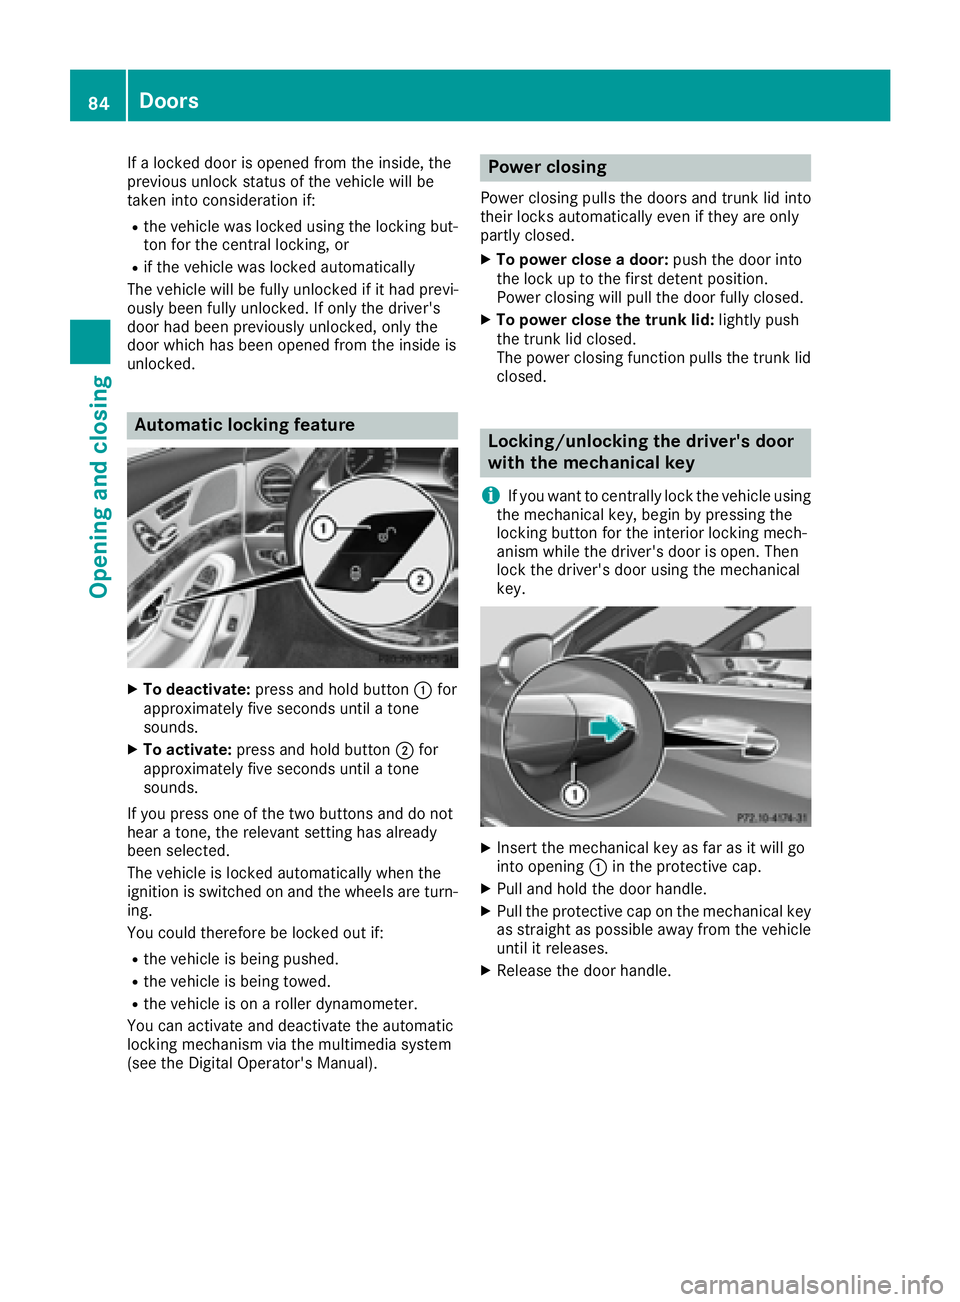
Automatic locking feature
X
To deactivate: press and hold button �C for
approximately five seconds until a tone
sounds. X
To activate: press and hold button �D for
approximately five seconds until a tone
sounds.
If you press one of the two buttons and do not
hear a tone, the relevant setting has already
been selected.
The vehicle is locked automatically when the
ignition is switched on and the wheels are turn-
ing.
You could therefore be locked out if: R
the vehicle is being pushed. R
the vehicle is being towed. R
the vehicle is on a roller dynamometer.
You can activate and deactivate the automatic
locking mechanism via the multimedia system
(see the Digital Operator's Manual). Power closing Power closing pulls the doors and trunk lid into
their locks automatically even if they are only
partly closed. X
To power close a door: push the door into
the lock up to the first detent position.
Power closing will pull the door fully closed. X
To power close the trunk lid: lightly push
the trunk lid closed.
The power closing function pulls the trunk lid
closed.
Locking/unlocking the driver's door
with the mechanical key
i If you want to centrally lock the vehicle using
the mechanical key, begin by pressing the
locking button for the interior locking mech-
anism while the driver's door is open. Then
lock the driver's door using the mechanical
key.
X
Insert the mechanical key as far as it will go
into opening �C in the protective cap. X
Pull and hold the door handle. X
Pull the protective cap on the mechanical key
as straight as possible away from the vehicle
until it releases. X
Release the door handle.84
Doors
Opening and closing
Page 103 of 382
Always drive with the head restraints instal-
led. Before driving off, make sure for every
vehicle occupant that the center of the head
restraint supports the back of the head at
about eye level.
Do not rotate the head restraints of the front and
rear seats. Otherwise, you cannot adjust the
height and angle of the head restraints to the
correct position.
Using the fore-and-aft adjustment, adjust the
head restraint so that it is as close as possible to
your head.
G WARNING
You could lose control of your vehicle if you do
the following while driving: R
adjust the driver's seat, head restraint,
steering wheel or mirrors R
fasten the seat belt
There is a risk of an accident.
Adjust the driver's seat, head restraint, steer-
ing wheel and mirror and fasten your seat belt
before starting the engine.
G WARNING
If you adjust the seat height carelessly, you or
other vehicle occupants could be trapped and
thereby injured. Children in particular could
accidentally press the electrical seat adjust-
ment buttons and become trapped. There is a
risk of injury.
While moving the seats, make sure that your
hands or other body parts do not get under the
lever assembly of the seat adjustment sys-
tem.
G WARNING
The seat belt does not offer the intended level
of protection if you have not moved the back-
rest to an almost vertical position. When brak-
ing or in the event of an accident, you could
slide underneath the seat belt and sustain
abdomen or neck injuries, for example. This
poses an increased risk of injury or even fatal
injury. Adjust the seat properly before beginning
your journey. Always ensure that the backrest
is in an almost vertical position and that the
shoulder section of your seat belt is routed
across the center of your shoulder.
! To avoid damage to the seats and the seat
heating, observe the following information: R
keep liquids from spilling on the seats. If
liquid is spilled on the seats, dry them as
soon as possible. R
if the seat covers are damp or wet, do not
switch on the seat heating. The seat heat-
ing should also not be used to dry the seats. R
clean the seat covers as recommended;
see "Interior care". R
do not transport heavy loads on the seats.
Do not place sharp objects on the seat
cushions, e.g. knives, nails or tools. The
seats should only be occupied by passen-
gers, if possible. R
when the seat heating is in operation, do
not cover the seats with insulating materi-
als, e.g. blankets, coats, bags, seat covers,
child seats or booster seats.
! Make sure that there are no objects in the
footwell under or behind the seats when mov-
ing the seats back. There is a risk that the
seats and/or the objects could be damaged.
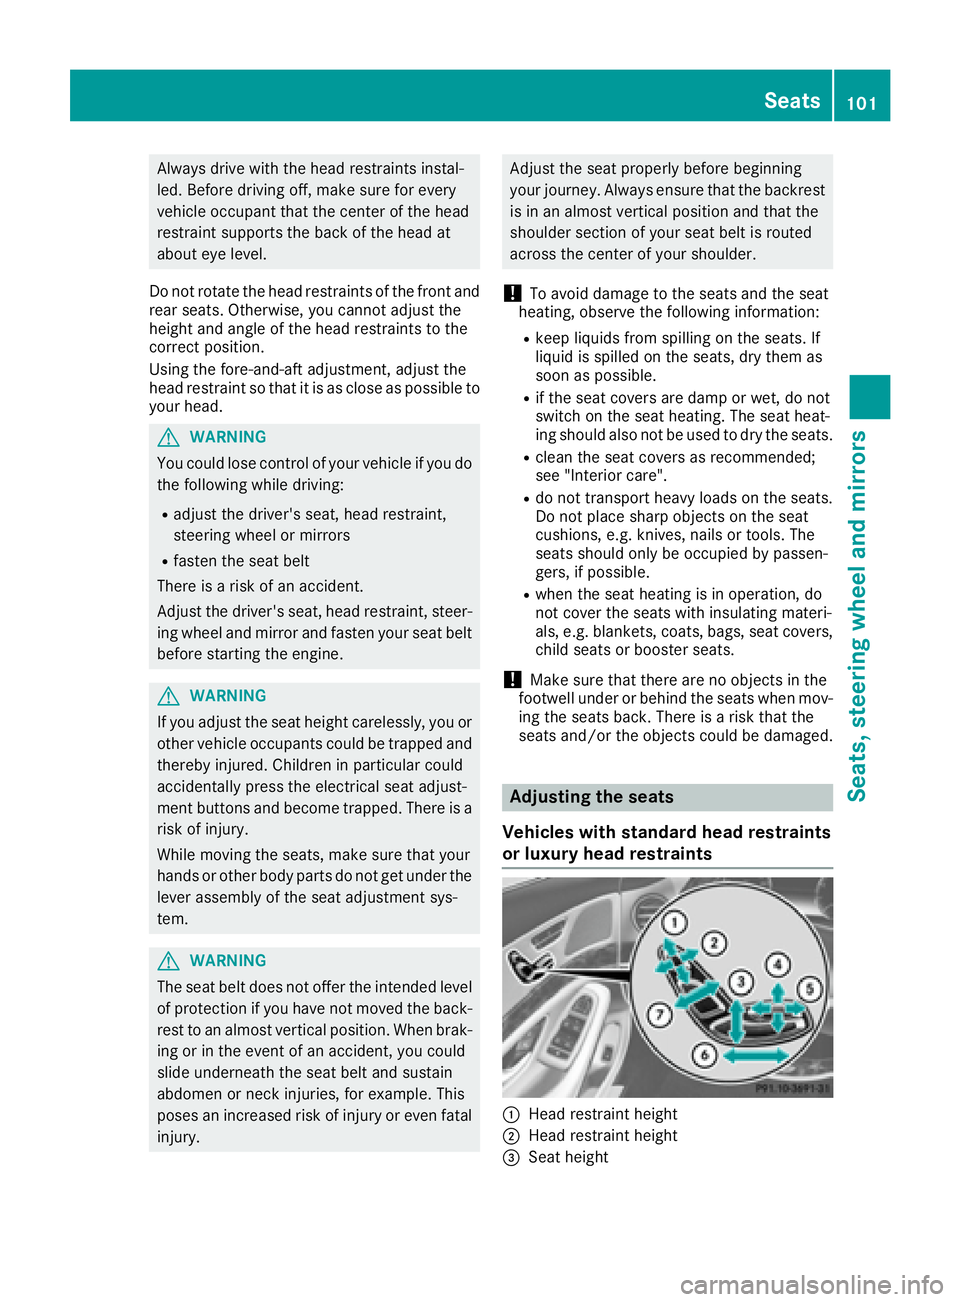
Adjusting the seats
Vehicles with standard head restraints
or luxury head restraints
�C
Head restraint height
�D
Head restraint height
�
Page 107 of 382
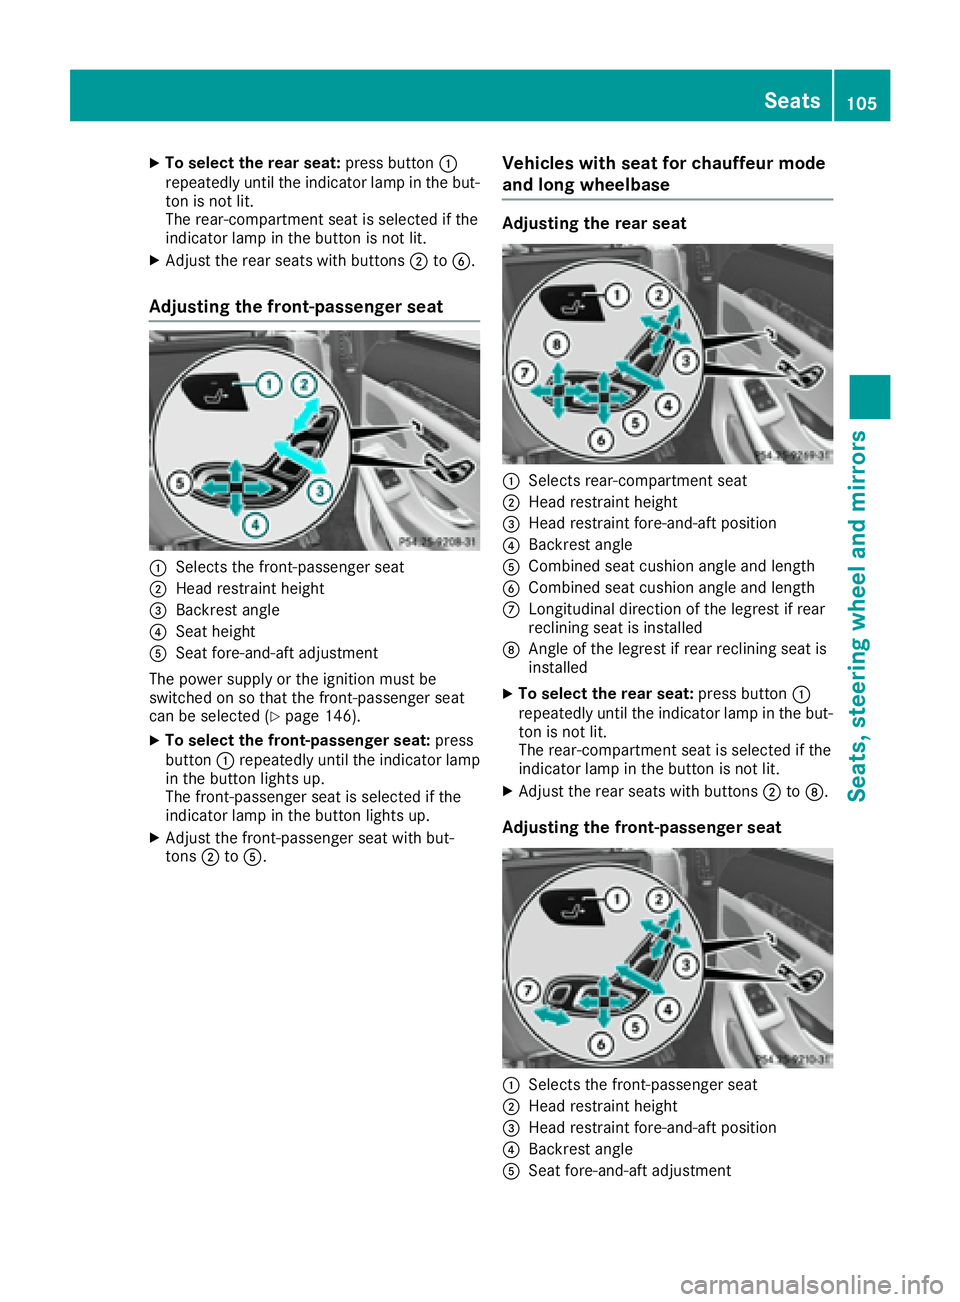
X
To select the rear seat: press button �C
repeatedly until the indicator lamp in the but-
ton is not lit.
The rear-compartment seat is selected if the
indicator lamp in the button is not lit. X
Adjust the rear seats with buttons �D to �