2017 MERCEDES-BENZ S-Class MAYBACH fuel consumption
[x] Cancel search: fuel consumptionPage 184 of 382
Rsections of the route have a very small radius
of curvature
Rif you accelerate hard or brake sharply
AIRMATIC
General notes
AIRMATIC is an air suspension with variable
damping for improved driving comfort. All-round
level control ensures the best possible suspen-
sion and constant ground clearance, even with a
laden vehicle. When you drive fast, the vehicle is
lowered automatically to improve driving safety
and to reduce fuel consumption. There is also
the option to manually adjust the vehicle level.
AIRMATIC consists of level setting, level control
and the Adaptive Damping System ADS PLUS.
Important safety notes
GWARNING
When the vehicle is being lowered, people
could become trapped if their limbs are
between the vehicle body and the wheels or
underneath the vehicle. There is a risk of
injury.
Make sure no one is underneath the vehicle or
in the immediate vicinity of the wheel arches
when the vehicle is being lowered.
Vehicle level
Setting the raised vehicle level
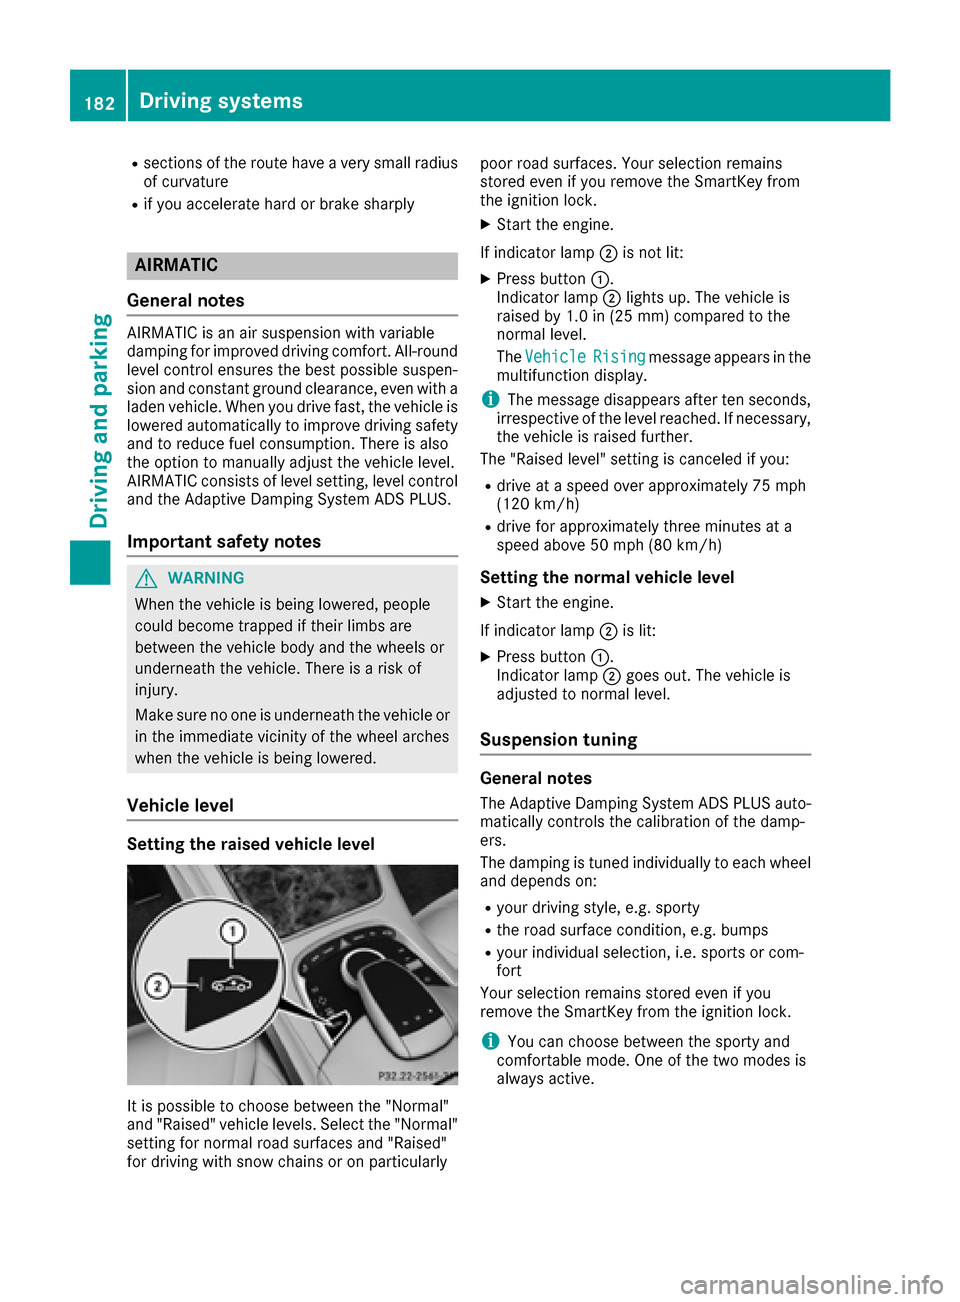
It is possible to choose between the "Normal"
and "Raised" vehicle levels. Select the "Normal"
setting for normal road surfaces and "Raised"
for driving with snow chains or on particularly poor road surfaces. Your selection remains
stored even if you remove the SmartKey from
the ignition lock.
XStart the engine.
If indicator lamp ;is not lit:
XPress button :.
Indicator lamp ;lights up. The vehicle is
raised by 1.0 in (25 mm) compared to the
normal level.
The Vehicle
Risingmessage appears in the
multifunction display.
iThe message disappears after ten seconds,
irrespective of the level reached. If necessary,
the vehicle is raised further.
The "Raised level" setting is canceled if you:
Rdrive at a speed over approximately 75 mph
(120 km/h)
Rdrive for approximately three minutes at a
speed above 50 mph (80 km/h)
Setting the normal vehicle level
XStart the engine.
If indicator lamp ;is lit:
XPress button :.
Indicator lamp ;goes out. The vehicle is
adjusted to normal level.
Suspension tuning
General notes
The Adaptive Damping System ADS PLUS auto-
matically controls the calibration of the damp-
ers.
The damping is tuned individually to each wheel
and depends on:
Ryour driving style, e.g. sporty
Rthe road surface condition, e.g. bumps
Ryour individual selection, i.e. sports or com-
fort
Your selection remains stored even if you
remove the SmartKey from the ignition lock.
iYou can choose between the sporty and
comfortable mode. One of the two modes is
always active.
182Driving systems
Driving and parking
Page 216 of 382
Using theDisplay Contentfunction, you
can, depending on your vehicle's equipment,
choose between four standard displays. The
selected contents then appear in the Head-up
Display.
In Mercedes-AMG vehicles, you can also
choose between two AMG displays. If you
select an AMG display, the Head-up Display
shows AMG-specific contents.
If you select a display with traffic signs, detec-
ted traffic signs from Traffic Sign Assist
appear in the Head-up Display.
Menus and submenus
Menu overview
Press the òbutton on the steering wheel to
open the menu list.
Operating the on-board computer (
Ypage 211).
Depending on the vehicle equipment, you can
select the following menu:
RTripmenu (Ypage 214)
RNavimenu (navigation instructions)
(Ypage 215)
RRadiomenu (Ypage 217)
RMediamenu (Ypage 218)
RTelephonemenu (Ypage 219)
RAssistance Graphicmenu (Ypage 221)
RServicemenu (Ypage 221)
RSettingsmenu (Ypage 221)
RAMGmenu (Mercedes-AMG vehicles)
(Ypage 226)
Trip menu
Standard display
XPress and hold the %button on the steer-
ing wheel until the Tripmenu with trip odom-
eter :and odometer ;appears.
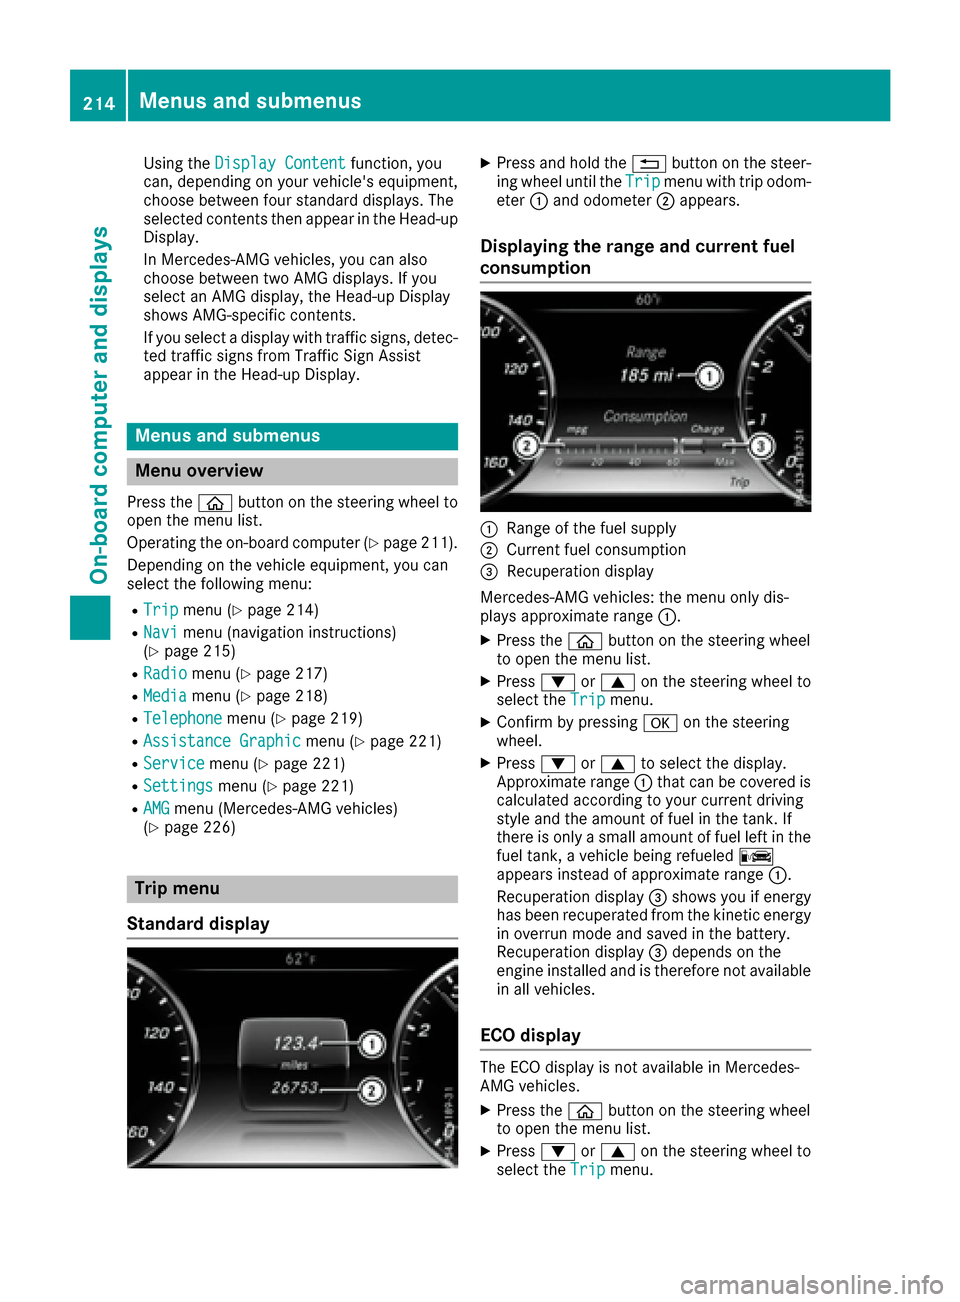
Displaying the range and current fuel
consumption
:Range of the fuel supply
;Current fuel consumption
=Recuperation display
Mercedes-AMG vehicles: the menu only dis-
plays approximate range :.
XPress theòbutton on the steering wheel
to open the menu list.
XPress :or9 on the steering wheel to
select the Tripmenu.
XConfirm by pressing aon the steering
wheel.
XPress :or9 to select the display.
Approximate range :that can be covered is
calculated according to your current driving
style and the amount of fuel in the tank. If
there is only a small amount of fuel left in the
fuel tank, a vehicle being refueled C
appears instead of approximate range :.
Recuperation display =shows you if energy
has been recuperated from the kinetic energy in overrun mode and saved in the battery.
Recuperation display =depends on the
engine installed and is therefore not available
in all vehicles.
ECO display
The ECO display is not available in Mercedes-
AMG vehicles.
XPress the òbutton on the steering wheel
to open the menu list.
XPress :or9 on the steering wheel to
select the Tripmenu.
214Menus and submenus
On-board computer and displays
Page 217 of 382
XConfirmbypressing aon the steering
wheel.
XSelect ECO Displaywith: or9.
If the ignition remains switched off for longer
than four hours, the ECO displaywill be auto-
matically reset.
For more information on the ECO display, see
(
Ypage 165).
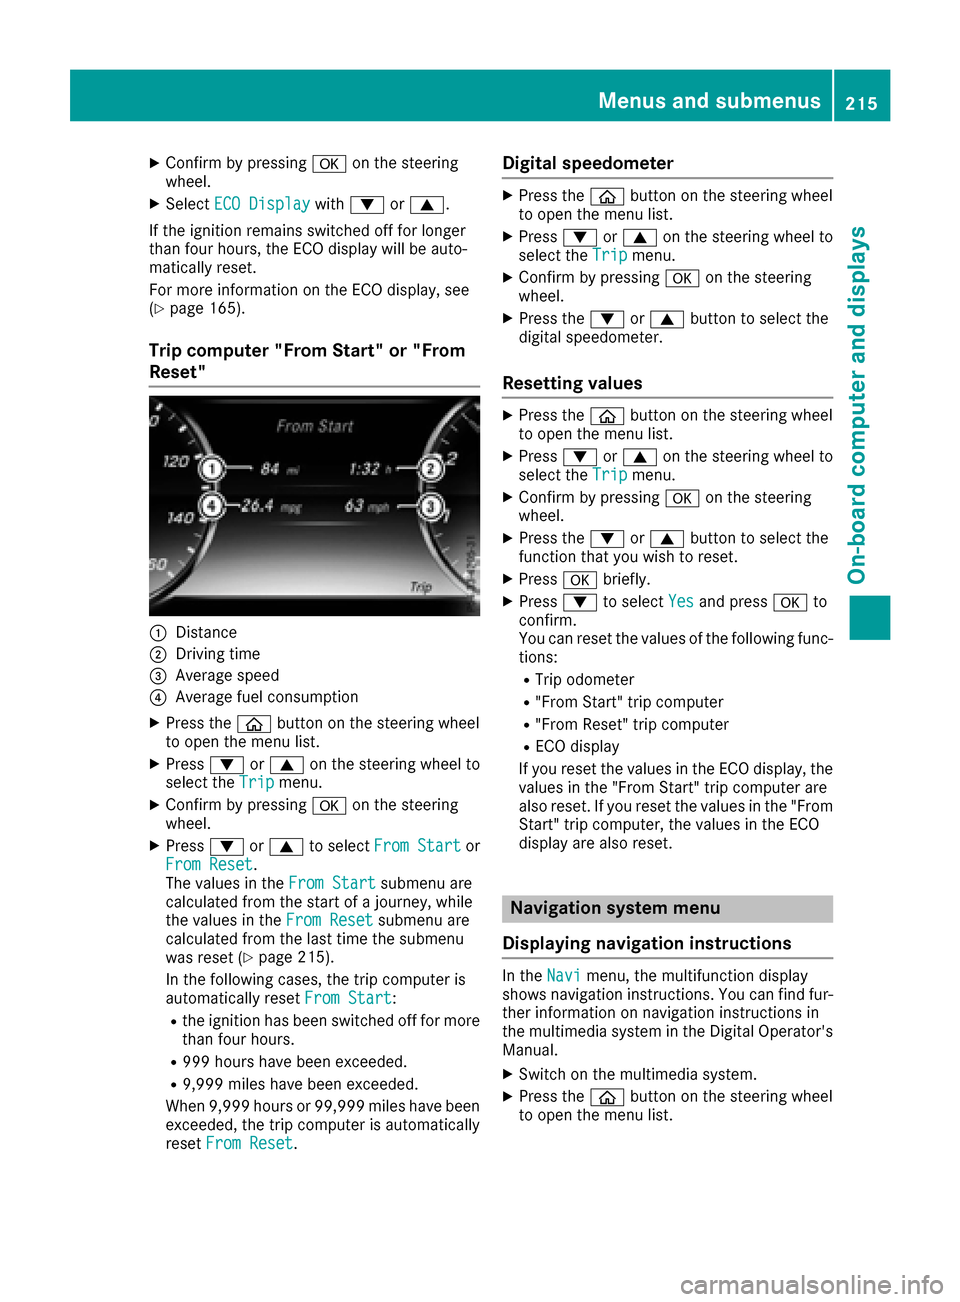
Trip computer "From Start" or "From
Reset"
:Distance
;Dr ivin g time
=Average speed
?Average fuel consumption
XPress the òbutton on the steering wheel
to open the menu list.
XPress :or9 on the steering wheel to
select the Tripmenu.
XConfirmbypressing aon the steering
wheel.
XPress :or9 to select From Startor
From Reset.
The values inthe From Startsubmenu are
calculated from the start of a journey, while
the values inthe From Reset
submenu are
calculated from the last time the submenu
was reset (
Ypage 215).
In the foll owing cases, the tr ipcomputer is
automatically reset From Start
:
Rthe ignition has been switched off for more
than four hours.
R999 hours have been excee ded.
R9,999miles have been excee ded.
When 9,999 hourso r 99,999 miles have been
exceeded, the trip computer is automatically
reset From Reset
.
Digital speedometer
XPress the òbutton on the steering wheel
to open the menu list.
XPress :or9 on the steering wheel to
select the Tripmenu.
XConfirm by pressing aon the steering
wheel.
XPress the :or9 button to select the
digital speedometer.
Resetting values
XPress the òbutton on the steering wheel
to open the menu list.
XPress :or9 on the steering wheel to
select the Tripmenu.
XConfirm by pressing aon the steering
wheel.
XPress the :or9 button to select the
function that you wish to reset.
XPress abriefly.
XPress :to select Yesand press ato
confirm.
You can reset the values of the following func-
tions:
RTrip odometer
R"From Start" trip computer
R"From Reset" trip computer
RECO display
If you reset the values in the ECO display, the values in the "From Start" trip computer are
also reset. If you reset the values in the "From
Start" trip computer, the values in the ECO
display are also reset.
Navigation system menu
Displaying navigation instructions
In the Navimenu, the multifunction display
shows navigation instructions. You can find fur-
ther information on navigation instructions in
the multimedia system in the Digital Operator's Manual.
XSwitch on the multimedia system.
XPress the òbutton on the steering wheel
to open the menu list.
Menus and submenus215
On-board computer and displays
Z
Page 277 of 382
PLUG‑IN HYBRID:before getting in, the driver's
seat area or the whole vehicle interior is briefly
warmed or ventilated. The air from the vents is
pre-cooled.
XCall up the climate control menu
(Ypage 274).
XTo select Pre-entry Climate Control
via Key: turn and press the controller.
XTo activate or deactivate: turn the control-
ler.
XTo exit the menu: press the%button.
Activating or deactivating pre-entry cli-
mate control at departure time
This function is available for PLUG ‑IN HYBRID
vehicles.
The driver's seat and the vehicle interior are
heated or cooled prior to the set departure time.
XCall up the climate control menu
(Ypage 274).
XTo select Pre-entry Climate Ctrl. at
DepartureTime: turn and press the control-
ler.
A rotary menu appears.
XTo select the setting: turn the controller.
The menu symbol, text and image show the
selected setting.
XTo exit the menu: press the%button.
Adjusting the footwell temperature
XCall up the climate control menu
(Ypage 274).
XTo select Adjust Footwell: turn and press
the controller.
XTo change sides: slide1 the controller.
XTo change the setting: turn the controller.
XTo exit the menu:press the%button.
Settings in the bottom bar of the cli-
mate control menu
Switching cooling with air dehumidifica-
tion on/off
iActivating the cooling with air dehumidifi-
cation facilitates the cooling of the vehicle
interior even with high outside temperatures.
XCall up the climate control menu
(Ypage 274).
XSlide 6the controller repeatedly until the
bottom bar is activated.
XTo select OA/C: turn and press the con-
troller.
XThe cooling with air dehumidification function
is activated Oor deactivated ª.
iThe current status of the cooling function is
displayed in the climate control bar: A/C ON
– activated, A/C OFF – deactivated.
iDeactivating the cooling with air dehumidi-
fication function reduces fuel consumption.
Synchronizing the climate control set-
tings
Use OSync(synchronization) to select the cli-
mate control setting for all zones together Oor
separately ª.
XCall up the climate control menu
(Ypage 274).
XSlide6the controller repeatedly until the
bottom bar is activated.
XTo select OSync: turn and press the con-
troller.
XThe synchronization function is activated O
or deactivated ª.
With the synchronization function switched off,
you can alternate between driver and front
passenger.
XTo switch from the footer to the main area:
slide 5the controller.
XTo switch between left and right: slide 1
the controller.
Not all climate control functions allow switch-
ing between the driver and front passenger.
For further information on synchronizing climate
control settings, see (
Ypage 138).
Navigation mode
Important safety notes
GWARNING
If you operate information systems and com-
munication equipment integrated in the vehi-
cle while driving, you will be distracted from
Operating system275
Multimedia system
Z
Page 350 of 382
The tire temperature and pressure increase
when the vehicle is in motion. This is dependent
on the driving speed and the load.
Therefore, you should only correct tire pres-
sures when the tires are cold.
The tires are cold:
Rif the vehicle has been parked with the tires
out of direct sunlight for at least three hours
and
Rif the vehicle has not been driven further than
1 mile (1.6 km)
The tire temperature changes depending on the outside temperature, the vehicle speed and the
tire load. If the tire temperature changes by
18 ‡ (10 †), the tire pressure changes by
approximately 10 kPa (0.1 bar/1.5 psi). Take
this into account when checking the pressure of
warm tires. Only correct the tire pressure if it is
too low for the current operating conditions. If
you check the tire pressure when the tires are
warm, the resulting value will be higher than if
the tires were cold. This is normal. Do not
reduce the tire pressure to the value specified
for cold tires. The tire pressure would otherwise
be too low.
Observe the recommended tire pressures for
cold tires:
Ron the Tire and Loading Information placard
on the B-pillar on the driver's side
Rin the tire pressure table on the fuel filler flap
(Ypage 162)
Underinflated or overinflated tires
Underinflated tires
GWARNING
Tires with pressure that is too low can over-
heat and burst as a consequence. In addition, they also suffer from excessive and/or irreg-
ular wear, which can severely impair the brak-
ing properties and the driving characteristics.
There is a risk of an accident.
Avoid tire pressures that are too low in all the
tires, including the spare wheel.
Underinflated tires may:
Roverheat, leading to tire defects
Radversely affect handling
Rwear excessively and/or unevenly
Rhave an adverse effect on fuel consumption
Overinflated tires
GWARNING
Tires with excessively high pressure can burst
because they are damaged more easily by
road debris, potholes etc. In addition, they
also suffer from irregular wear, which can
severely impair the braking properties and the driving characteristics. There is a risk of an
accident.
Avoid tire pressures that are too high in all the
tires, including the spare wheel.
Overinflated tires may:
Rincrease the braking distance
Radversely affect handling
Rwear excessively and/or unevenly
Rhave an adverse effect on ride comfort
Rbe more susceptible to damage
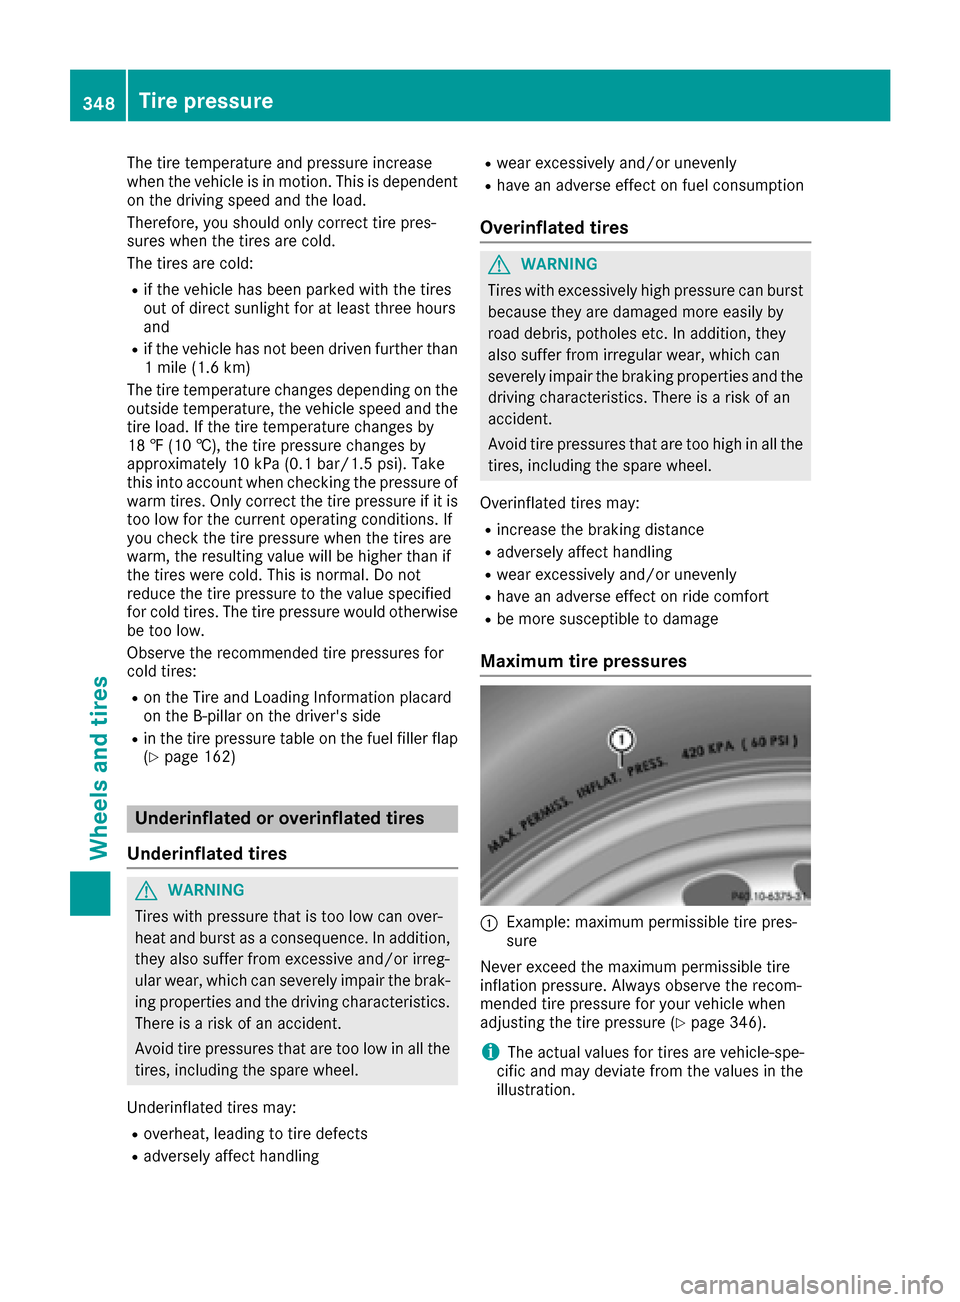
Maximum tire pressures
:Example: maximum permissible tire pres-
sure
Never exceed the maximum permissible tire
inflation pressure. Always observe the recom-
mended tire pressure for your vehicle when
adjusting the tire pressure (
Ypage 346).
iThe actual values for tires are vehicle-spe-
cific and may deviate from the values in the
illustration.
348Tire pressure
Wheels and tires
Page 369 of 382

XClean the wheel and wheel hub contact sur-
faces.
XSlide the wheel to bemounted onto the align-
ment boltand push iton.
XTighten the wheel bolts unt ilthey are finger-
tight.
XUnscrew the alignment bolt.
XTighten the last wheel boltuntil it is finger-
tight.
Lowering the vehicle
GWAR NING
The wheels could work loose ifthe wheel nuts
and bolts are not tightened to the specifie d
tightening torque. There isa risk of acc ident.
Have the tightening torque immediately
checked at a qualified specialist workshop
after a wheel ischanged.
XPlace the ratchet wrench onto the hexagon
nut of the jack so that the letters ABare vis i-
ble.
XTurn the ratchet wrench unt ilthe veh icle is
once again standing firmly on the ground.
XPlace the jack to one side.
XTighten the wheel bolts evenly in a crosswise pattern inthe sequence indicated (: toA).
The tightening torque must be 110lb-ft
(1 50 Nm) .
XTurn the jack back to its initial position.
XStow the jack and the rest of the vehicle tools
in the trunk again.
XMercedes-AMG vehicles and vehicles
with AMG equipment: insert the cover into
the outer sill.
XCheck the tire pressure of the newly mounted
wheel and adjust it if necessary.
Observe the recommended tire pressure
(
Ypage 346).
iVehicles with a tire pressure control
system: all mounted wheels must be equip-
ped with functioning sensors for the tire pres-
sure monitor.
Wheel-tire combination
You can ask for information regarding permitted wheel-tire combinations at an authorized
Mercedes-Benz Center.
!For safety reasons, Mercedes-Benz recom-
mends that you only use tires and wheels
whic h have been approved byMercedes-Benz
specific allyfor your vehicle.
These tires have been specially adapted for
use with the control systems, such as ABS or
ESP
®, and are marked as follows:
RMO = Mercedes-Benz Original
RMOE = Mercedes-Benz Original Extended
(t ires featuring run-flat characteristics)
RMO1 = Mercedes-Benz Original (only cer-
tain AMG tires)
Mercedes-Benz Original Extended tires may
only be used on wheels that have been spe-
cifically approved byMercedes-Benz.
Only use tires, wheels or accessories tested
and appr oved byMercedes-Benz. Certain
characteristics, e.g. handling, vehicle noise
emissions or fuel consumption, may other-
wise be adverselyaffected. Inaddition, when
driving with a load, tire dimension variations
could cause the tires to come into contact
with the bodywork and axle components. This
could result in damage to the tires or the vehi- cle.
Wheel-tire combination367
Wheels and tires
Z
Page 375 of 382

If standard unleaded gasoline is unavailable
and you have to refuel with unleaded gasoline
of a lower grade, observe the following pre-
cautions:
ROnly fill the fuel tank to half full with regular unleaded gasoline and fill the rest with pre-
mium-grade unleaded gasoline as soon as
possible.
RDo not drive at the maximum speed.
RAvoid sudden acceleration and engine
speeds over 3,000 rpm.
You will usually find information about the fuel
grade on the pump. If you cannot find the label
on the pump, ask the staff for assistance.
iFor further information, consult a qualified
specialist workshop or visit
http://www.mbusa.com (USA only).
As a temporary measure, if the recommended
fuel is not available, you may also use regular
unleaded gasoline with an octane rating of
87 AKI/91 RON. This may reduce engine per-
formance and increase fuel consumption. Avoid
driving at full throttle and sudden acceleration.
Never refuel using gasoline with a lower AKI.
Information on refueling (
Ypage 159).
Additives
!Operating the engine with fuel additives
added later can lead to engine failure. Do not
mix fuel additives with fuel. This does not
include additives for the removal and preven-
tion of residue buildup. gasoline must only be mixed with additives recommended by
Mercedes-Benz. Comply with the instructions
for use on the product label. More information
about recommended additives can be
obtained from any authorized Mercedes-Benz Center.
Mercedes-Benz recommends that you use bran-
ded fuels that have additives.
The fuel quality available in some countries may
not be sufficient. Residue could build up in the
fuel injection system as a result. In such cases,
and in consultation with an authorized
Mercedes-Benz Center, the fuel may be mixed
with the cleaning additive recommended by
Mercedes-Benz. You must observe the notes
and mixing ratios specified on the container.
Engine oil
General notes
!Never use engine oil or an oil filter of a spec-
ification other than is necessary to fulfill the
prescribed service intervals. Do not change
the engine oil or oil filter in order to achieve
longer replacement intervals than those pre-
scribed. You could otherwise cause engine
damage or damage to the exhaust gas after-
treatment.
Follow the instructions in the service interval display regarding the oil change. Otherwise,
you may damage the engine and the exhaust
gas aftertreatment.
When handling engine oil, observe the important
safety notes on service products (
Ypage 371).
The engine oils are matched to the performance
of Mercedes-Benz engines and service intervals.
You should therefore only use engine oils and oil
filters that are approved for vehicles with main- tenance systems.
For a list of approved engine oils and oil filters,
consult an authorized Mercedes-Benz Center.
Or visit the website
http://bevo.mercedes-benz.com.
The table shows which engine oils have been
approved for your vehicle.
ModelMB-Freigabe or MB-Approval
All models229.5
Use only SAE 0W-40 or SAE 5W-40 engine oils
for Mercedes-AMG vehicles.
iMB approval is indicated on the oil contain-
ers.
Service products and filling capacities373
Technical data
Z