2017 MERCEDES-BENZ S-Class MAYBACH remote control
[x] Cancel search: remote controlPage 15 of 382

K
Key positionsSmartKey ...................................... .145
Start/Stop button .......................... 145
KEYLESS-GO
Activating ......................................... 78
Convenience closing feature ............ 92
Deactivation ..................................... 78
Locking ............................................ 78
Start function ................................... 79
Unlocking ......................................... 78
Kickdown
Driving tips ....................................1 55
Knee bag .............................................. 49
L
Lamps
see Warning and indicator lamps
Lane Keeping Assist
see Active Lane Keeping Assist
LATCH-type (ISOFIX) child seat
anchors ................................................ 61
License plate lamp (display mes-
sage) ................................................... 241
Light sensor (display message) ....... 241
Lights
Adaptive Highbeam Assist PLUS .... 126
Automatic headlamp mode ............ 124
Cornering light function ................. 126
Fogged up headlamps .................... 127
General notes ................................ 124
Hazard warning lamps ................... 126
High beam flasher .......................... 125
High-beam headlamps ................... 125
Light switch ................................... 124
Low-beam headlamps .................... 125
Parking lamps ................................ 125
Setting exterior lighting ................. 124
Standing lamps .............................. 125
Switching the daytime running
lamps on/off (on-board com-
puter) ............................................. 225
Switching the spotlight on/off ....... 225
Turn signals ................................... 125
see Interior lighting
Loading guidelines ............................ 281 Locking
see Central locking
Locking (doors)
Automatic ........................................ 84
Emergency locking ........................... 84
From inside (central locking but-
ton) ..................................................8 3
Locking centrally
see Central locking
Low-beam headlamps
Display message ............................ 241
Switching on/off .......................... .125
Lumbar support
Adjusting the 4-way lumbar sup-
port ................................................ 112
Luxury head restraints ..................... 110M
M+S tires............................................ 345
Magic Body Control ........................... 180
MAGIC SKY CONTROL ......................... 97
Malfunction message
see Display messages
Matte finish (cleaning instruc-
tions) ..................................................3 21
MBC
see Magic Body Control
mbrace
Call priority ....................................3 04
Display message ............................ 233
Downloading destinations
(COMAND) ..................................... 304
Downloading routes ....................... 307
Emergency call .............................. 301
General notes ................................ 300
Geo fencing ................................... 307
Info call button .............................. 303
Locating a stolen vehicle ...............3 06
Remote fault diagnosis .................. 306
Remote vehicle locking .................. 305
Roadside Assistance button .......... 302
Search & Send ............................... 304
Self-test ......................................... 301
Speed alert .................................... 307
System .......................................... 301
Triggering the vehicle alarm ........... 307
Vehicle remote unlocking .............. 305
Index13
Page 19 of 382
Q
QR codeMercedes-Benz Guide App ................. 1
Rescue card .....................................3 1
Qualified specialist workshop ........... 30
Quick access for telephone
Sending DTMF tones ......................2 72
R
Radiator cover................................... 313
Radio
Selecting a station ......................... 217
Radio mode
see also Digital Operator's Man-
ual ..................................................2 69
Radio-wave reception/transmis-
sion in the vehicle
Declaration of conformity ................ 29
Rain closing feature
Panorama sliding sunroof ................ 96
Reading lamp ..................................... 127
Rear compartment
Activating/deactivating climate
control ...........................................1 35
Setting the air distribution ............. 138
Setting the air vents ......................1 43
Setting the airflow ......................... 138
Setting the temperature ................ 137
Stowage compartment .................. 283
Rear Seat Entertainment System
AUX jacks ...................................... 280
AUX jacks CD/DVD drive .............. 279
Rear seats
Adjusting ....................................... 102
Adjusting a rear reclining seat ....... 102
Overview .......................................... 41
Setting the reclined position .......... 103
Rear view camera
Cleaning instructions ..................... 323
Displays in the COMAND display ... 191
Function/notes ............................. 190
Rear window blind ............................ 293
Rear window defroster
Problem (malfunction) ................... 140
Switching on/off ........................... 139 Rear-view mirror
Anti-glare (manual) ........................ 117
Dipping (automatic) ....................... 118
Refrigerant (air-conditioning sys-
tem)
Important safety notes .................. 375
Refueling
Fuel gauge ....................................... 35
Important safety notes .................. 159
see Fuel
Remote control
Garage door opener ....................... 307
Programming (garage door
opener) .......................................... 308
Replacing bulbs
General notes ................................ 128
Reporting safety defects .................... 30
Rescue card ......................................... 31
Reserve (fuel tank)
see Fuel
Reserve fuel
Display mes sage ............................ 244
W
arning lamp ................................. 264
Residual heat (climate control) ........ 140
Restraint system
Display message ............................ 237
Introduction ..................................... 42
Warning lamp ................................. 263
Warning lamp (function) ................... 43
Reversing feature
Panorama sliding sunroof ................ 95
Roller sunblinds ............................... 96
Side windows ................................... 91
Trunk lid ........................................... 85
ROAD SURFACE SCAN ....................... 181
Roadside Assistance (breakdown) .... 28
Roller sunblind
Panorama roof with power tilt/
sliding panel ..................................... 96
Rear side windows ......................... 293
Rear window .................................. 293
Roller sunblind of the panorama
roof with power tilt/sliding panel
Operating (front roller sunblind) ....... 96
Operating (rear roller sunblind) ........ 97
Roof carrier ........................................ 289
Index17
Page 79 of 382
SmartKey
Important safety notes
GWARNING
If children are left unsupervised in the vehicle,
they could:
Ropen the doors, thus endangering other
people or road users.
Rget out and disrupt traffic.
Roperate the vehicle's equipment.
Additionally, children could set the vehicle in
motion if, for example, they:
Rrelease the parking brake.
Rshifting the automatic transmission out of
park position P
RStart the engine.
There is a risk of an accident and injury.
When leaving the vehicle, always take the
SmartKey with you and lock the vehicle. Never
leave children or animals unattended in the
vehicle. Always keep the SmartKey out of
reach of children.
GWARNING
If you attach heavy or large objects to the
SmartKey, the SmartKey could be uninten-
tionally turned in the ignition lock. This could
cause the engine to be switched off. There is a risk of an accident.
Do not attach any heavy or large objects to the
SmartKey. Remove any bulky key rings before
inserting the SmartKey into the ignition lock.
!Keep the SmartKey away from strong mag-
netic fields. Otherwise, the remote control
function could be affected.
Strong magnetic fields can occur in the vicin-
ity of powerful electrical installations.
Do not keep the SmartKey:
Rwith electronic devices, e.g. a mobile phone
or another SmartKey.
Rwith metallic objects, e.g. coins or metal foil.
Rinside metallic objects, e.g. a metal case.
This can affect the functionality of the Smart- Key. Do not keep the SmartKey in the temperature-
controlled cup holder (
Ypage 292). On vehicles
with the KEYLESS-GO start function, do not
keep it on the parcel shelf or in the trunk. Oth-
erwise, the SmartKey may not be detected, e.g.
when starting the engine using the Start/Stop
button.
A brief radio connection between the vehicle
and the SmartKey determines whether a valid
SmartKey is in, or in the direct vicinity of, the
vehicle. This occurs, for example:
Rwhen starting the engine
Rwhile driving
Rwhen using HANDS-FREE ACCESS
Rwhen the external door handles are touched
Rduring convenience closing
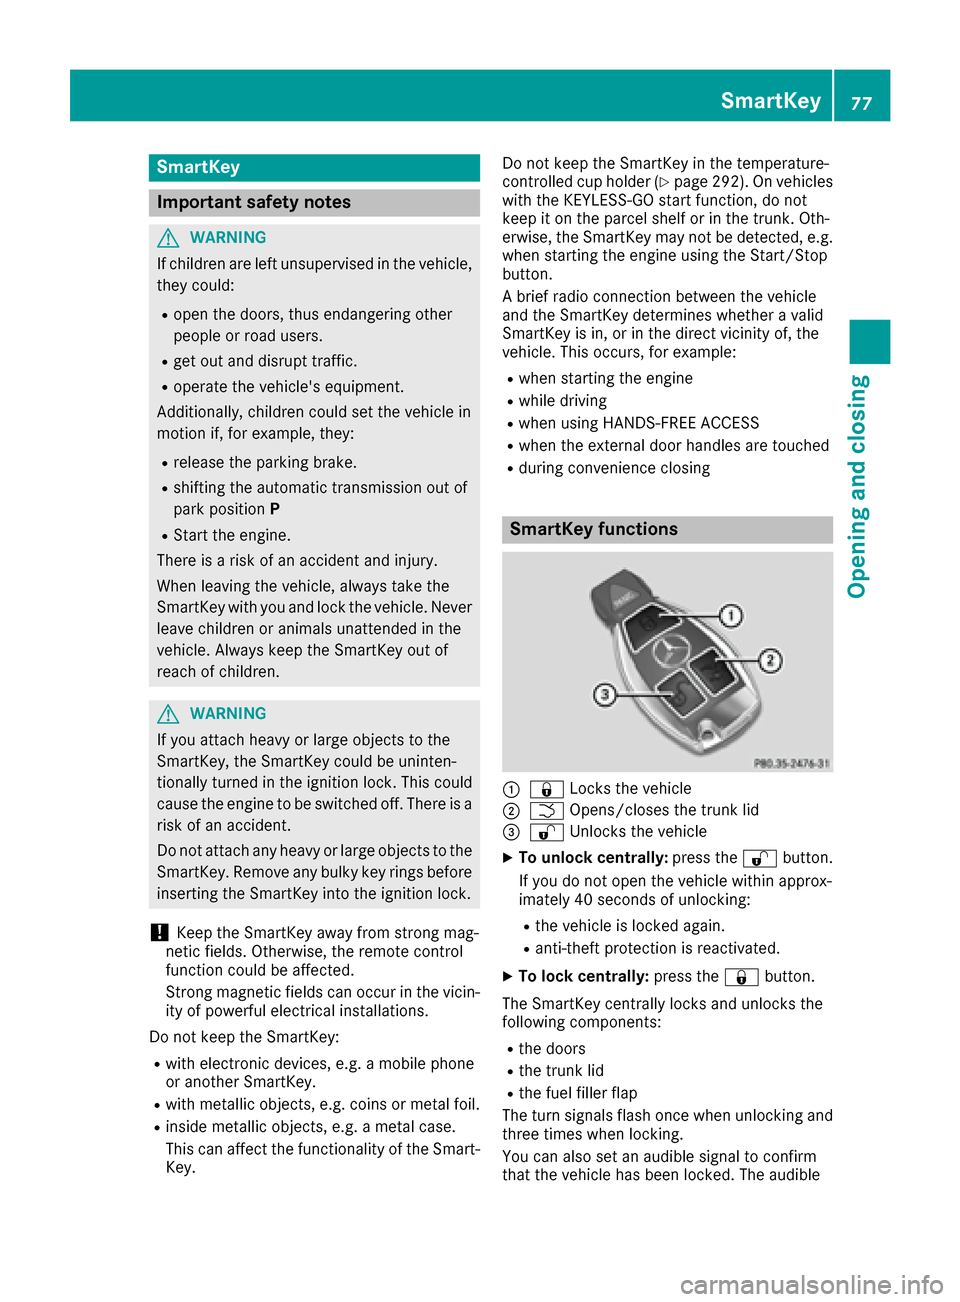
SmartKey functions
:& Locks the vehicle
;FOpens/closes the trunk lid
=%Unlocks the vehicle
XTo unlock centrally: press the%button.
If you do not open the vehicle within approx-
imately 40 seconds of unlocking:
Rthe vehicle is locked again.
Ranti-theft protection is reactivated.
XTo lock centrally: press the&button.
The SmartKey centrally locks and unlocks the
following components:
Rthe doors
Rthe trunk lid
Rthe fuel filler flap
The turn signals flash once when unlocking and
three times when locking.
You can also set an audible signal to confirm
that the vehicle has been locked. The audible
SmartKey77
Opening and closing
Z
Page 84 of 382

ProblemPossible causes/consequences andMSolutions
KEYLESS-GO is malfunctioning.
XLock/unlock the vehicle using the remote control function of the
SmartKey.
XHave the vehicle and SmartKey checked at a qualified specialist
workshop.
If the vehicle can also not be locked/unlocked using the remote con-
trol function:
XLock or unlock the vehicle using the mechanical key (Ypage 84).
XHave the vehicle and SmartKey checked at a qualified specialist
workshop.
The engine cannot be
started using the Smart-
Key.The on-board voltage is too low.
XSwitch off non-essential consumers, e.g. seat heating or interior
lighting, and try to start the engine again.
If this does not work:
XCheck the starter battery and charge it if necessary (Ypage 334).
or
XJump-start the vehicle (Ypage 335).
or
XConsult a qualified specialist workshop.
The engine cannot be
started using the Start/
Stop button. The Smart-
Key is in the vehicle.The vehicle is locked.
XUnlock the vehicle and try to start the vehicle again.
The SmartKey battery is discharged or nearly discharged.
XCheck the SmartKey battery (Ypage 80) and replace it if necessary
(Ypage 80).
If this does not work:
XStart your vehicle with the SmartKey in the ignition lock.
There is interference from a powerful source of radio waves.
XStart your vehicle with the SmartKey in the ignition lock.
You have lost a Smart-
Key.XHave the SmartKey deactivated at a qualified specialist workshop.
XReport the loss immediately to the vehicle insurers.
XIf necessary, have the locks changed as well.
You have lost the
mechanical key.XReport the loss immediately to the vehicle insurers.
XIf necessary, have the locks changed as well.
82SmartKey
Opening and closing
Page 92 of 382
XTo deactivate:open the glove box.
XPush the switch to position :.
If the vehicle is unlocked centrally, the trunk
will also be unlocked.
Unlocking the trunk using the
mechanical key
General notes
Use the mechanical key if the trunk lid can no
longer be unlocked:
Rusing the SmartKey
Rusing HANDS-FREE ACCESS
Rusing the remote operating switch in the door
control panel
!The trunk lid swings upwards when opened.
Therefore, make sure that there is sufficient
clearance above the trunk lid.
The opening dimensions of the trunk lid can be
found in the "Vehicle data" section
(
Ypage 376).
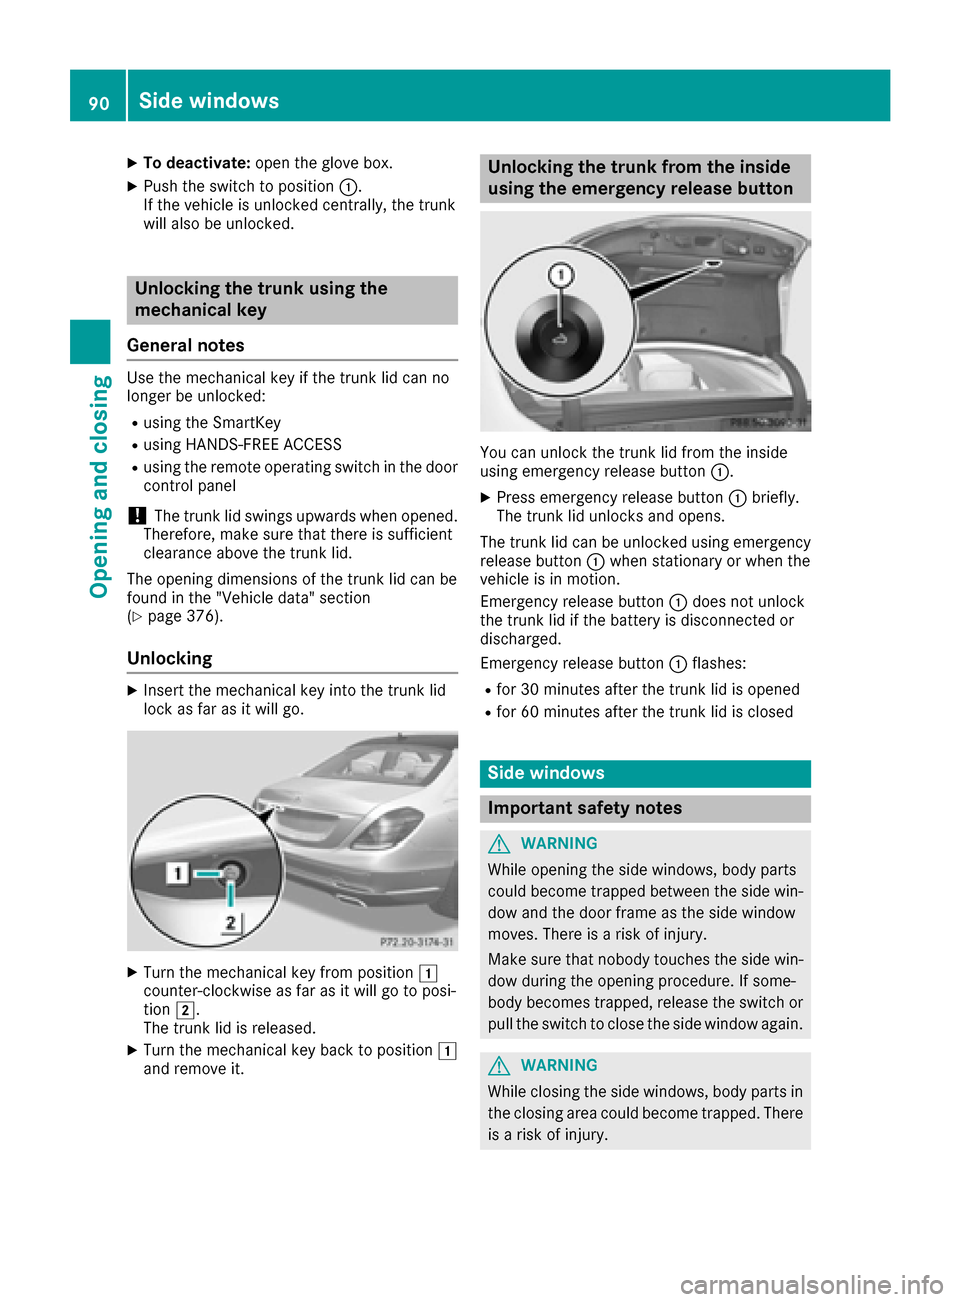
Unlocking
XInsert the mechanical key into the trunk lid
lock as far as it will go.
XTurn the mechanical key from position 1
counter-clockwise as far as it will go to posi-
tion 2.
The trunk lid is released.
XTurn the mechanical key back to position 1
and remove it.
Unlocking the trunk from the inside
using the emergency release button
You can unlock the trunk lid from the inside
using emergency release button :.
XPress emergency release button :briefly.
The trunk lid unlocks and opens.
The trunk lid can be unlocked using emergency
release button :when stationary or when the
vehicle is in motion.
Emergency release button :does not unlock
the trunk lid if the battery is disconnected or
discharged.
Emergency release button :flashes:
Rfor 30 minutes after the trunk lid is opened
Rfor 60 minutes after the trunk lid is closed
Side windows
Important safety notes
GWARNING
While opening the side windows, body parts
could become trapped between the side win-
dow and the door frame as the side window
moves. There is a risk of injury.
Make sure that nobody touches the side win-
dow during the opening procedure. If some-
body becomes trapped, release the switch or
pull the switch to close the side window again.
GWARNING
While closing the side windows, body parts in
the closing area could become trapped. There is a risk of injury.
90Side windows
Opening and closing
Page 114 of 382
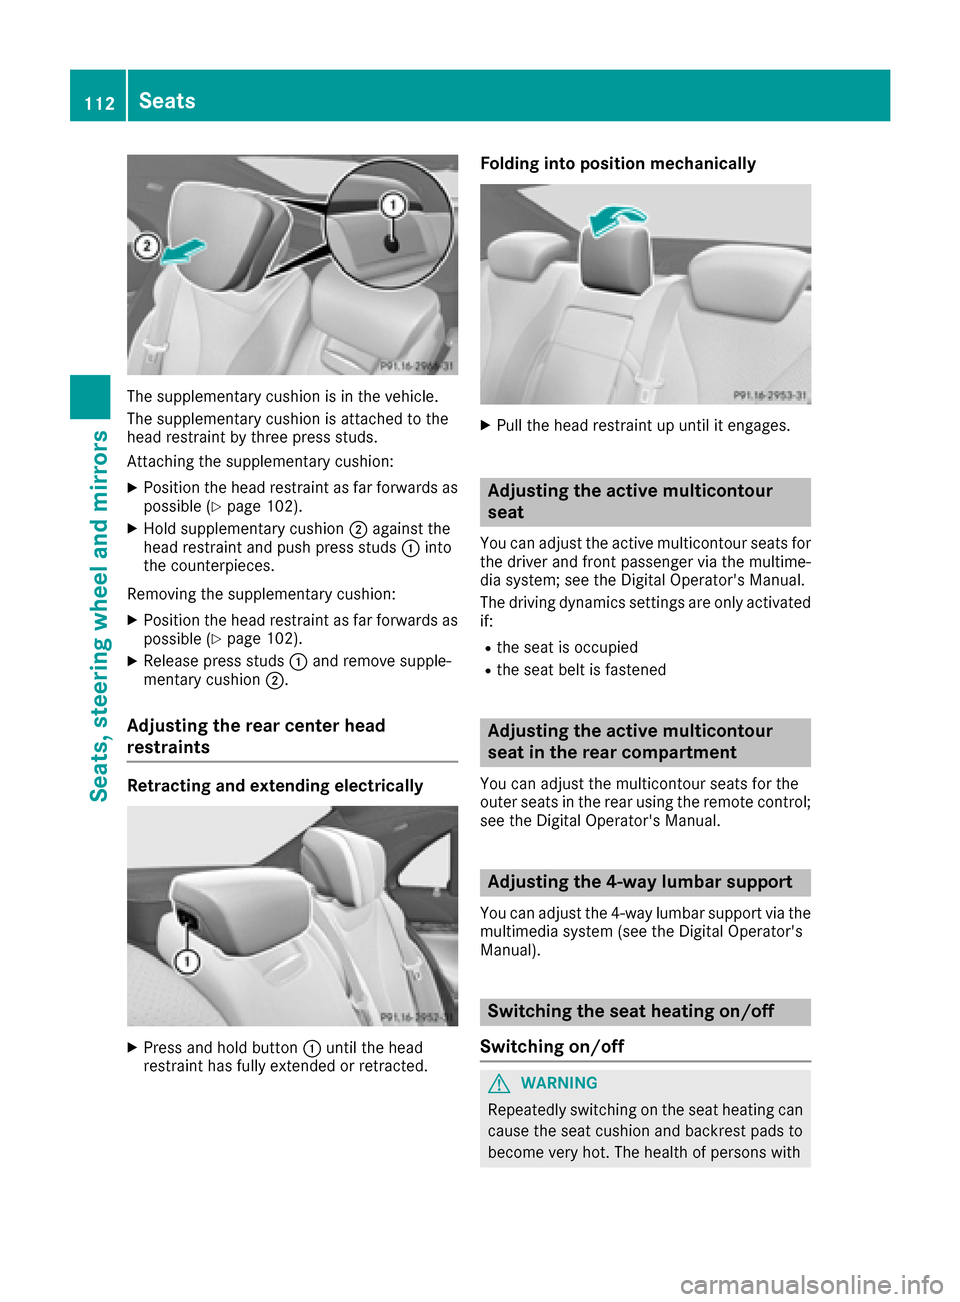
The supplementary cushion is in the vehicle.
The supplementary cushion is attached to the
head restraint by three press studs.
Attaching the supplementary cushion:
XPosition the head restraint as far forwards as
possible (Ypage 102).
XHold supplementary cushion;against the
head restraint and push press studs :into
the counterpieces.
Removing the supplementary cushion:
XPosition the head restraint as far forwards as
possible (Ypage 102).
XRelease press studs :and remove supple-
mentary cushion ;.
Adjusting the rear center head
restraints
Retracting and extending electrically
XPress and hold button :until the head
restraint has fully extended or retracted.
Folding into position mechanically
XPull the head restraint up until it engages.
Adjusting the active multicontour
seat
You can adjust the active multicontour seats for
the driver and front passenger via the multime-
dia system; see the Digital Operator's Manual.
The driving dynamics settings are only activated if:
Rthe seat is occupied
Rthe seat belt is fastened
Adjusting the active multicontour
seat in the rear compartment
You can adjust the multicontour seats for the
outer seats in the rear using the remote control;
see the Digital Operator's Manual.
Adjusting the 4-way lumbar support
You can adjust the 4-way lumbar support via the
multimedia system (see the Digital Operator's
Manual).
Switching the seat heating on/off
Switching on/off
GWARNING
Repeatedly switching on the seat heating can
cause the seat cushion and backrest pads to
become very hot. The health of persons with
112Seats
Seats, steering wheel and mirrors
Page 147 of 382
There is a risk of fire and an accident. Releasethe parking brake fully before driving off.
!Do not warm up the engine with the vehicle
stationary. Drive off immediately. Avoid high
engine speeds and driving at full throttle until
the engine has reached its operating temper-
ature.
Only shift the automatic transmission to the
desired drive position when the vehicle is sta-
tionary.
Where possible, avoid spinning the drive
wheels when pulling away on slippery roads.
You could otherwise damage the drive train.
!At low engine oil temperatures under 68 ‡
(+20 †), the maximum engine speed is limi-
ted in order to protect the engine. To protect
the engine and maintain smooth engine oper-
ation, avoid driving at full throttle when the
engine is cold.
Hybrid vehicles: make sure that you read the
separate operating instructions. Otherwise, you
may not recognize dangers.
SmartKey positions
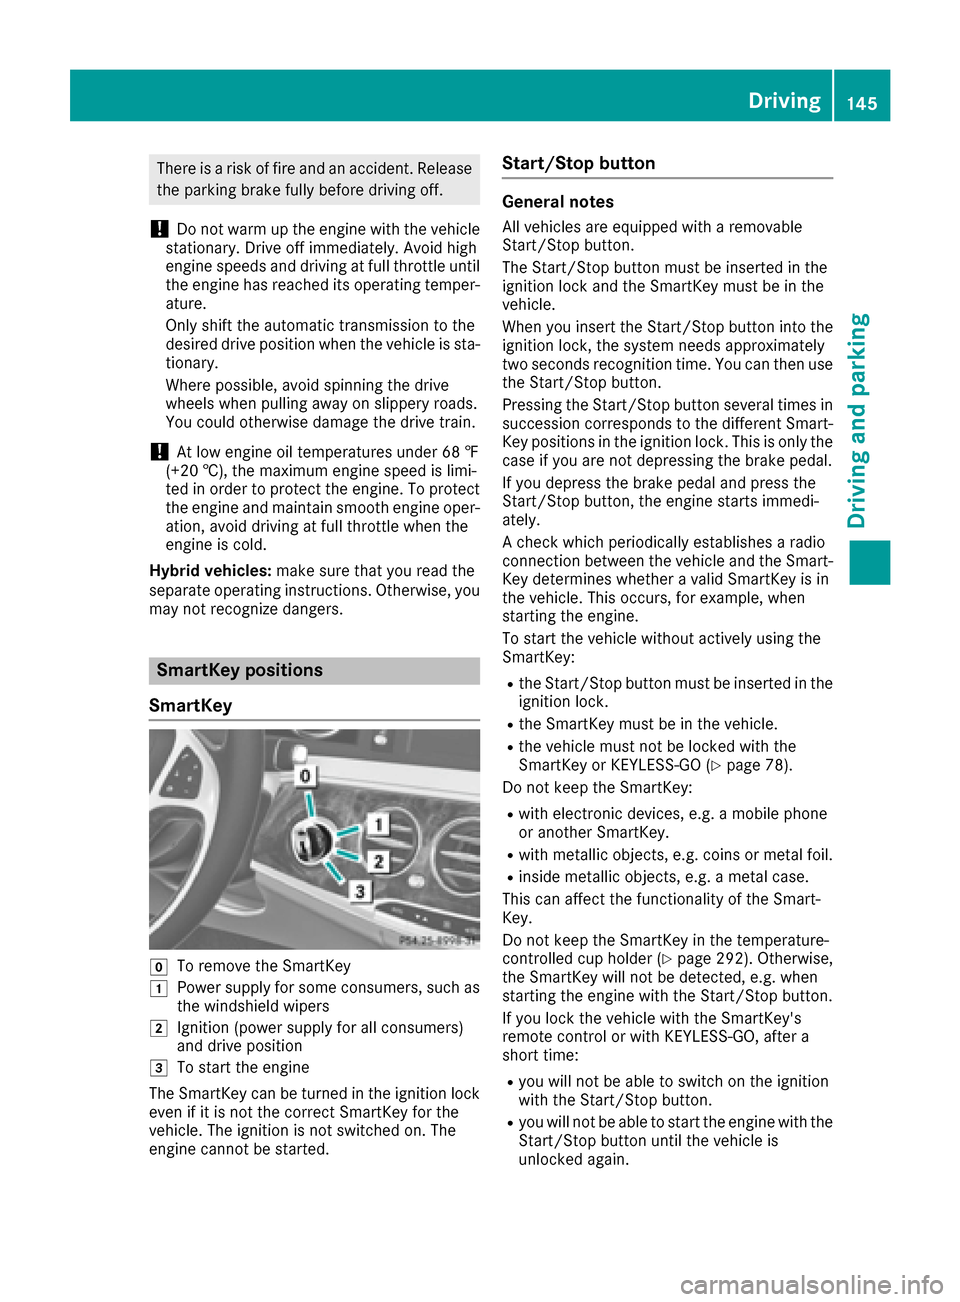
SmartKey
gTo remove the SmartKey
1Power supply for some consumers, such as
the windshield wipers
2Ignition (power supply for all consumers)
and drive position
3To start the engine
The SmartKey can be turned in the ignition lock
even if it is not the correct SmartKey for the
vehicle. The ignition is not switched on. The
engine cannot be started.
Start/Stop button
General notes
All vehicles are equipped with a removable
Start/Stop button.
The Start/Stop button must be inserted in the
ignition lock and the SmartKey must be in the
vehicle.
When you insert the Start/Stop button into the
ignition lock, the system needs approximately
two seconds recognition time. You can then use
the Start/Stop button.
Pressing the Start/Stop button several times in
succession corresponds to the different Smart-
Key positions in the ignition lock. This is only the
case if you are not depressing the brake pedal.
If you depress the brake pedal and press the
Start/Stop button, the engine starts immedi-
ately.
A check which periodically establishes a radio
connection between the vehicle and the Smart-
Key determines whether a valid SmartKey is in
the vehicle. This occurs, for example, when
starting the engine.
To start the vehicle without actively using the
SmartKey:
Rthe Start/Stop button must be inserted in the
ignition lock.
Rthe SmartKey must be in the vehicle.
Rthe vehicle must not be locked with the
SmartKey or KEYLESS-GO (Ypage 78).
Do not keep the SmartKey:
Rwith electronic devices, e.g. a mobile phone
or another SmartKey.
Rwith metallic objects, e.g. coins or metal foil.
Rinside metallic objects, e.g. a metal case.
This can affect the functionality of the Smart-
Key.
Do not keep the SmartKey in the temperature-
controlled cup holder (
Ypage 292). Otherwise,
the SmartKey will not be detected, e.g. when
starting the engine with the Start/Stop button.
If you lock the vehicle with the SmartKey's
remote control or with KEYLESS-GO, after a
short time:
Ryou will not be able to switch on the ignition
with the Start/Stop button.
Ryou will not be able to start the engine with the
Start/Stop button until the vehicle is
unlocked again.
Driving145
Driving and parking
Z
Page 284 of 382
Stowage compartments in the front
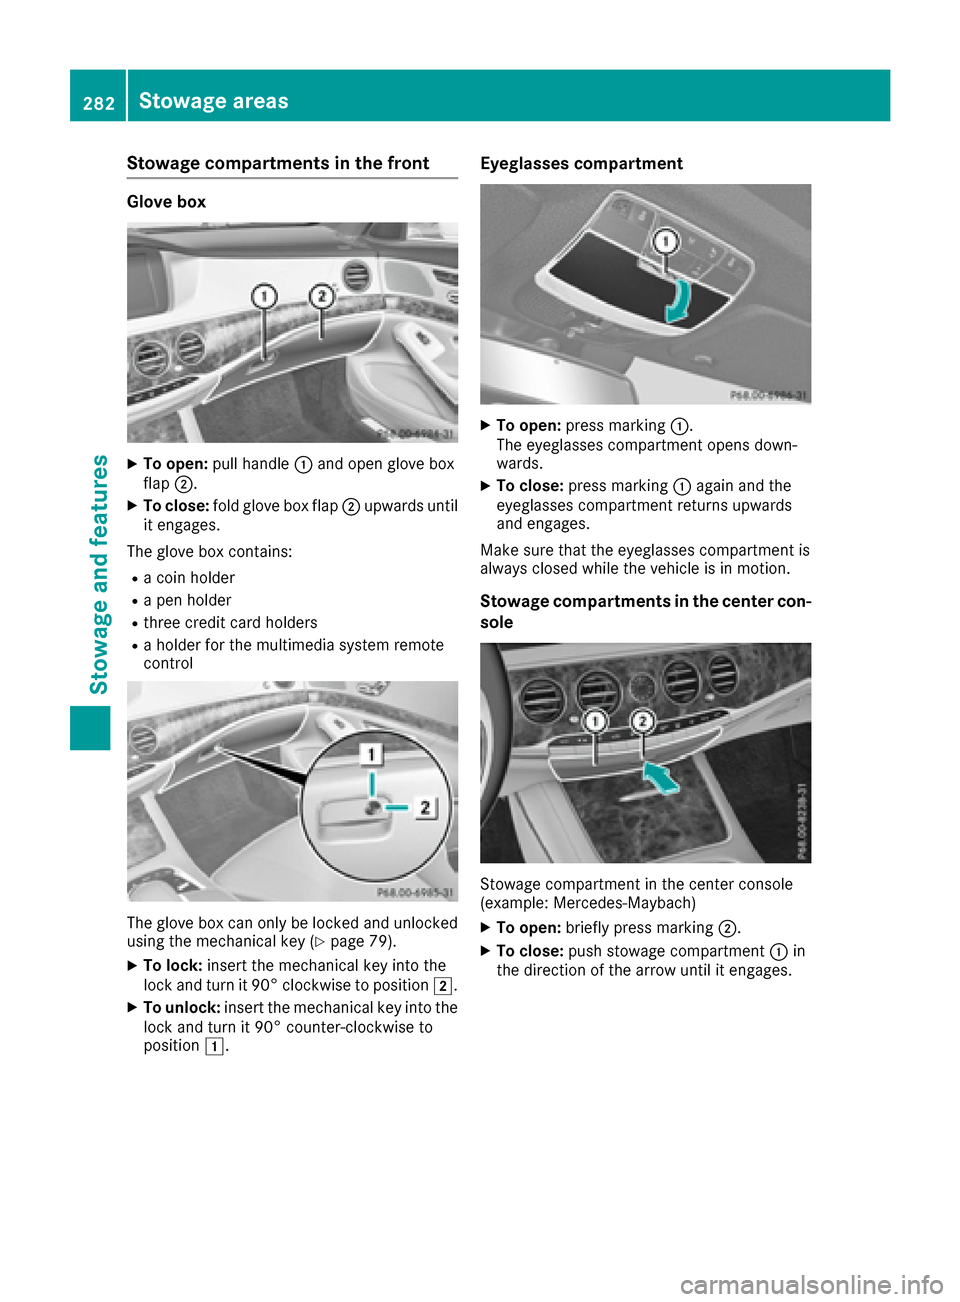
Glove box
XTo open:pull handle :and open glove box
flap ;.
XTo close: fold glove box flap ;upwards until
it engages.
The glove box contains:
Ra coin holder
Ra pen holder
Rthree credit card holders
Ra holder for the multimedia system remote
control
The glove box can only be locked and unlocked
using the mechanical key (Ypage 79).
XTo lock: insert the mechanical key into the
lock and turn it 90° clockwise to position 2.
XTo unlock:insert the mechanical key into the
lock and turn it 90° counter-clockwise to
position 1.
Eyeglasses compartment
XTo open: press marking :.
The eyeglasses compartment opens down-
wards.
XTo close: press marking :again and the
eyeglasses compartment returns upwards
and engages.
Make sure that the eyeglasses compartment is
always closed while the vehicle is in motion.
Stowage compartments in the center con-
sole
Stowage compartment in the center console
(example: Mercedes ‑Maybach)
XTo open:briefly press marking ;.
XTo close:push stowage compartment :in
the direction of the arrow until it engages.
282Stowage areas
Stowage and features