2017 MERCEDES-BENZ S-Class MAYBACH parking
[x] Cancel search: parkingPage 342 of 382

the combination switch, the hazard warning
lamp starts flashing again.
Transporting the vehicle
General notes
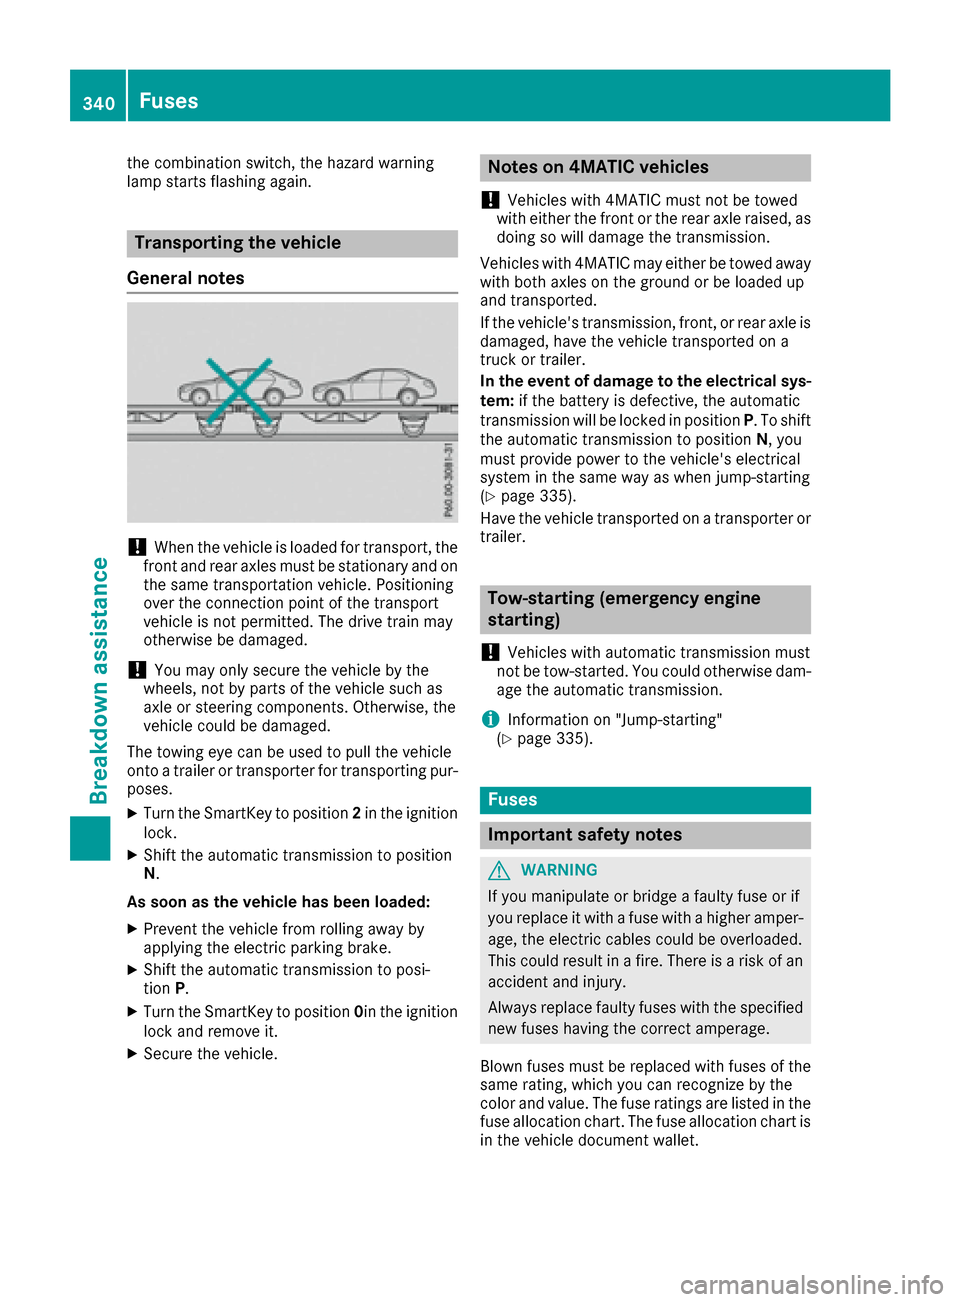
!When the vehicle is loaded for transport, the
front and rear axles must be stationary and on
the same transportation vehicle. Positioning
over the connection point of the transport
vehicle is not permitted. The drive train may
otherwise be damaged.
!You may only secure the vehicle by the
wheels, not by parts of the vehicle such as
axle or steering components. Otherwise, the
vehicle could be damaged.
The towing eye can be used to pull the vehicle
onto a trailer or transporter for transporting pur-
poses.
XTurn the SmartKey to position 2in the ignition
lock.
XShift the automatic transmission to position
N.
As soon as the vehicle has been loaded:
XPrevent the vehicle from rolling away by
applying the electric parking brake.
XShift the automatic transmission to posi-
tion P.
XTurn the SmartKey to position 0in the ignition
lock and remove it.
XSecure the vehicle.
Notes on 4MATIC vehicles
!
Vehicles with 4MATIC must not be towed
with either the front or the rear axle raised, as
doing so will damage the transmission.
Vehicles with 4MATIC may either be towed away with both axles on the ground or be loaded up
and transported.
If the vehicle's transmission, front, or rear axle is
damaged, have the vehicle transported on a
truck or trailer.
In the event of damage to the electrical sys-
tem: if the battery is defective, the automatic
transmission will be locked in position P. To shift
the automatic transmission to position N, you
must provide power to the vehicle's electrical
system in the same way as when jump-starting
(
Ypage 335).
Have the vehicle transported on a transporter or
trailer.
Tow-starting (emergency engine
starting)
!
Vehicles with automatic transmission must
not be tow-started. You could otherwise dam-
age the automatic transmission.
iInformation on "Jump-starting"
(Ypage 335).
Fuses
Important safety notes
GWARNING
If you manipulate or bridge a faulty fuse or if
you replace it with a fuse with a higher amper- age, the electric cables could be overloaded.
This could result in a fire. There is a risk of an
accident and injury.
Always replace faulty fuses with the specified
new fuses having the correct amperage.
Blown fuses must be replaced with fuses of the
same rating, which you can recognize by the
color and value. The fuse ratings are listed in the
fuse allocation chart. The fuse allocation chart is
in the vehicle document wallet.
340Fuses
Breakdown assistance
Page 345 of 382

Important safety notes
GWARNING
If wheels and tires of th ewrong siz eare used,
th ewhee lbrakes or suspension component s
may be damaged. Ther eis aris kof an acci-
dent.
Always replace wheels and tires wit hthose
that fulfill th especification sof th eoriginal
part .
When replacing wheels, mak esur eto use th e
correct:
Rdesignation
Rmodel
When replacing tires ,mak esur eto use th e
correct:
Rdesignation
Rmanufacturer
Rmodel
GWARNIN G
A flat tire severely impairs th edriving ,steer -
ing and braking characteristics of th evehicle.
Ther eis aris kof accident.
Tires without run-flat characteristics :
Rdo notdriv ewit h a flat tire.
Rimmediately replace th eflat tire wit hyour
emergenc yspar ewhee lor spar ewheel, or
consult aqualified specialist workshop.
Tires wit hrun-flat characteristics :
Rpay attention to theinformation and warn -
ing notice son MOExtended tires (tire swit h
run-flat characteristics).
Accessories that are no tapprove dfor your vehi-
cle by Mercedes-Ben zor are no tbein gused cor-
rectl ycan impair th eoperating safety.
Before purchasing and usin gnon-approve d
accessories, visit aqualified specialist work-
sho pand inquire about :
Rsuitability
Rlegal stipulation s
Rfactory recommendation sInformation on th
esizes and types of wheels and
tires for your vehicl ecan be foun dunder
"Wheel/tire combinations" (
Ypage 367).
Information on tire pressur ecan be found:
Ron th evehicle's Tir eand Loading Information
placard on th eB-pillar (Ypage 353)
Rin thetire pressur etable in th efuel filler flap
(Ypage 162)
Runder "Tir epressure" (Ypage 346)
Operation
Information on driving
Checkth etire pressur ewhen th evehicl eis
heavily laden and adjust prio rto atrip.
While driving ,pay attention to vibrations, noises
and unusual handlin gcharacteristics ,e.g. pull-
ing to on eside .This may indicat ethat th e
wheels or tires are damaged. If you suspec tthat
a tire is defective, reduce your spee dimmedi-
ately. Stop th evehicl eas soo nas possible to
chec kth ewheels and tires for damage. Hidden
tire damag ecould also be causing th eunusual
handlin gcharacteristics .If you fin dno sign sof
damage, hav eth etires and wheels checke dat a
qualified specialist workshop.
When parking your vehicle, mak esur ethat th e
tires do no tget deformed by th ecur bor other
obstacles. If they canno tbe avoided, driv eove r
obstacles suc has curbs slowly and at an obtuse
angle. Otherwise, you may damag eth ewheels
or tires .
Regular checking of wheels and tires
GWARNIN G
Damaged tires can caus etire inflation pres-
sur eloss .As aresult ,you could lose control of
your vehicle. Ther eis aris kof accident.
Chec kth etires regularly for sign sof damag e
and replace any damaged tires immediately.
Chec kwheels and tires for damag eat least once
a month .Chec kwheels and tires after driving
off-road or on roug hroads. Damaged wheels
can caus e aloss of tire pressure.
Pay particular attention to damag esuc has:
Rcut sin th etires
Rpunctures in th etires
Operation343
Wheels and tires
Z
Page 348 of 382

RLocal regulations may restrict the use of snow
chains. Observe the appropriate regulations if
you wish to mount snow chains.
RDo not exceed the maximum permissible
speed of 31 mph (50 km/h).
ROn vehicles with AIRMATIC (Ypage 182) or
Magic Body Control (MBC) (Ypage 180), you
must drive at raised vehicle level if snow
chains have been mounted.
RIf snow chains have been mounted, you must
not use Active Parking Assist (Ypage 186).
You may wish to deactivate ESP®(Ypage 71)
when pulling away with snow chains mounted.
You can thereby allow the wheels to spin in a
controlled manner, achieving an increased driv-
ing force (cutting action).
Tire pressure
Tire pressure specifications
Important safety notes
GWARNING
Underinflated or overinflated tires pose the
following risks:
Rthe tires may burst, especially as the load
and vehicle speed increase.
Rthe tires may wear excessively and/or
unevenly, which may greatly impair tire
traction.
Rthe driving characteristics, as well as steer-
ing and braking, may be greatly impaired.
There is a risk of an accident.
Follow recommended tire inflation pressures
and check the pressure of all the tires includ-
ing the spare wheel:
Rmonthly, at least
Rif the load changes
Rbefore beginning a long journey
Runder different operating conditions, e.g.
off-road driving
If necessary, correct the tire pressure.
The data on the Tire and Loading Information
placard and tire pressure table shown here are
examples. Tire pressure specifications are vehi- cle-specific and may deviate from the data
shown here. The tire pressure specifications
that are valid for your vehicle can be found on
the Tire and Loading Information placard and
tire pressure table on the vehicle.
General notes
The recommended tire pressures for the tires
mounted at the factory can be found on the
labels described here.
Further information on tire pressures can be
obtained at a qualified specialist workshop.
Tire and Loading Information placard
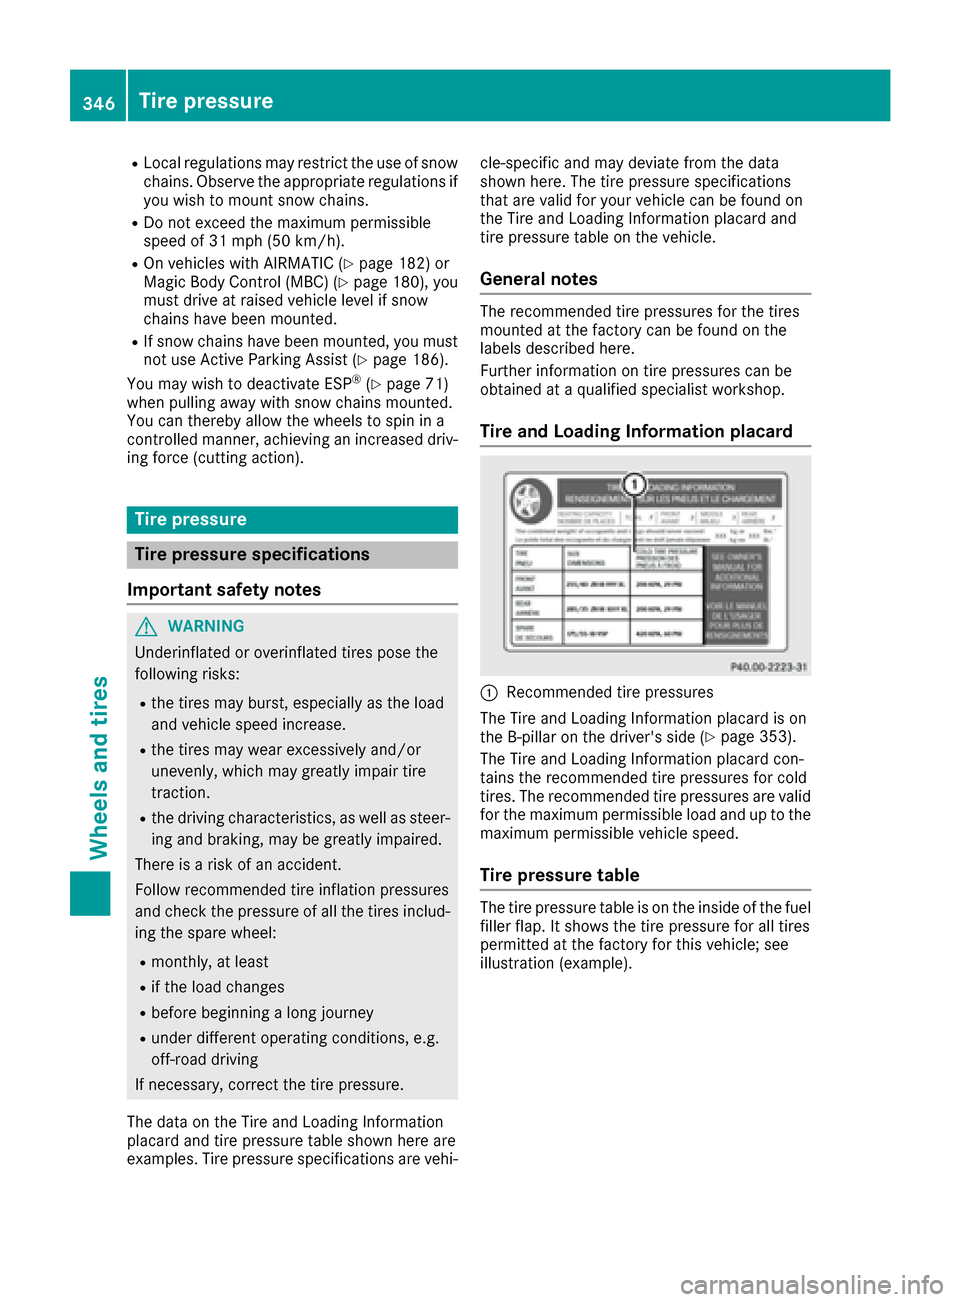
:Recommended tire pressures
The Tire and Loading Information placard is on
the B-pillar on the driver's side (
Ypage 353).
The Tire and Loading Information placard con-
tains the recommended tire pressures for cold
tires. The recommended tire pressures are valid
for the maximum permissible load and up to the
maximum permissible vehicle speed.
Tire pressure table
The tire pressure table is on the inside of the fuel
filler flap. It shows the tire pressure for all tires
permitted at the factory for this vehicle; see
illustration (example).
346Tire pressure
Wheels and tires
Page 365 of 382

Always observe the instructions and safety
notes in the "Mounting a wheel" section
(
Ypage 363).
The wear patterns on the front and rear tires
differ, depending on the operating conditions.
Rotate the wheels before a clear wear pattern
has formed on the tires. Front tires typically
wear more on the shoulders and the rear tires in the center.
On vehicles that have the same size front and
rear wheels, you can rotate the wheels accord-
ing to the intervals in the tire manufacturer's
warranty book in your vehicle documents. If no
warranty book is available, the tires should be
rotate every 3,000 to 6,000 miles(5,00 0 to
10,000 km). Earlier may be necessary, depend-
ing on the degree of tire wear. Do not change the
direction of wheel rotation.
Clean the contact surfaces of the wheel and the
brake disc thoroughly every time a wheel is rota- ted. Check the tire pressure and, if necessary,
restart the tire pressure loss warning system
(
Ypage 352) or the tire pressure monitor
(Ypage 351).
Direction of rotation
Tires with a specified direction of rotation have
additional benefits, e.g. if there is a risk of hydro-
planing. These advantages can only be gained if
the tires are installed corresponding to the
direction of rotation.
An arrow on the sidewall of the tire indicates its
correct direction of rotation.
Storing wheels
Store wheels that are not being used in a cool,
dry and preferably dark place. Protect the tires
from oil, grease, gasoline and diesel.
Mounting a wheel
Preparing the vehicle
XStop the vehicle on solid, non-slippery and
level ground.
XApply the electric parking brake manually.
XBring the front wheels into the straight-ahead
position.
XShift the transmission to position P.
XMake sure that the vehicle level is set to "Nor-
mal" for AIRMATIC (Ypage 182) or Active
Body Control (ABC) (Ypage 180).
XSwitch off the engine.
XOpen the driver's door.
The vehicle electronics now have status 0.
This is the same as the SmartKey having been
removed.
XRemove Start/Stop button from ignition lock
(Ypage 145).
or, if the SmartKey is inserted in the ignition
lock:
XRemove the SmartKey from the ignition lock.
XMake sure that the engine cannot be started
via your smartphone (Ypage 147).
XIf included in the vehicle equipment, remove
the tire-change tool kit from the vehicle.
XSafeguard the vehicle against rolling away.
Securing the vehicle to prevent it from
rolling away
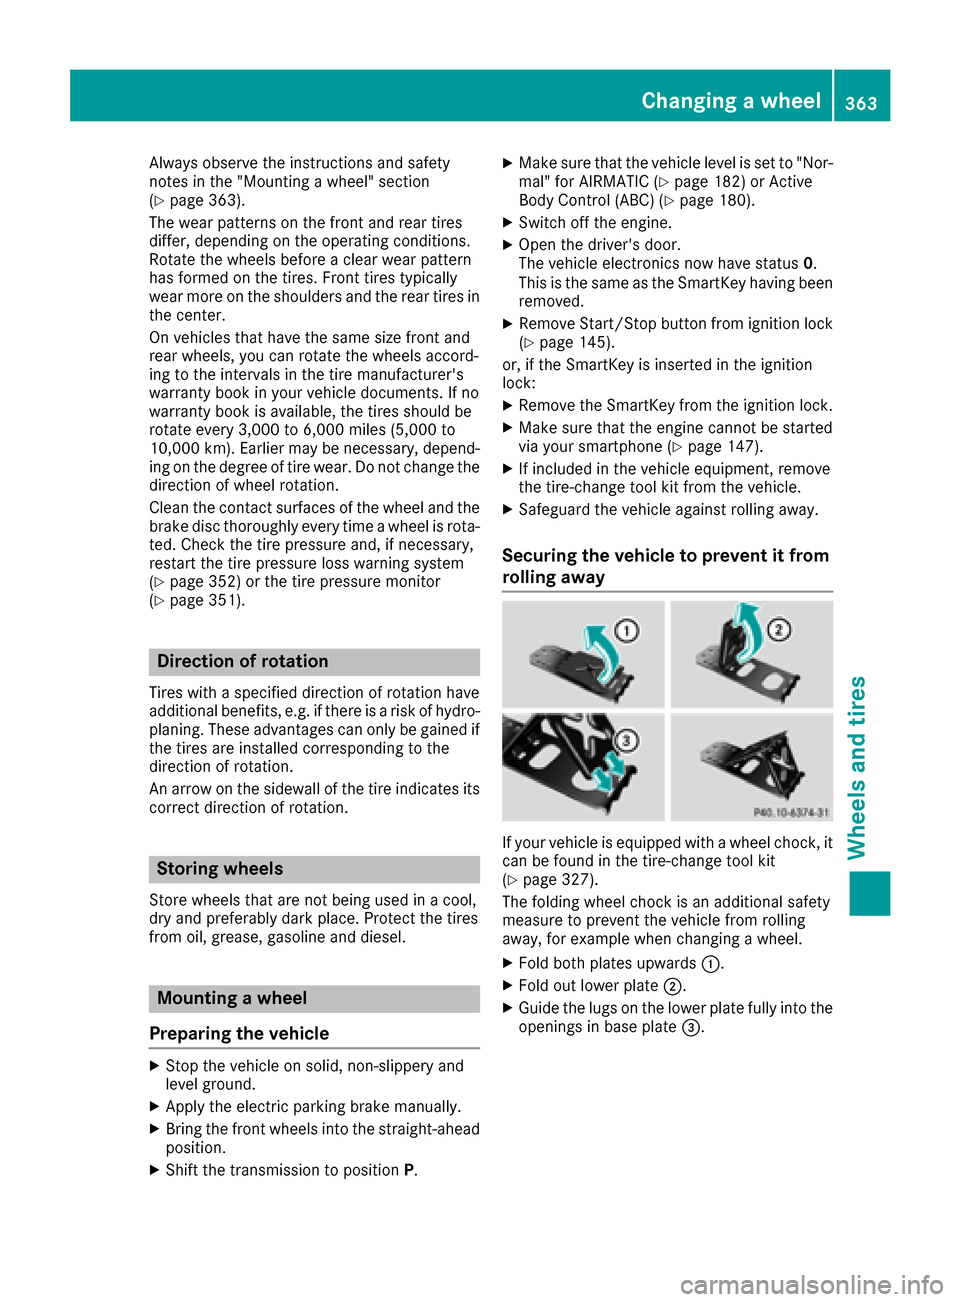
If your vehicle is equipped with a wheel chock, it can be found in the tire-change tool kit
(
Ypage 327).
The folding wheel chock is an additional safety
measure to prevent the vehicle from rolling
away, for example when changing a wheel.
XFold both plates upwards :.
XFold out lower plate;.
XGuide the lugs on the lower plate fully into the
openings in base plate =.
Changing awheel363
Wheels an d tires
Z
Page 366 of 382

XPlace chocks or other suitable items under
the front and rear of the wheel that is diago-
nally opposite the wheel you wish to change.
Raising the vehicle
GWARNING
If you do not position the jack correctly at the
appropriate jacking point of the vehicle, the
jack could tip over with the vehicle raised.
There is a risk of injury.
Only position the jack at the appropriate jack-
ing point of the vehicle. The base of the jack
must be positioned vertically, directly under
the jacking point of the vehicle.
!The jack is designed exclusively for jacking
up the vehicle at the jacking points. Other-
wise, your vehicle could be damaged.
Observe the following when raising the vehi-
cle:
RTo raise the vehicle, only use the vehicle-spe-
cific jack that has been tested and approved
by Mercedes-Benz. If used incorrectly, the
jack could tip over with the vehicle raised.
RThe jack is designed only to raise and hold the
vehicle for a short time while a wheel is being
changed. It must not be used for performing
maintenance work under the vehicle.
RAvoid changing the wheel on uphill and down-
hill slopes.
RBefore raising the vehicle, secure it from roll-
ing away by applying the parking brake and
inserting wheel chocks. Do not disengage the
parking brake while the vehicle is raised.
RThe jack must be placed on a firm, flat and
non-slip surface. On a loose surface, a large,
flat, load-bearing underlay must be used. On a slippery surface, a non-slip underlay must be
used, e.g. rubber mats.
RDo not use wooden blocks or similar objects
as a jack underlay. Otherwise, the jack will not
be able to achieve its load-bearing capacity
due to the restricted height.
RMake sure that the distance between the
underside of the tires and the ground does not
exceed 1.2 in (3 cm).
RDo not place your hands or feet under the
raised vehicle.
RDo not lie under the vehicle.
RDo not start the engine when the vehicle is
raised.
RDo not open or close a door or the trunk lid
when the vehicle is raised.
RMake sure that no persons are present in the
vehicle when the vehicle is raised.
Vehicles with AMG wheels and hub caps: the
hub cap covers the wheel bolts. Before you can
unscrew the wheel bolts, you must remove the
hub cap. Two different variant
s can be installed.
Vehicles with AMG wheels and plastic hub
caps:
XTo remove: turn the center cover of hub
cap :counter-clockwise and remove.
XTo install: before installing, ensure that hub
cap :is in the open position. To do this, turn
the center cover counter-clockwise.
XPosition hub cap :and turn the center cover
clockwise until hub cap :engages physically
and audibly.
XMake sure that hub cap :is installed
securely.
364Changing a wheel
Wheels and tires