2017 MERCEDES-BENZ S-Class COUPE key
[x] Cancel search: keyPage 86 of 338
GWARNING
Combustion engines emit poisonous exhaust
gases such as carbon monoxide. Exhaust
gases can enter the vehicle interior if the
trunk lid is open when the engine is running,
especially if the vehicle is in motion. There is a
risk of poisoning.
Always switch off the engine before opening
the trunk lid. Never drive with the trunk lid
open.
!The trunk lid swings upwards when opened.
Therefore, make sure that there is sufficient
clearance above the trunk lid.
The opening dimensions of the trunk lid can be
found in the "Vehicle data" section
(
Ypage 335).
Opening and closing
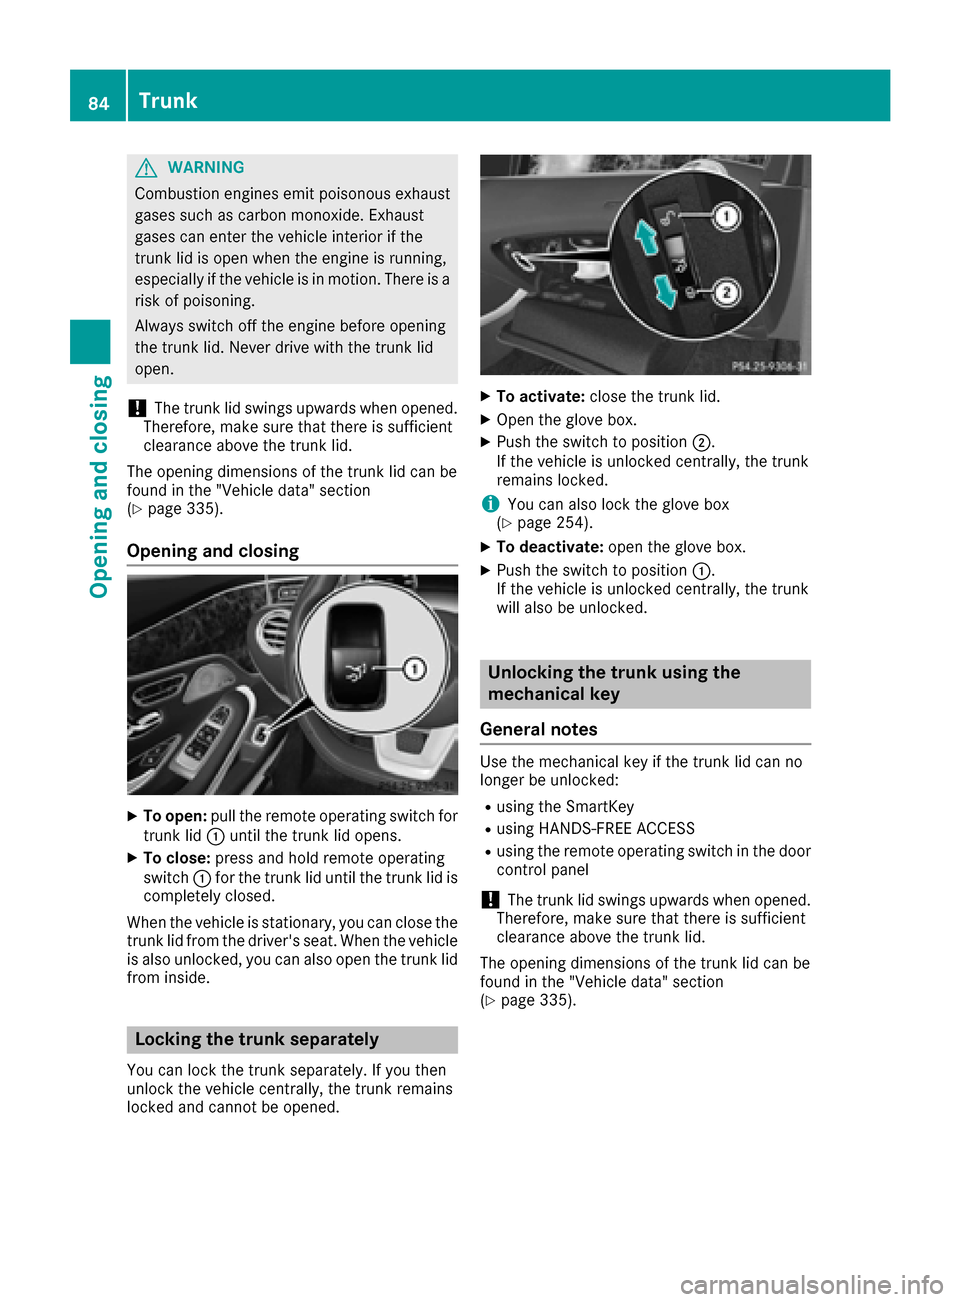
XTo open: pull the remote operating switch for
trunk lid 0043until the trunk lid opens.
XTo close: press and hold remote operating
switch 0043for the trunk lid until the trunk lid is
completely closed.
When the vehicle is stationary, you can close the
trunk lid from the driver's seat. When the vehicle
is also unlocked, you can also open the trunk lid
from inside.
Locking the trunk separately
You can lock the trunk separately. If you then
unlock the vehicle centrally, the trunk remains
locked and cannot be opened.
XTo activate: close the trunk lid.
XOpen the glove box.
XPush the switch to position 0044.
If the vehicle is unlocked centrally, the trunk
remains locked.
iYou can also lock the glove box
(Ypage 254).
XTo deactivate: open the glove box.
XPush the switch to position 0043.
If the vehicle is unlocked centrally, the trunk
will also be unlocked.
Unlocking the trunk using the
mechanical key
General notes
Use the mechanical key if the trunk lid can no
longer be unlocked:
Rusing the SmartKey
Rusing HANDS-FREE ACCESS
Rusing the remote operating switch in the door
control panel
!The trunk lid swings upwards when opened.
Therefore, make sure that there is sufficient
clearance above the trunk lid.
The opening dimensions of the trunk lid can be
found in the "Vehicle data" section
(
Ypage 335).
84Trunk
Opening and closing
Page 87 of 338
Unlocking
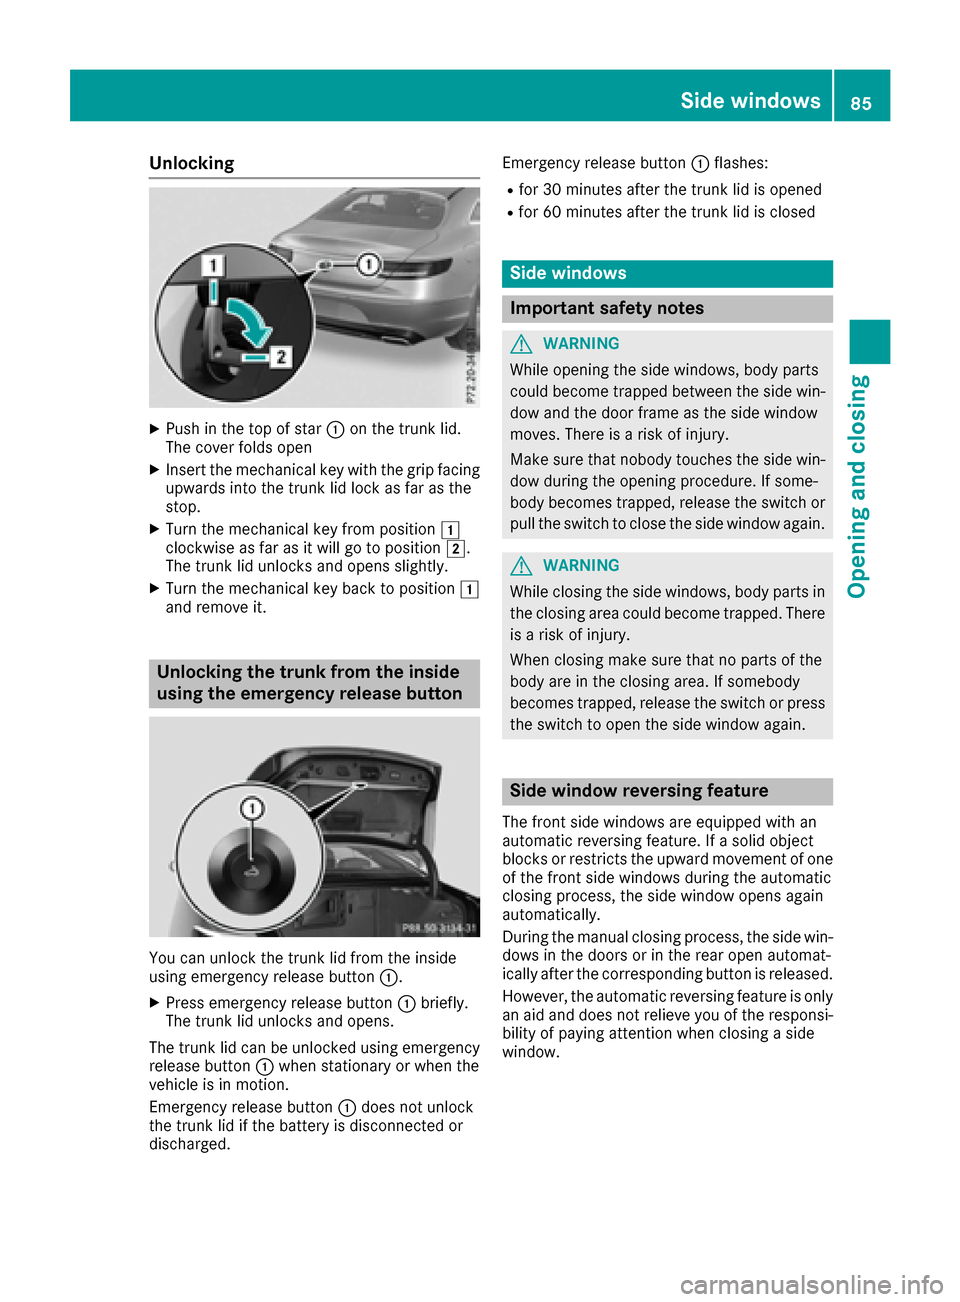
XPush in the top of star0043on the trunk lid.
The cover folds open
XInsert the mechanical key with the grip facing
upwards into the trunk lid lock as far as the
stop.
XTurn the mechanical key from position 0047
clockwise as far as it will go to position 0048.
The trunk lid unlocks and opens slightly.
XTurn the mechanical key back to position 0047
and remove it.
Unlocking the trunk from the inside
using the emergency release button
You can unlock the trunk lid from the inside
using emergency release button 0043.
XPress emergency release button 0043briefly.
The trunk lid unlocks and opens.
The trunk lid can be unlocked using emergency
release button 0043when stationary or when the
vehicle is in motion.
Emergency release button 0043does not unlock
the trunk lid if the battery is disconnected or
discharged. Emergency release button
0043flashes:
Rfor 30 minutes after the trunk lid is opened
Rfor 60 minutes after the trunk lid is closed
Side windows
Important safety notes
GWARNING
While opening the side windows, body parts
could become trapped between the side win-
dow and the door frame as the side window
moves. There is a risk of injury.
Make sure that nobody touches the side win-
dow during the opening procedure. If some-
body becomes trapped, release the switch or
pull the switch to close the side window again.
GWARNING
While closing the side windows, body parts in
the closing area could become trapped. There is a risk of injury.
When closing make sure that no parts of the
body are in the closing area. If somebody
becomes trapped, release the switch or press
the switch to open the side window again.
Side window reversing feature
The front side windows are equipped with an
automatic reversing feature. If a solid object
blocks or restricts the upward movement of one
of the front side windows during the automatic
closing process, the side window opens again
automatically.
During the manual closing process, the side win- dows in the doors or in the rear open automat-
ically after the corresponding button is released.
However, the automatic reversing feature is only
an aid and does not relieve you of the responsi-
bility of paying attention when closing a side
window.
Side windows85
Opening and closing
Z
Page 88 of 338
GWARNING
The reversing feature does not react:
Rto soft, light and thin objects, e.g. small fin-
gers
Rwhile resetting
This means that the reversing feature cannot
prevent someone being trapped in these sit-
uations. There is a risk of injury.
Make sure that no body parts are in close
proximity during the closing procedure. If
someone becomes trapped, press the switch
to open the side window again.
Opening and closing the side win-
dows
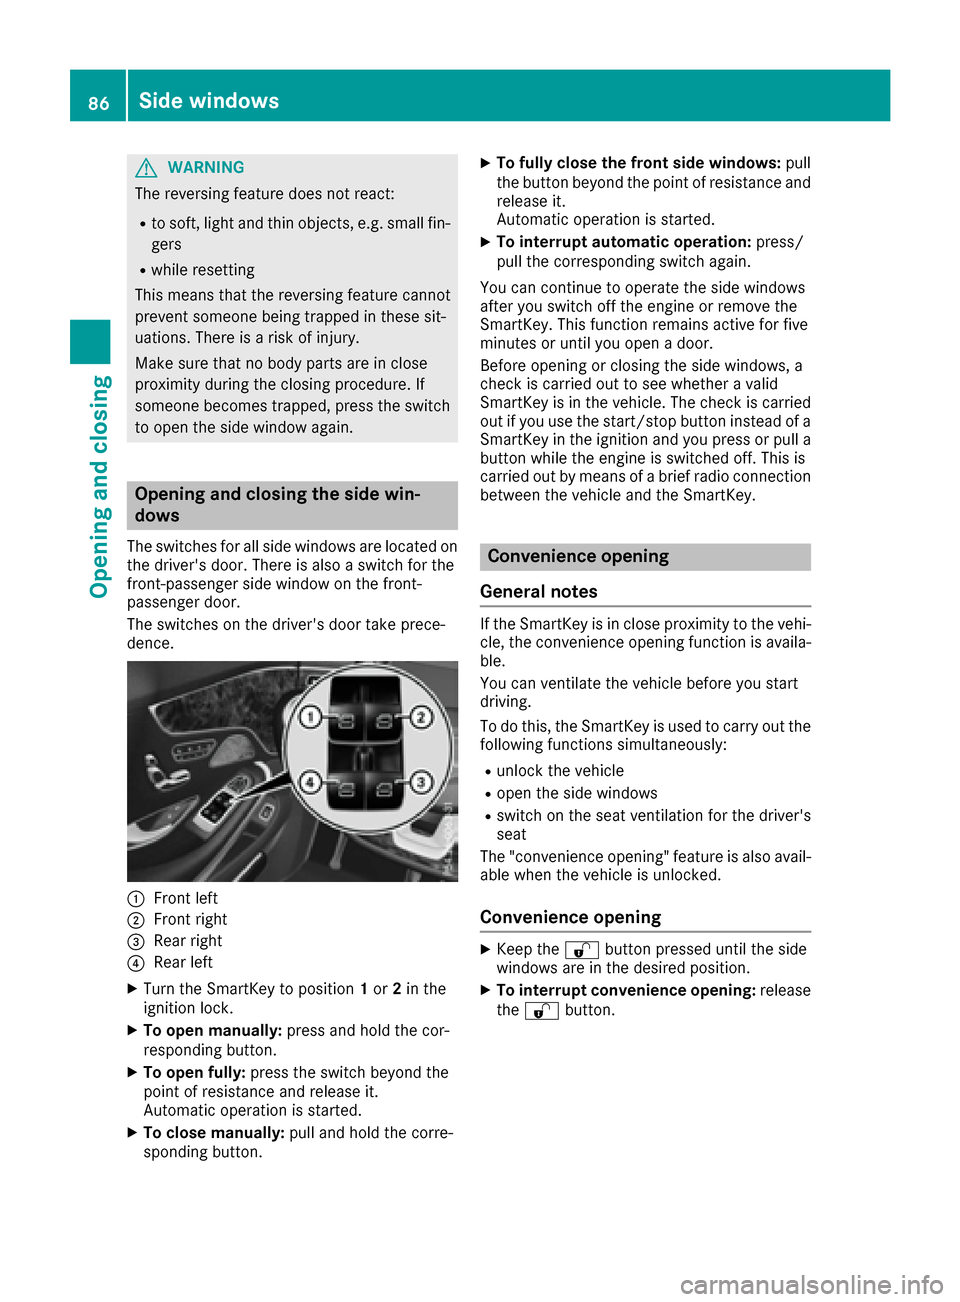
The switches for all side windows are located on the driver's door. There is also a switch for the
front-passenger side window on the front-
passenger door.
The switches on the driver's door take prece-
dence.
0043Front left
0044Front right
0087Rear right
0085Rear left
XTurn the SmartKey to position 1or 2in the
ignition lock.
XTo open manually: press and hold the cor-
responding button.
XTo open fully: press the switch beyond the
point of resistance and release it.
Automatic operation is started.
XTo close manually: pull and hold the corre-
sponding button.
XTo fully close the front side windows: pull
the button beyond the point of resistance and
release it.
Automatic operation is started.
XTo interrupt automatic operation: press/
pull the corresponding switch again.
You can continue to operate the side windows
after you switch off the engine or remove the
SmartKey. This function remains active for five
minutes or until you open a door.
Before opening or closing the side windows, a
check is carried out to see whether a valid
SmartKey is in the vehicle. The check is carried out if you use the start/stop button instead of a
SmartKey in the ignition and you press or pull a
button while the engine is switched off. This is
carried out by means of a brief radio connection
between the vehicle and the SmartKey.
Convenience opening
General notes
If the SmartKey is in close proximity to the vehi-
cle, the convenience opening function is availa-
ble.
You can ventilate the vehicle before you start
driving.
To do this, the SmartKey is used to carry out the
following functions simultaneously:
Runlock the vehicle
Ropen the side windows
Rswitch on the seat ventilation for the driver's
seat
The "convenience opening" feature is also avail-
able when the vehicle is unlocked.
Convenience opening
XKeep the 0036button pressed until the side
windows are in the desired position.
XTo interrupt convenience opening: release
the 0036 button.
86Side windows
Opening and closing
Page 89 of 338

Convenience closing feature
Important safety notes
GWARNING
When using the convenience closing feature,
parts of the body could be trapped in the clos-
ing area when a side window is being closed.
There is a risk of injury.
Observe the complete closing procedure
when the convenience closing feature is oper-
ating. Make sure that no body parts are in
close proximity during the closing procedure.
When you lock the vehicle, you can close the
windows at the same time.
You can then close the roller sunblinds.
iNotes on the automatic reversing feature
for:
Rthe side window (Ypage 85)
Rthe roller sunblind (Ypage 88)
Using the SmartKey
XPress and hold the 0037button until the side
windows are fully closed.
XMake sure that all the side windows are
closed.
XPress and hold the 0037button again until the
roller sunblinds of the panorama roof close.
XTo interrupt convenience closing: release
the 0037 button.
Using KEYLESS-GO
The SmartKey must be outside the vehicle. All
the doors must be closed.
XTouch recessed sensor surface 0043on the
door handle until the side windows are fully
closed.
iMake sure you only touch recessed sensor
surface 0043.
XMake sure that all the side windows are
closed.
XTouch recessed sensor surface 0043on the
door handle again until the roller sunblind of
the panorama roof closes.
XTo interrupt convenience closing: release
recessed sensor surface 0043on the door han-
dle.
Resetting the side windows
If a side window can no longer be closed fully,
you must reset it.
XClose all the doors.
XTurn the SmartKey to position 1or 2in the
ignition lock.
XPull the corresponding switch on the door
control panel until the side window is com-
pletely closed (
Ypage 86).
XHold the switch for an additional second.
If the side window opens again slightly:
XImmediately pull the corresponding switch on
the door control panel until the side window is
completely closed (
Ypage 86).
XHold the switch for an additional second.
XIf the respective side window remains closed
after the button is released, then it has been
set correctly. If this is not the case, repeat the
steps above.
Side windows87
Opening and closing
Z
Page 91 of 338
cannot prevent someone being trapped in
these situations. There is a risk of injury.
When closing the roller sunblind, make sure
that no body parts are in the sweep area.
If somebody becomes trapped:
Rrelease the switch immediately, or
Rpress the switch in any direction during the
automatic closing process
The closing process is stopped.
Opening and closing the roller sunblind
XTurn the SmartKey to position 1or 2in the
ignition lock.
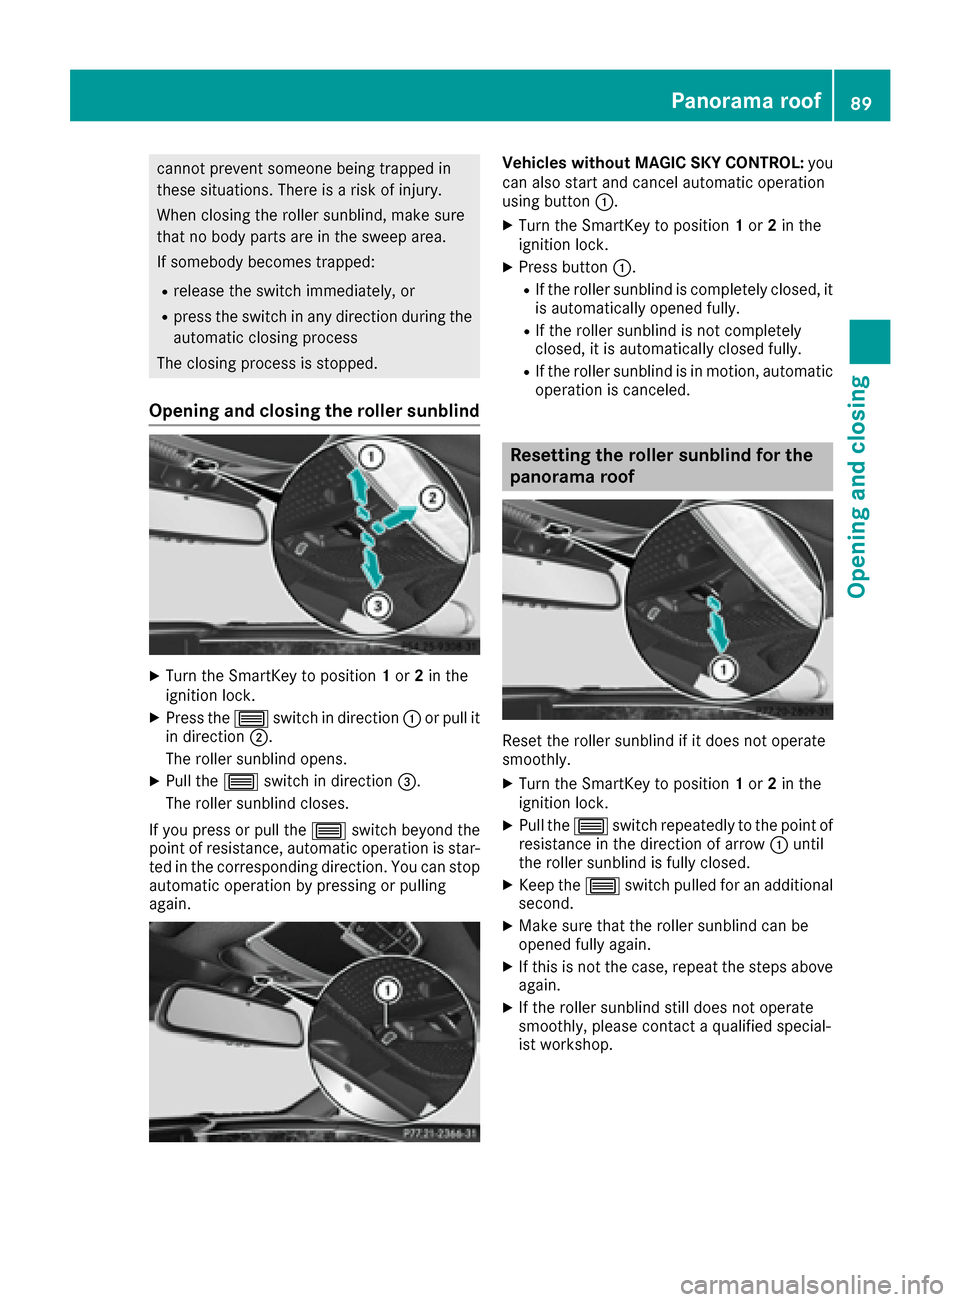
XPress the 0057switch in direction 0043or pull it
in direction 0044.
The roller sunblind opens.
XPull the 0057switch in direction 0087.
The roller sunblind closes.
If you press or pull the 0057switch beyond the
point of resistance, automatic operation is star-
ted in the corresponding direction. You can stop
automatic operation by pressing or pulling
again.
Vehicles without MAGIC SKY CONTROL: you
can also start and cancel automatic operation
using button 0043.
XTurn the SmartKey to position 1or 2in the
ignition lock.
XPress button 0043.
RIf the roller sunblind is completely closed, it
is automatically opened fully.
RIf the roller sunblind is not completely
closed, it is automatically closed fully.
RIf the roller sunblind is in motion, automatic
operation is canceled.
Resetting the roller sunblind for the
panorama roof
Reset the roller sunblind if it does not operate
smoothly.
XTurn the SmartKey to position 1or 2in the
ignition lock.
XPull the 0057switch repeatedly to the point of
resistance in the direction of arrow 0043until
the roller sunblind is fully closed.
XKeep the 0057switch pulled for an additional
second.
XMake sure that the roller sunblind can be
opened fully again.
XIf this is not the case, repeat the steps above
again.
XIf the roller sunblind still does not operate
smoothly, please contact a qualified special-
ist workshop.
Panorama roof89
Opening and closing
Z
Page 92 of 338
MAGIC SKY CONTROL
General notes
MAGIC SKY CONTROL is a panorama roof, the
transparency of which can be changed by apply-
ing electrical voltage.
MAGIC SKY CONTROL can be switched between
darkened and transparent states.
MAGIC SKY CONTROL darkens automatically
after a short period when you turn the SmartKey
to position 0or remove the SmartKey.
Risk of electric shock
GDANGER
MAGIC SKY CONTROL operates using high
voltage. If the headliner behind the panorama
roof is damaged or removed, electrical com-
ponents will be exposed. If you touch these
components, you could get an electric shock.
There is a risk of fatal injury.
RNever remove the headliner behind the
panorama roof.
RIf the headliner is damaged, never touch the
electrical components behind it.
RAlways have work on the MAGIC SKY CON-
TROL carried out at a qualified specialist
workshop.
The high-voltage components of MAGIC SKY
CONTROL are protected behind the headliner.
The MAGIC SKY CONTROL voltage transformer
is stamped with a high-voltage symbol, warning
you about the high voltage. The electric cables
of the high-voltage section are color orange.
Operating MAGIC SKY CONTROL
XTurn the SmartKey to position 1or 2in the
ignition lock.
MAGIC SKY CONTROL switches to the status
it was set to before the engine was switched
off.
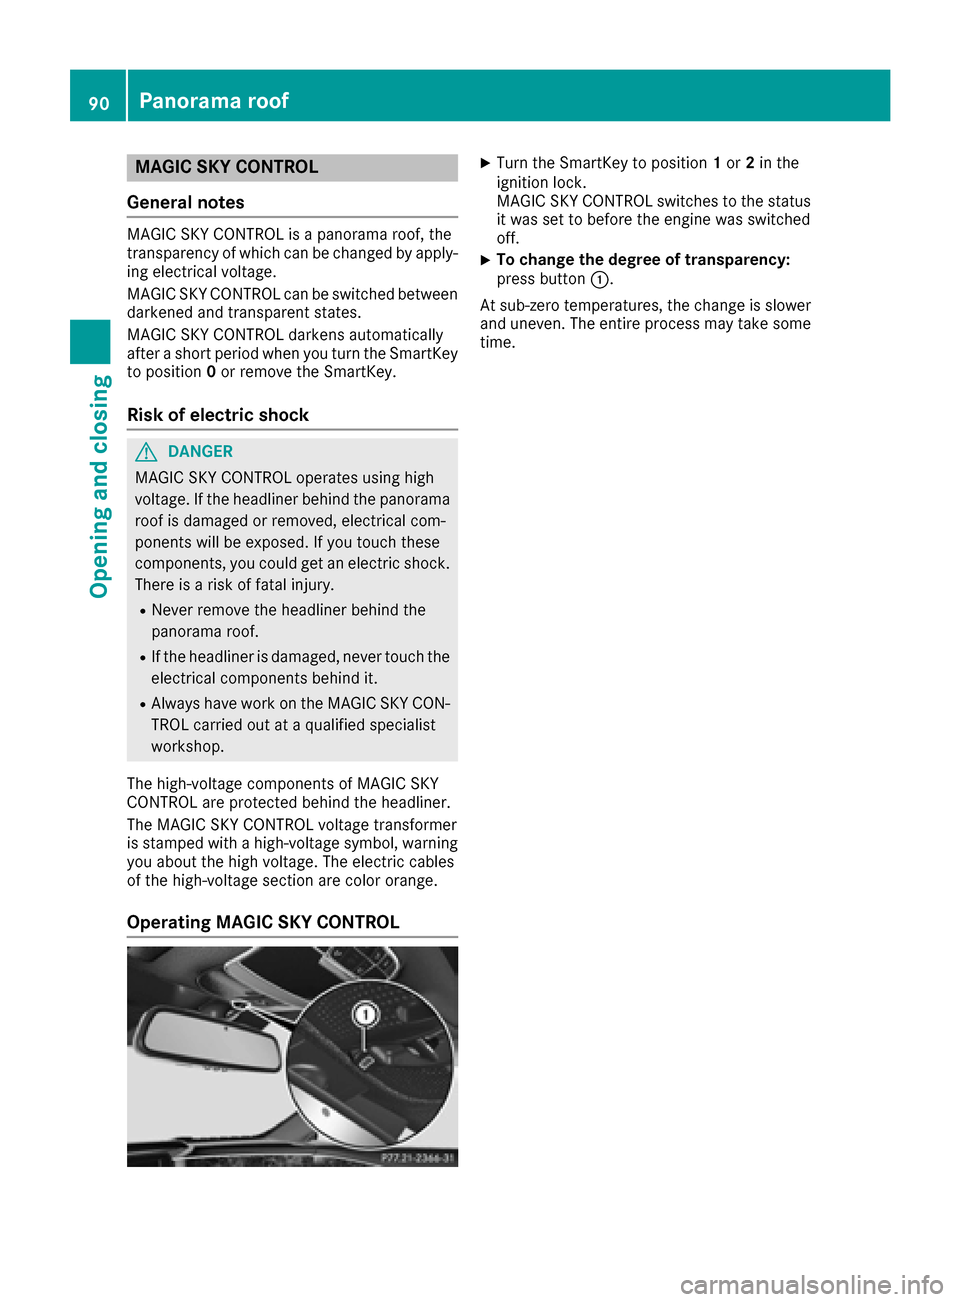
XTo change the degree of transparency:
press button 0043.
At sub-zero temperatures, the change is slower
and uneven. The entire process may take some
time.
90Panorama roof
Opening and closing
Page 93 of 338
Correct driver's seat position
GWARNING
You could lose control of your vehicle if you do the following while driving:
Radjust the driver's seat, head restraint,
steering wheel or mirrors
Rfasten the seat belt
There is a risk of an accident.
Adjust the driver's seat, head restraint, steer-
ing wheel and mirror and fasten your seat belt before starting the engine.
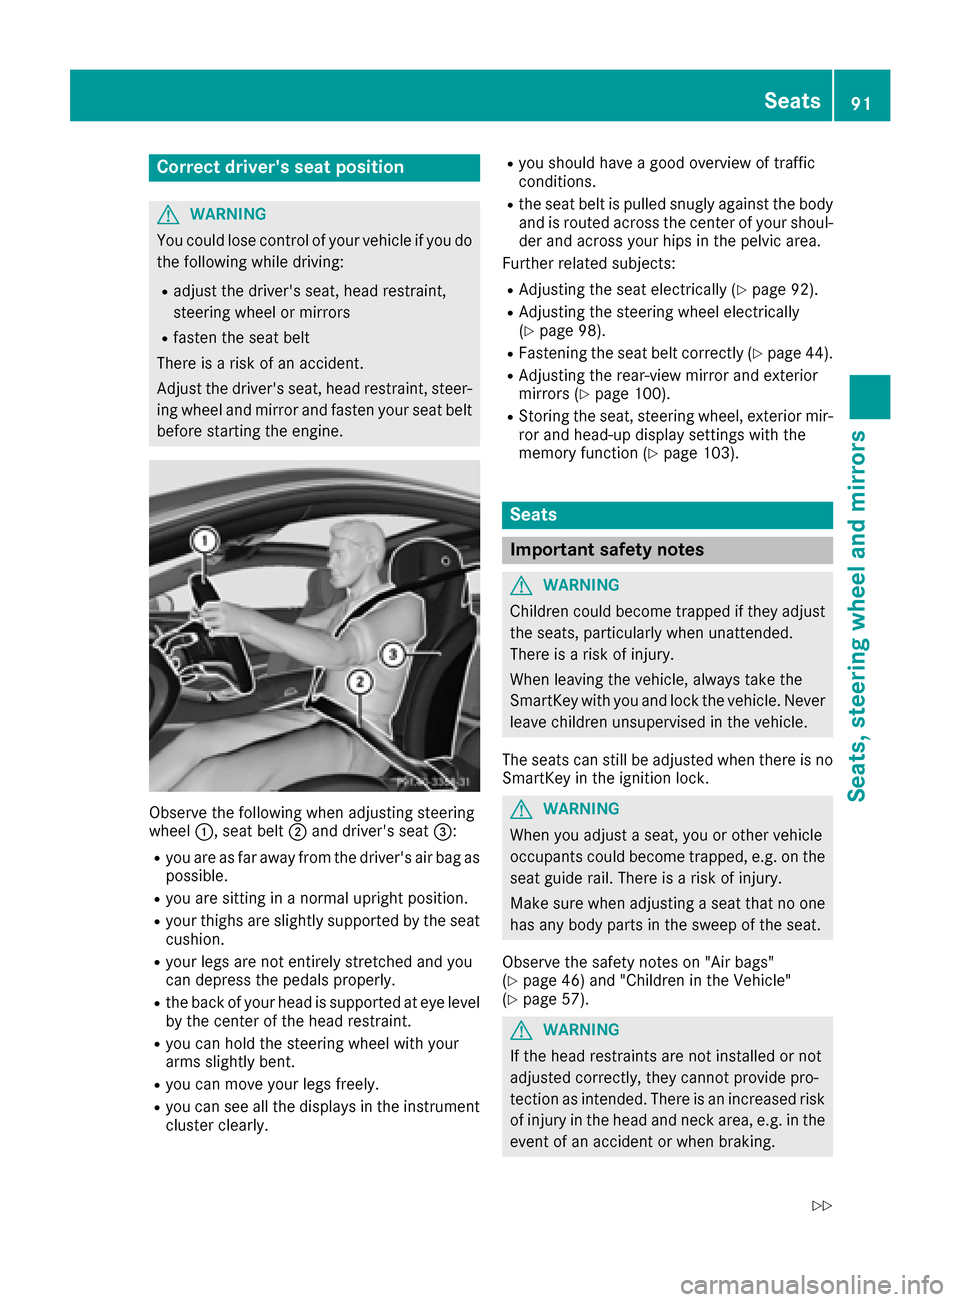
Observe the following when adjusting steering
wheel 0043, seat belt 0044and driver's seat 0087:
Ryou are as far away from the driver's air bag as
possible.
Ryou are sitting in a normal upright position.
Ryour thighs are slightly supported by the seat
cushion.
Ryour legs are not entirely stretched and you
can depress the pedals properly.
Rthe back of your head is supported at eye level
by the center of the head restraint.
Ryou can hold the steering wheel with your
arms slightly bent.
Ryou can move your legs freely.
Ryou can see all the displays in the instrument
cluster clearly.
Ryou should have a good overview of traffic
conditions.
Rthe seat belt is pulled snugly against the bodyand is routed across the center of your shoul-
der and across your hips in the pelvic area.
Further related subjects:
RAdjusting the seat electrically (Ypage 92).
RAdjusting the steering wheel electrically
(Ypage 98).
RFastening the seat belt correctly (Ypage 44).
RAdjusting the rear-view mirror and exterior
mirrors (Ypage 100).
RStoring the seat, steering wheel, exterior mir-
ror and head-up display settings with the
memory function (
Ypage 103).
Seats
Important safety notes
GWARNING
Children could become trapped if they adjust
the seats, particularly when unattended.
There is a risk of injury.
When leaving the vehicle, always take the
SmartKey with you and lock the vehicle. Never
leave children unsupervised in the vehicle.
The seats can still be adjusted when there is no
SmartKey in the ignition lock.
GWARNING
When you adjust a seat, you or other vehicle
occupants could become trapped, e.g. on the seat guide rail. There is a risk of injury.
Make sure when adjusting a seat that no one
has any body parts in the sweep of the seat.
Observe the safety notes on "Air bags"
(
Ypage 46) and "Children in the Vehicle"
(Ypage 57).
GWARNING
If the head restraints are not installed or not
adjusted correctly, they cannot provide pro-
tection as intended. There is an increased risk
of injury in the head and neck area, e.g. in the event of an accident or when braking.
Seats91
Seats, steering wheel and mirrors
Z
Page 95 of 338
0083Seat cushion length
0084Seat fore-and-aft adjustment
006BBackrest angle
iIf PRE-SAFE®is triggered, the front-
passenger seat will be moved to a better posi- tion if it was previously in an unfavorable posi-
tion (
Ypage 55).
iYou can store the seat settings using the
memory function (Ypage 103).
iTo ensure the largest possible range of seat
settings, certain seat adjustment functions
will also adjust other settings.
iThe head restraint height is adjusted auto-
matically when you adjust the seat height or
the seat fore-and-aft position.
Adjusting the front-passenger seat
from the driver’s seat
Important safety notes
GWARNING
When you adjust a seat, you or other vehicle
occupants could become trapped, e.g. on the seat guide rail. There is a risk of injury.
Make sure when adjusting a seat that no one
has any body parts in the sweep of the seat.
Observe the safety notes on "Air bags"
(
Ypage 46) and "Children in the Vehicle"
(Ypage 57).
GWARNING
The front-air bags for could also injure the
vehicle occupants in the front If the front
seats are positioned too close to the dash-
board or steering wheel. This poses an
increased risk of injury or even fatal injury.
Always adjust the front seats so that they are
as far from the front air bags as possible. Also
observe the notes on the correct adjustment
of the seats.
GWARNING
Children could become trapped if they adjust
the seats, particularly when unattended.
There is a risk of injury.
When leaving the vehicle, always take the
SmartKey with you and lock the vehicle. Never
leave children unsupervised in the vehicle.
!Do not move the front-passenger seat fully
forwards if there are objects in the parcel net
in the front-passenger footwell. The objects
could otherwise be damaged.
Adjusting the front-passenger seat
The power supply or the ignition must be
switched on so that the front-passenger seat
can be selected (
Ypage 122).
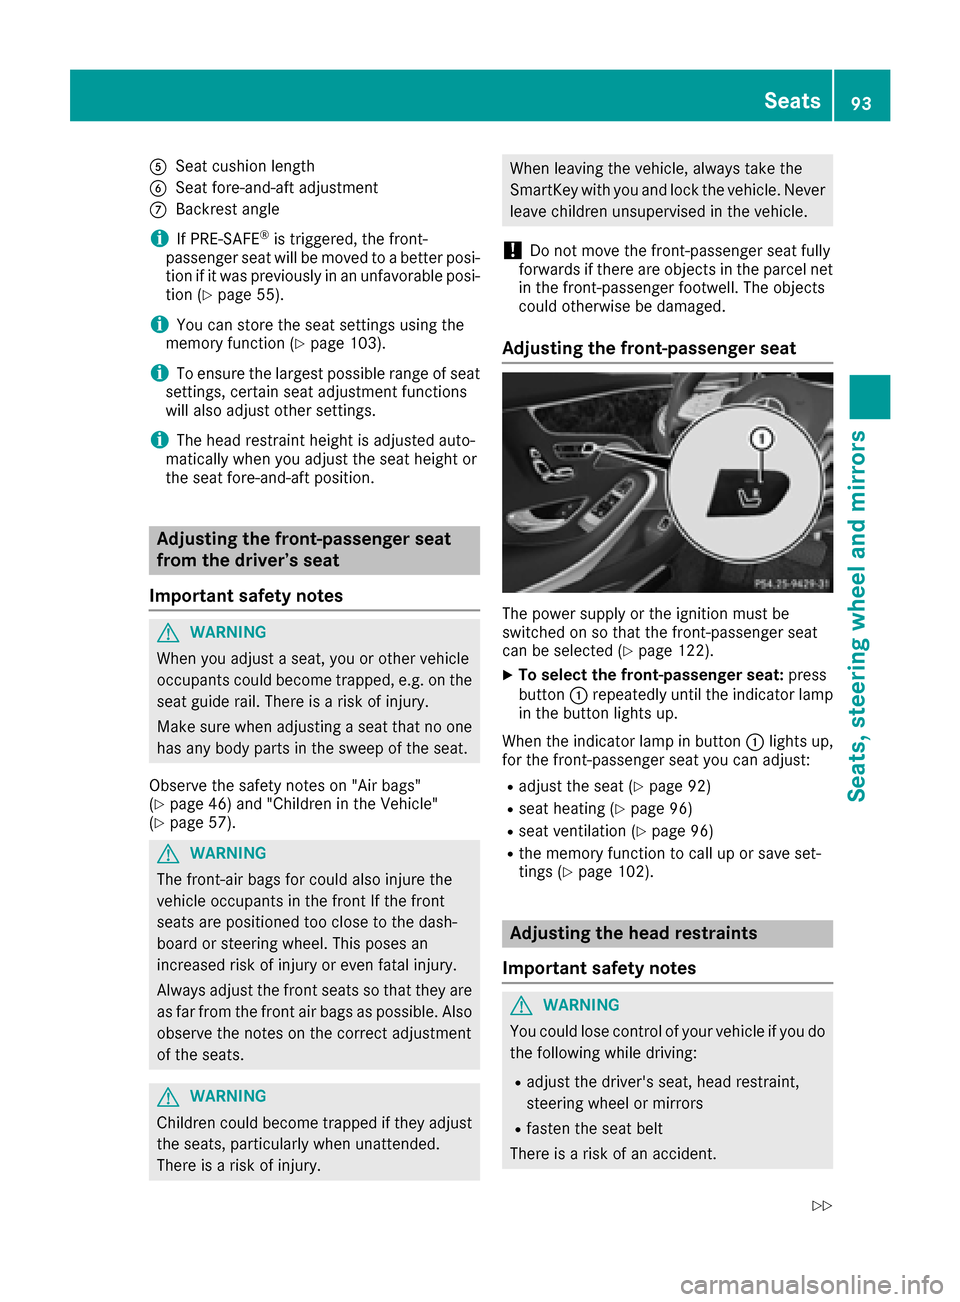
XTo select the front-passenger seat: press
button 0043repeatedly until the indicator lamp
in the button lights up.
When the indicator lamp in button 0043lights up,
for the front-passenger seat you can adjust:
Radjust the seat (Ypage 92)
Rseat heating (Ypage 96)
Rseat ventilation (Ypage 96)
Rthe memory function to call up or save set-
tings (Ypage 102).
Adjusting the head restraints
Important safety notes
GWARNING
You could lose control of your vehicle if you do the following while driving:
Radjust the driver's seat, head restraint,
steering wheel or mirrors
Rfasten the seat belt
There is a risk of an accident.
Seats93
Seats, steering wheel and mirrors
Z