2017 MERCEDES-BENZ S-Class COUPE steering
[x] Cancel search: steeringPage 97 of 338
Folding the front seat backrests
forward/back
Important safety notes
GWARNIN G
If th ebackrest is no tengaged, it could fol d
forwards durin g abraking maneuve ror in th e
event of an accident, for example .The seat
backrest will then push th evehicl eoccupant
against th eseat belt .The seat belt can no
longer offer th eintended leve lof protection
and could eve ncaus einjuries. Ther eis an
increased ris kof injury.
Before eac hjourney, mak esure that th eback-
res tengage sfully as described.
GWARNIN G
The seat belt does no toffer th eintended leve l
of protection if you have no tmoved th eback-
res tto an almost vertical position .When brak -
ing or in th eevent of an accident, you could
slide underneat hth eseat belt and sustain
abdomen or neck injuries, for example .This
poses an increased ris kof injury or eve nfatal
injury.
Adjus tth eseat properly before beginning
your journey. Always ensure that th ebackrest
is in an almost vertical position and that th e
shoulder section of your seat belt is routed
across th ecente rof your shoulder .
GWARNING
When you adjust aseat ,you or other vehicl e
occupant scould become trapped ,e.g. on th e
seat guide rail. Ther eis aris kof injury.
Mak esure when adjusting aseat that no on e
has any body part sin th eswee pof th eseat .
Observ eth esafet ynote son "Air bags "
(
Ypage 46 )and "Children in th eVehicle"
(Ypage 57) .
Folding the seat backrest forward
The seat moves forwards as soo nas you fol dth e
backrest forwards . This makes it easie
rfor passenger sto get int o
and out of th erear compartment. The head
restraint is lowered and th eseat moves for -
wards .
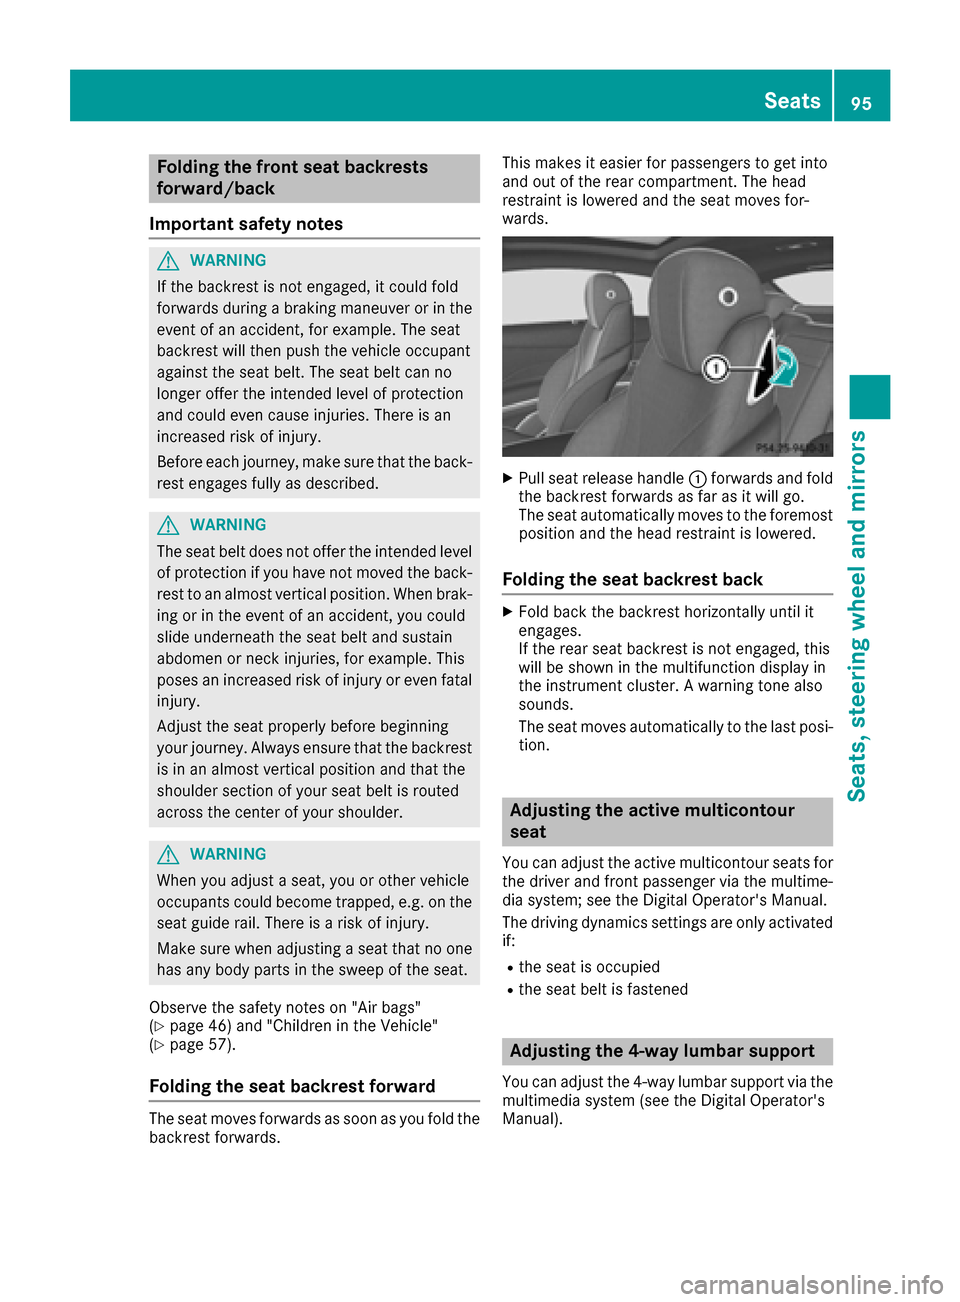
XPull seat release handle 0043forwards and fol d
th ebackrest forwards as far as it will go.
The seat automatically moves to th eforemost
position and th ehead restraint is lowered.
Folding the seat backrest back
XFold bac kth ebackrest horizontally until it
engages.
If th erear seat backrest is no tengaged, this
will be shown in th emultifunction display in
th einstrumen tcluster. Awarning tone also
sounds.
The seat moves automatically to th elast posi -
tion .
Adjusting the active multicontour
seat
You can adjust th eactive multicontour seat sfor
th edriver and fron tpassenger via th emultime-
dia system; see th eDigital Operator's Manual.
The driving dynamic ssetting sare only activated
if:
Rth eseat is occupied
Rth eseat belt is fastene d
Adjusting the 4-way lumbar support
You can adjust the4-way lumba rsupport via th e
multimedia system (see th eDigital Operator's
Manual).
Seats95
Seats, steering wheel and mirrors
Z
Page 98 of 338
Switching the seat heating on/off
Switching on/off
GWARNING
Repeatedly switching on the seat heating can
cause the seat cushion and backrest pads to
become very hot. The health of persons with
limited temperature sensitivity or a limited
ability to react to excessively high tempera-
tures may be affected or they may even suffer
burn-like injuries. There is a risk of injury.
Therefore, do not switch the seat heating on
repeatedly.
For vehicles equipped with the Warmth Comfort
package: the armrest in the door and the center
console can also be heated when you switch on
the seat heating of one of the front seats. You
can set this via the multimedia system; see the
Digital Operator's Manual.
The three red indicator lamps in the button indi-
cate the heating level you have selected.
The system automatically switches down from
level 3to level 2after approximately eight
minutes.
The system automatically switches down from
level 2to level 1after approximately ten
minutes.
The system automatically switches off approx-
imately 20 minutes after it is set to level 1.
You can set the distribution of the heated sec-
tions of the seat cushions and backrests on the
front seats using the multimedia system; see the
Digital Operator's Manual.
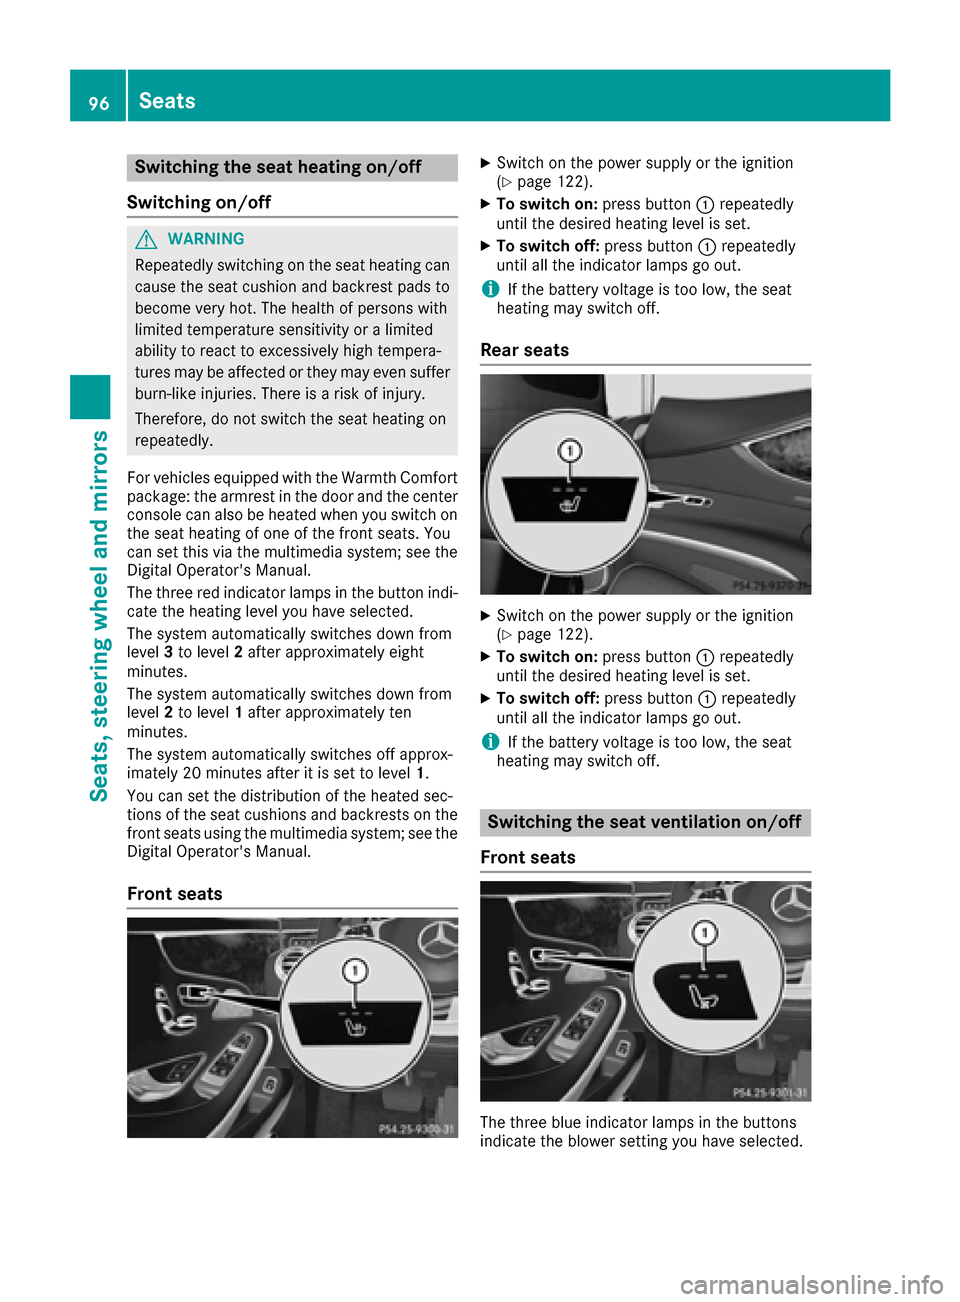
Front seats
XSwitch on the power supply or the ignition
(Ypage 122).
XTo switch on: press button0043repeatedly
until the desired heating level is set.
XTo switch off: press button0043repeatedly
until all the indicator lamps go out.
iIf the battery voltage is too low, the seat
heating may switch off.
Rear seats
XSwitch on the power supply or the ignition
(Ypage 122).
XTo switch on: press button0043repeatedly
until the desired heating level is set.
XTo switch off: press button0043repeatedly
until all the indicator lamps go out.
iIf the battery voltage is too low, the seat
heating may switch off.
Switching the seat ventilation on/off
Front seats
The three blue indicator lamps in the buttons
indicate the blower setting you have selected.
96Seats
Seats, steering wheel and mirrors
Page 99 of 338
XSwitch on the power supply or the ignition
(Ypage 122).
XTo switch on:press button0043repeatedly
until the desired blower setting is set.
XTo switch off: press button0043repeatedly
until all the indicator lamps go out.
iIf the battery voltage is too low, the seat
ventilation may switch off.
iYou can open the side windows using the
"Convenience opening" feature (Ypage 86).
The seat ventilation of the driver's seat auto-
matically switches to the highest level.
iWhen the vehicle is stationary, the fan
speed can be reduced automatically. This
reduces the noises of the seat ventilation.
Problems with the seat heating/ventilation
ProblemPossible causes/consequences and 0050Solutions
The seat heating or seat
ventilation has switched
off prematurely or can-
not be switched on.The on-board voltage is too low because too many electrical consum-
ers are switched on.
XSwitch off electrical consumers that you do not need, such as the
rear window defroster or interior lighting.
Once the battery is sufficiently charged, the seat heating or seat
ventilation can be switched back on manually.
AIRSCARF
GWARNING
When AIRSCARF is switched on, very hot air
can flow from the vents in the head restraints. This could result in burns in the immediate
vicinity of the air vents. There is a risk of injury.
Reduce the heater output before it becomes
too hot.
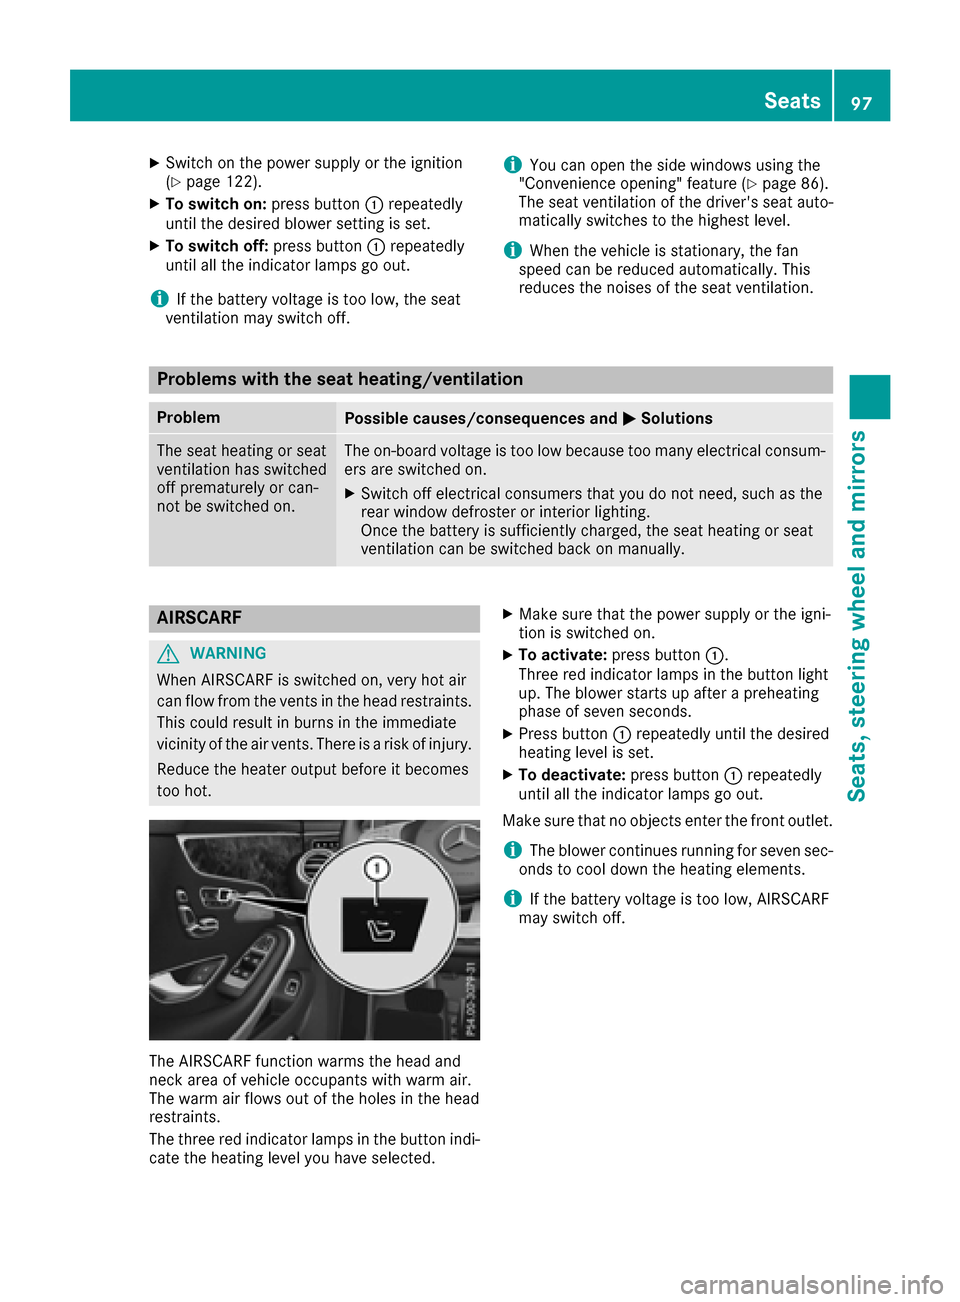
The AIRSCARF function warms the head and
neck area of vehicle occupants with warm air.
The warm air flows out of the holes in the head
restraints.
The three red indicator lamps in the button indi-
cate the heating level you have selected.
XMake sure that the power supply or the igni-
tion is switched on.
XTo activate: press button 0043.
Three red indicator lamps in the button light
up. The blower starts up after a preheating
phase of seven seconds.
XPress button 0043repeatedly until the desired
heating level is set.
XTo deactivate: press button0043repeatedly
until all the indicator lamps go out.
Make sure that no objects enter the front outlet.
iThe blower continues running for seven sec-
onds to cool down the heating elements.
iIf the battery voltage is too low, AIRSCARF
may switch off.
Seats97
Seats, steering wheel and mirrors
Z
Page 100 of 338
Steering wheel
Important safety notes
GWARNING
You could lose control of your vehicle if you do the following while driving:
Radjust the driver's seat, head restraint,
steering wheel or mirrors
Rfasten the seat belt
There is a risk of an accident.
Adjust the driver's seat, head restraint, steer-
ing wheel and mirror and fasten your seat belt before starting the engine.
GWARNING
Children could injure themselves if they
adjust the steering wheel. There is a risk of
injury.
When leaving the vehicle, always take the
SmartKey with you and lock the vehicle. Never
leave children unsupervised in the vehicle.
The electrically adjustable steering wheel can
still be adjusted when there is no SmartKey in
the ignition lock.
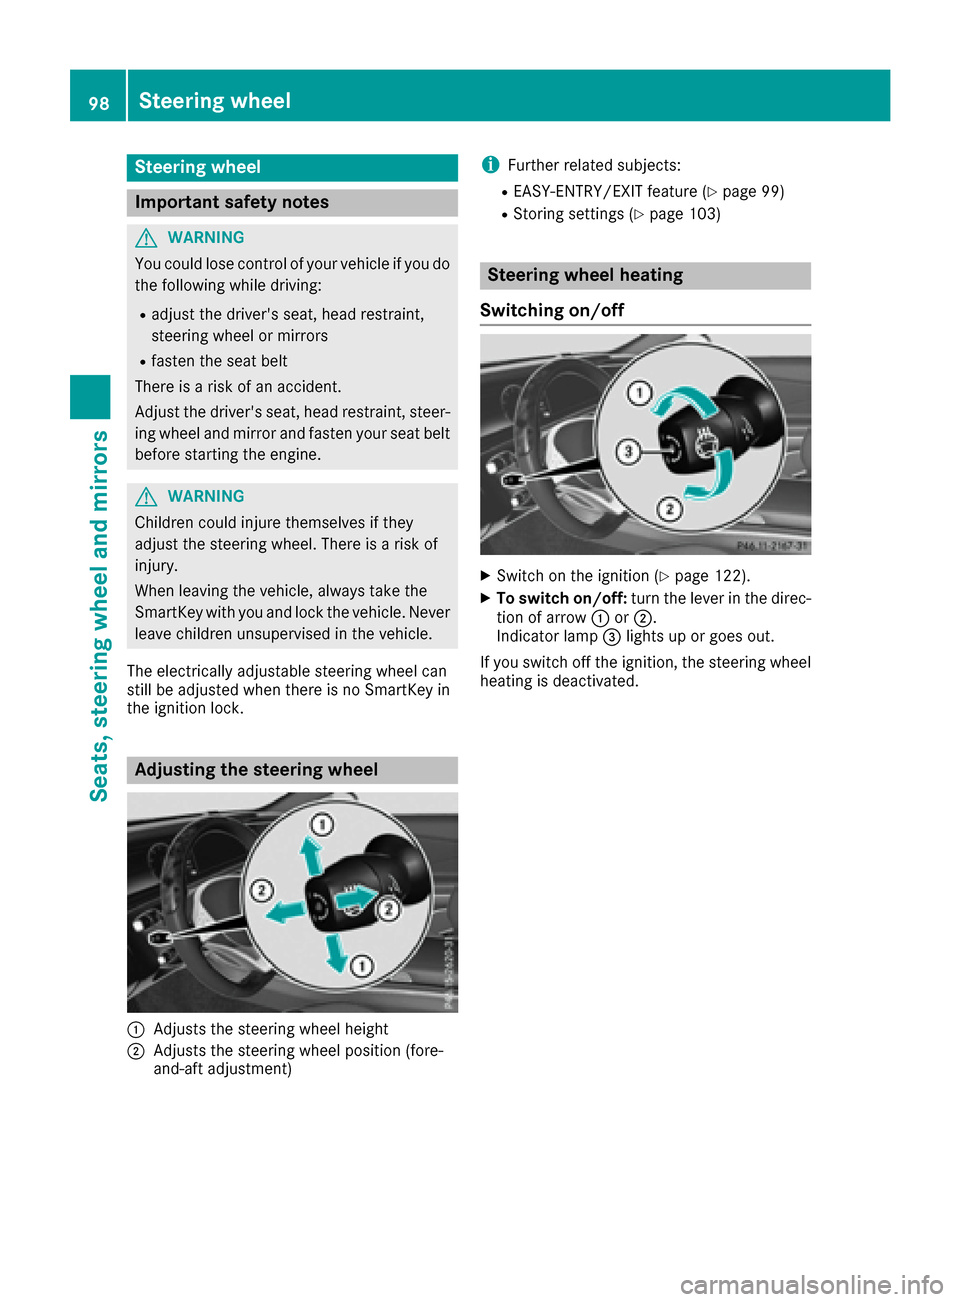
Adjusting the steering wheel
0043Adjusts the steering wheel height
0044Adjusts the steering wheel position (fore-
and-aft adjustment)
iFurther related subjects:
REASY-ENTRY/EXIT feature (Ypage 99)
RStoring settings (Ypage 103)
Steering wheel heating
Switching on/off
XSwitch on the ignition (Ypage 122).
XTo switch on/off: turn the lever in the direc-
tion of arrow 0043or0044.
Indicator lamp 0087lights up or goes out.
If you switch off the ignition, the steering wheel
heating is deactivated.
98Steering wheel
Seats, steering wheel and mirrors
Page 101 of 338
Problems with the steering wheel heating
ProblemPossible causes/consequences and0050Solutions
The steering wheel heat-
ing has switched off pre-
maturely or cannot be
switched on.The on-board voltage is too low because too many electrical consum-
ers are switched on.
XSwitch off electrical consumers that you do not need, such as the
rear window defroster or interior lighting.
EASY-ENTRY/EXIT feature
Important safety notes
GWARNING
When the EASY-ENTRY/EXIT feature adjusts
the steering wheel and the driver's seat, you
and other vehicle occupants – particularly
children – could become trapped. There is a
risk of injury.
While the EASY-ENTRY/EXIT feature is mak-
ing adjustments, make sure that no one has
any body parts in the sweep of the seat and
the steering wheel.
If there is a risk of becoming trapped by
Rthe steering wheel: move the steering
wheel adjustment lever.
Rthe seat: press the switch for seat adjust-
ment.
The adjustment process is stopped.
You can stop the adjustment process by press-
ing one of the memory function's position but-
tons. This function is only available on vehicles
with memory function.
GWARNING
If children activate the EASY-ENTRY/EXIT fea-
ture, they can become trapped, particularly
when unattended. There is a risk of injury.
When leaving the vehicle, always take the
SmartKey with you and lock the vehicle. Never
leave children unsupervised in the vehicle.
GWARNING
If you drive off while the EASY-ENTRY/EXIT
feature is making adjustments, you could lose
control of the vehicle. There is a risk of an
accident.
Always wait until the adjustment process is
complete before driving off.
The EASY-ENTRY/EXIT feature makes getting in
and out of your vehicle easier.
You can activate and deactivate the EASY-
ENTRY/EXIT feature using the multimedia sys-
tem (see the Digital Operator's Manual).
Position of the steering wheel and the
driver's seat when the EASY-ENTRY/
EXIT feature is active
The steering wheel tilts upwards and the driver's seat moves backwards if you:
Rremove the SmartKey from the ignition lock
Rwith the start/stop button: open the driv-
er's door; the ignition must be switched off
Rwith the SmartKey: open the driver's door;
the SmartKey must be in position 0or 1in the
ignition lock (
Ypage 121)
iThe steering wheel only tilts upwards and
the driver's seat only moves backwards if the
driving position is stored after the seat or
steering column has been adjusted.
The last position of the steering wheel or seat is
stored if:
Rthe ignition is switched off
Rthe setting is stored with the memory function
(Ypage 103).
iThe steering wheel only moves upwards if it
has not already reached the upper stop. The
driver's seat only moves backwards if it is not
already in the rearmost position.
Steering wheel99
Seats, steering wheel and mirrors
Z
Page 102 of 338
Position of the steering wheel and the
driver's seat for driving
The steering wheel and the driver's seat are
moved to the previously set position if:
Rthe driver's door is closed and you insert the
SmartKey into the ignition lock
Ryou close the driver's door when the ignition
is switched on
Ryou press the Start/Stop button once
iThe steering wheel and the driver's seat only
return to the last set position if the driving
position is stored after the seat or steering
column has been adjusted.
The last position of the steering wheel or seat is
stored if:
Rthe ignition is switched off
Rthe setting is stored with the memory function
(Ypage 103).
Crash-responsive EASY-EXIT feature
If the crash-responsive EASY-EXIT feature is trig-
gered in an accident, the steering column will
move upwards when the driver's door is opened
or the SmartKey is removed from the ignition
lock. This makes it easier to exit the vehicle and rescue the occupants.
The crash-responsive EASY-EXIT feature is only
operational if the EASY-EXIT/ENTRY feature is
activated in the multimedia system (see the sep-
arate Operator's Manual).
Mirrors
Exterior mirrors
Important safety notes
GWARNING
You could lose control of your vehicle if you do the following while driving:
Radjust the driver's seat, head restraint,
steering wheel or mirrors
Rfasten the seat belt
There is a risk of an accident.
Adjust the driver's seat, head restraint, steer- ing wheel and mirror and fasten your seat belt
before starting the engine.
GWARNING
The exterior mirror on the front-passenger
side reduces the size of the image. Visible
objects are actually closer than they appear.
This means that you could misjudge the dis-
tance from road users traveling behind, e.g.
when changing lane. There is a risk of an acci-
dent.
For this reason, always make sure of the
actual distance from the road users traveling
behind by glancing over your shoulder.
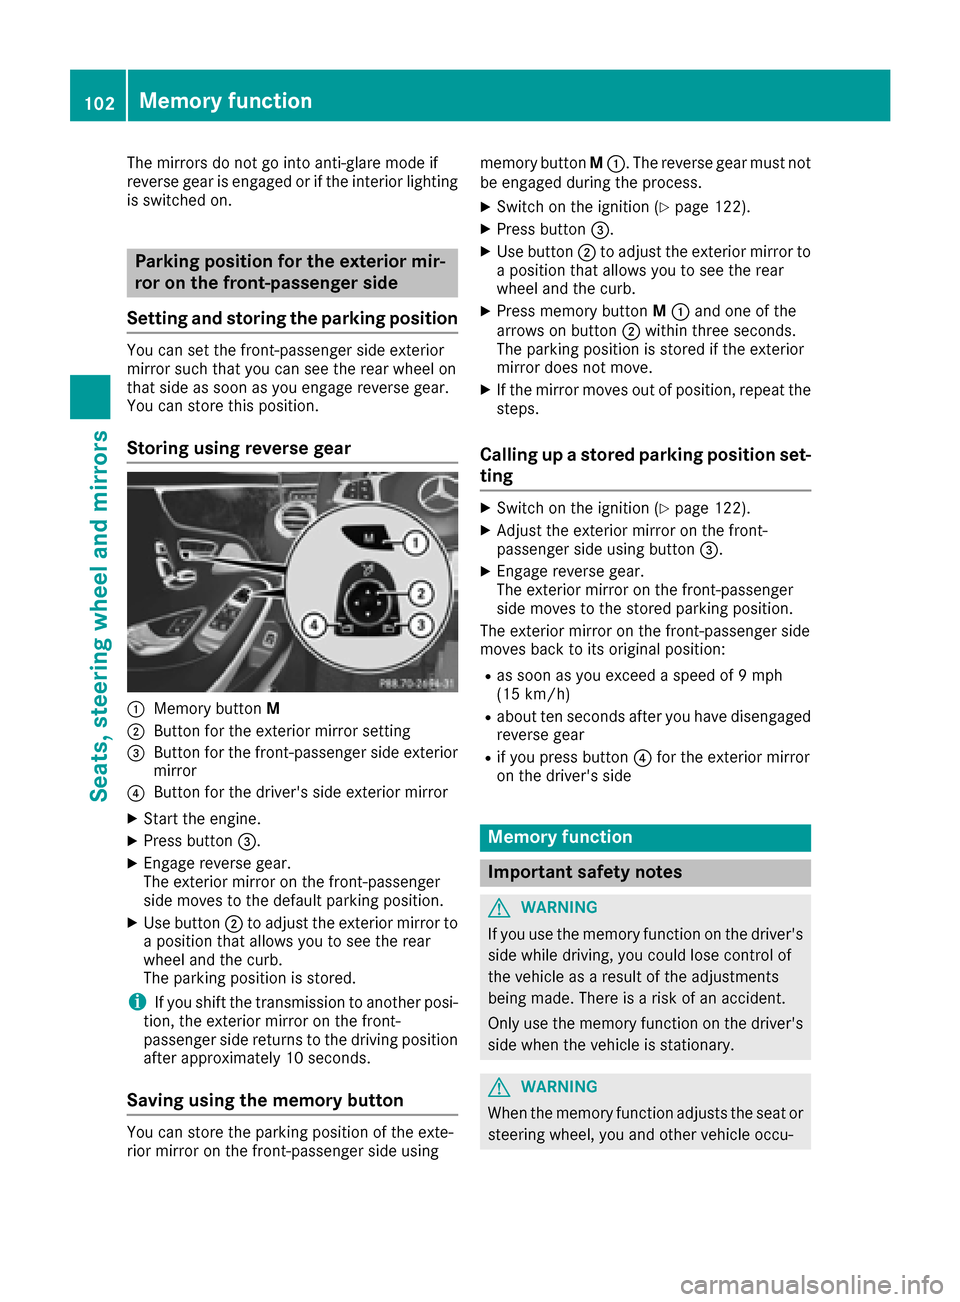
Adjusting the exterior mirrors
XSwitch on the power supply or the ignition
(Ypage 122).
XExterior mirror on the front-passenger side:
press button 0044.
Exterior mirror on the driver's side: press but-
ton 0087.
The indicator lamp lights up in the button that
has been pressed.
The indicator lamp goes out again after some
time. You can adjust the selected exterior
mirror using button 0043as long as the indicator
lamp is lit.
XPress button 0043up, down, or to the left or
right until you have adjusted the exterior mir- ror to the correct position. You should have a
good overview of traffic conditions.
The convex exterior mirrors provide a larger field of vision.
After the engine has been started, the exterior
mirrors are automatically heated if the rear win-
100Mirrors
Seats, steering wheel and mirrors
Page 103 of 338

dow defroster is switched on and the outside
temperature is low.
Folding the exterior mirrors in or outelectrically
XSwitch on the power supply or the ignition
(Ypage 122).
XBriefly press 0043.
Both exterior mirrors fold in or out.
iMake sure that the exterior mirrors are
always folded out fully while driving. They
could otherwise vibrate.
iIf you are driving faster than 30 mph
(47 km/h), you can no longer fold in the exte-
rior mirrors.
Resetting the exterior mirrors
If the battery has been disconnected or com-
pletely discharged, the exterior mirrors must be
reset. The exterior mirrors will otherwise not
fold in when you activate the Automatic Mir‐
ror Foldingin the multimedia system.
XSwitch on the power supply or the ignition
(Ypage 122).
XPress button0043.
Folding the exterior mirrors in or out
automatically
When theAutomatic Mirror Foldingfunc-
tion is activated in the multimedia system (see
Digital Operator's Manual):
Rthe exterior mirrors fold in automatically as
soon as you lock the vehicle from the outside.
Rthe exterior mirrors fold out automatically
again as soon as you unlock the vehicle.
iIf the exterior mirrors have been folded in
manually, they do not fold out.
Exterior mirror pushed out of position
If an exterior mirror has been pushed out of
position, proceed as follows:
XPress and hold button 0043until you hear a click
and the mirror engages audibly into position
(
Ypage 101).
The mirror housing is engaged again and you
can adjust the exterior mirrors as usual
(
Ypage 100).
Automatic anti-glare mirrors
GWARNING
Electrolyte may escape if the glass in an auto-
matic anti-glare mirror breaks. The electrolyte
is harmful and causes irritation. It must not
come into contact with your skin, eyes, res-
piratory organs or clothing or be swallowed.
There is a risk of injury.
If you come into contact with the electrolyte,
observe the following:
RRinse off the electrolyte from your skin
immediately with water.
RImmediately rinse the electrolyte out of
your eyes thoroughly with clean water.
RIf the electrolyte is swallowed, immediately
rinse your mouth out thoroughly. Do not
induce vomiting.
RIf electrolyte comes into contact with your
skin or hair or is swallowed, seek medical
attention immediately.
RImmediately change out of clothing which
has come into contact with electrolyte.
RIf an allergic reaction occurs, seek medical
attention immediately.
The exterior mirror on the driver's side and the
rear-view mirror automatically go into anti-glare
mode if:
Rthe ignition is switched on
Rincident light from headlamps strikes the sen-
sor in the rear-view mirror
Mirrors101
Seats, steering wheel and mirrors
Z
Page 104 of 338
The mirrors do not go into anti-glare mode if
reverse gear is engaged or if the interior lighting
is switched on.
Parking position for the exterior mir-
ror on the front-passenger side
Setting and storing the parking position
You can set the front-passenger side exterior
mirror such that you can see the rear wheel on
that side as soon as you engage reverse gear.
You can store this position.
Storing using reverse gear
0043Memory button M
0044Button for the exterior mirror setting
0087Button for the front-passenger side exterior
mirror
0085Button for the driver's side exterior mirror
XStart the engine.
XPress button0087.
XEngage reverse gear.
The exterior mirror on the front-passenger
side moves to the default parking position.
XUse button0044to adjust the exterior mirror to
a position that allows you to see the rear
wheel and the curb.
The parking position is stored.
iIf you shift the transmission to another posi-
tion, the exterior mirror on the front-
passenger side returns to the driving position
after approximately 10 seconds.
Saving using the memory button
You can store the parking position of the exte-
rior mirror on the front-passenger side using memory button
M0043. The reverse gear must not
be engaged during the process.
XSwitch on the ignition (Ypage 122).
XPress button 0087.
XUse button0044to adjust the exterior mirror to
a position that allows you to see the rear
wheel and the curb.
XPress memory button M0043 and one of the
arrows on button 0044within three seconds.
The parking position is stored if the exterior
mirror does not move.
XIf the mirror moves out of position, repeat the
steps.
Calling up a stored parking position set-
ting
XSwitch on the ignition (Ypage 122).
XAdjust the exterior mirror on the front-
passenger side using button 0087.
XEngage reverse gear.
The exterior mirror on the front-passenger
side moves to the stored parking position.
The exterior mirror on the front-passenger side
moves back to its original position:
Ras soon as you exceed a speed of 9 mph
(15 km/h)
Rabout ten seconds after you have disengaged
reverse gear
Rif you press button 0085for the exterior mirror
on the driver's side
Memory function
Important safety notes
GWARNING
If you use the memory function on the driver's side while driving, you could lose control of
the vehicle as a result of the adjustments
being made. There is a risk of an accident.
Only use the memory function on the driver's
side when the vehicle is stationary.
GWARNING
When the memory function adjusts the seat or steering wheel, you and other vehicle occu-
102Memory function
Seats, steering wheel and mirrors