2017 MERCEDES-BENZ GLE43AMG SUV hood release
[x] Cancel search: hood releasePage 112 of 366
XSwitch on the ignition.
XTurn the combination switch to the corre-
sponding position.
In the ÄorÅ position, the appropriate
wiping frequency is set automatically according
to the intensity of the rain. In the Åposition,
the rain sensor is more sensitive than in
the Ä position, causing the windshield wiper
to wipe more frequently.
Vehicles with MAGIC VISION CONTROL: the
washer fluid is fed through the wiper blades and
when wiping with washer fluid îthe washer
fluid is emitted directly from the blades.
If the wiper blades are worn, the windshield will
no longer be wiped properly. This could prevent
you from observing the traffic conditions.
Replacing the wiper blades
Important safety notes
GWARNING
If the windshield wipers begin to move while
you are changing the wiper blades, you could be trapped by the wiper arm. There is a risk of
injury.
Always switch off the windshield wipers and
ignition before changing the wiper blades.
!Always position the windshield wiper arms
vertically before folding them away from the
windshield. By doing so, you will avoid dam-
age to the hood.
!To avoid damaging the wiper blades, make
sure that you touch only the wiper arm of the
wiper.
!Never open the hood if a windshield wiper
arm has been folded away from the wind-
shield.
Never fold a windshield wiper arm without a
wiper blade back onto the windshield.
Hold the windshield wiper arm firmly when
you change the wiper blade. If you release the
windshield wiper arm without a wiper blade
and it falls onto the windshield, the windshield
may be damaged by the force of the impact.
Mercedes-Benz recommends that you have
the wiper blades changed at a qualified spe-
cialist workshop.
Replacing the wiper blades (standard
wiper blades)
Moving the wiper arms to a vertical posi-
tion
On vehicles without KEYLESS-GO:
XTurn the SmartKey to position 0in the ignition
lock (Ypage 125).
XSet the windshield wiper to position °on
the combination switch.
XTurn the SmartKey to position 1in the ignition
lock (Ypage 125).
XAs soon as the wiper arms are vertical to the
hood, turn the SmartKey to position 0in the
ignition lock (
Ypage 125).
XRemove the SmartKey.
XFold the wiper arms away from the windshield
until you feel them snap into place.
On vehicles with KEYLESS-GO:
XSwitch off the engine.
XRemove your foot from the brake pedal.
XSet the windshield wiper to the °position.
XPress the Start/Stop button repeatedly until
the windshield wiper starts.
XWhen the wiper arms are vertical to the hood,
press the Start/Stop button repeatedly until
the windshield wiper stops.
XFold the wiper arms away from the windshield
until you feel them snap into place.
Removing the wiper blades
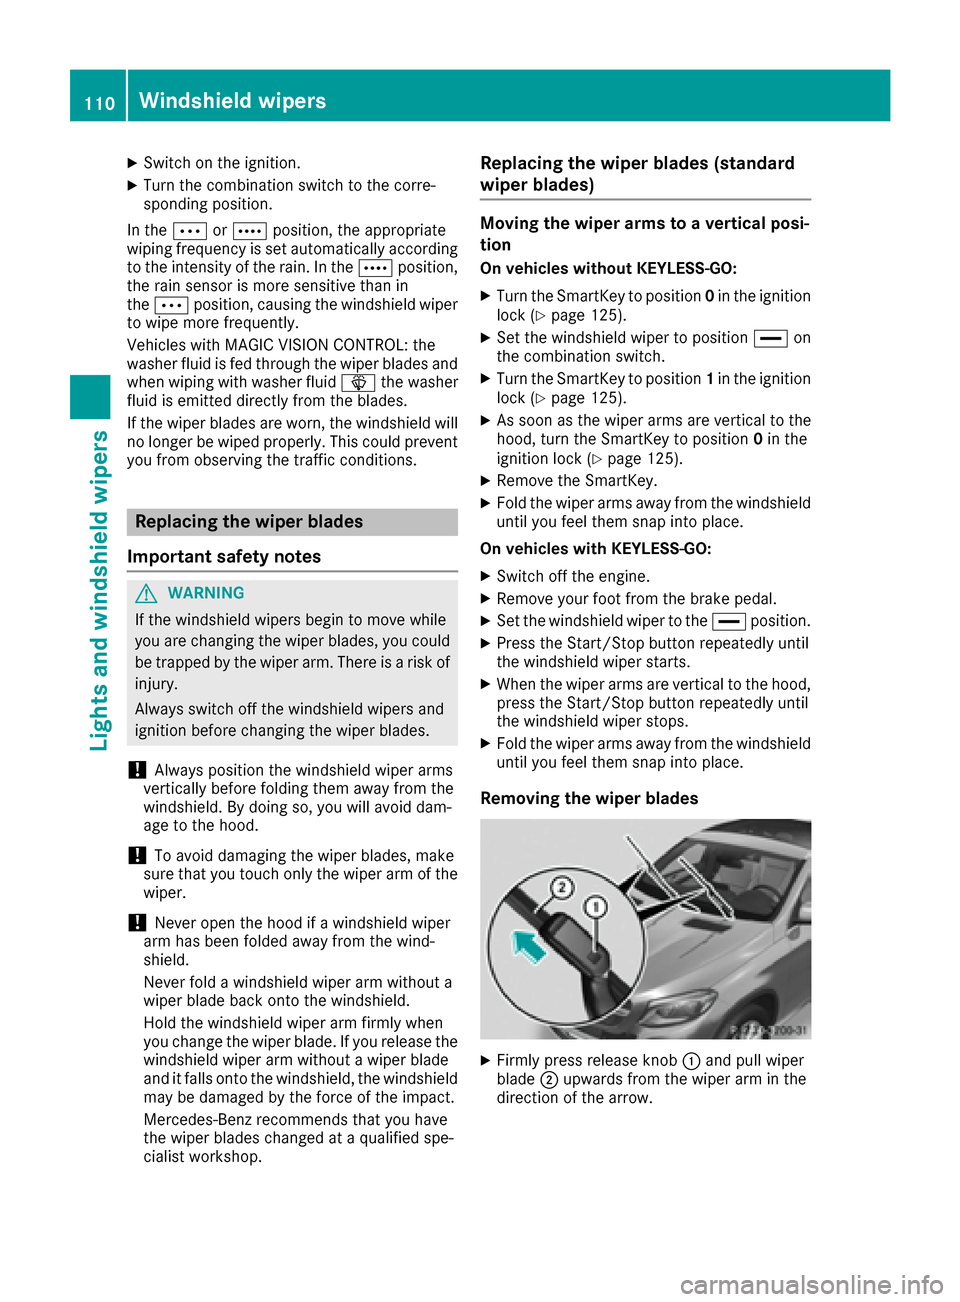
XFirmly press release knob :and pull wiper
blade ;upwards from the wiper arm in the
direction of the arrow.
110Windshield wipers
Lights and windshield wipers
Page 113 of 366
Installing the wiper blades
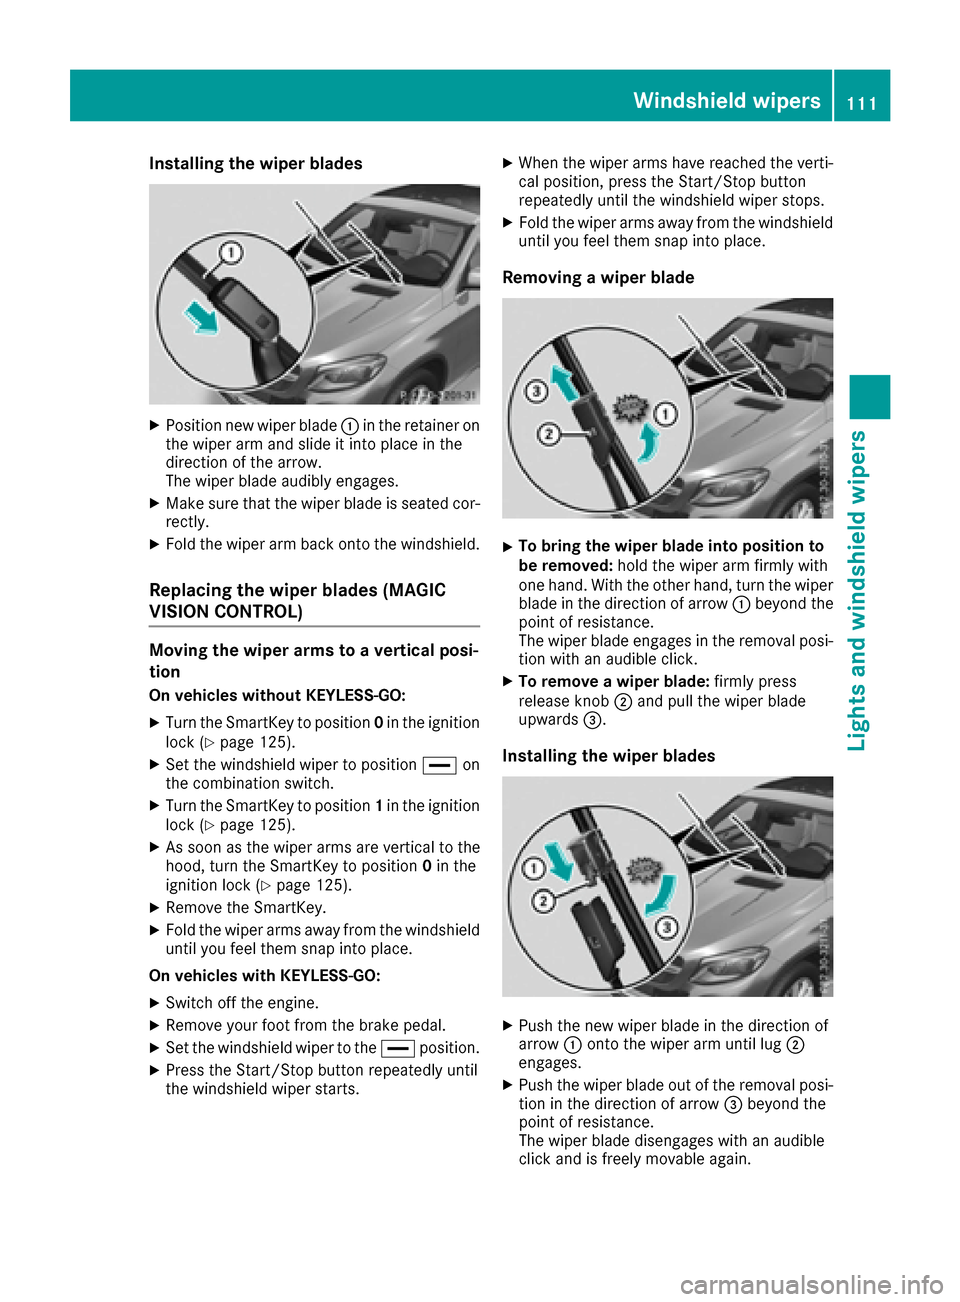
XPosition newwiper blade:inthe retainer on
the wiper arm and slide itintoplacein the
dire ction of the arrow.
The wiper blade audibly engages.
XMake sure that thewiper blade isseated cor-
rectly.
XFold the wiperarm back onto the windshield.
Replacing the wiper blades (MAGIC
VISION CONTROL)
Moving the wiper arms to a vertical posi-
tion
On vehicles without KEYLESS-GO:
XTurn the SmartKey to position 0in the ignition
lock (Ypage 125).
XSet the windshield wiperto position °on
the co mbination switch.
XTurn the SmartKey to position 1in the ignition
lock (Ypage 125).
XAs soon as the wiperarms are vertical to the
hood, turn the SmartKey to position 0in the
ignition lock (
Ypage 125).
XRemove the SmartKey.
XFold the wiperarms away from the windshield
unt ilyou feel them snap into place.
On vehicles with KEYLESS-GO:
XSwit ch off the engine.
XRemove your foot from the brake pedal.
XSet thewindshield wiperto the °position.
XPress the Start /S top button repeatedly until
the windshield wiperstarts.
XWhen the wiper arms have reached the verti-
cal position, press the Start/Stop button
repeatedly until the windshield wiper stops.
XFo ldthe wiper arms away from the windshield
until you feel them snap into place.
Removing a wiper blade
XTo bring the wiper blade into positi on to
be removed: hold the wiper arm firmly with
one hand. With the other hand, turn thewiper
blade inthe direction of arrow :beyond the
point of resistance.
The wiper blade engages in the removal posi-
tion with an audible click.
XTo remove a wiper blade: firmly press
release knob ;and pull the wiper blade
upwards =.
Installing the wiper blades
XPush the new wiper blade in the direction of
arrow:onto the wiper arm until lug ;
engages.
XPush the wiper blade out of the removal posi- tion inthe direction of arrow =beyond the
point of resistance.
The wiper blade disengages with an audible
click and is freely movable again.
Windshield wipers111
Lights and windshield wipers
Z
Page 129 of 366
ignite if in contact with the exhaust system or
parts of the engine that heat up. There is a risk
of fire.
Carry out regular checks to make sure that
there are no flammable foreign materials in
the engine compartment or in the exhaust
system.
General notes
Vehicles with a gasoline engine:the catalytic
converter is preheated for up to 30 seconds
after a cold start. The sound of the engine may
change during this time.
Automatic transmission
XShift the transmission to position P
(Ypage 132).
The transmission position display in the mul-
tifunction display shows P(
Ypage 134).
iYou can start the engine in transmission
position Pand N.
Starting procedure with the SmartKey
XTo start a diesel engine : turn the SmartKey
to position 2in the ignition lock (Ypage 125).
The % preglow indicator lamp in the instru-
ment cluster lights up.
XTurn the SmartKey to position 3in the ignition
lock and release it as soon as the engine is
running (
Ypage 125).
iVehicles with a diesel engine: you can
start the engine without preglow if the engine
is warm.
Using KEYLESS-GO to start the engine
The Start/Stop button can be used to start the
vehicle without inserting the SmartKey into the
ignition lock. The Start/Stop button must be
inserted in the ignition lock and the SmartKey
must be in the vehicle. This mode for starting the
engine operates independently of the ECO
start/stop automatic engine start function.
XDepress the brake pedal and keep it
depressed.
XPress the Start/Stop button once
(Ypage 125).
Vehicles with a gasoline engine: the engine
starts.
Vehicles with a diesel engine: preglow is
activated and the engine starts.
Starting procedure via smartphone
Observe the important safety notes on starting
the engine (Ypage 126).
You can also start your engine via your smart-
phone from outside the vehicle. In this case, the
previously selected climate control setting is
activated. In this way you can cool or heat the
interior of the vehicle before starting the jour-
ney.
Only start the engine via your smartphone if it is
safe to start and run the engine where your vehi-
cle is parked.
Observe the legal stipulations in the area where your vehicle is parked. Engine start via smart-
phone may be limited to certain countries or
regions.
You can execute a maximum of two consecutive
starting attempts via your smartphone. If you
insert the SmartKey into the ignition lock, you
can carry out two more starting attempts.
Once you have started the engine, you can
switch the engine off via your smartphone at any
time.
You can only start the engine via your smart-
phone if:
Rthe SmartKey is in the ignition lock
Rpark position Pis selected
Rthe accelerator pedal is not depressed
Rthe anti-theft alarm system is not activated
Rthe panic alarm is not activated
Rthe hazard warning lamps are switched off
Rthe hood is closed.
Rthe doors are closed and locked
Rthe windows and sliding sunroof are closed
Also make sure that:
Rthe fuel tank is sufficiently filled
Rthe starter battery is sufficiently charged
Driving127
Driving and parking
Z
Page 130 of 366
GWARNING
Limbs could be crushed or trapped if the
engine is started unintentionally during ser-
vice or maintenance work. There is a risk of
injury.
Always secure the engine against uninten-
tional starting before carrying out mainte-
nance or repair work.
Make sure that the engine cannot be started via
your smartphone before carrying out mainte-
nance or repairs. You can prevent an engine
start via your smartphone, for example, if you:
Rswitch on the hazard warning lamps
Rdo not lock the doors
Ropen the hood
Pulling away
General notes
GWARNING
If the engine speed is above the idling speed
and you engage transmission position Dor R,
the vehicle could pull away suddenly. There is
a risk of an accident.
When engaging transmission position Dor R,
always firmly depress the brake pedal and do not simultaneously accelerate.
Depress the accelerator carefully when pulling
away.
The vehicle locks centrally once you have pulled
away. The locking knobs in the doors drop down.
You can open the doors from the inside at any
time.
You can also deactivate the automatic locking
feature (
Ypage 216).
It is only possible to shift the transmission from
position Pto the desired position if you depress
the brake pedal. Only then is the parking lock
released. If you do not depress the brake pedal,
the DIRECT SELECT lever can still be moved but the parking lock remains engaged.
iUpshifts take place at higher engine speeds
after a cold start. This helps the catalytic con-
verter to reach its operating temperature
more quickly. Information on the automatic release of the
electric parking brake (
Ypage 147).
Pulling away with a trailer
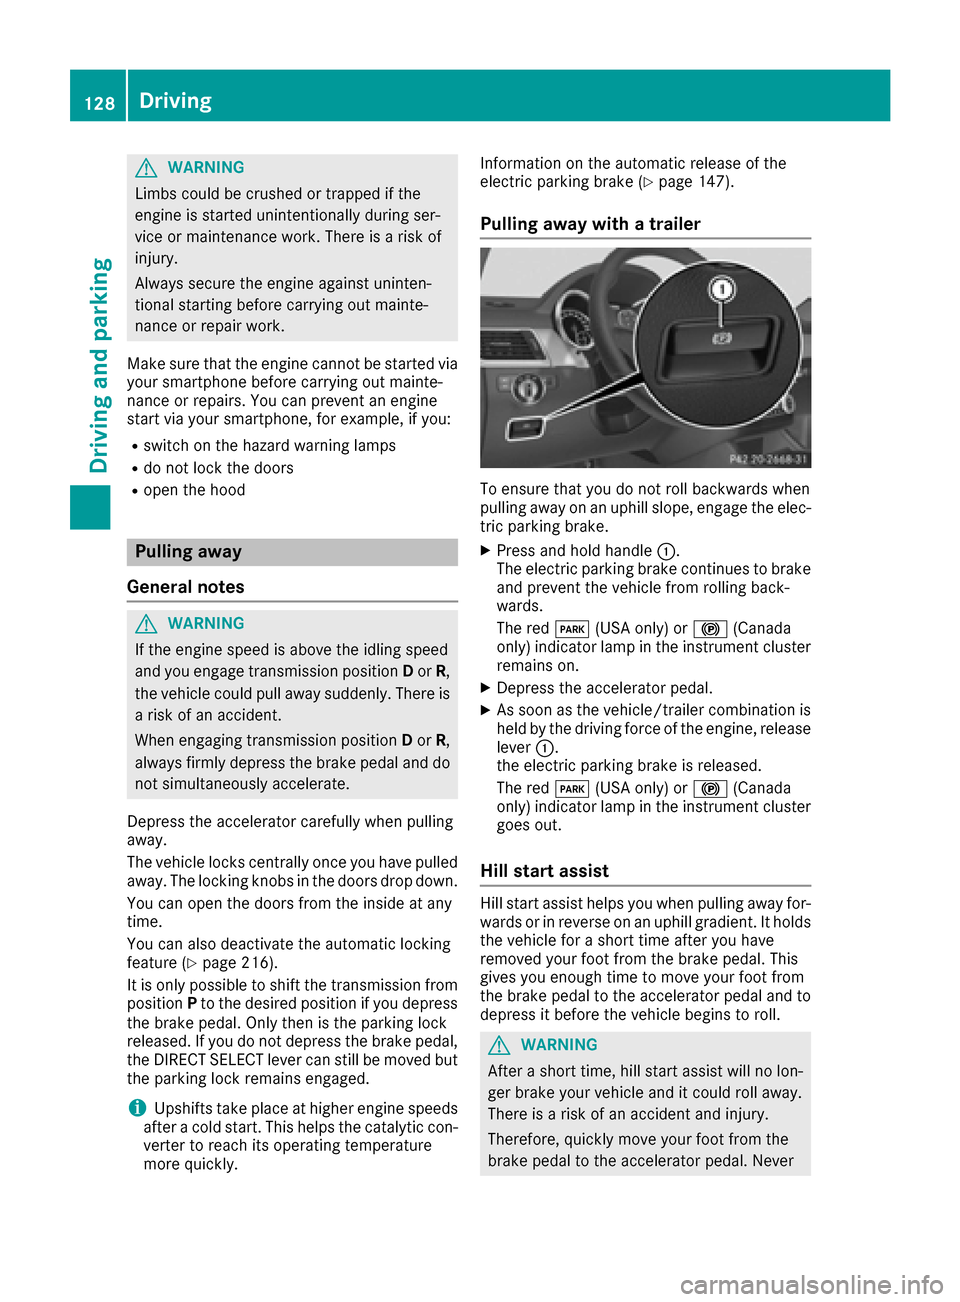
To ensure that you do not roll backwards when
pulling away on an uphill slope, engage the elec-
tric parking brake.
XPress and hold handle
:.
The electric parking brake continues to brake
and prevent the vehicle from rolling back-
wards.
The red F(USA only) or !(Canada
only) indicator lamp in the instrument cluster remains on.
XDepress the accelerator pedal.
XAs soon as the vehicle/trailer combination isheld by the driving force of the engine, release
lever :.
the electric parking brake is released.
The red F(USA only) or !(Canada
only) indicator lamp in the instrument cluster goes out.
Hill start assist
Hill start assist helps you when pulling away for-
wards or in reverse on an uphill gradient. It holds
the vehicle for a short time after you have
removed your foot from the brake pedal. This
gives you enough time to move your foot from
the brake pedal to the accelerator pedal and to
depress it before the vehicle begins to roll.
GWARNING
After a short time, hill start assist will no lon-
ger brake your vehicle and it could roll away.
There is a risk of an accident and injury.
Therefore, quickly move your foot from the
brake pedal to the accelerator pedal. Never
128Driving
Driving and parking
Page 294 of 366
operate in the frequency range of 280 to
433 MHz.
RReplace the batteries in garage door remote
controlA. This increases the likelihood that
garage door remote control Awill transmit a
strong and precise signal to the integrated
garage door opener.
RWhen programming, hold remote control A
at varying distances and angles and from but-
tons ;to? which you are programming. Try
various angles at a distance between 2and
8 inches (5to 20 cm) or at the same angle but
at varying distances.
RIf another remote control Ais available for
the same garage door drive, repeat the same
programming steps with this remote control
A. Before performing these steps, make sure
that new batteries have been installed in
garage door drive remote control A.
RNote that some remote controls only transmit
for a limited amount of time (the indicator
lamp on the remote control goes out). Press
buttonBon remote control Aagain before
transmission ends.
RAlign the antenna cable of the garage door
opener unit. This can improve signal recep-
tion/transmission.
Opening/closing the garage door
After it has been programmed, the integrated
garage door opener performs the function of the
garage door system remote control. Please also
read the operating instructions for the garage
door system.
XTurn the SmartKey to position 2in the ignition
lock (Ypage 125).
XPress buttons ;,=or? which you have
programmed to operate the garage door.
Garage door system with a fixed code: indi-
cator lamp :lights up green.
Garage door system with a rolling code: indi-
cator lamp :flashes green.
The transmitter will transmit a signal as long
as the button is pressed. The transmission is
halted after a maximum of ten seconds and
indicator lamp :lights up yellow.
XPress button ;,=or? again if necessary.
Clearing the memory
Make sure that you clear the memory of the
integrated garage door opener before selling the
vehicle.
XTurn the SmartKey to position 2in the ignition
lock (Ypage 125).
XPress and hold buttons ;and ?.
The indicator lamp initially lights up yellow
and then green.
XRelease buttons ;and ?.
The memory of the integrated garage door
opener in the rear-view mirror is cleared.
Floormats
GWARNING
Objects in the driver's footwell can restrict the pedal travel or obstruct a depressed pedal.
The operating and road safety of the vehicle is
jeopardized. There is a risk of an accident.
Make sure that all objects in the vehicle are
stowed correctly, and that they cannot enter
the driver's footwell. Install the floormats
securely and as specified in order to ensure
sufficient clearance for the pedals. Do not use
loose floormats and do not place floormats on
top of one another.
XDriver's seat/front-passenger seat: slide
the respective seat back.
XRear seats: slide the corresponding front
seat forwards.
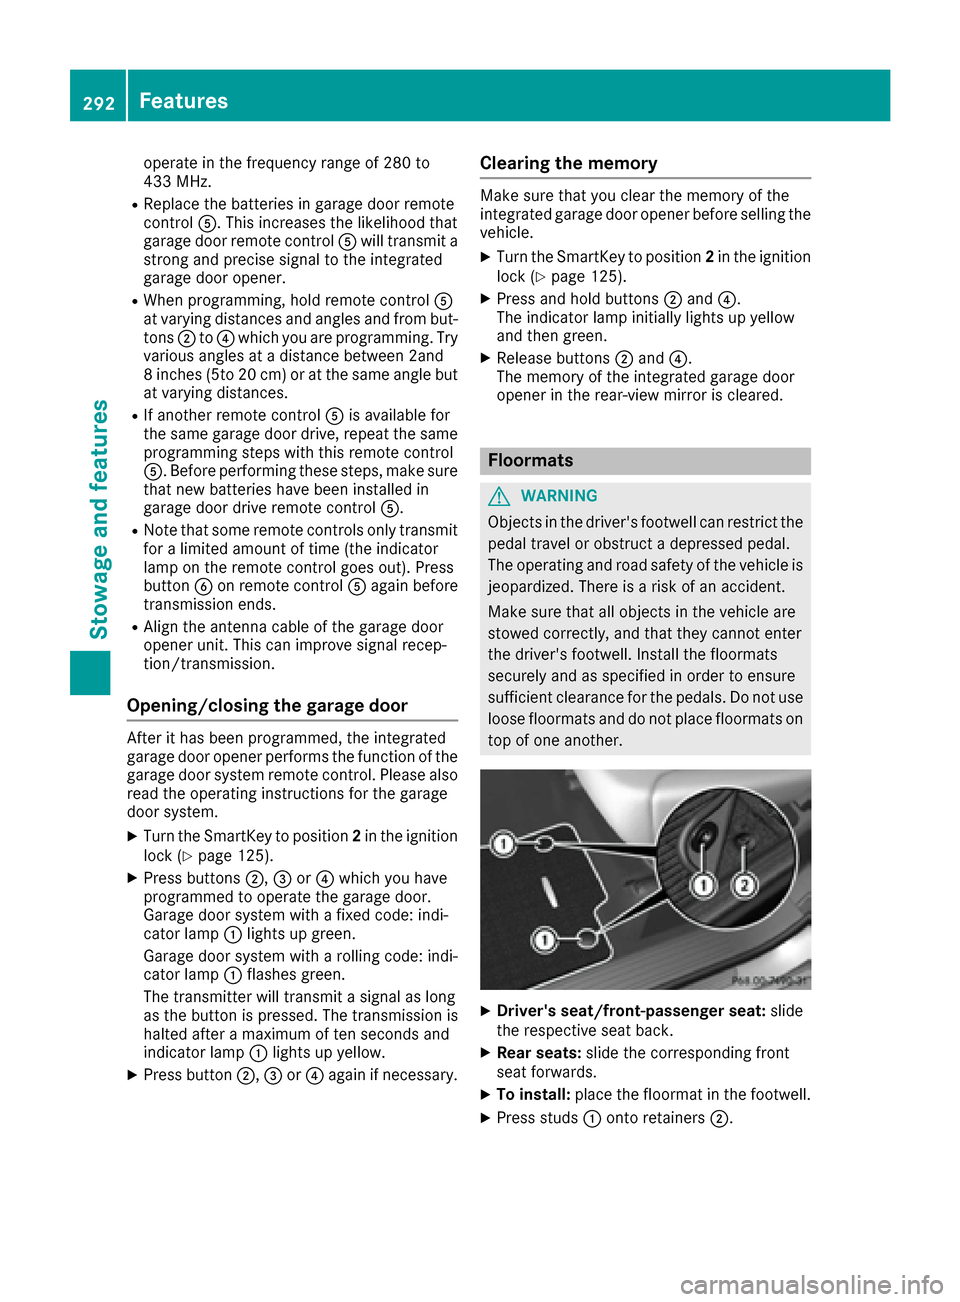
XTo install: place the floormat in the footwell.
XPress studs :onto retainers ;.
292Features
Stowage and features
Page 297 of 366
XMake sure that the windshield wipers are
turned off.
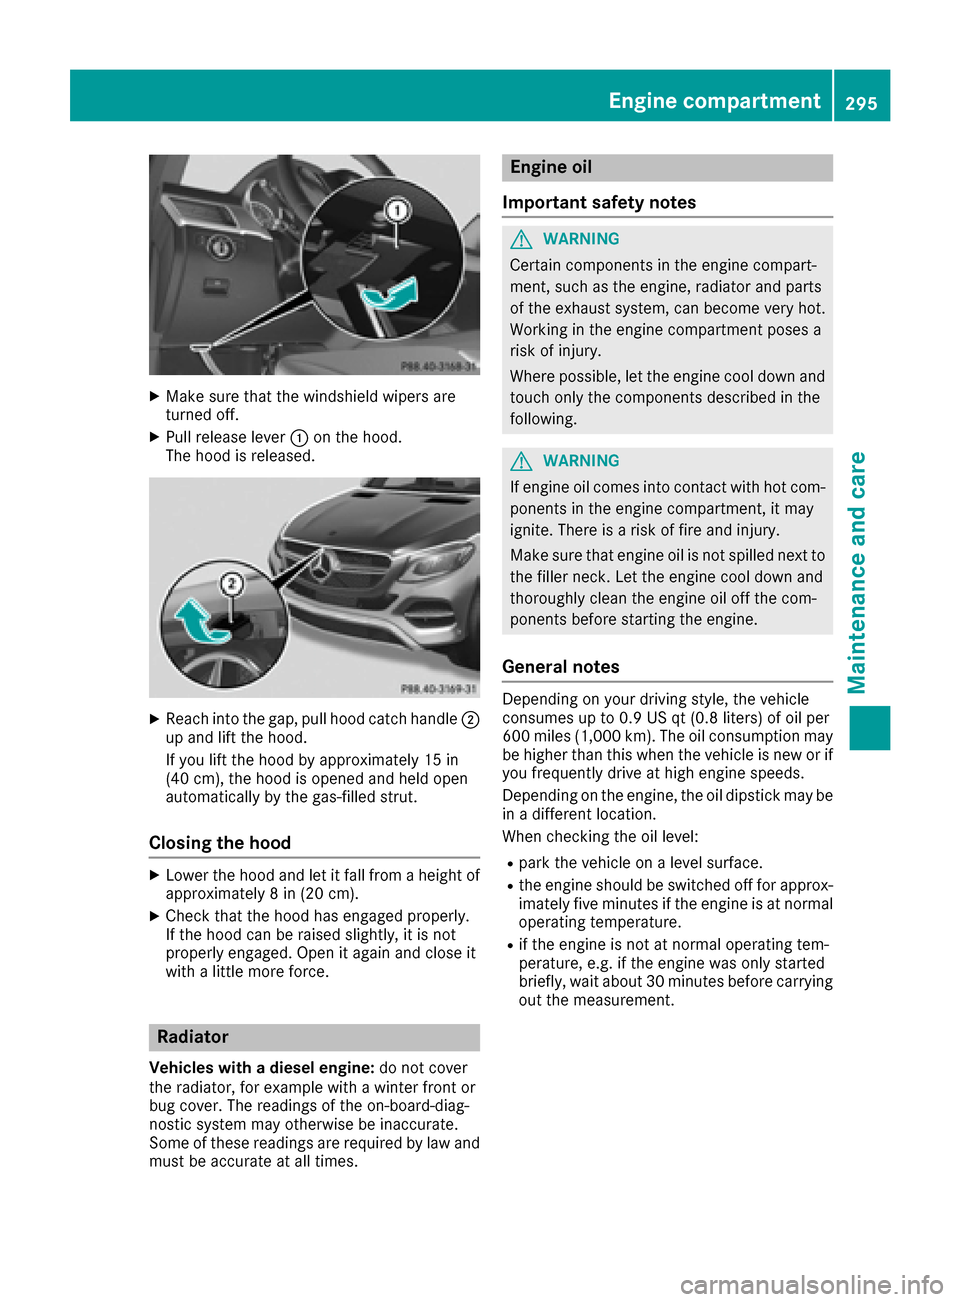
XPull release lever:on the hood.
The hood is released.
XReach into the gap, pull hood catch handle ;
up and lift the hood.
If you lift the hood by approximately 15 in
(40 cm), the hood is opened and held open
automatically by the gas-filled strut.
Closing the hood
XLower the hood and let it fall from a height of
approximately 8 in (20 cm).
XCheck that the hood has engaged properly.
If the hood can be raised slightly, it is not
properly engaged. Open it again and close it
with a little more force.
Radiator
Vehicles with a diesel engine: do not cover
the radiator, for example with a winter front or
bug cover. The readings of the on-board-diag-
nostic system may otherwise be inaccurate.
Some of these readings are required by law and
must be accurate at all times.
Engine oil
Important safety notes
GWARNING
Certain components in the engine compart-
ment, such as the engine, radiator and parts
of the exhaust system, can become very hot.
Working in the engine compartment poses a
risk of injury.
Where possible, let the engine cool down and touch only the components described in the
following.
GWARNING
If engine oil comes into contact with hot com- ponents in the engine compartment, it may
ignite. There is a risk of fire and injury.
Make sure that engine oil is not spilled next to
the filler neck. Let the engine cool down and
thoroughly clean the engine oil off the com-
ponents before starting the engine.
General notes
Depending on your driving style, the vehicle
consumes up to 0.9 US qt (0.8 liters) of oil per
600 miles (1,000 km). The oil consumption may
be higher than this when the vehicle is new or if
you frequently drive at high engine speeds.
Depending on the engine, the oil dipstick may be
in a different location.
When checking the oil level:
Rpark the vehicle on a level surface.
Rthe engine should be switched off for approx-
imately five minutes if the engine is at normal
operating temperature.
Rif the engine is not at normal operating tem-
perature, e.g. if the engine was only started
briefly, wait about 30 minutes before carrying
out the measurement.
Engine compartment295
Maintenance and care
Z