2017 MERCEDES-BENZ GLE43AMG SUV fuel cap
[x] Cancel search: fuel capPage 13 of 366

Warning lamp ................................. 255
ETS/4ETS (Electronic Traction Sys-
tem) ...................................................... 64
Exhaust check ................................... 149
Exhaust pipe (cleaning instruc-
tions) .................................................. 303
Exterior lighting
see Lights
Exterior mirrors
Adjusting ......................................... 99
Dipping (automatic) ....................... 101
Folding in when locking (on-board
computer) ...................................... 217
Folding in/out (automatically) .......1 00
Folding in/out (electrically) ........... 100
Out of position (troubleshooting) ... 100
Setting ...........................................1 00
Storing settings (memory func-
tion) ............................................... 102
Storing the parking position .......... 101
Eyeglasses compartment ................. 272
F
Favorites
Overview ........................................ 265
Filler cap
see Refueling
Flat tire
MOExtended tires .......................... 307
Preparing the vehicle ..................... 306
TIREFIT kit ...................................... 308
see Emergency spare wheel
Floormats ...........................................2 92
Fog lamps (extended range) ............. 107
Folding the rear bench seat for-
wards/back ....................................... 273
Fording
Off-road ......................................... 152
On flooded roads ........................... 152
Frequencies
Mobile phone ................................. 350
Two-way radio ................................ 350
Fuel
Additives ........................................ 354
Consumption statistics .................. 209
Displaying the current consump-
tion ................................................ 210 Displaying the range ......................2
10
Driving tips ....................................1 48
Fuel gauge ....................................... 33
Grade (gasoline) ............................ 353
Important safety notes .................. 353
Low outside temperatures ............. 354
Problem (malfunction) ................... 142
Quality (diesel) ............................... 354
Refueling ........................................ 139
Tank content/reserve fuel ............. 353
Fuel filler flap
Opening ......................................... 141
Fuel filter (display message) ............ 237
Fuel level
Calling up the range (on-board
computer) ...................................... 210
Fuel tank
Capacity ........................................ 353
Problem (malfunction) ................... 142
Fuses
Allocation chart ............................. 318
Before changing ............................. 319
Dashboard fuse box ....................... 319
Fuse box in the engine compart-
ment .............................................. 319
Fuse box under rear bench seat .... 320
Important safety notes .................. 318
G
Garage door openerClearing the memory ..................... 292
General notes ................................ 289
Important safety notes .................. 290
Opening/closing the garage doo r..2 92
Problems when programming ........2 91
Programming (button in the rear-
view mirror) ................................... 290
Synchronizing the rolling code ....... 291
Gear indicator (on-board com-
puter, Mercedes-AMG vehicles) ....... 218
Genuine parts ...................................... 24
Glove box ...........................................2 71
Google™ Local Search
see also Digital Operator's Man-
ual ..................................................2 63
GTW (Gross Trailer Weight) (defini-
tion) .................................................... 339
Index11
Page 21 of 366

Segments ...................................... 206
Selecting the display unit ............... 215
Standing lamps
Display message ............................ 233
Switching on/off ........................... 105
Start/Stop button
Removing ....................................... 126
Starting the engine ........................ 127
Start/stop function
see ECO start/stop function
Starting (engine) ................................ 126
STEER CONTROL .................................. 69
Steering
Display message ............................ 248
Steering Pilot
Activating/deactivating ................. 214
Display message ............................ 243
Steering wheel
Adjusting (electrically) ..................... 97
Adjusting (manually) ........................ 97
Button overview ............................... 34
Buttons (on-board computer) ......... 207
Cleaning ......................................... 304
Important safety notes .................... 97
Steering wheel heating .................... 98
Storing settings (memory func-
tion) ............................................... 102
Steering wheel heating
Problem (malfunction) ..................... 98
Switching on/off .............................. 98
Steering wheel paddle shifters ........ 136
Stopwatch (RACETIMER) ................... 218
Stowage areas ................................... 270
Stowage compartments
Armrest (under) ............................. 271
Center console .............................. 272
Center console (rear) ..................... 272
Cup holders ................................... 277
Eyeglasses compartment ............... 272
Glove box ....................................... 271
Important safety information ......... 270
Stowage net ................................... 272
Stowage net ....................................... 272
Summer tires
In winter ........................................ 323
Sun visor ............................................ 279 Suspension setting
AMG adaptive sport suspension
system ........................................... 173
Suspension settings
SETUP (on-board computer) .......... 218
SUV
(Sport Utility Vehicle) ....................... 27
Switching air-recirculation mode
on/off ................................................. 121
Switching on media mode
Via the device list .......................... 268
T
Tachometer ........................................ 206
Tailgate
Display message ............................ 247
Emergency unlocking ....................... 82
Important safety notes .................... 78
Limiting the opening angle ............... 82
Opening dimensions ...................... 358
Opening/closing (automatically
from inside) ...................................... 81
Opening/closing (automatically
from outside) ................................... 80
Opening/closing (from outside) ....... 79
Tank content
Fuel gauge ....................................... 33
Technical data
Capacities ...................................... 352
Information .................................... 350
Tires/wheels ................................. 345
Trailer loads ................................... 361
Vehicle data ................................... 358
Telephone
Accepting a call (multifunction
steering wheel) .............................. 213
Authorizing a mobile phone (con-
necting) ......................................... 267
Connecting a mobile phone (gen-
eral information) ............................ 266
Display message ............................ 248
Menu (on-board computer) ............ 212
Number from the phone book ........ 213
Redialing ........................................ 213
Rejecting/ending a call ................. 213
see also Digital Operator's Man-
ual .................................................. 263
Index19
Page 80 of 366

Automa tic locking featu re
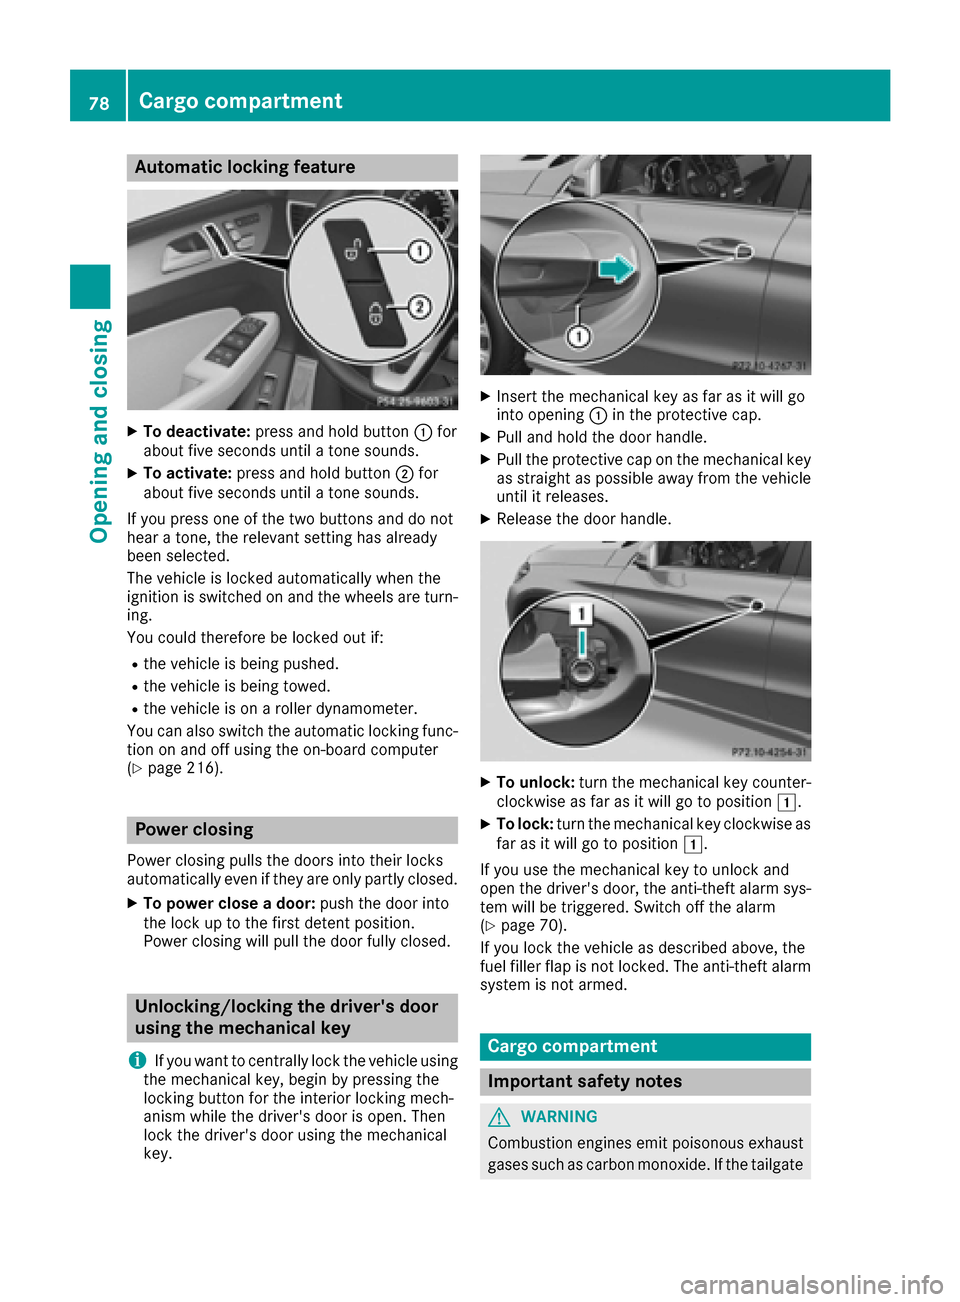
XTo deactivate:press and hold butto n: for
about fiv eseconds until atone sounds.
XTo activate: press and hold butto n; for
about fiv eseconds until atone sounds.
If you press on eof th etwo buttons and do no t
hear atone ,th erelevan tsetting has already
been selected.
The vehicl eis locke dautomatically when th e
ignition is switched on and th ewheels are turn-
ing .
You could therefor ebe locke dout if:
Rth evehicl eis bein gpushed.
Rth evehicl eis bein gtowed.
Rth evehicl eis on aroller dynamometer.
You can also switch th eautomatic locking func-
tion on and off usin gth eon-board computer
(
Ypage 216).
Power closing
Powe rclosin gpulls th edoor sint otheir locks
automatically eve nif they are only partly closed.
XTo power close adoor :push th edoor int o
th eloc kup to th efirst deten tposition .
Powe rclosin gwill pull th edoor fully closed.
Unlocking/locking the driver's door
using the mechanical key
i
If you want to centrally loc kth evehicl eusin g
th emechanical key, begi nby pressing th e
locking butto nfor th einterior locking mech-
anism while th edriver's door is open .The n
loc kth edriver's door usin gth emechanical
key.
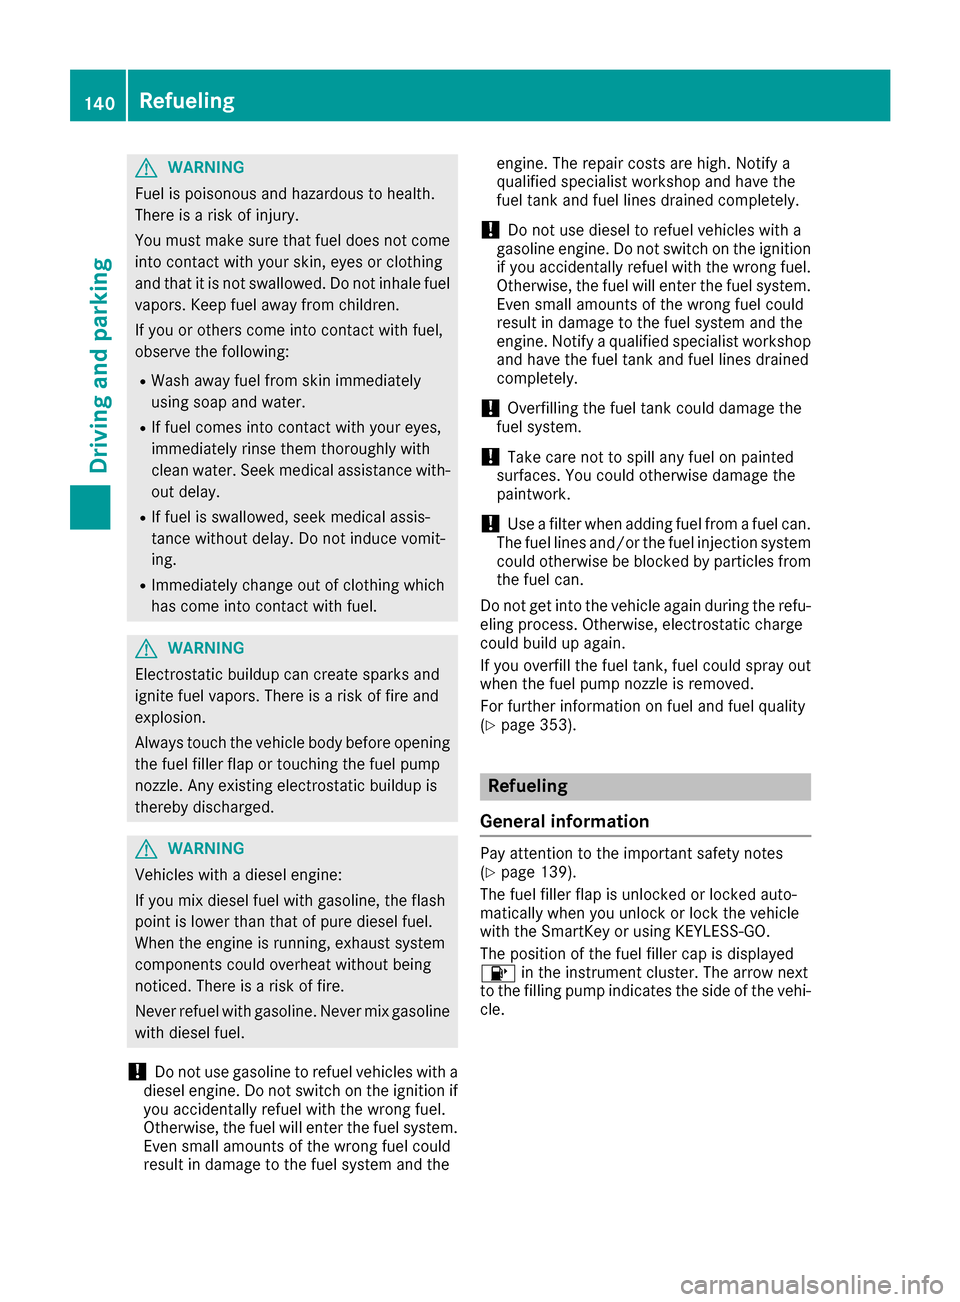
XInser tth emechanical ke yas far as it will go
int oopening :in th eprotective cap .
XPull and hold th edoor handle.
XPull th eprotective cap on th emechanical ke y
as straight as possibl eaway from th evehicl e
until it releases.
XReleas eth edoor handle.
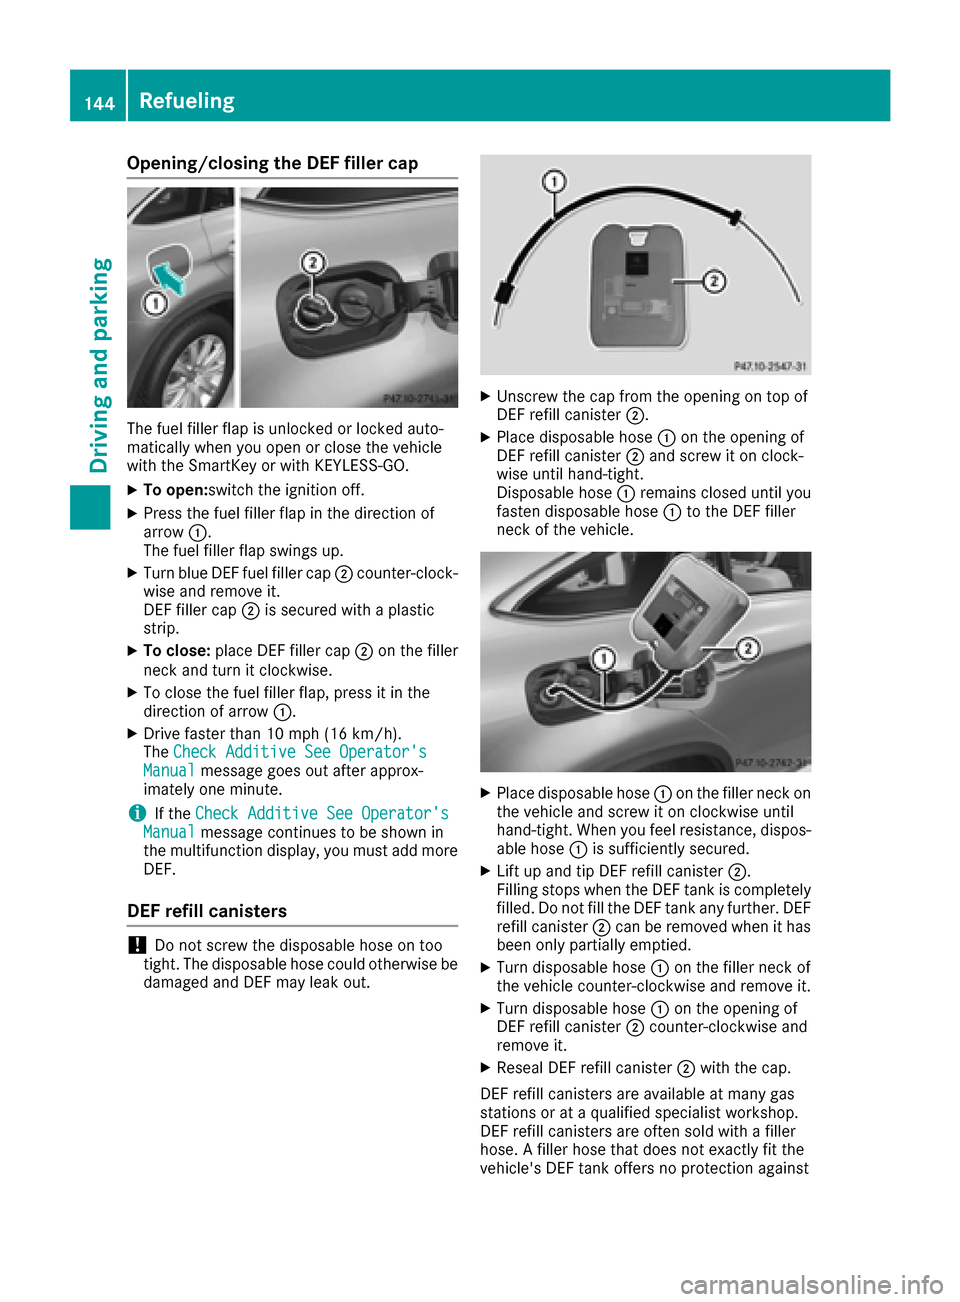
XTo unlock: turnth emechanical ke ycounter-
clockwise as far as it will go to position 1.
XTo lock:turnth emechanical ke yclockwise as
far as it will go to position 1.
If you use th emechanical ke yto unloc kand
open th edriver's door ,th eanti-thef talarm sys-
te m will be triggered .Switc hoff th ealarm
(
Ypage 70).
If you loc kth evehicl eas described above, th e
fuel filler flap is no tlocked. The anti-thef talarm
system is no tarmed.
Cargo compa rtment
Import ant safety notes
GWARNIN G
Combustion engines emi tpoisonous exhaust
gase ssuc has carbon monoxide. If th etailgat e
78Cargo compartment
Opening and closing
Page 142 of 366

GWARNING
Fuel is poisonous and hazardous to health.
There is a risk of injury.
You must make sure that fuel does not come into contact with your skin, eyes or clothing
and that it is not swallowed. Do not inhale fuel
vapors. Keep fuel away from children.
If you or others come into contact with fuel,
observe the following:
RWash away fuel from skin immediately
using soap and water.
RIf fuel comes into contact with your eyes,
immediately rinse them thoroughly with
clean water. Seek medical assistance with-
out delay.
RIf fuel is swallowed, seek medical assis-
tance without delay. Do not induce vomit-
ing.
RImmediately change out of clothing which
has come into contact with fuel.
GWARNING
Electrostatic buildup can create sparks and
ignite fuel vapors. There is a risk of fire and
explosion.
Always touch the vehicle body before opening
the fuel filler flap or touching the fuel pump
nozzle. Any existing electrostatic buildup is
thereby discharged.
GWARNING
Vehicles with a diesel engine:
If you mix diesel fuel with gasoline, the flash
point is lower than that of pure diesel fuel.
When the engine is running, exhaust system
components could overheat without being
noticed. There is a risk of fire.
Never refuel with gasoline. Never mix gasoline with diesel fuel.
!Do not use gasoline to refuel vehicles with a
diesel engine. Do not switch on the ignition if
you accidentally refuel with the wrong fuel.
Otherwise, the fuel will enter the fuel system. Even small amounts of the wrong fuel could
result in damage to the fuel system and the engine. The repair costs are high. Notify a
qualified specialist workshop and have the
fuel tank and fuel lines drained completely.
!Do not use diesel to refuel vehicles with a
gasoline engine. Do not switch on the ignition
if you accidentally refuel with the wrong fuel.
Otherwise, the fuel will enter the fuel system. Even small amounts of the wrong fuel could
result in damage to the fuel system and the
engine. Notify a qualified specialist workshop
and have the fuel tank and fuel lines drained
completely.
!Overfilling the fuel tank could damage the
fuel system.
!Take care not to spill any fuel on painted
surfaces. You could otherwise damage the
paintwork.
!Use a filter when adding fuel from a fuel can.
The fuel lines and/or the fuel injection system
could otherwise be blocked by particles from
the fuel can.
Do not get into the vehicle again during the refu-
eling process. Otherwise, electrostatic charge
could build up again.
If you overfill the fuel tank, fuel could spray out
when the fuel pump nozzle is removed.
For further information on fuel and fuel quality
(
Ypage 353).
Refueling
General information
Pay attention to the important safety notes
(Ypage 139).
The fuel filler flap is unlocked or locked auto-
matically when you unlock or lock the vehicle
with the SmartKey or using KEYLESS-GO.
The position of the fuel filler cap is displayed
8 in the instrument cluster. The arrow next
to the filling pump indicates the side of the vehi-
cle.
140Refueling
Driving and parking
Page 143 of 366

Opening the fuel filler flap
:Opening the fuel filler flap
;To insert the fuel filler cap
=Tire pressure table
?Instruction label for fuel type to be refueled
XSwitch off the engine.
XRemove the SmartKey from the ignition lock.
or, in vehicles with KEYLESS-GO start-function
or KEYLESS ‑GO
XOpen the driver's door.
The vehicle electronics now have status 0.
This is the same as the SmartKey having been
removed.
The driver’s door can be closed again.
XMake sure that the engine cannot be started
via your smartphone (Ypage 127).
XPress the fuel filler flap in the direction of
arrow :.
The fuel filler flap swings up.
XTurn the fuel filler cap counterclockwise and
remove it.
XInsert the fuel filler cap into the holder
bracket on the inside of filler flap ;.
XCompletely insert the filler neck of the fuel
pump nozzle into the tank, hook in place and
refuel.
XOnly fill the tank until the pump nozzle
switches off.
Do not add any more fuel after the pump stops
filling for the first time. Otherwise, fuel may leak
out.
Vehicles with a diesel engine: the filler neck is
designed for refueling at diesel filling pumps.
Closing the fuel filler flap
XReplace the cap on the filler neck and turn
clockwise until it engages audibly.
XClose the fuel filler flap.
Close the fuel filler flap before locking the vehi-
cle.
If you are driving with the fuel filler cap open, the
8 reserve fuel warning lamp flashes. A mes-
sage appears in the multifunction display
(
Ypage 236).
In addition, the ;Check Engine warning
lamp may light up (
Ypage 259).
Refueling141
Driving and parking
Z
Page 146 of 366

Opening/closing the DEF filler cap
The fuel filler flap is unlocked or locked auto-
matically when you open or close the vehicle
with the SmartKey or with KEYLESS-GO.
XTo open:switch the ignition off.
XPress the fuel filler flap in the direction of
arrow:.
The fuel filler flap swings up.
XTurn blue DEF fuel filler cap ;counter-clock-
wise and remove it.
DEF filler cap ;is secured with a plastic
strip.
XTo close: place DEF filler cap ;on the filler
neck and turn it clockwise.
XTo close the fuel filler flap, press it in the
direction of arrow :.
XDrive faster than 10 mph (16 km/h).
TheCheck Additive See Operator's
Manualmessage goes out after approx-
imately one minute.
iIf the Check Additive See Operator'sManualmessage continues to be shown in
the multifunction display, you must add more
DEF.
DEF refill canisters
!Do not screw the disposable hose on too
tight. The disposable hose could otherwise be damaged and DEF may leak out.
XUnscrew the cap from the opening on top of
DEF refill canister ;.
XPlace disposable hose :on the opening of
DEF refill canister ;and screw it on clock-
wise until hand-tight.
Disposable hose :remains closed until you
fasten disposable hose :to the DEF filler
neck of the vehicle.
XPlace disposable hose :on the filler neck on
the vehicle and screw it on clockwise until
hand-tight. When you feel resistance, dispos-
able hose :is sufficiently secured.
XLift up and tip DEF refill canister ;.
Filling stops when the DEF tank is completely
filled. Do not fill the DEF tank any further. DEF
refill canister ;can be removed when it has
been only partially emptied.
XTurn disposable hose :on the filler neck of
the vehicle counter-clockwise and remove it.
XTurn disposable hose :on the opening of
DEF refill canister ;counter-clockwise and
remove it.
XReseal DEF refill canister ;with the cap.
DEF refill canisters are available at many gas
stations or at a qualified specialist workshop.
DEF refill canisters are often sold with a filler
hose. A filler hose that does not exactly fit the
vehicle's DEF tank offers no protection against
144Refueling
Driving and parking
Page 157 of 366

Checklist before driving off-road
!If the engine oil warning lamp lights up while
the vehicle is in motion, stop the vehicle in a
safe place as soon as possible. Check the
engine oil level. The engine oil warning lamp
warning must not be ignored. Continuing the
journey while the symbol is displayed could
lead to engine damage.
XEngine oil level: check the engine oil level
and add oil if necessary.
When driving on steep gradients, the engine
oil level must be sufficiently high to ensure a
correct oil supply in the vehicle.
XDEF tank (BlueTEC vehicles): check the
level and add if necessary (Ypage 142).
XTire-changing tool kit: check that the jack is
working and make sure you have the lug
wrench, a robust tow cable and a folding
spade in the vehicle.
XWheels and tires: check the tire tread depth
and tire pressure.
XCheck for damage and remove any foreign
objects, e.g. small stones, from the wheels/
tires.
XReplace any missing valve caps.
XReplace dented or damaged wheels.
XRims: dented or bent rims can result in a loss
of tire pressure and damage the tire bead.
Before driving off-road, check the wheels and replace them if necessary.
Checklist after driving off-road
!If you detect damage to the vehicle after
driving off-road, have the vehicle checked
immediately at a qualified specialist work-
shop.
Driving over rough terrain places greater
demands on your vehicle than driving on normal
roads. After driving off-road, check the vehicle.
This allows you to detect damage promptly and
reduce the risk of an accident to yourself and
other road users.
XDeactivate DSR (Ypage 168).
XLower the vehicle level again to a level suita-
ble to the road conditions, e.g. to the normal
level.
XClean the headlamps and rear lights and
check for damage.
XClean the front and rear license plates.
XClean the wheels and tires with a water jet
and remove any foreign objects.
XClean the wheels, wheel housings and the
vehicle underside with a water jet; check for
any foreign objects and damage.
XCheck whether twigs or other parts of plants
have become trapped. These increase the risk of fire and can damage fuel pipes, brake
hoses or the rubber bellows of the axle joints
and propeller shafts.
XAfter the trip, examine without fail the entire
undercarriage, wheels, tires, brakes, body-
work structure, steering, chassis and exhaust
system for damage.
XAfter driving for extended periods across
sand, mud, gravel, water or in similarly dirty
condition s, hav
e the brake discs, wheels,
brake pads/linings and axle joints checked
and cleaned.
XIf you detect strong vibrations after off-road
travel, check for foreign objects in the wheels
and drive train and remove them if necessary. Foreign objects can disturb the balance and
cause vibrations.
Driving on sand
Observe the following rules when driving on
sand:
RSelect a higher vehicle level.
RAvoid high engine speeds.
RUse the left-hand steering wheel paddle
shifter to shift to a lower gear appropriate to
the terrain.
RDrive quickly to overcome the rolling resist-
ance. Otherwise the vehicle's wheels could
become stuck in loose ground.
RDrive in the tracks of other vehicles if possi-
ble. Make sure that:
-the tire ruts are not too deep.
-the sand is sufficiently firm.
-the ground clearance of the vehicle is suf-
ficient.
Tire ruts and gravel roads
!Check that the ruts are not too deep and
that your vehicle has sufficient clearance.
Otherwise, your vehicle could be damaged or
bottom out and get stuck.
Driving tips155
Driving and parking
Z
Page 202 of 366

Please observe the manufacturer's operating
instructions for the trailer coupling if a detach-
able trailer coupling is used.
Couple and uncouple the trailer carefully. If you
do not couple the trailer to the towing vehicle
correctly, the trailer could become detached.
Make sure that the following values are not
exceeded:
Rthe permissible trailer drawbar noseweight
Rthe permissible trailer load
Rthe permissible rear axle load of the towing
vehicle
Rthe maximum permissible gross vehicle
weight of both the towing vehicle and the
trailer
The applicable permissible values, which must
not be exceeded, can be found:
Rin the vehicle documents
Ron the identification plates for the trailer tow
hitch and the trailer
Ron the vehicle identification plate
If the values differ, the lowest value applies.
When towing a trailer, your vehicle's handling
characteristics will be different in comparison
with when driving without a trailer.
The vehicle/trailer combination:
Ris heavier
Ris restricted in its acceleration and gradient-
climbing capability
Rhas an increased braking distance
Ris affected more by strong crosswinds
Rdemands more sensitive steering
Rhas a larger turning circle
This could impair the handling characteristics.
When towing a trailer, always adjust your speed
to the current road and weather conditions. Do
not exceed the maximum permissible speed for
your vehicle/trailer combination.
Notes on towing a trailer
General notes
!If you have a trailer tow hitch retrofitted,
changes to the cooling system and drive train
may be necessary, depending on the vehicle
type. If you have a trailer tow hitch retrofitted,
observe the anchorage points on the chassis
frame.
RDo not exceed the legally prescribed maxi-
mum speed for vehicle/trailer combinations
in the relevant country.
This lowers the risk of an accident.
ROnly install an approved trailer coupling on
your vehicle.
Further information on availability and on
installation is available from any authorized
Mercedes-Benz Center.
RThe bumpers of your vehicle are not suitable
for installing detachable trailer couplings.
RDo not install hired trailer couplings or other
detachable trailer couplings on the bumpers
of your vehicle.
RIf you no longer need the ball coupling,
remove it from the ball coupling recess. This
will reduce the risk of damage to the ball cou-
pling.
When towing a trailer, set the tire pressure on
the rear axle of the towing vehicle for the max-
imum load. You will find the values in the tire
pressure table in the fuel filler flap of the vehicle (
Ypage 339).
Please note that when towing a trailer, the fol-
lowing driving systems have limited availability
or are not available at all:
RParking Assist PARKTRONIC (Ypage 174)
RBlind Spot Assist (Ypage 191)
RActive Lane Keeping Assist (Ypage 197)
On vehicles without level control, the height of
the ball coupling will alter according to the load
placed on the vehicle. If necessary, use a trailer
with a height-adjustable drawbar.
You will find installing dimensions and loads
under "Technical data" (
Ypage 361).
Driving tips
Observe the information on ESP®trailer stabili-
zation (Ypage 66) and on pulling away with a
trailer (Ypage 128).
The maximum permissible speed for vehicle/
trailer combinations depends on the type of
trailer. Before beginning the journey, check the
trailer's documents to see what the maximum
permissible speed is. Observe the legally pre-
scribed maximum speed in the relevant country.
200Towing a trailer
Driving and parking