2017 MERCEDES-BENZ GLE43AMG SUV four wheel drive
[x] Cancel search: four wheel drivePage 6 of 366

1, 2, 3 ...
4ETS (Electronic Traction System)see ETS/4ETS (Electronic Trac-
tion System)
4MATIC (permanent four-wheel
drive) .................................................. 168
12 V socket
see Sockets
115 V socket ...................................... 281
360° camera
Cleaning ........................................ .303
Display in the multimedia system .. 186
Function/notes .............................1 85
A
ABS (Anti-lock Braking System)
Display message ............................ 222
Function/notes ................................ 61
Important safety notes .................... 61
Warning lamp ................................. 253
Accident
Automatic measures after an acci-
dent ................................................. 54
Activating media mode
General notes ................................ 268
Activating/deactivating cooling
with air dehumidification ................. 118
Active Blind Spot Assist
Activating/deactivating (on-
board computer) ............................ 214
Display message ............................ 240
Function/information .................... 194
Trailer towing ................................. 197
Active Brake Assist
Activating or deactivating .............. 214
Display message ............................ 227
Function/notes ................................ 62
Active Brake Assist with cross-
traffic function
Activating or deactivating .............. 214
Display message ............................ 228
Function/notes ................................ 67
Important safety notes .................... 67
Warning lamp ................................. 261
Active Curve System
Display message ............................ 238 Function/notes ............................. 171
Active Lane Keeping Assist
Activating/deactivating (on-
board computer) ............................ 215
Display message ............................ 240
Function/information .................... 197
Trailer towing ................................. 199
Active light function ......................... 106
ADAPTIVE BRAKE ................................. 67
Adaptive Brake Assist
Function/notes ................................ 63
Adaptive Damping System
Function/notes ............................. 173
Adaptive Highbeam Assist
Display message ............................ 234
Function/notes ............................. 107
Switching on/off ........................... 108
Additives (engine oil) ........................ 356
Address book
see also Digital Operator's Man-
ual .................................................. 263
Adjusting the volume
Audio 20 ........................................ 264
COMAND ....................................... 264
ADS PLUS (Adaptive Damping Sys-
tem)
Fu
nction/notes ............................. 170
Air bags
Deployment ..................................... 51
Display message ............................ 231
Front air bag (driver, front
passenger) ....................................... 45
Important safety notes .................... 44
Introduction ..................................... 44
Knee bag .......................................... 45
Occupant Classification System
(OCS) ............................................... 46
PASSENGER AIR BAG indicator
lamps ............................................... 40
Side impact air bag .......................... 46
Window curtain air bag .................... 46
Air filter (display message) .............. 237
AIR FLOW ........................................... 118
Air vents
Glove box ....................................... 123
Important safety notes .................. 122
Rear ............................................... 123
4Index
Page 170 of 366

Ryou depress thebrak epedal again wit h acer-
tai namount of pressur euntil :disappear s
from th emultifunction display.
Ryou secure th evehicl eusin gth eelectric park -
in g brake.
Ryou activat eDistanc ePilo tDISTRONIC.
iAfte r atime, th eelectric parkin gbrak e
secures th evehicl eand relieves th eservic e
brake.
Whe nth eHOLD function is activated, th etrans -
mission is shifted automatically to position Pif:
Rth edriver's doo ris open and th edriver's seat
belt is unfastened.
Rth eengin eis switched off ,unless it is auto-
matically switched off by th eECO start/sto p
function .
The electric parkin gbrak esecures th evehicl e
automatically if th eHOLD function is activated
when th evehicl eis stationary and :
Rasystem malfunction occurs.
Rth epowe rsupply is no tsufficient.
On steep uphil lor downhill incline sor if there is
a malfunction ,th etransmission may also be
automatically shifted into position P.
4MATIC
4MATIC ensures that all fourwheels are perma-
nently driven .Together wit hES P®and 4ETS, it
improves th etraction of your vehicl ewheneve r
a drive whee lspin sdue to insufficien tgrip.
If you fail to adapt your drivin gstyle, 4MATIC can
neither reduce th eris kof acciden tno roverride
th elaws of physics .4MATIC canno ttak e
accoun tof road, weather and traffic conditions.
4MATIC is only an aid. You are responsibl efor
th edistanc eto th evehicl ein front, for vehicl e
speed, for brakin gin goo dtime and for stayin gin
your lane.
!Never to wthevehicl ewit hon eaxl eraised.
This may damage th etransfer case. Damage
of this sor tis no tcovered by th eMercedes -
Benz Limited Warranty. Al lwheels mus t
remain either on th eground or be full yraised.
Observ eth einstruction sfor towin gth evehi-
cle wit hall wheels in full contact wit hth e
ground .
!Afunction or performance test should only
be carrie dout on atwo-axl edynamometer. Befor
eyou operate th evehicl eon suc h a
dynamometer, pleas econsult aqualified
workshop .You could otherwise damage th e
drive train or th ebrak esystem.
iIn wintr ydrivin gconditions, th emaximum
effec tof 4MATIC can only be achieved if you
use winte rtires (M+Stire s), wi th snow chains
if necessary.
DSR (Downhill Speed Regulation)
General notes
DSR is an aid to assist you when driving down-
hill. It keeps the speed of travel at the speed
selected on the on-board computer. The steeper
the downhill gradient, the greater the DSR brak-
ing effect on the vehicle. When driving on flat
stretches of road or on an uphill gradient, the
DSR braking effect is minimal or nonexistent.
DSR controls the vehicle’s speed when it is acti-
vated and the transmission is in position D,R or
N. You can drive at a higher or a lower speed
than that set on the on-board computer at any
time by accelerating or braking.
Important safety notes
GWARNING
If the speed driven and the set speed deviate and you activate DSR on a slippery road sur-
face, the wheels may lose traction. There is an
increased danger of skidding and accidents.
Before switching DSR on, please take into
consideration the road surface and the differ- ence between driving speed and the set
speed.
If you fail to adapt your driving style, DSR can
neither reduce the risk of accident nor override the laws of physics. DSR cannot take account of
road, weather and traffic conditions. DSR is only
an aid. You are responsible for the distance to
the vehicle in front, for vehicle speed, for brak-
ing in good time and for staying in your lane.
You are always responsible for keeping control
of the vehicle and for assessing whether the
downhill gradient can be managed. DSR may not always be able to keep to the set speed, depend-
ing on road surface and tire conditions. Select a
168Driving system s
Driving an d parking
Page 211 of 366

Possible displays in the multifunction dis-
play:
RZGearshift recommendation, when shifting
manually (Ypage 136)
Rj Parking Pilot (Ypage 177)
RCRUISECruise control (Ypage 157)
R_ Adaptive Highbeam Assist
(Ypage 108)
Rè ECO start/stop function (Ypage 129)
RëHOLD function (Ypage 167)
RaDistance Pilot DISTRONIC Steering Pilot
(Ypage 214)
RDSRDownhill Speed Regulation
(Ypage 168)
Menus and submenus
Menu overview
Press the =or; button on the steering
wheel to call up the menu bar and select a menu.
Operating the on-board computer (
Ypage 207).
Depending on the equipment installed in the
vehicle, you can call up the following menus:
RTripmenu (Ypage 209)
RNavimenu (navigation instructions)
(Ypage 210)
RAudiomenu (Ypage 211)
RTelmenu (telephone) (Ypage 212)
RDriveAssistmenu (assistance)
(Ypage 213)
RServ.menu (Ypage 213)
RSett.menu (settings) (Ypage 215)
RAMGmenu (Mercedes-AMG vehicles)
(Ypage 218)
Trip menu
Standard display
XPress and hold the %button on the steer-
ing wheel until the Tripmenu with trip odom-
eter :and odometer ;appears.
Trip computer "From Start" or "From
Reset"
:Distance
;Driving time
=Average speed
?Average fuel consumption
XPress the =or; button on the steering
wheel to select the Tripmenu.
XPress the9or: button to select
From startor From reset.
The values in the From
Startsubmenu are cal-
culated from the start of a journey, while the
values in the From Reset
submenu are calcu-
lated from the last time the submenu was reset
(
Ypage 210).
The From Start
trip computer is automatically
reset if:
Rthe ignition has been switched off for more
than four hours.
R999 hours have been exceeded.
R9,999 miles have been exceeded.
The From reset
trip computer is automatically
reset if the value exceeds 9,999 hours or
99,999 miles.
ECO display
The ECO display is not available for Mercedes-
AMG vehicles.
XPress the =or; button on the steering
wheel to select the Tripmenu.
XPress the9or: button to select ECODISPLAY.
If the ignition remains switched off for longer
than four hours, the ECO display will be auto-
matically reset.
For more information on the ECO display, see
(
Ypage 149).
Menus and submenus209
On-board computer and displays
Z
Page 333 of 366

You can find more tire pressure values for
various operating conditions in the tire pres-
sure table inside the fuel filler flap
(
Ypage 324).
XMake sure that the tire pressure is correct on
all four wheels.
XMake sure that the SmartKey is in position2
in the ignition lock.
XPress the =or; button on the steering
wheel to select the Serv.menu.
XPress the9or: button to select
Tire Pressure.
XPress the abutton.
The multifunction display shows the current
tire pressure for the individual tires or the
Tire pressure will be displayed
after driving a few minutesmessage.
XPress the :button.
The UseCurrentPressuresasNewRef‐erenceValuesmessage appears in the mul-
tifunction display.
If you wish to confirm the restart:
XPress the abutton.
The TirePress.MonitorRestartedmes-
sage appears in the multifunction display.
After driving for a few minutes, the system
checks whether the current tire pressures are
within the specified range. The new tire pres-
sures are then accepted as reference values
and monitored.
If you wish to cancel the restart:
XPress the %button.
The tire pressure values stored at the last
restart will continue to be monitored.
Radio type approval for the tire pres-
sure monitor
CountryRadio type approval number
USAFCC ID: MRXMW2433A
FCC ID: MRXGG4
FCC ID: MRXMC34MA4
CanadaIC: 2546A-MW2433A
IC: 2546A-GG4
IC: 2546A-MC34MA4
Loading the vehicle
Instruction labels for tires and loads
GWARNING
Overloaded tires can overheat, causing a
blowout. Overloaded tires can also impair the steering and driving characteristics and lead
to brake failure. There is a risk of accident.
Observe the load rating of the tires. The load
rating must be at least half of the GAWR of
your vehicle. Never overload the tires by
exceeding the maximum load.
Two instruction labels on your vehicle show the maximum possible load.
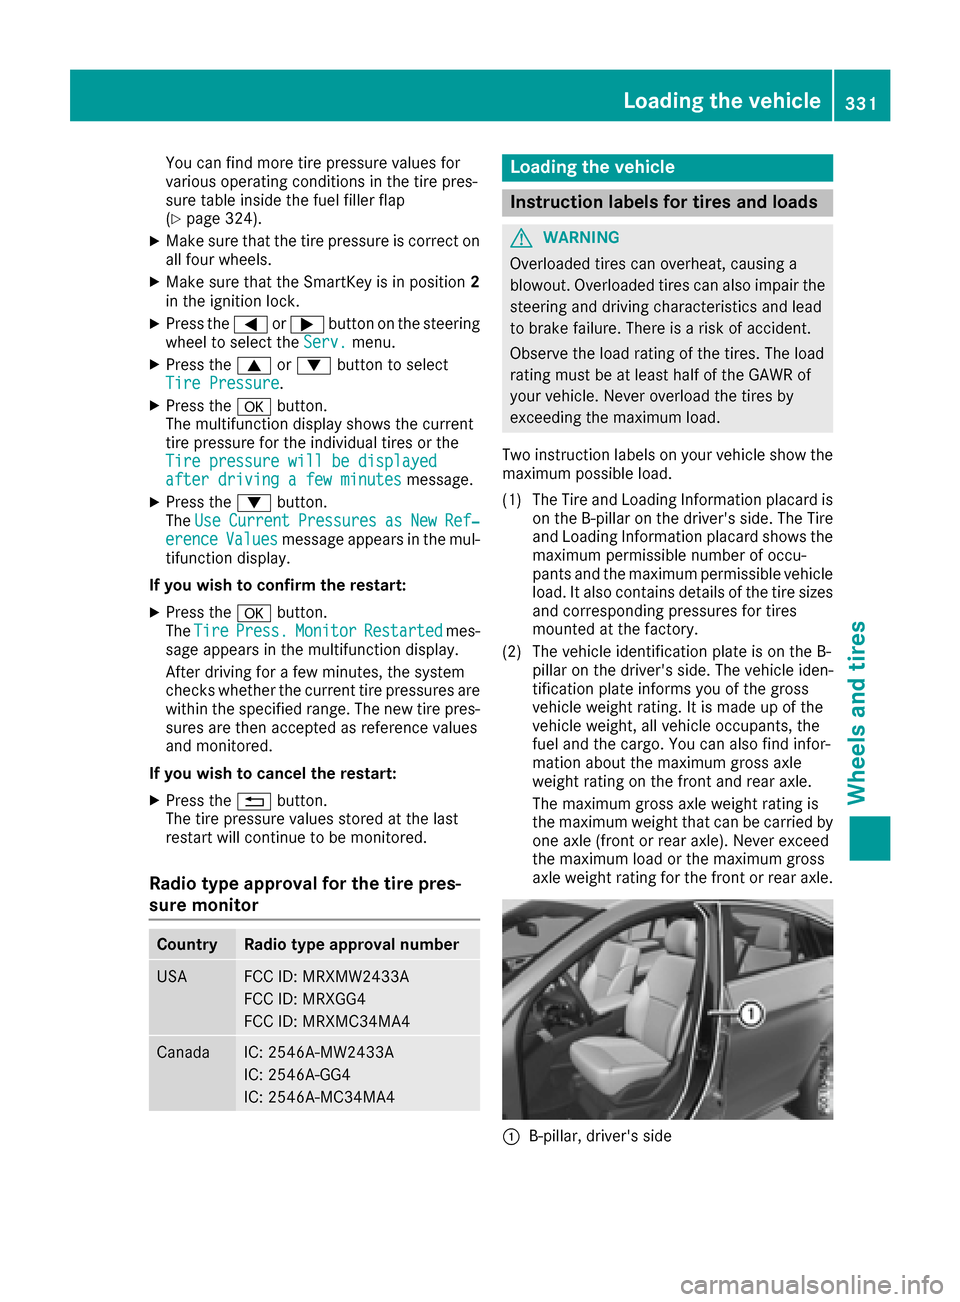
(1) The Tire and Loading Information placard is on the B-pillar on the driver's side. The Tire
and Loading Information placard shows the
maximum permissible number of occu-
pants and the maximum permissible vehicle
load. It also contains details of the tire sizes
and corresponding pressures for tires
mounted at the factory.
(2) The vehicle identification plate is on the B- pillar on the driver's side. The vehicle iden-
tification plate informs you of the gross
vehicle weight rating. It is made up of the
vehicle weight, all vehicle occupants, the
fuel and the cargo. You can also find infor-
mation about the maximum gross axle
weight rating on the front and rear axle.
The maximum gross axle weight rating is
the maximum weight that can be carried by
one axle (front or rear axle). Never exceed
the maximum load or the maximum gross
axle weight rating for the front or rear axle.
:B-pillar, driver's side
Loading the vehicle331
Wheels and tires
Z
Page 340 of 366

Maximum load rating
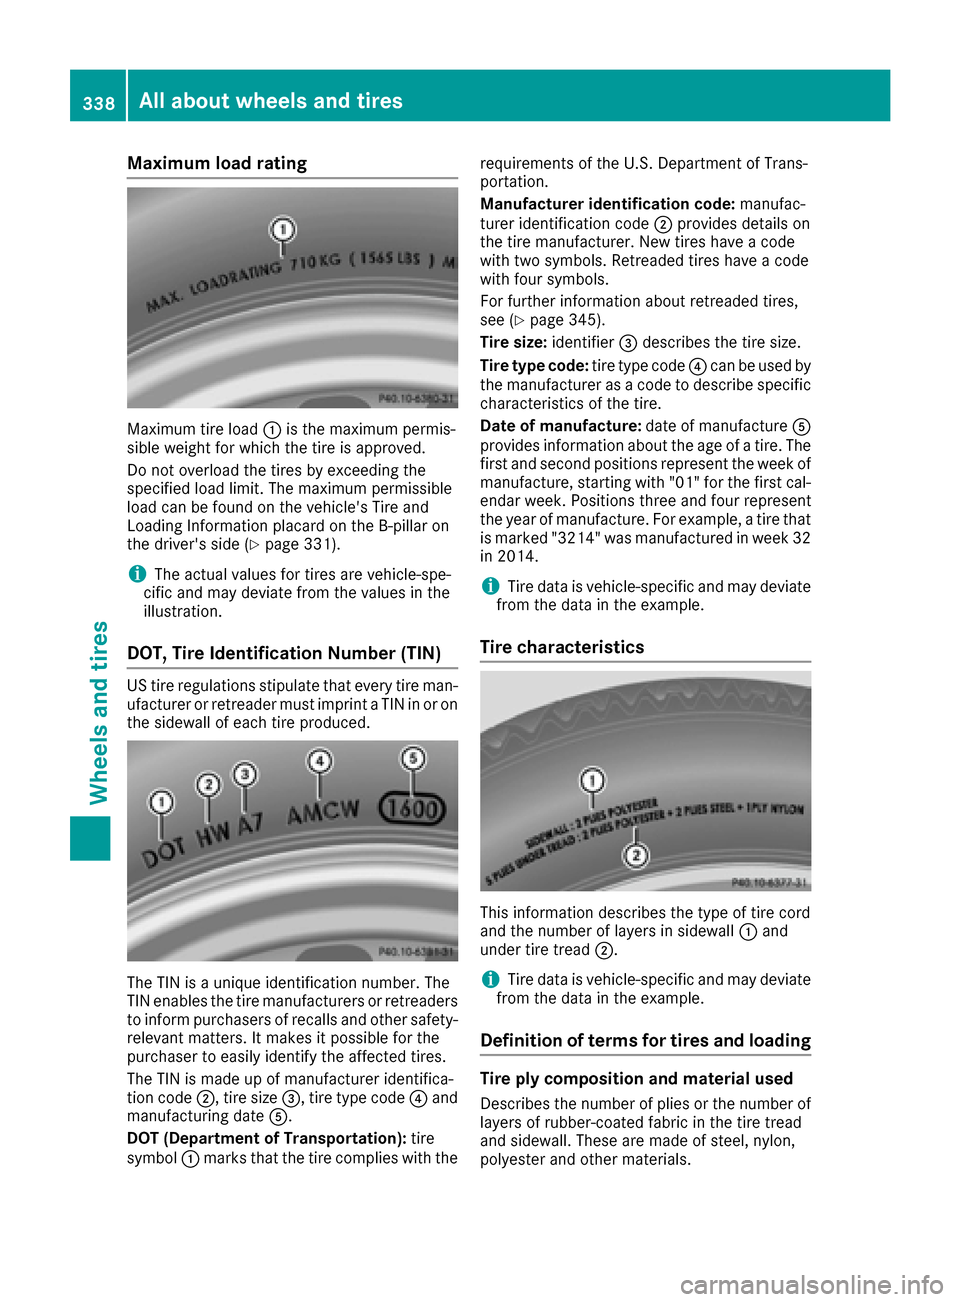
Maximum tire load:is the maximum permis-
sible weight for which the tire is approved.
Do not overload the tires by exceeding the
specified load limit. The maximum permissible
load can be found on the vehicle's Tire and
Loading Information placard on the B-pillar on
the driver's side (
Ypage 331).
iThe actual values for tires are vehicle-spe-
cific and may deviate from the values in the
illustration.
DOT, Tire Identification Number (TIN)
US tire regulations stipulate that every tire man-
ufacturer or retreader must imprint a TIN in or on
the sidewall of each tire produced.
The TIN is a unique identification number. The
TIN enables the tire manufacturers or retreaders
to inform purchasers of recalls and other safety-
relevant matters. It makes it possible for the
purchaser to easily identify the affected tires.
The TIN is made up of manufacturer identifica-
tion code ;, tire size =, tire type code ?and
manufacturing date A.
DOT (Department of Transportation): tire
symbol :marks that the tire complies with the requirements of the U.S. Department of Trans-
portation.
Manufacturer identification code:
manufac-
turer identification code ;provides details on
the tire manufacturer. New tires have a code
with two symbols. Retreaded tires have a code
with four symbols.
For further information about retreaded tires,
see (
Ypage 345).
Tire size: identifier=describes the tire size.
Tire type code: tire type code?can be used by
the manufacturer as a code to describe specific
characteristics of the tire.
Date of manufacture: date of manufactureA
provides information about the age of a tire. The
first and second positions represent the week of
manufacture, starting with "01" for the first cal-
endar week. Positions three and four represent
the year of manufacture. For example, a tire that
is marked "3214" was manufactured in week 32
in 2014.
iTire data is vehicle-specific and may deviate
from the data in the example.
Tire characteristics
This information describes the type of tire cord
and the number of layers in sidewall :and
under tire tread ;.
iTire data is vehicle-specific and may deviate
from the data in the example.
Definition of terms for tires and loading
Tire ply composition and material used
Describes the number of plies or the number of
layers of rubber-coated fabric in the tire tread
and sidewall. These are made of steel, nylon,
polyester and other materials.
338All about wheels and tires
Wheels and tires