2017 MERCEDES-BENZ GLE43AMG SUV bulb
[x] Cancel search: bulbPage 4 of 366

Index....................................................... 4
Introduction......................................... 24
Protecting the environment .................. .24
Genuine Mercedes-Benz parts .............. .24
Operator's Manual ................................. 25
Service and vehicle operation ................2 5
Operating safety .................................... 27
QR codes for the rescue card ................2 9
Data stored in the vehicle ...................... 29
Information on copyright ....................... 31
At a glance ........................................... 32
Cockpit .................................................. 32
Instrument cluster ................................. 33
Multifunction steering wheel ................. 34
Center console ...................................... 35
Overhead control panel .........................3 7
Door control panel ................................. 38
Safety ................................................... 39
Panic alarm ............................................ 39
Occupant safety .................................... 39
Children in the vehicle ........................... 55
Pets in the vehicle ................................. 60
Driving safety systems ........................... 60
Protection against theft .........................7 0
Opening and closing...........................71
SmartKey ............................................... 71
Doors ..................................................... 77
Cargo compartment .............................. .78
Side windows ......................................... 83
Sliding sunroof ....................................... 86
Seats, steering wheel and mirrors ....91
Correct driver's seat position ................ 91
Seats ..................................................... 91
Steering wheel ....................................... 97
Mirrors ................................................... 99
Memory function ................................. 102
Lights and windshield wipers ..........104
Exterior lighting ................................... 104 Interior lighting .................................... 108
Replacing bulbs (vehicles with LED
headlamps) .......................................... 109
Windshield wipers ................................ 109
Climate control
................................. 113
Overview of climate control systems ... 113
Operating the climate control sys-
tems .................................................... 117
Setting the air vents ............................ 122
Driving and parking ..........................124
Notes on breaking-in a new vehicle ..... 124
Driving ................................................. 124
DYNAMIC SELECT controller ............... 132
Automatic transmission ....................... 132
Refueling ............................................. 139
Parking ................................................ 145
Driving tips .......................................... 148
Driving systems ................................... 157
Towing a trailer .................................... 199
On-board computer and displays ....206
Important safety notes ........................ 206
Displays and operation ........................ 206
Menus and submenus ......................... 209
Display messages ................................ 220
Warning and indicator lamps in the
instrument cluster ............................... 250
Multimedia system ...........................263
General notes ...................................... 263
Important safety notes ........................ 263
Function restrictions ............................ 263
Operating system ................................ 264
Stowage and features ......................270
Stowage areas ..................................... 270
Features .............................................. 277
Maintenance and care ......................294
Engine compartment ........................... 294
ASSYST PLUS ...................................... 298
Care ..................................................... 299
2Contents
Page 19 of 366

Rear-view mirrorAnti-glare (manual) .......................... 99
Dipping (automatic) ....................... 101
Refrigerant (air-conditioning sys-
tem)
Important safety notes .................. 357
Refueling
Fuel gauge ....................................... 33
Important safety notes .................. 139
Refueling process .......................... 140
see Fuel
Remote control
Garage door opener ....................... 289
Programming (garage door
opener) .......................................... 290
Replacing bulbs
General notes ................................ 109
Reporting safety defects .................... 29
Rescue card ......................................... 29
Reserve (fuel tank)
see Fuel
Reserve fuel
Display message ............................ 236
Warning lamp ................................. 259
Residual heat (climate control) ........ 121
Restraint system
Display message ............................ 229
Introduction ..................................... 39
Warning lamp ................................. 258
Warning lamp (function) ................... 40
Reversing feature
Panorama sliding sunroof ................ 87
Roller sunblind ................................. 88
Side windows ................................... 83
Tailgate ............................................ 79
Reversing lamps (display mes-
sage) ................................................... 233
Roadside Assistance (breakdown) .... 26
Roller sunblind
Panorama roof with power tilt/
sliding panel ..................................... 88
Roof carrier ........................................ 277
Roof lining and carpets (cleaning
guidelines) ......................................... 305
Roof load (maximum) ........................ 358
Route (navigation)
see Route guidance (navigation) Route guidance
see also Digital Operator's Man-
ual .................................................. 263
Route guidance (navigation) ............ 210
S
Safety
Children in the vehicle ..................... 55
see Occupant safety
see Operating safety
SD card
Inserting ........................................ 268
Inserting/removing ........................ 268
Removing ....................................... 268
SD memory card
see also Digital Operator's Man-
ual .................................................. 263
Selecting ........................................ 212
Search & Send
see also Digital Operator's Man-
ual .................................................. 263
Seat belts
Adjusting the driver's and front-
passenger seat belt ......................... 43
Adjusting the height ......................... 42
Cleaning ......................................... 305
Correct usage .................................. 42
Fastening ......................................... 42
Important safety guidelines ............. 41
Introduction ..................................... 40
Releasing ......................................... 43
Switching belt adjustment on/off
(on-board computer) ...................... 217
Warning lamp ................................. 250
Warning lamp (function) ................... 43
Seats
Adjusting (electrically) ..................... 93
Adjusting the 4-way lumbar sup-
port .................................................. 95
Adjusting the head restraint ............ 93
Calling up a stored setting (mem-
ory function) .................................. 103
Cleaning the cover ......................... 305
Correct driver's seat position ........... 91
Folding the rear bench seat for-
wards/back ................................... 273
Important safety notes .................... 91
Index17
Page 111 of 366

Automa tic interi orlighting control
XTo switch on: set theswitch to center posi-
tion B.
XTo switch off :set th eswitch to th e|
position .
The interior lighting automatically switches on if
you:
Runloc kth evehicl e
Ropenadoor
Rremove th eSmartKey from th eignition loc k
The interior ligh tis activated for ashort while
when th eSmartKey is remove dfrom th eignition
lock. This delaye dswitch-off can be adjusted via
th emultimedia system; see th eseparat eoper -
ating instructions.
Crash-responsive eme rgency lighting
The interior lighting is activated automatically if
thevehicl eis involved in an accident.
XTo switch off th ecrash-responsive emer-
gency lighting: press thehazard warning
lamp button.
or
XLoc kand then unloc kth evehicl eusin gth e
SmartKey.
Replacing bulbs (vehicles with LED
headla mps)
The fron tand rear ligh tclusters of your vehicl e
are equipped wit hLE Dbulbs .Do no treplace th e
vehicle's bulbs yourself .Contac t aqualified spe-
cialist workshop whic hhas th enecessar yspe-
cialist knowledge and tools to carry out th ewor k
required.
Lamps are an important aspect of vehicl esafety.
You mus ttherefor emak esur ethat these func-
tion correctl yat all times .Hav eth eheadlamp
setting checke dregularly.
Windshield wipers
Switching the windshield wipers
on/off
!
Do no toperate th ewindshield wiper swhen
th ewindshield is dry, as this could damag e
th ewiper blades. Moreover, dust that has col-
lecte don th ewindshield can scratch th eglas s
if wipin gtakes plac ewhen th ewindshield is
dry.
If it is necessar yto switch on th ewindshield
wiper sin dry weather conditions, always use
washer fluid when operating th ewindshield
wipers.
!If th ewindshield wiper sleav esmears on th e
windshield after th evehicl ehas been washe d
in an automatic car wash ,wax or other resi-
dues may be th ereason for this. Clean th e
windshield usin gwasher fluid after washing
th evehicl ein an automatic car wash .
!Intermittent wipingwit hrain sensor :due to
optical influence sand th ewindshield becom-
ing dirty in dry weather conditions, th ewind-
shield wiper smay be activated inadvertently.
This could then damag eth ewindshield wiper
blade sor scratch th ewindshield.
Fo rthis reason ,you should always switch off
th ewindshield wiper sin dry weather .
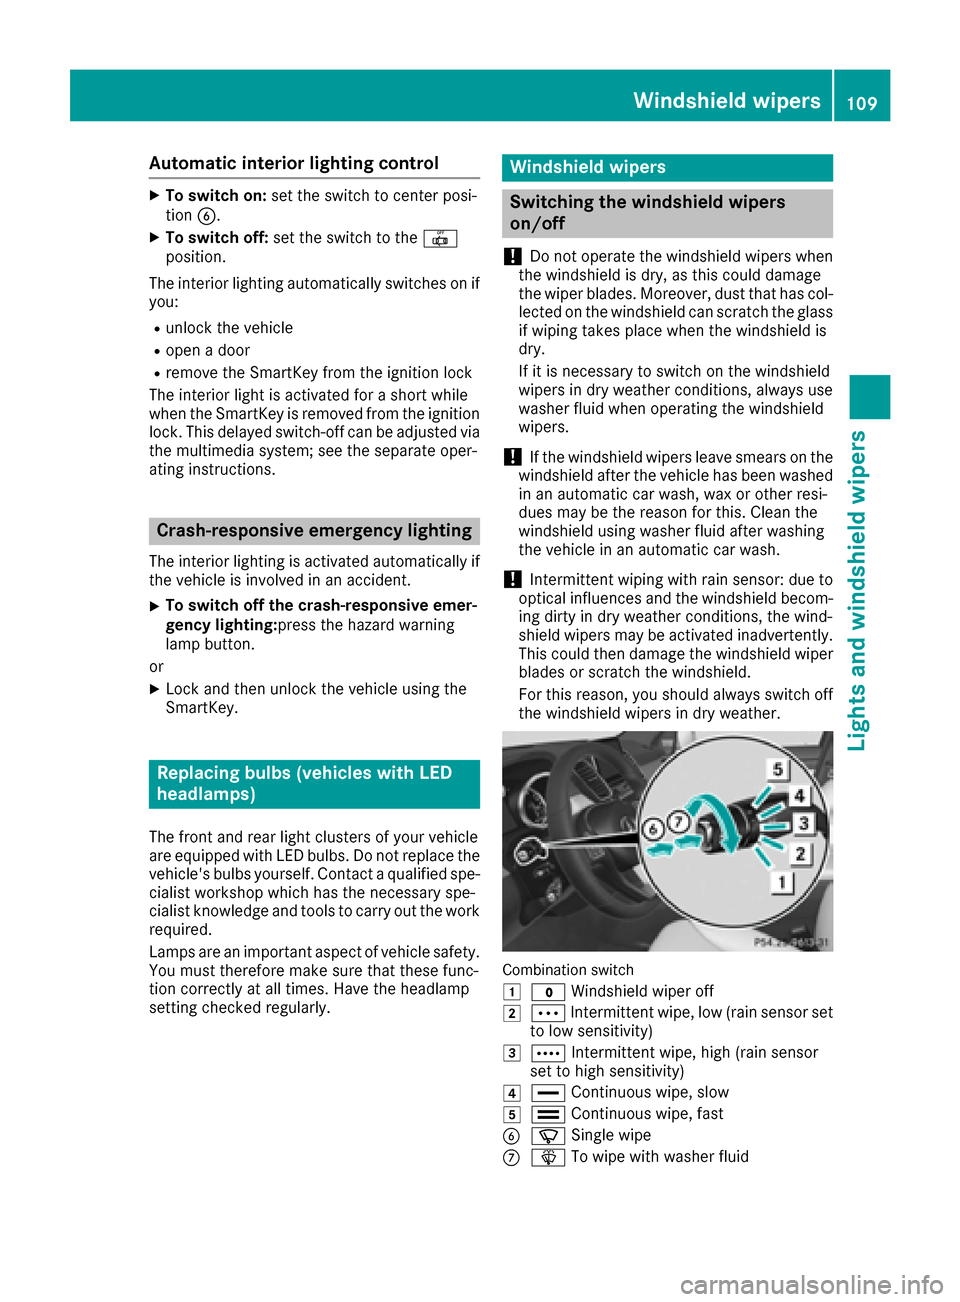
Combination switch
1
$Windshield wiper off
2ÄIntermittent wipe, low (rai nsensor set
to low sensitivity)
3Å Intermittent wipe, high (rai nsensor
set to high sensitivity)
4° Continuous wipe, slow
5¯Continuous wipe, fas t
BíSingle wipe
CîTo wipe wit hwasher fluid
Windshield wipers109
Lights and windshield wipers
Z
Page 183 of 366

Canceling Parking Pilot
XStop the movement of the multifunction
steering wheel or steer yourself.
Parking Pilot is immediately canceled. The
Parking
PilotCanceledmessage appears
in the multifunction display.
or
XPress the Parking Assist PARKTRONIC button
(Ypage 176).
Parking Assist PARKTRONIC is switched off
and Parking Pilot is immediately canceled.
The Parking Pilot Canceled
message
appears in the multifunction display.
Parking Pilot is canceled automatically if:
Rthe electric parking brake is engaged
Rtransmission position Pis selected
Rparking using Parking Pilot is no longer pos-
sible
Ryou are driving faster than 6 mph (10 km/h)
Ra wheel spins, ESP®intervenes or fails. The
÷ warning lamp lights up in the instrument
cluster
A warning tone sounds. The parking symbol dis-
appears and the multifunction display shows the
Parking Pilot Canceled
message.
When Parking Pilot is canceled, you must steer
and brake again yourself.
If a system malfunction occurs, the vehicle is
braked to a standstill. To drive on, depress the
accelerator again.
Rear view camera
General notes
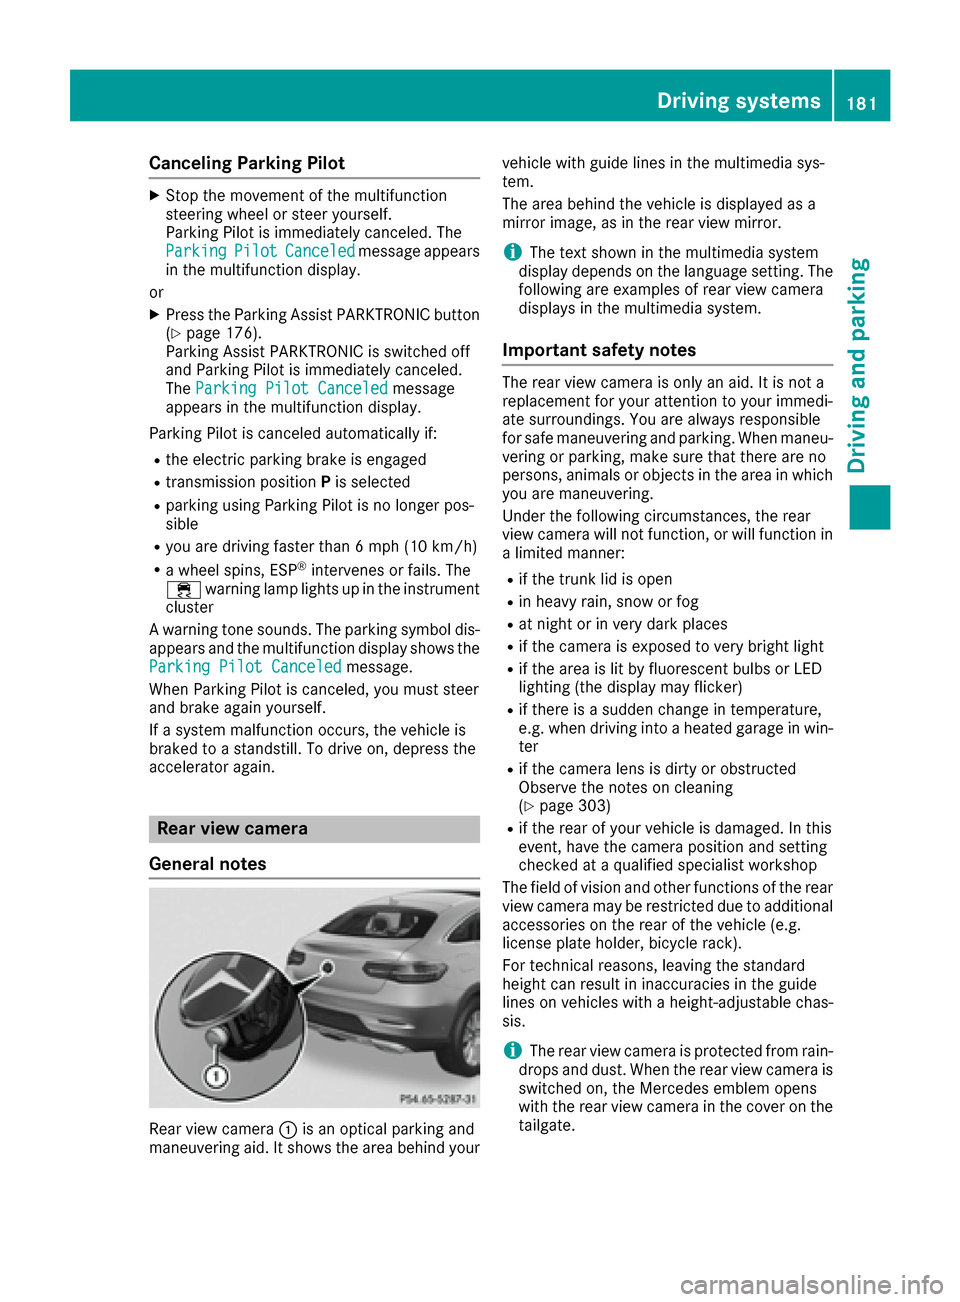
Rear view camera :is an optical parking and
maneuvering aid. It shows the area behind your vehicle with guide lines in the multimedia sys-
tem.
The area behind the vehicle is displayed as a
mirror image, as in the rear view mirror.
iThe text shown in the multimedia system
display depends on the language setting. The
following are examples of rear view camera
displays in the multimedia system.
Important safety notes
The rear view camera is only an aid. It is not a
replacement for your attention to your immedi-
ate surroundings. You are always responsible
for safe maneuvering and parking. When maneu-
vering or parking, make sure that there are no
persons, animals or objects in the area in which you are maneuvering.
Under the following circumstances, the rear
view camera will not function, or will function in
a limited manner:
Rif the trunk lid is open
Rin heavy rain, snow or fog
Rat night or in very dark places
Rif the camera is exposed to very bright light
Rif the area is lit by fluorescent bulbs or LED
lighting (the display may flicker)
Rif there is a sudden change in temperature,
e.g. when driving into a heated garage in win- ter
Rif the camera lens is dirty or obstructed
Observe the notes on cleaning
(
Ypage 303)
Rif the rear of your vehicle is damaged. In this
event, have the camera position and setting
checked at a qualified specialist workshop
The field of vision and other functions of the rear
view camera may be restricted due to additional
accessories on the rear of the vehicle (e.g.
license plate holder, bicycle rack).
For technical reasons, leaving the standard
height can result in inaccuracies in the guide
lines on vehicles with a height-adjustable chas-
sis.
iThe rear view camera is protected from rain-
drops and dust. When the rear view camera is
switched on, the Mercedes emblem opens
with the rear view camera in the cover on the tailgate.
Driving systems181
Driving and parking
Z
Page 187 of 366

360° camera
General notes
The 360° camera is a system consisting of four
cameras.
The system processes images from the follow-
ing cameras:
RRear view camera
RFront camera
RTwo cameras in the exterior rear view mirrors
The cameras capture the immediate surround-
ings of the vehicle. The system supports you,
e.g. when parking or if vision is restricted at an
exit.
You can show pictures from the 360° camera in
full-screen mode or in seven different split-
screen views on the multimedia system display.
A split-screen view also includes a top view of
the vehicle. This view is calculated from the data
supplied by the installed cameras (virtual cam-
era).
The six split-screen views are:
RTop view and picture from the rear view cam-
era (130° viewing angle)
RTop view and image from the front camera
(130° viewing angle without displaying the
maximum steering wheel angle)
RTop view and enlarged rear view
RTop view and enlarged front view
RTop view and rear-view images from the exte- rior mirror cameras (rear wheel view)
RTop view and forward-view images from the
exterior mirror cameras (front wheel view)
When the function is active and you shift the
transmission from Dor Rto N, the dynamic
guidelines are hidden.
When you change between transmission posi-
tions Dand R, you see the previously selected
front or rear view.
Distances measured by Parking Assist
PARKTRONIC will also be optically displayed:
Rin split screen view as red or yellow brackets around the vehicle icon in the top view, or
Rat the bottom right as red or yellow brackets
around the vehicle symbol in full-screen mode
The line thickness and color of the brackets
show how far the vehicle is away from an object:
Ryellow brackets with thin lines: Parking Assist
PARKTRONIC is active
Ryellow brackets with normal lines: an object is present in close range of the vehicle
Rred line: an object is present in the immediate
close range of the vehicle
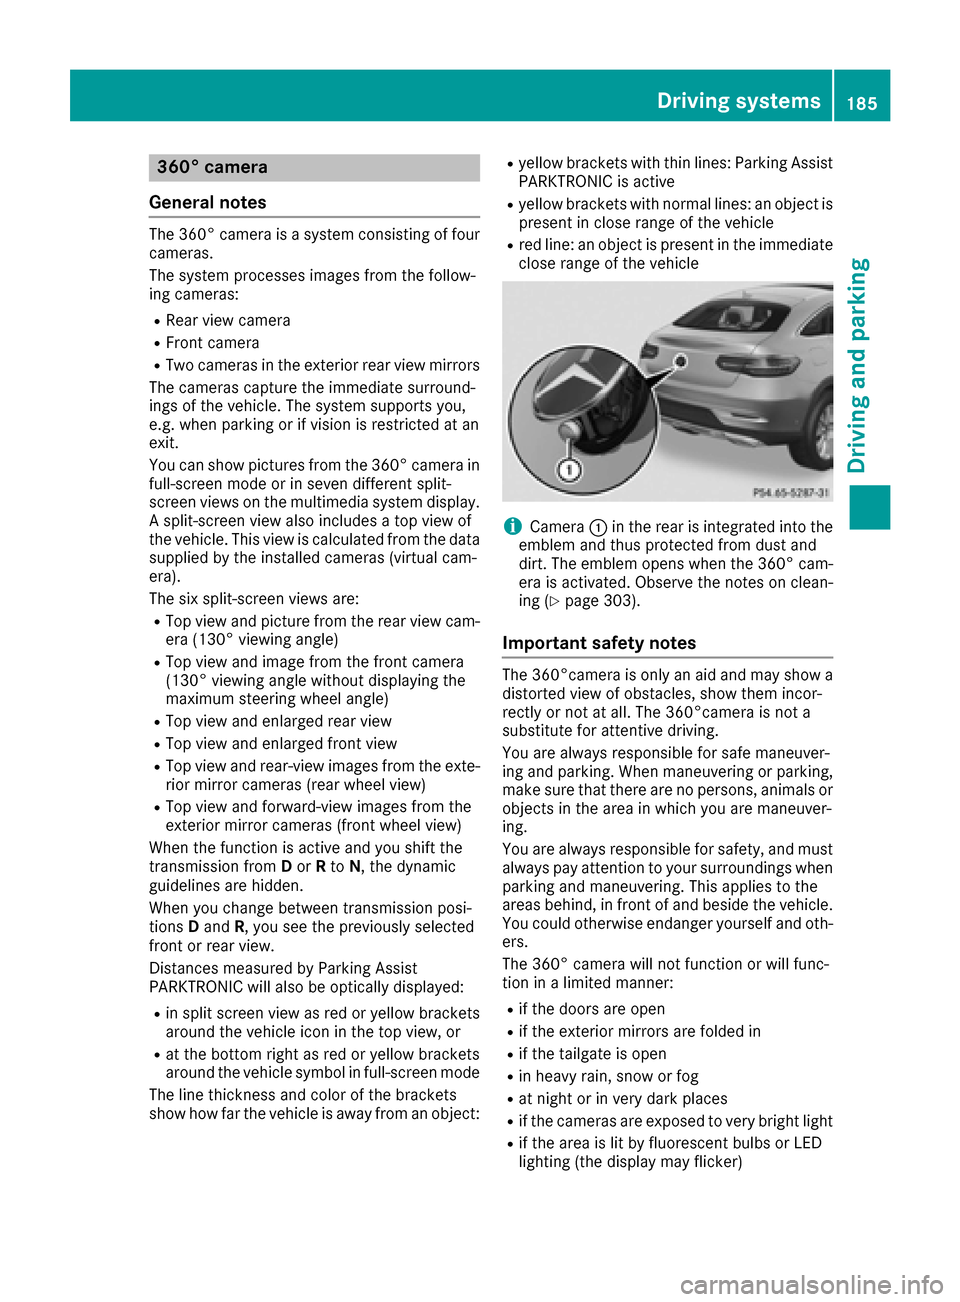
iCamera:in the rear is integrated into the
emblem and thus protected from dust and
dirt. The emblem opens when the 360° cam-
era is activated. Observe the notes on clean-
ing (
Ypage 303).
Important safety notes
The 360°camera is only an aid and may show a
distorted view of obstacles, show them incor-
rectly or not at all. The 360°camera is not a
substitute for attentive driving.
You are always responsible for safe maneuver-
ing and parking. When maneuvering or parking, make sure that there are no persons, animals or
objects in the area in which you are maneuver-
ing.
You are always responsible for safety, and must
always pay attention to your surroundings when parking and maneuvering. This applies to the
areas behind, in front of and beside the vehicle.
You could otherwise endanger yourself and oth-
ers.
The 360° camera will not function or will func-
tion in a limited manner:
Rif the doors are open
Rif the exterior mirrors are folded in
Rif the tailgate is open
Rin heavy rain, snow or fog
Rat night or in very dark places
Rif the cameras are exposed to very bright light
Rif the area is lit by fluorescent bulbs or LED
lighting (the display may flicker)
Driving systems185
Driving and parking
Z
Page 235 of 366

Display messagesPossible causes/consequences andMSolutions
XVisitaqualified specialist workshop immediately.
Fo rfurther information about th eOccupant Classification System, see
(
Ypage 47).
Lights
i
Vehicles wit hLE Dbulbs in th eligh tclusters :
The display message for th ecorrespondin glamp only appear swhen all of th eLEDs in th elamp
hav efailed.
Display messagesPossible causes/consequences and MSolutions
b
Check LeftLowBea m(Example)
The bulb in question is malfunctioning .
XVisitaqualified specialist workshop .
or
XChec kwhether you are permitte dto replace th ebulb yourself
(Ypage 109).
b
Active HeadlampsInoperative
The active ligh tfunction is faulty.
XVisit aqualified specialist workshop .
b
Malfunction SeeOperator'sManual
The exterio rlighting is malfunctioning .
XVisitaqualified specialist workshop .
Vehicles withtrailer to whitch : afusemay hav eblown .
XPull ove rand stop th evehicl esafely as soo nas possible, payin g
attention to roa dand traffic conditions.
XSecur eth evehicl eagainst rollin gaway (Ypage 145).
XCheckth efuses (Ypage 318).
XIf necessary, replace th eblown fuse. Observ eth ewarning notes.
If th emultifunction display still shows th edisplay message :
XVisitaqualified specialist workshop .
b
Malfunction SeeOperator'sManual
The exterio rlighting is malfunctioning .
XVisitaqualified specialist workshop .
b
AutoLam pFunctionInoperative
The ligh tsensor is defective.
XVisit aqualified specialist workshop .
b
Switch Off Lights
You leaveth evehicl eand th elights are switched on . Awarning tone
also sounds.
XTurn th eligh tswitch to th eà position .
Display messages233
On-board computer and displays
Z