2017 MERCEDES-BENZ GLE43AMG SUV display
[x] Cancel search: displayPage 70 of 366

if Active Brake Assist with cross-traffic func-
tion alerts you.
In order to maintain the appropriate distance to
the vehicle in front and thus prevent a collision,
you must apply the brakes yourself.
GWARNING
Active Brake Assist with cross-traffic function does not react:
Rto small people, e.g. children
Rto animals
Rto oncoming vehicles
Rwhen cornering
As a result, Active Brake Assist with cross-
traffic function may not warn you or engage in
all critical situations. There is a risk of an acci-
dent.
Always pay careful attention to the traffic sit- uation and be ready to brake.
In the event of snowfall or heavy rain, the rec-
ognition can be impaired.
Recognition by the radar sensor system is also
impaired if:
Rthere is dirt on the sensors or anything else
covering the sensors
Rthere is interference by other radar sources
Rthere are strong radar reflections, for exam-
ple in parking garages
Ra narrow vehicle is traveling in front, e.g. a
motorbike
Ra vehicle is traveling in front on a different line relative to the center of your vehicle
Rvehicles quickly move into the radar sensor
system detection range
Recognition by the camera system is also
impaired in the event of:
Rdirt on the camera or if the camera is covered
Rglare on the camera system, e.g. from the sun being low in the sky
Rdarkness
Ror if:
-pedestrians move quickly, e.g. into the path
of the vehicle
-the camera system no longer recognizes a
pedestrian as a person due to special cloth-ing or other objects
-a pedestrian is concealed by other objects
-the typical outline of a person is not distin-
guishable from the background
Following damage to the front end of the vehic le,
have t
he configuration and operation of the
radar sensors checked at a qualified specialist
workshop. This also applies to collisions at slow
speeds where there is no visible damage to the
front of the vehicle.
Following damage to the windshield, have the
configuration and operation of the camera sys-
tem checked at a qualified specialist workshop.
Function
XTo activate or deactivate: activate or deac-
tivate Active Brake Assist with cross-traffic
function using the on-board computer
(
Ypage 214).
If the Active Brake Assist with cross-traffic
function is deactivated, the æsymbol
appears in the multifunction display.
If you have activated DSR (
Ypage 168), the
Active Brake Assist with cross-traffic function is
deactivated.
Starting at a speed of around 4 mph (7 km/h),
this function warns you if you rapidly approach a
vehicle in front. An intermittent warning tone
will then sound and the ·distance warning
lamp will light up in the instrument cluster.
XBrake immediately to defuse the situation.
or
XTake evasive action provided it is safe to do
so.
Active Brake Assist with cross-traffic function
can also brake the vehicle automatically under
the following conditions:
Rthe driver and front-passenger have their seat
belts fastened
and
Rthe vehicle speed is between approximately
4 mph (7 km/h) and 124 mph (200 km/h)
68Driving safety systems
Safety
Page 93 of 366
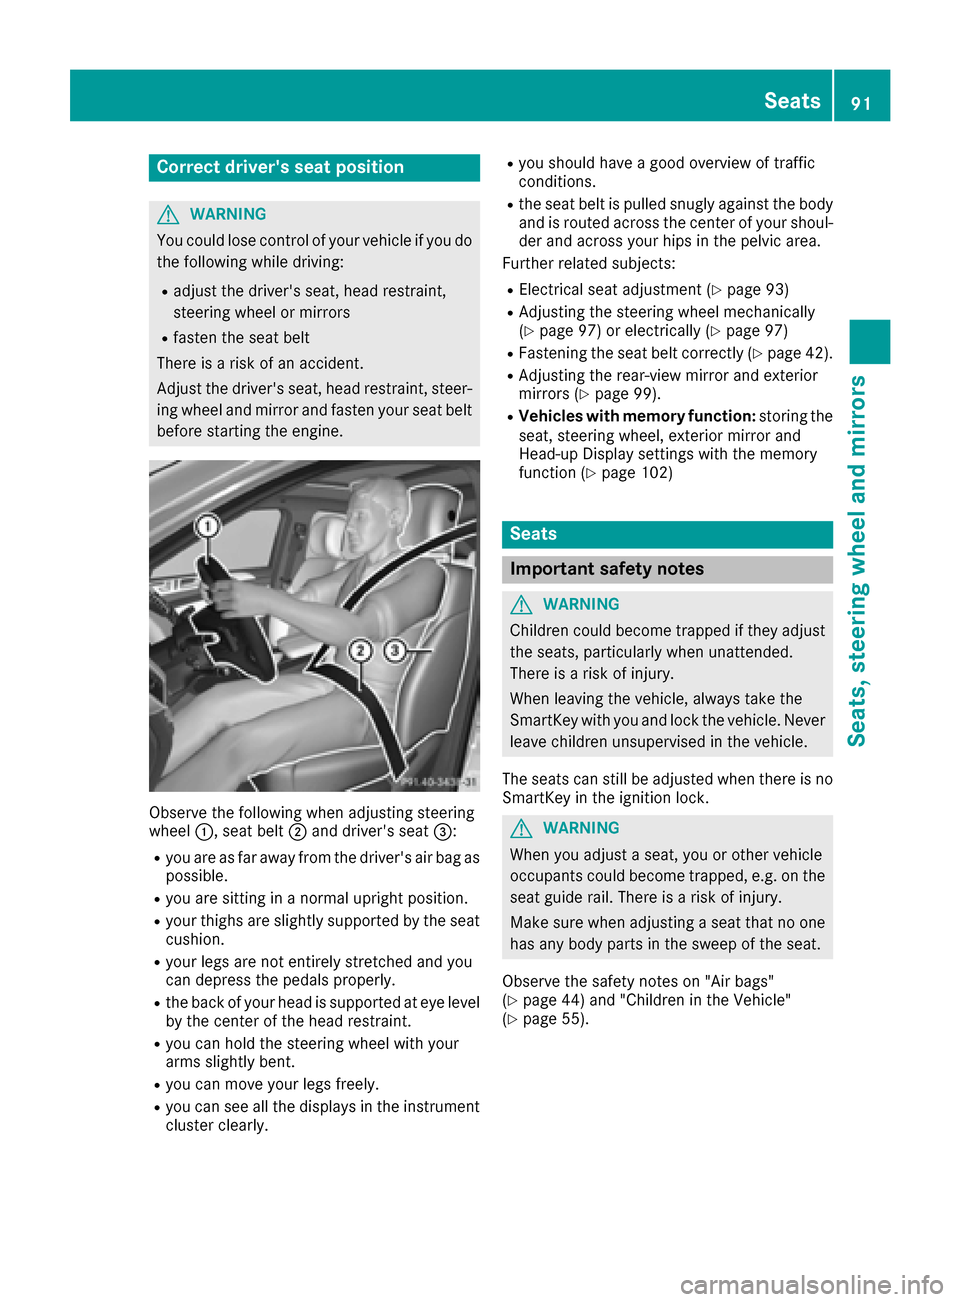
Correct driver's seat position
GWARNING
You could lose control of your vehicle if you do the following while driving:
Radjust the driver's seat, head restraint,
steering wheel or mirrors
Rfasten the seat belt
There is a risk of an accident.
Adjust the driver's seat, head restraint, steer-
ing wheel and mirror and fasten your seat belt before starting the engine.
Observe the following when adjusting steering
wheel :, seat belt ;and driver's seat =:
Ryou are as far away from the driver's air bag as
possible.
Ryou are sitting in a normal upright position.
Ryour thighs are slightly supported by the seat
cushion.
Ryour legs are not entirely stretched and you
can depress the pedals properly.
Rthe back of your head is supported at eye level
by the center of the head restraint.
Ryou can hold the steering wheel with your
arms slightly bent.
Ryou can move your legs freely.
Ryou can see all the displays in the instrument
cluster clearly.
Ryou should have a good overview of traffic
conditions.
Rthe seat belt is pulled snugly against the bodyand is routed across the center of your shoul-
der and across your hips in the pelvic area.
Further related subjects:
RElectrical seat adjustment (Ypage 93)
RAdjusting the steering wheel mechanically
(Ypage 97) or electrically (Ypage 97)
RFastening the seat belt correctly (Ypage 42).
RAdjusting the rear-view mirror and exterior
mirrors (Ypage 99).
RVehicles with memory function: storing the
seat, steering wheel, exterior mirror and
Head-up Display settings with the memory
function (
Ypage 102)
Seats
Important safety notes
GWARNING
Children could become trapped if they adjust
the seats, particularly when unattended.
There is a risk of injury.
When leaving the vehicle, always take the
SmartKey with you and lock the vehicle. Never
leave children unsupervised in the vehicle.
The seats can still be adjusted when there is no
SmartKey in the ignition lock.
GWARNING
When you adjust a seat, you or other vehicle
occupants could become trapped, e.g. on the seat guide rail. There is a risk of injury.
Make sure when adjusting a seat that no one
has any body parts in the sweep of the seat.
Observe the safety notes on "Air bags"
(
Ypage 44) and "Children in the Vehicle"
(Ypage 55).
Seats91
Seats, steering wheel and mirrors
Z
Page 110 of 366
Always carefully observe the traffic conditions
and switch off the high-beam headlamps in
good time.
Adaptive Highbeam Assist cannot take into
account road, weather or traffic conditions.
Adaptive Highbeam Assist is only an aid. You are
responsible for adjusting the vehicle's lighting
to the prevailing light, visibility and traffic con-
ditions.
In particular, the detection of obstacles can be
impaired if:
Rpoor visibility, e.g. due to fog, heavy rain or
snow
Rdirt on the sensors or the sensors are
obscured
Switching Adaptive Highbeam Assist
on/off
XTo switch on: turn the light switch to Ã.
XPress the combination switch beyond the
pressure point in the direction of arrow :.
The _ indicator lamp in the multifunction
display lights up when it is dark and the light
sensor activates the low-beam headlamps.
If you are driving at speeds above approx-
imately 16 mph (25 km/h):
The headlamp range is set automatically
depending on the distance between the vehi-
cle and other road users.
If you are driving at speeds above approx-
imately 19 mph (30 km/h) and no other road
users have been detected:
The high-beam headlamps are switched on
automatically. The Kindicator lamp in the
instrument cluster also lights up.
If you are driving at speeds below approx-
imately 16 mph (25 km/h) or other road users
have been detected or the roads are ade-
quately lit:
The high-beam headlamps are switched off
automatically. The Kindicator lamp in the
instrument cluster goes out. The _indi-
cator lamp in the multifunction display
remains lit.
XTo switch off:move the combination switch
back to its normal position or move the light
switch to another position.
The _ indicator lamp in the multifunction
display goe s o
ut.
Headlamps fogged up on the inside
Certain climatic and physical conditions may
cause moisture to form in the headlamp. This
moisture does not affect the functionality of the
headlamp.
Interior lighting
Overview of interior lighting
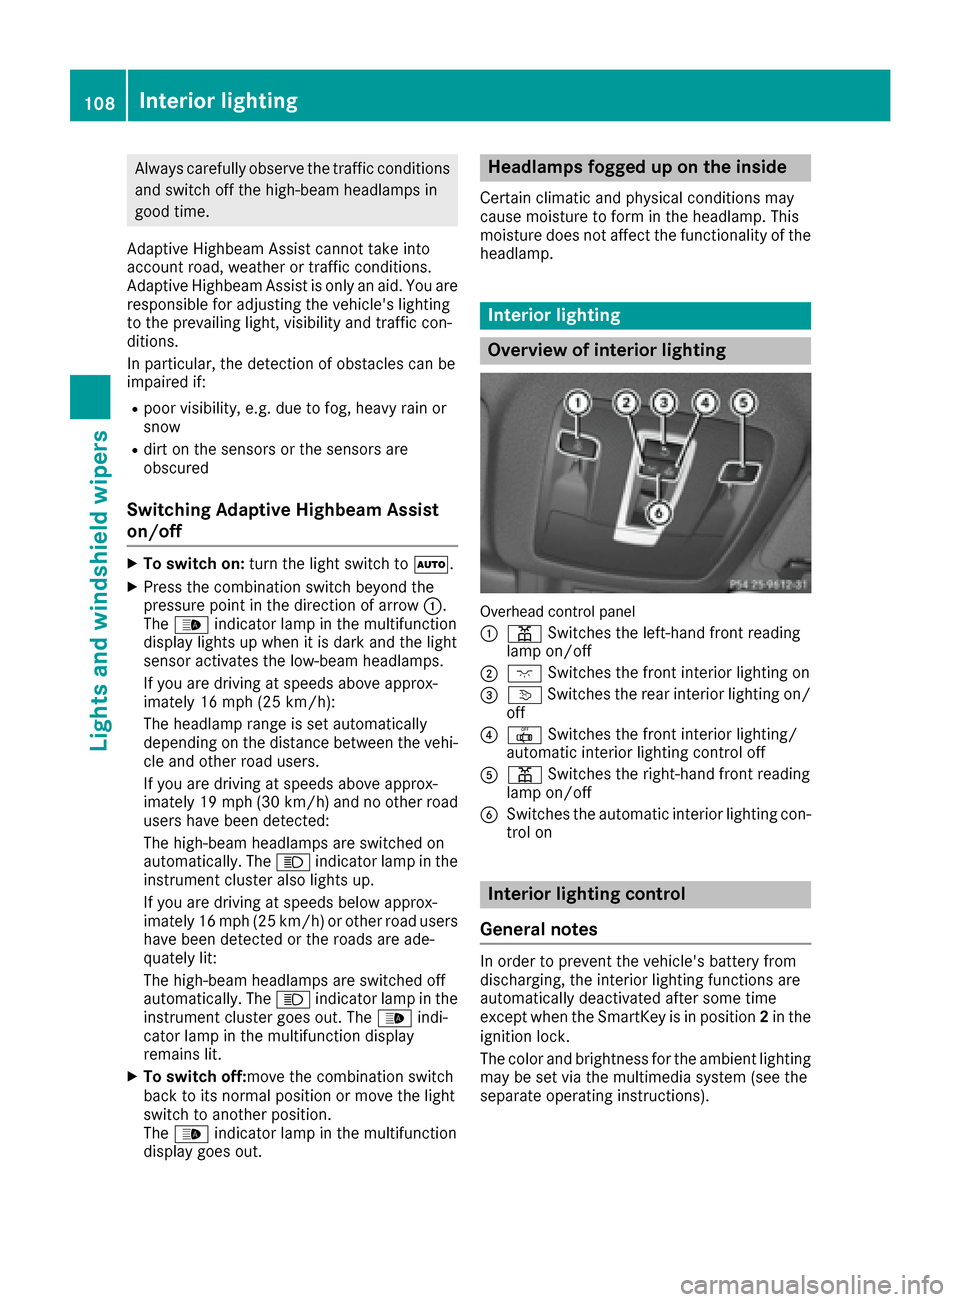
Overhead control panel
:
pSwitches the left-hand front reading
lamp on/off
;c Switches the front interior lighting on
=vSwitches the rear interior lighting on/
off
?| Switches the front interior lighting/
automatic interior lighting control off
Ap Switches the right-hand front reading
lamp on/off
BSwitches the automatic interior lighting con-
trol on
Interior lighting control
General notes
In order to prevent the vehicle's battery from
discharging, the interior lighting functions are
automatically deactivated after some time
except when the SmartKey is in position 2in the
ignition lock.
The color and brightness for the ambient lighting
may be set via the multimedia system (see the
separate operating instructions).
108Interior lighting
Lights and windshield wiper s
Page 118 of 366
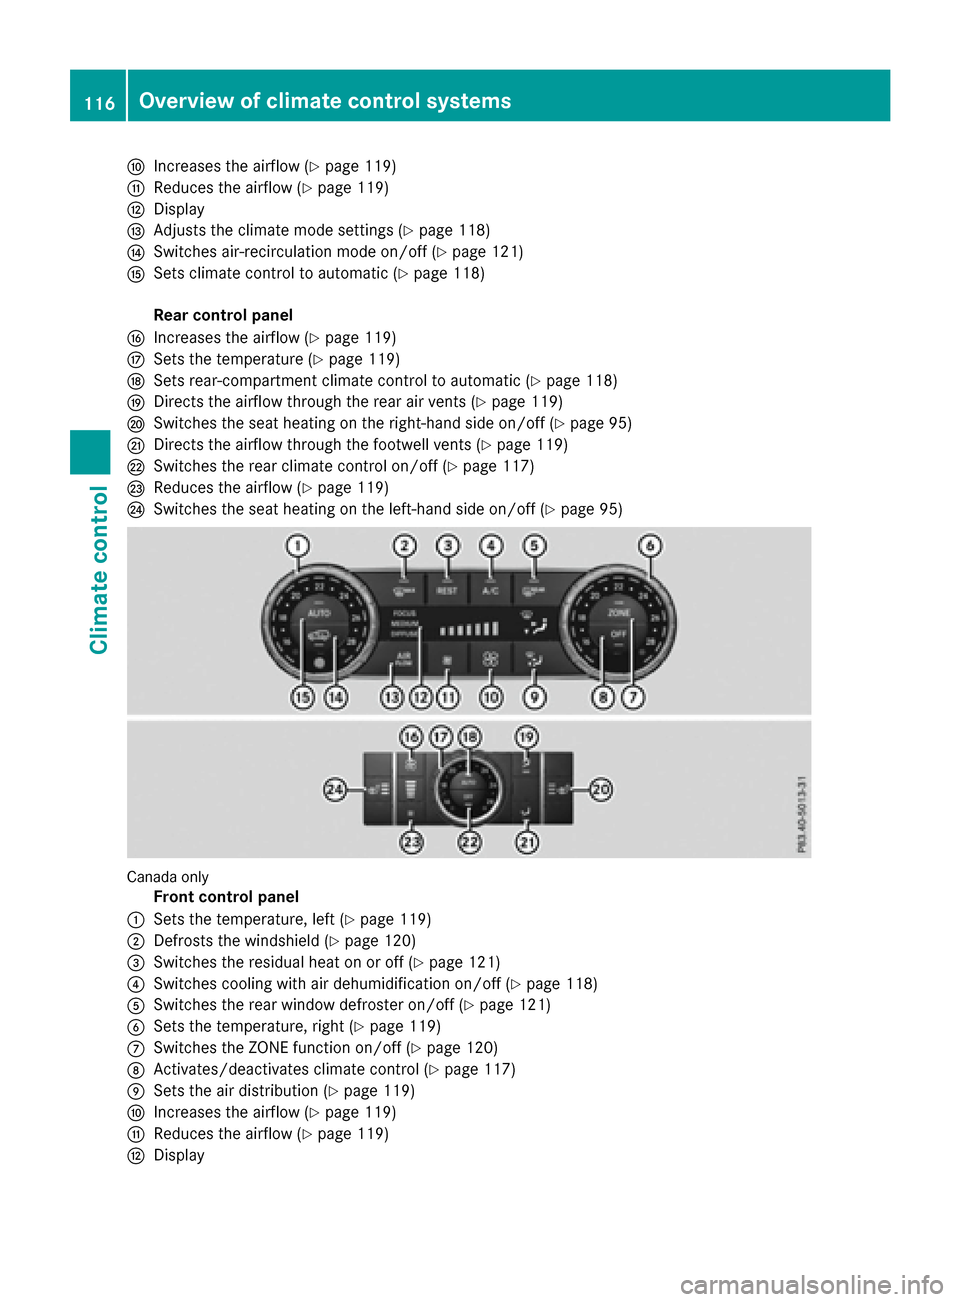
FIncreases the airflow (Ypage 119)
GReduces the airflow (Ypage 119)
HDisplay
IAdjusts the climate mode settings (Ypage 118)
JSwitches air-recirculation mode on/off (Ypage 121)
KSets climate control to automatic (Ypage 118)
Rear control panel
LIncreases the airflow (Ypage 119)
MSets the temperature (Ypage 119)
NSets rear-compartment climate control to automatic (Ypage 118)
ODirects the airflow through the rear air vents (Ypage 119)
PSwitches the seat heating on the right-hand side on/off (Ypage 95)
QDirects the airflow through the footwell vents (Ypage 119)
RSwitches the rear climate control on/off (Ypage 117)
SReduces the airflow (Ypage 119)
TSwitches the seat heating on the left-hand side on/off (Ypage 95)
Canada only
Front control panel
:Sets the temperature, left (Ypage 119)
;Defrosts the windshield (Ypage 120)
=Switches the residual heat on or off (Ypage 121)
?Switches cooling with air dehumidification on/off (Ypage 118)
ASwitches the rear window defroster on/off (Ypage 121)
BSets the temperature, right (Ypage 119)
CSwitches the ZONE function on/off (Ypage 120)
DActivates/deactivates climate control (Ypage 117)
ESets the air distribution (Ypage 119)
FIncreases the airflow (Ypage 119)
GReduces the airflow (Ypage 119)
HDisplay
116Overview of climate control systems
Climate control
Page 119 of 366

IAdjusts the climate mode settings (Ypage 118)
JSwitches air-recirculation mode on/off (Ypage 121)
KSets climate control to automatic (Ypage 118)
Rear control panel
LIncreases the airflow (Ypage 119)
MSets the temperature (Ypage 119)
NSets rear-compartment climate control to automatic (Ypage 118)
ODirects the airflow through the rear air vents (Ypage 119)
PSwitches the seat heating on the right-hand side on/off (Ypage 95)
QDirects the airflow through the footwell vents (Ypage 119)
RSwitches the rear climate control on/off (Ypage 117)
SReduces the airflow (Ypage 119)
TSwitches the seat heating on the left-hand side on/off (Ypage 95)
Information about using automatic
climate control
Optimum use of the automatic climate
control
The following contains notes and recommenda-
tions on optimum use of the dual-zone or 3-zone
automatic climate control.
RYou can switch on climate control by using the
à and¿ orà andÁ buttons.
The indicator lamps in the Ãand
¿ buttons or the ÃandÁ buttons
light up.
RVehicles with 3-zone climate control:in
automatic mode, you can also use the
ñ button to set a climate mode (FOCUS/
MEDIUM/DIFFUSE). The MEDIUM level is
recommended.
RSet the temperature to 72 ‡ (22 †).
ROnly use the "Windshield defrosting" function
briefly until the windshield is clear again.
ROnly use air-recirculation mode briefly, e.g. if
there are unpleasant outside odors or when in
a tunnel. The windows could otherwise fog up,
since no fresh air is drawn into the vehicle in
air-recirculation mode.
RVehicles with 3-zone climate control:use
the ZONE function to adopt the temperature
settings on the driver's side for the front-
passenger side and the rear compartment as
well. The indicator lamp above the ábut-
ton goes out.
RVehicles with 3-zone climate control:use
the "residual heat" function if you want to heat or ventilate the vehicle interior when the igni-
tion is switched off. The residual heat functio
n
ca
n only be activated or deactivated with the
ignition switched off.
RIf you change the settings of the climate con-
trol system, the climate status display
appears for approximately three seconds at
the bottom of the screen in the multimedia
system display. You will see the current set-
tings of the various climate control functions.
During automatic engine switch-off, the climate
control system only operates at a reduced capa-
city. If you require the full climate control output,
you can switch off the ECO start/stop function
by pressing the ECO button (
Ypage 130).
Operating the climate control sys-
tems
Activating/deactivating climate con-
trol
General notes
When the climate control is switched off, the air
supply and air circulation are also switched off.
The windows could fog up. Therefore, switch off
climate control only briefly
Activate climate control primarily using the
à button (
Ypage 118).
In the rear compartment, you can also switch
climate control on and off using the Ãand
^ buttons.
Operating the climate control systems117
Climate control
Page 120 of 366
Activating/deactivating
XTurn theSmartKey to position 2in th eignition
loc k (Ypage 125).
XTo switch on: press theà button.
The indicator lamp in th eà buttonlights
up. Airflo wand air distribution are set to auto -
matic mode.
XTo deactivate: press the^ button.
The indicator lamp in th e^ buttonlights
up.
Switching cooling with air dehumidi-
ficati onon/off
Activating/deactivating
XTo activate: press the¿ orÁ button.
The indicator lamp in th e¿ orÁ button
lights up.
XTo deactivate: press the¿ orÁ but-
ton.
The indicator lamp in th e¿ orÁ button
goe sout .The "Cooling wit hair dehumidifica-
tion "function has adelaye dswitch-off fea-
ture.
Problems with the "Cooling with air dehumidification" function
ProblemPossible causes/consequences and MSolutions
The indicator lamp in the
¿ orÁ button
flashes three times or
remain soff .The "Cool-
ing wit hair dehumidifi-
cation "function canno t
be switched on .Cooling withair dehumidification has been deactivated due to amal-
function .
XVisitaqualified specialist workshop .
Setting climate controlto automatic
Gene ral notes
In automatic mode, th eset temperature is main -
taine dautomatically at aconstan tlevel. The
system automatically regulates th etemperature
of th edispensed air, th eairflow and th eair dis-
tribution .
The "Cooling wit hair dehumidification "function
is activated automatically in automatic mode.
In th erear compartment, you can also switch
climat econtrol for th erear seat sto automatic
mod eusin gth eà button.
Automa tic control
XTurn th eSmartKey to position 2in th eignition
loc k (Ypage 125).
XSetth edesired temperature.
XTo activate: press theà button.
The indicator lamp in th eà buttonlights
up. Automatic air distribution and airflow are
activated.
XTo switch to manua lmode:p ressth e_
button.
3-zone automatic climat econtrol :when auto -
matic mod eis activated, you can select acli -
mat emod e (
Ypage 118).
Adjusting the climate mode settings
You can select th efollowin gclimat emod eset -
ting sin automatic mode:
FOCUS high airflow, slightly cooler setting
MEDIUM medium airflow, standard setting
DIFFUS Elow airflow, slightly warmer and draft-
free setting
XTurn the SmartKey to position 2in the ignition
lock (Ypage 125).
XPress the Ãbutton.
XPress the ñbutton repeatedly until the
desired climate mode appears in the display.
118Operating the climate control systems
Climate control
Page 121 of 366

Setting the temperature
Dual-zone automatic climate control
Different temperatures can be set for the driv-
er's and front-passenger sides.
XTurn the SmartKey to position 2in the ignition
lock (Ypage 125).
XTo increase or decrease: turn control:or
B counter-clockwise or clockwise
(
Ypage 113).
Only change the temperature setting in small
increments. Start at 72 ‡ (22 †).
3-zone automatic climate control
You can select different temperature settings
for the driver's and front-passenger sides as well
as for the rear compartment.
XTurn the SmartKey to position 2in the ignition
lock (Ypage 125).
XTo increase or decrease temperature in
the front compartment: turn control:or
B counter-clockwise or clockwise
(
Ypage 115).
Only change the temperature setting in small increments. Start at 72 ‡ (22 †).
XTo increase or reduce the temperature in
the rear compartment using the front con-
trol panel: press theábutton.
The indicator lamp in the ábutton goes
out.
The temperature setting for the driver's side
is adopted for the rear compartment and the
front-passenger side.
XTurn thumbwheel :to the left or right
(Ypage 115).
Only change the temperature setting in small
increments. Start at 72 ‡ (22 †).
XTo increase or decrease the rear compart-
ment temperature using the rear control
panel: turn control Mcounter-clockwise or
clockwise on the rear control panel
(
Ypage 115).
Only change the temperature setting in small
increments. Start at 72 ‡ (22 †).
Setting the air distribution
Air distribution settings
Front control panel
P Directs the airflow through the center
vents
O Directs air through the footwell air vents
S Directs the airflow through the center
and footwell vents
¯ Directs air through the defroster vents
b Directs the airflow through the defroster
and center vents (Canada only)
a Directs air through the defroster and
footwell vents
_ Directs the airflow through the defroster,
center and footwell air vents (Canada
only)
Rear control panel
M Directs the airflow through the rear cen-
ter and B-pillar air vents
O Directs air through the footwell air vents
iUsing the rear control panel, you can also
activate both air distribution positions simul-
taneously. In order to do this, press both air
distribution buttons. The air is then routed
through all rear air vents.
iRegardless of the air distribution setting,
airflow is always directed through the side air
vents. The side air vents can only be closed
when the controls on the side air vents are
turned downwards.
Adjusting
XTurn the SmartKey to position 2in the ignition
lock (Ypage 125).
XPress the _button repeatedly until the
desired symbol appears in the display.
Setting the airflow
XTurn the SmartKey to position 2in the ignition
lock (Ypage 125).
XTo increase: press theKbutton.
XTo reduce: press theIbutton.
Operating the climate control systems119
Climate control
Page 122 of 366
iYou can use 3-zone automatic climate con-
trol to set the airflow in the rear compartment
separately.
Switching the ZONE function on/off
XTo activate: press theábutton.
The indicator lamp above the ábutton
lights up.
Dual-zone automatic climate control: the tem-
perature setting for the driver's side is not
adopted for the front-passenger side.
3-zone automatic climate control: the tem-
perature setting for the driver's side is not
adopted for the front-passenger side and the rear compartment.
XTo deactivate: press theábutton.
The indicator lamp above the ábutton
goes out.
Dual-zone automatic climate control: the tem-
perature setting for the driver's side is adop-
ted for the front-passenger side.
3-zone automatic climate control: the tem-
perature setting for the driver's side is adop-
ted for the front-passenger side and the rear
compartment.
Defrosting the windshield
General notes
You can use this function to defrost the wind-
shield or to clear a fogged up windshield or front
side windows on the inside.
Switch off the "Windshield defrosting" function
as soon as the windshield is clear again.
Activating/deactivating
XTurn the SmartKey to position 2in the ignition
lock (Ypage 125).
XTo activate: press the¬button.
The indicator lamp in the ¬button lights
up.
The climate control system switches to the
following settings:
Rhigh airflow
Rhigh temperature
Rair distribution to the windshield and front
side windows
Rair-recirculation mode off
XTo deactivate: press the¬button.
The indicator lamp in the ¬button goes
out. The previously selected settings are
restored. Air-recirculation mode remains
deactivated.
MAX COOL maximum cooling
The MAX COOL function is only available in vehi-
cles for the USA.
MAX COOL is only operational when the engine
is running.
XTo activate: press theÙbutton.
The indicator lamp in the Ùbutton lights
up.
XTo deactivate: press theÙbutton.
The indicator lamp in the Ùbutton goes
out. The previously selected settings are
restored.
When you activate MAX COOL, climate control
switches to the following functions:
Rmaximum cooling
Rmaximum airflow
Rair-recirculation mode on
Defrosting the windows
Windows fogged up on the inside
XActivate the ¿orÁ cooling with air
dehumidification function.
XActivate automatic mode Ã.
XIf the windows continue to fog up, activate the
"windshield defrosting" function
(
Ypage 120).
iYou should only select this setting until the
windshield is clear again.
Windows fogged up on the outside
XActivate the windshield wipers.
XPress the _button repeatedly until the
P orO symbol appears in the display.
iYou should only select this setting until the
windshield is clear again.
120Operating the climate control systems
Climate control