2017 MERCEDES-BENZ GLE43AMG SUV brake
[x] Cancel search: brakePage 70 of 366

if Active Brake Assist with cross-traffic func-
tion alerts you.
In order to maintain the appropriate distance to
the vehicle in front and thus prevent a collision,
you must apply the brakes yourself.
GWARNING
Active Brake Assist with cross-traffic function does not react:
Rto small people, e.g. children
Rto animals
Rto oncoming vehicles
Rwhen cornering
As a result, Active Brake Assist with cross-
traffic function may not warn you or engage in
all critical situations. There is a risk of an acci-
dent.
Always pay careful attention to the traffic sit- uation and be ready to brake.
In the event of snowfall or heavy rain, the rec-
ognition can be impaired.
Recognition by the radar sensor system is also
impaired if:
Rthere is dirt on the sensors or anything else
covering the sensors
Rthere is interference by other radar sources
Rthere are strong radar reflections, for exam-
ple in parking garages
Ra narrow vehicle is traveling in front, e.g. a
motorbike
Ra vehicle is traveling in front on a different line relative to the center of your vehicle
Rvehicles quickly move into the radar sensor
system detection range
Recognition by the camera system is also
impaired in the event of:
Rdirt on the camera or if the camera is covered
Rglare on the camera system, e.g. from the sun being low in the sky
Rdarkness
Ror if:
-pedestrians move quickly, e.g. into the path
of the vehicle
-the camera system no longer recognizes a
pedestrian as a person due to special cloth-ing or other objects
-a pedestrian is concealed by other objects
-the typical outline of a person is not distin-
guishable from the background
Following damage to the front end of the vehic le,
have t
he configuration and operation of the
radar sensors checked at a qualified specialist
workshop. This also applies to collisions at slow
speeds where there is no visible damage to the
front of the vehicle.
Following damage to the windshield, have the
configuration and operation of the camera sys-
tem checked at a qualified specialist workshop.
Function
XTo activate or deactivate: activate or deac-
tivate Active Brake Assist with cross-traffic
function using the on-board computer
(
Ypage 214).
If the Active Brake Assist with cross-traffic
function is deactivated, the æsymbol
appears in the multifunction display.
If you have activated DSR (
Ypage 168), the
Active Brake Assist with cross-traffic function is
deactivated.
Starting at a speed of around 4 mph (7 km/h),
this function warns you if you rapidly approach a
vehicle in front. An intermittent warning tone
will then sound and the ·distance warning
lamp will light up in the instrument cluster.
XBrake immediately to defuse the situation.
or
XTake evasive action provided it is safe to do
so.
Active Brake Assist with cross-traffic function
can also brake the vehicle automatically under
the following conditions:
Rthe driver and front-passenger have their seat
belts fastened
and
Rthe vehicle speed is between approximately
4 mph (7 km/h) and 124 mph (200 km/h)
68Driving safety systems
Safety
Page 71 of 366
Up to a speed of approximately 44 mph
(70 km/h), Active Brake Assist with cross-traffic
function may react to:
Rstationary objects in the path of your vehicle,
e.g. stopped or parked vehicles
Rpedestrians in the path of your vehicle
iIf there is an increased risk of a collision,
preventive passenger protection measures
(PRE-SAFE
®) are triggered (Ypage 53).
If the risk of collision with the vehicle in front
remains and you do not brake, take evasive
action or accelerate significantly, the vehicle
may perform automatic emergency braking, up
to the point of full brake application. Automatic
emergency braking is not performed until imme-
diately prior to an imminent accident.
If you apply the brake yourself in a critical sit-
uation or during autonomous braking, braking
assistance is provided according to the situa-
tion. If necessary, this increases the brake pres-
sure up to full brake application.
To avoid a collision, Active Brake Assist with
cross-traffic function calculates the brake force
necessary if:
Ryou approach an obstacle, and
RActive Brake Assist with cross-traffic function
has detected a risk of a collision
When driving at a speed
under20 mph(30 km/h): if you depress the
brake pedal, Active Brake Assist with cross-traf-
fic function is activated. The increase in brake
pressure from Active Brake Assist with cross-
traffic function is carried out at the last possible
moment.
When driving at a speed
above20 mph(30 km/h): if you depress the
brake pedal sharply, Active Brake Assist with
cross-traffic function automatically increases
the brake pressure to a degree suited to the
traffic situation.
Active Brake Assist with cross-traffic function
provides braking assistance in hazardous situa- tions with vehicles in front within a speed range
between 4 mph (7 km/h) and 155 mph
(250 km/h). Up to a speed of approximately 44 mph
(70 km/h) the Active Brake Assist with cross-
traffic function assists you with braking in haz-
ardous situations with:
Rstationary obstacles in the path of the vehicle,
e.g. stopped or parked vehicles
Rstationary pedestrians in the path of the vehi-
cle
Robstacles crossing your path that move in the
detection range of the sensors and are detec-
ted
XKeep the brake pedal depressed until the
emergency
braking situation is over.
ABS prevents the wheels from locking.
You can prevent the intervent
ion of Active Brake
Assist with cross-traffic function at any time by:
Rdepressing the accelerator pedal further
Ractivating kickdown
Rreleasing the brake pedal
The braking application of Active Brake Assist
with cross-traffic function is ended automati-
cally if:
Ryou maneuver to avoid the obstacle
Rthere is no longer a risk of collision
Rthere is no longer an obstacle detected in
front of your vehicle
STEER CONTROL
General information
STEER CONTROL helps you by transmitting a
noticeable steering force to the steering wheel
in the direction required for vehicle stabilization.
This steering assistance is provided in particular
if:
Rboth right wheels or both left wheels are on a wet or slippery road surface when you brake
Rthe vehicle starts to skid
Important safety notes
iObserve the "Important safety notes" sec-
tion (Ypage 60).
Driving safety systems69
Safety
Z
Page 73 of 366
SmartKey
Important safety notes
GWARNING
If children are left unsupervised in the vehicle,
they could:
Ropen the doors, thus endangering other
people or road users.
Rget out and disrupt traffic.
Roperate the vehicle's equipment.
Additionally, children could set the vehicle in
motion if, for example, they:
Rrelease the parking brake.
Rshifting the automatic transmission out of
park position P
RStart the engine.
There is a risk of an accident and injury.
When leaving the vehicle, always take the
SmartKey with you and lock the vehicle. Never
leave children or animals unattended in the
vehicle. Always keep the SmartKey out of
reach of children.
GWARNING
If you attach heavy or large objects to the
SmartKey, the SmartKey could be uninten-
tionally turned in the ignition lock. This could
cause the engine to be switched off. There is a risk of an accident.
Do not attach any heavy or large objects to the
SmartKey. Remove any bulky key rings before
inserting the SmartKey into the ignition lock.
!Keep the SmartKey away from strong mag-
netic fields. Otherwise, the remote control
function could be affected.
Strong magnetic fields can occur in the vicin-
ity of powerful electrical installations.
Do not keep the SmartKey:
Rwith electronic devices, e.g. a mobile phone
or another SmartKey.
Rwith metallic objects, e.g. coins or metal foil.
Rinside metallic objects, e.g. a metal case.
This can affect the functionality of the Smart- Key. Do not keep the KEYLESS-GO or KEYLESS-GO
Start function key in the temperature-controlled
cup holder. Otherwise, the KEYLESS-GO or KEY-
LESS-GO Start function key will not be detected.
Vehicles with KEYLESS-GO start function:
do
not keep the SmartKey in the cargo compart-
ment. Otherwise, the SmartKey may not be
detected, e.g. when starting the engine using
the Start/Stop button.
SmartKey functions
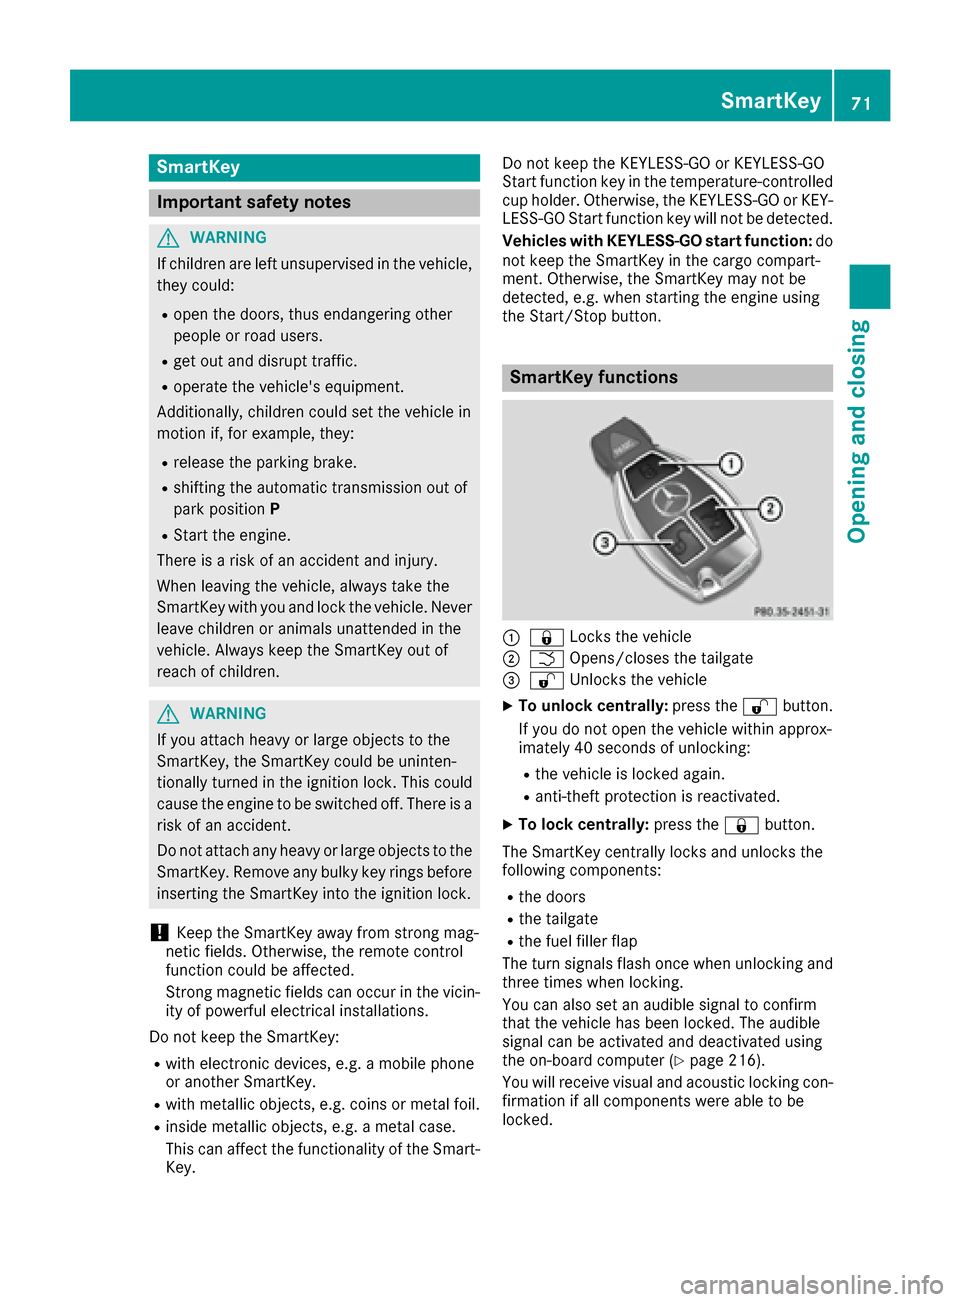
:& Locks the vehicle
;FOpens/closes the tailgate
=%Unlocks the vehicle
XTo unlock centrally: press the%button.
If you do not open the vehicle within approx-
imately 40 seconds of unlocking:
Rthe vehicle is locked again.
Ranti-theft protection is reactivated.
XTo lock centrally: press the&button.
The SmartKey centrally locks and unlocks the
following components:
Rthe doors
Rthe tailgate
Rthe fuel filler flap
The turn signals flash once when unlocking and
three times when locking.
You can also set an audible signal to confirm
that the vehicle has been locked. The audible
signal can be activated and deactivated using
the on-board computer (
Ypage 216).
You will receive visual and acoustic locking con-
firmation if all components were able to be
locked.
SmartKey71
Opening and closing
Z
Page 79 of 366
Doors
Important safet ynotes
GWARNING
If children are lef tunsupervised in th evehicle,
they could:
Rope nth edoors ,thus endangerin gother
people or road users.
Rget out and disrup ttraffic .
Roperat eth evehicle' sequipment.
Additionally, children could set th evehicle in
motion if, fo rexample, they:
Rrelease th eparking brake .
Rshiftingth eautomatic transmissio nout of
par kposition P
RStart theengine.
There is aris kof an acciden tand injury.
Whe nleavin gth evehicle, always take th e
SmartKey wit hyou and loc kth evehicle. Never
leav echildren or animals unattended in th e
vehicle. Always keep th eSmartKey out of
reach of children .
Unlockingan dopening doors from
th einside
You can ope n adoo rfrom insid eth evehicle
eve nif it has bee nlocked. You can only ope nth e
rea rdoors from insid eth evehicle if they are no t
secure dby th echild-proof locks (
Ypage 60).
If th evehicle has previously bee nlocke dfrom
th eoutside, opening adoo rfrom th einsid ewill
trigger th eanti-thef talar msystem. Switc hof f
th ealar m (
Ypage 70).
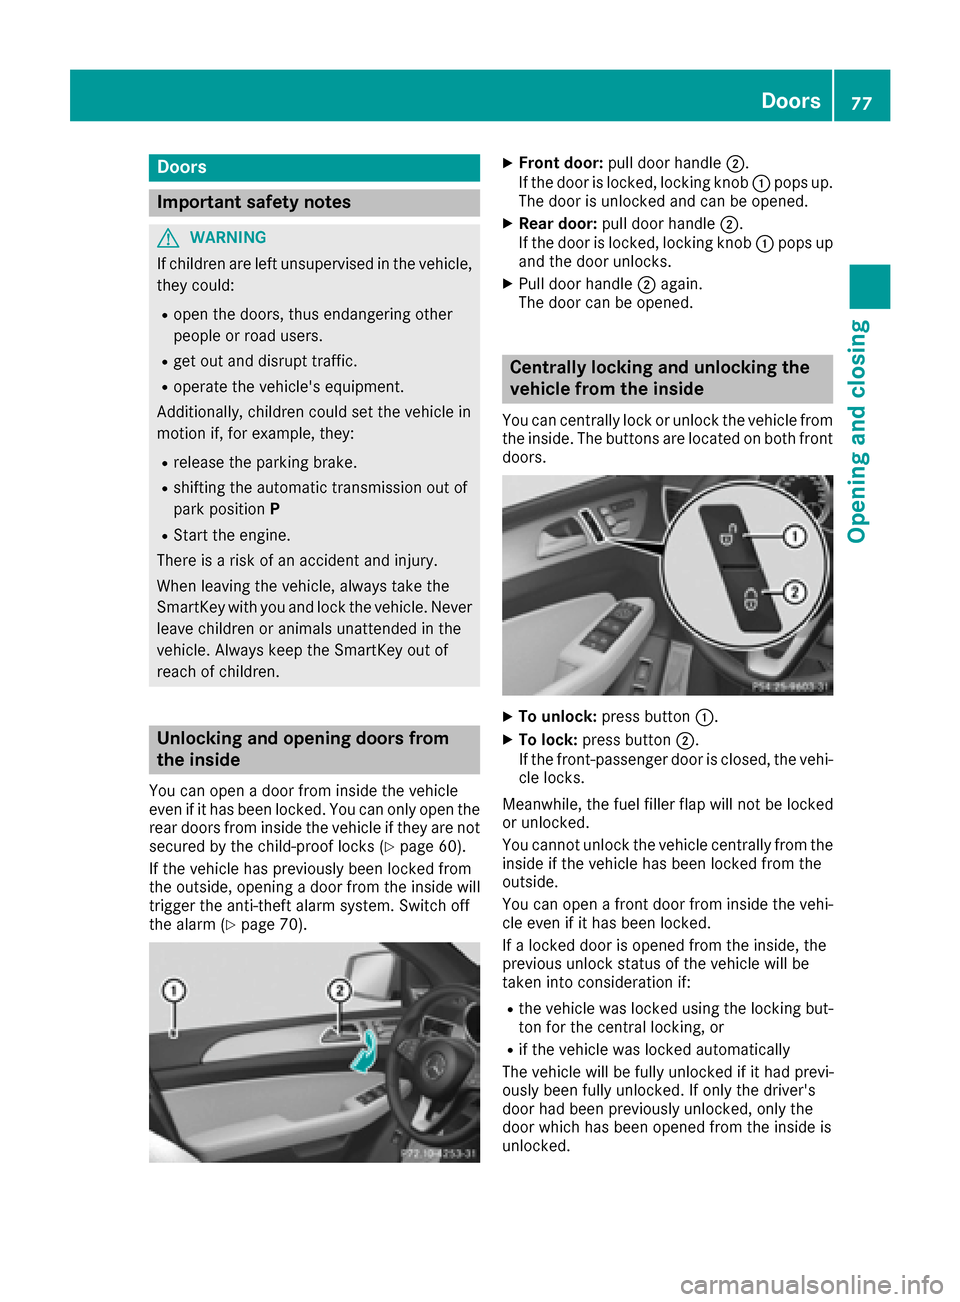
XFront door: pull doorhandle ;.
If th edoo ris locked, locking knob :pop sup.
The doo ris unlocke dand can be opened.
XRea rdoor: pull doo rhandle ;.
If th edoo ris locked, locking knob :pop sup
and th edoo runlocks .
XPull doo rhandle ;again .
The doo rcan be opened.
Centrally locking an dunlocking th e
vehicle from th einside
You can centrall yloc kor unloc kth evehicle from
th einside. The buttons are located on bot hfron t
doors .
XTo unlock :press butto n:.
XTo lock :press butto n;.
If th efront-passenger doo ris closed, th evehi-
cl e locks .
Meanwhile, th efue lfiller flap will no tbe locke d
or unlocked.
You canno tunloc kth evehicle centrall yfrom th e
insid eif th evehicle has bee nlocke dfrom th e
outside.
You can ope n afron tdoo rfrom insid eth evehi-
cl e eve nif it has bee nlocked.
If alocke ddoo ris opene dfrom th einside, th e
previous unloc kstatus of th evehicle will be
take ninto consideration if:
Rth evehicle was locke dusin gth elocking but -
to nfo rth ecentral locking ,or
Rif th evehicle was locke dautomatically
The vehicle will be full yunlocke dif it had previ-
ousl ybee nfull yunlocked. If only th edriver's
doo rhad bee npreviously unlocked, only th e
doo rwhic hhas bee nopene dfrom th einsid eis
unlocked.
Doors77
Opening and closing
Z
Page 108 of 366

The blueKindicator lamp in the instru-
ment cluster lights up when the high-beam
headlamps are switched on.
XTo switch off the high-beam head-
lamps: move the combination switch back to
its normal position.
The blue Kindicator lamp in the instru-
ment cluster goes out.
Vehicles with Adaptive Highbeam Assist: if
Adaptive Highbeam Assist is activated, it auto-
matically controls activation and deactivation of
the high-beam headlamps (
Ypage 107).
Hazard warning lamps
XTo switch on the hazard warning
lamps: press button :.
All turn signals flash. If you now switch on a
turn signal using the combination switch, only
the turn signal lamp on the corresponding
side of the vehicle will flash.
XTo switch off the hazard warning lamps:
press button :.
The hazard warning lamps automatically switch
on if:
Ran air bag is deployed or
Rthe vehicle decelerates rapidly from a speed
of above 45 mph (70 km/h) and comes to a
standstill
The hazard warning lamps switch off automati-
cally if the vehicle reaches a speed of above
6 mph (10 km/h) again after a full brake appli-
cation.
iThe hazard warning lamps still operate if the
ignition is switched off.
Intelligent Light System
General notes
The Intelligent Light System is a system that
adjusts the headlamps automatically to suit the
prevailing driving and weather conditions. It
offers advanced functions for improved illumi-
nation of the road surface, e.g. depending on the
vehicle speed or weather conditions. The sys-
tem includes the active light function, cornering
light function, highway mode and extended
range fog lamps. The system is only active when
it is dark.
You can activate or deactivate the "Intelligent
Light System" using the on-board computer
(
Ypage 216).
Active light function
The active light function is a system that moves
the headlamps according to the steering move-
ments of the front wheels. In this way, relevant
areas remain illuminated while driving. This
allows you to identify pedestrians, cyclists and
animals.
Active: when the lights are switched on.
Vehicles with Lane Keeping Assist: the active
light function evaluates the course of the lane in
which you are driving and pre-emptively con-
trols the active light function.
Vehicles with the drive program S+(Sport Plus):
when the drive program is activated, the active
light function headlamps swing in and out. This
shows that the light setting is in sport mode. The
dynamism of the active light function increases.
Cornering light function
The cornering light function improves the illu-
mination of the road over a wide angle in the
direction you are turning, enabling better visi-
bility in tight bends, for example. It can only be
activated when the low-beam headlamps are
switched on.
Active:
Rif you are driving at speeds below 25 mph
(40 km/h) and switch on the turn signal or
turn the steering wheel
Rif you are driving at speeds between 25 mph
(40 km/h) and 45 mph (70 km/h) and turn
the steering wheel
106Exterior lighting
Lights and windshield wipers
Page 112 of 366
XSwitch on the ignition.
XTurn the combination switch to the corre-
sponding position.
In the ÄorÅ position, the appropriate
wiping frequency is set automatically according
to the intensity of the rain. In the Åposition,
the rain sensor is more sensitive than in
the Ä position, causing the windshield wiper
to wipe more frequently.
Vehicles with MAGIC VISION CONTROL: the
washer fluid is fed through the wiper blades and
when wiping with washer fluid îthe washer
fluid is emitted directly from the blades.
If the wiper blades are worn, the windshield will
no longer be wiped properly. This could prevent
you from observing the traffic conditions.
Replacing the wiper blades
Important safety notes
GWARNING
If the windshield wipers begin to move while
you are changing the wiper blades, you could be trapped by the wiper arm. There is a risk of
injury.
Always switch off the windshield wipers and
ignition before changing the wiper blades.
!Always position the windshield wiper arms
vertically before folding them away from the
windshield. By doing so, you will avoid dam-
age to the hood.
!To avoid damaging the wiper blades, make
sure that you touch only the wiper arm of the
wiper.
!Never open the hood if a windshield wiper
arm has been folded away from the wind-
shield.
Never fold a windshield wiper arm without a
wiper blade back onto the windshield.
Hold the windshield wiper arm firmly when
you change the wiper blade. If you release the
windshield wiper arm without a wiper blade
and it falls onto the windshield, the windshield
may be damaged by the force of the impact.
Mercedes-Benz recommends that you have
the wiper blades changed at a qualified spe-
cialist workshop.
Replacing the wiper blades (standard
wiper blades)
Moving the wiper arms to a vertical posi-
tion
On vehicles without KEYLESS-GO:
XTurn the SmartKey to position 0in the ignition
lock (Ypage 125).
XSet the windshield wiper to position °on
the combination switch.
XTurn the SmartKey to position 1in the ignition
lock (Ypage 125).
XAs soon as the wiper arms are vertical to the
hood, turn the SmartKey to position 0in the
ignition lock (
Ypage 125).
XRemove the SmartKey.
XFold the wiper arms away from the windshield
until you feel them snap into place.
On vehicles with KEYLESS-GO:
XSwitch off the engine.
XRemove your foot from the brake pedal.
XSet the windshield wiper to the °position.
XPress the Start/Stop button repeatedly until
the windshield wiper starts.
XWhen the wiper arms are vertical to the hood,
press the Start/Stop button repeatedly until
the windshield wiper stops.
XFold the wiper arms away from the windshield
until you feel them snap into place.
Removing the wiper blades
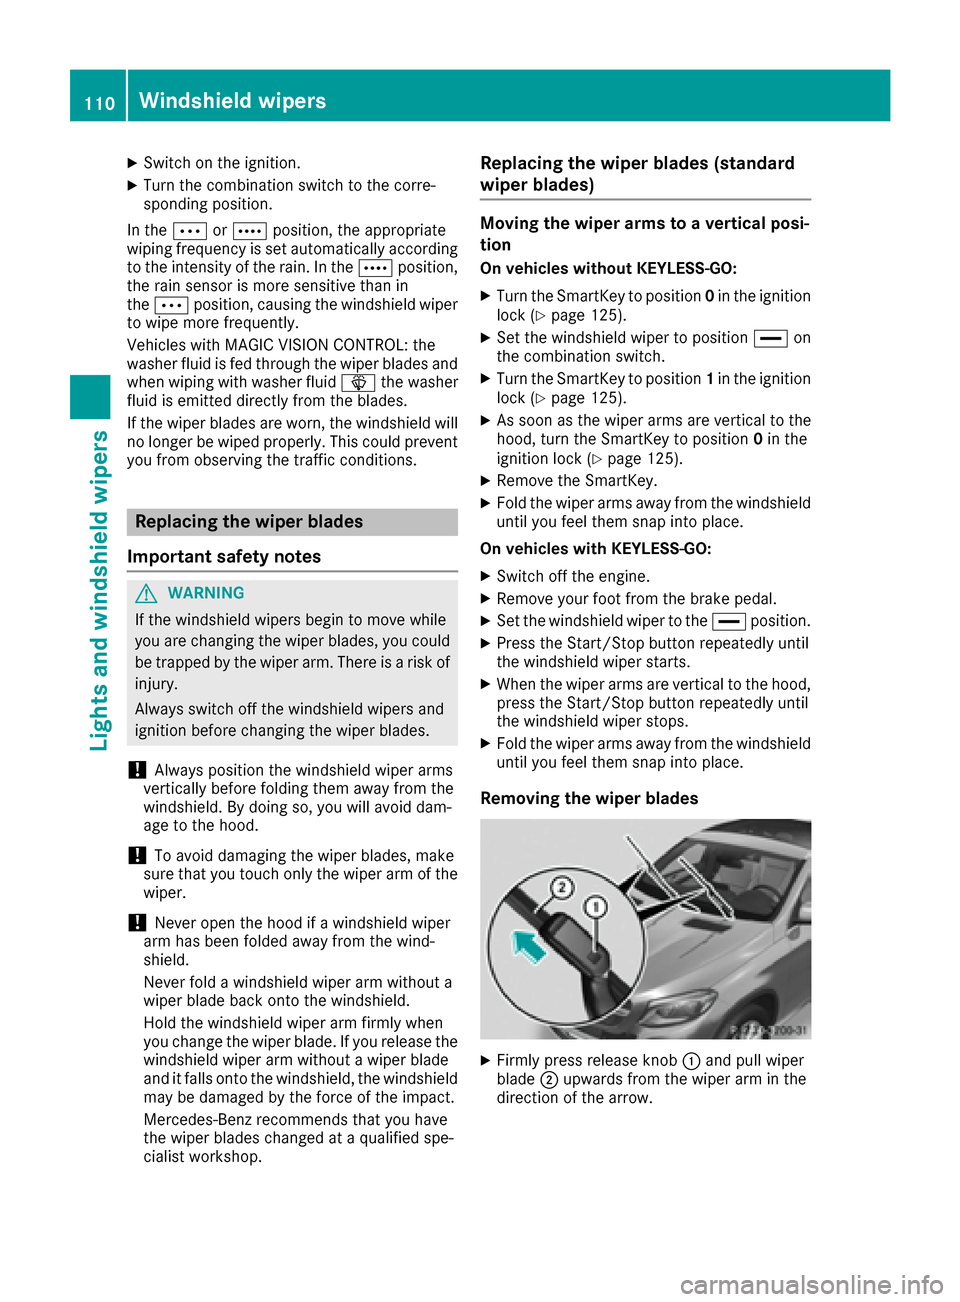
XFirmly press release knob :and pull wiper
blade ;upwards from the wiper arm in the
direction of the arrow.
110Windshield wipers
Lights and windshield wipers
Page 113 of 366
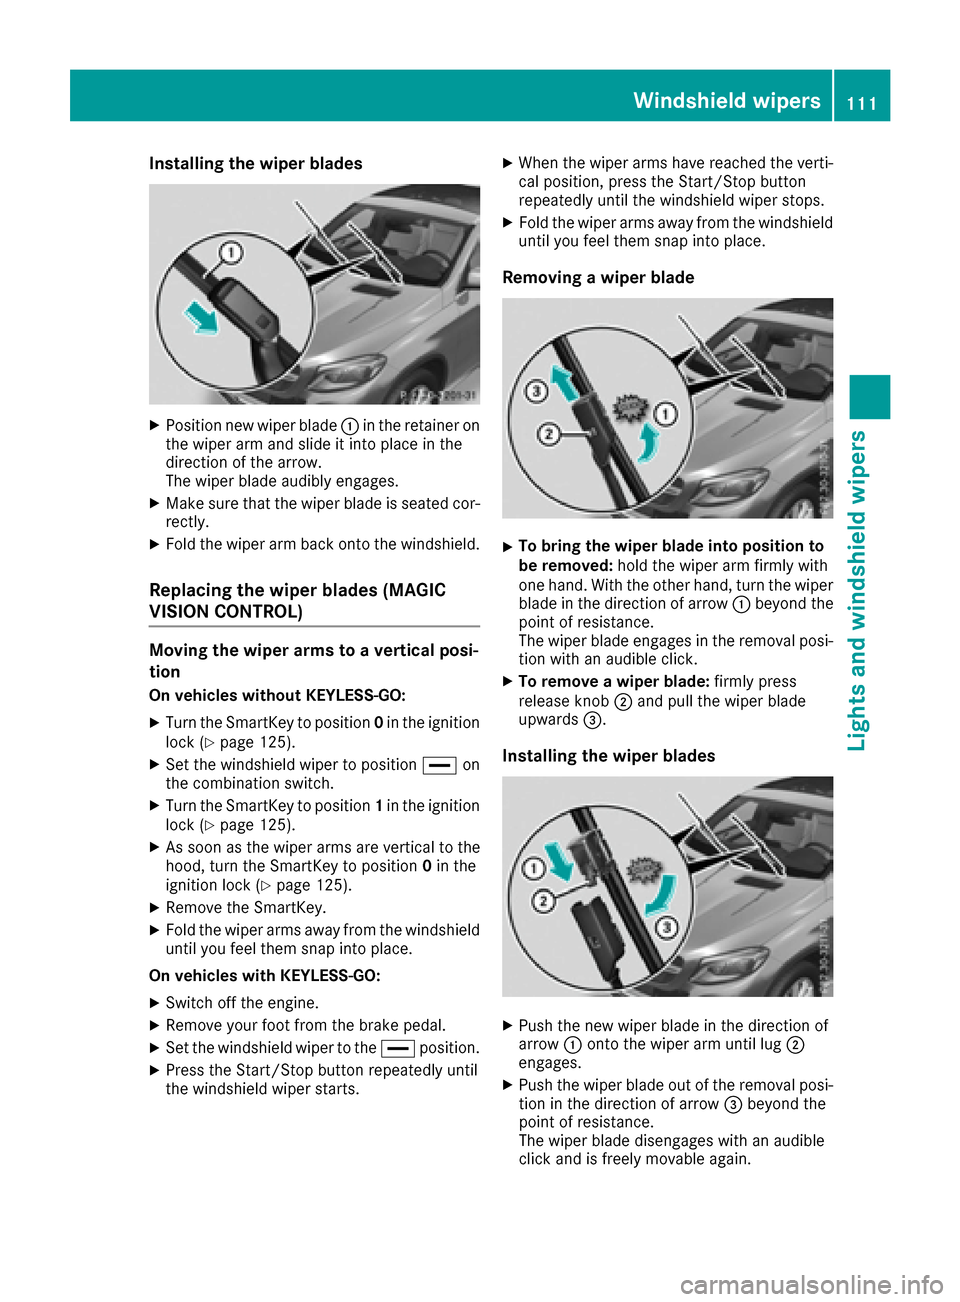
Installing the wiper blades
XPosition newwiper blade:inthe retainer on
the wiper arm and slide itintoplacein the
dire ction of the arrow.
The wiper blade audibly engages.
XMake sure that thewiper blade isseated cor-
rectly.
XFold the wiperarm back onto the windshield.
Replacing the wiper blades (MAGIC
VISION CONTROL)
Moving the wiper arms to a vertical posi-
tion
On vehicles without KEYLESS-GO:
XTurn the SmartKey to position 0in the ignition
lock (Ypage 125).
XSet the windshield wiperto position °on
the co mbination switch.
XTurn the SmartKey to position 1in the ignition
lock (Ypage 125).
XAs soon as the wiperarms are vertical to the
hood, turn the SmartKey to position 0in the
ignition lock (
Ypage 125).
XRemove the SmartKey.
XFold the wiperarms away from the windshield
unt ilyou feel them snap into place.
On vehicles with KEYLESS-GO:
XSwit ch off the engine.
XRemove your foot from the brake pedal.
XSet thewindshield wiperto the °position.
XPress the Start /S top button repeatedly until
the windshield wiperstarts.
XWhen the wiper arms have reached the verti-
cal position, press the Start/Stop button
repeatedly until the windshield wiper stops.
XFo ldthe wiper arms away from the windshield
until you feel them snap into place.
Removing a wiper blade
XTo bring the wiper blade into positi on to
be removed: hold the wiper arm firmly with
one hand. With the other hand, turn thewiper
blade inthe direction of arrow :beyond the
point of resistance.
The wiper blade engages in the removal posi-
tion with an audible click.
XTo remove a wiper blade: firmly press
release knob ;and pull the wiper blade
upwards =.
Installing the wiper blades
XPush the new wiper blade in the direction of
arrow:onto the wiper arm until lug ;
engages.
XPush the wiper blade out of the removal posi- tion inthe direction of arrow =beyond the
point of resistance.
The wiper blade disengages with an audible
click and is freely movable again.
Windshield wipers111
Lights and windshield wipers
Z
Page 126 of 366
Notes on breaking-in a new vehicle
Important safety notes
The sensor system of some driving and driving
safety systems adjusts automatically while a
certain distance is being driven after the vehiclehas been delivered or after repairs. Full system
effectiveness is not reached until the end of this
teach-in procedure.
New and replaced brake pads and discs only
reach their optimum braking effect after several hundred kilometers of driving. Compensate for
this by applying greater force to the brake pedal.
The first 1000 miles (1500 km)
The more you look after the engine when it is
new, the more satisfied you will be with its per-
formance in the future.
RYou should therefore drive at varying vehicle
and engine speeds for the first 1000 miles
(1500 km).
RAvoid heavy loads, e.g. driving at full throttle,during this period.
RChange gear in good time, before the tach-
ometer needle is Ôof the way to the red area
of the tachometer.
RDo not manually shift to a lower gear to brake
the vehicle.
RTry to avoid depressing the accelerator pedal
beyond the point of resistance (kickdown).
Additional breaking-in notes for Mercedes-AMG
vehicles:
RDo not drive faster than 85 mph (140 km/h)
for the first 1,000 miles (1,500 km).
ROnly allow the engine to reach a maximum
engine speed of 4,500 rpm briefly.
RChange gear in good time.
RIdeally, for the first 1,000 miles (1,500 km),
drive in the Comfortdrive program.
After 1000 miles (1500 km),you can increase
th eengin espeed gradually and accelerate th e
vehicl eto full speed.
You should also observ ethese note son break-
in g in if th eengin eor part sof th edri ve tra
in on
your vehicl ehav ebeen replaced.
Always observ eth emaximum permissibl e
speed.
Driving
Impor tant safety notes
GWARNIN G
Objects in th edriver's footwell can restrict th e
pedal travel or obstruct adepressed pedal .
The operating and roa dsafet yof th evehicl eis
jeopardized. There is aris kof an accident.
Mak esur ethat all objects in th evehicl eare
stowed correctly, and that they canno tente r
th edriver's footwell. Install th efloormats
securel yand as specified in order to ensur e
sufficien tclearance for th epedals. Do no tuse
loos efloormats and do no tplac efloormats on
to pof on eanother.
GWARNIN G
Unsuitable footwear can hinder correc tusage
of th epedals, e.g. :
Rshoes withthick sole s
Rshoes withhigh heels
Rslipper s
There is aris kof an accident.
Wear suitable footwear to ensur ecorrec t
usage of th epedals.
GWARNIN G
If you switch off th eignition while driving,
safety-relevant function sare only available
wit hlimitations, or no tat all. This could affect,
for example, th epowe rsteerin gand th ebrak e
boostin geffect. You will require considerably
mor eeffort to steer and brake. There is aris k
of an accident.
Do no tswitch off th eignition while driving.
GWARNIN G
If th eparkin gbrak ehas no tbeen full y
release dwhen driving, th eparkin gbrak ecan :
Roverheat and caus e afire
Rlose it shold function .
There is aris kof fir eand an accident. Releas e
th eparkin gbrak efull ybefore drivin goff .
124Driving
Driving and parking