2017 MERCEDES-BENZ GLE43AMG SUV wheel
[x] Cancel search: wheelPage 183 of 366
Canceling Parking Pilot
XStop the movement of the multifunction
steering wheel or steer yourself.
Parking Pilot is immediately canceled. The
Parking
PilotCanceledmessage appears
in the multifunction display.
or
XPress the Parking Assist PARKTRONIC button
(Ypage 176).
Parking Assist PARKTRONIC is switched off
and Parking Pilot is immediately canceled.
The Parking Pilot Canceled
message
appears in the multifunction display.
Parking Pilot is canceled automatically if:
Rthe electric parking brake is engaged
Rtransmission position Pis selected
Rparking using Parking Pilot is no longer pos-
sible
Ryou are driving faster than 6 mph (10 km/h)
Ra wheel spins, ESP®intervenes or fails. The
÷ warning lamp lights up in the instrument
cluster
A warning tone sounds. The parking symbol dis-
appears and the multifunction display shows the
Parking Pilot Canceled
message.
When Parking Pilot is canceled, you must steer
and brake again yourself.
If a system malfunction occurs, the vehicle is
braked to a standstill. To drive on, depress the
accelerator again.
Rear view camera
General notes
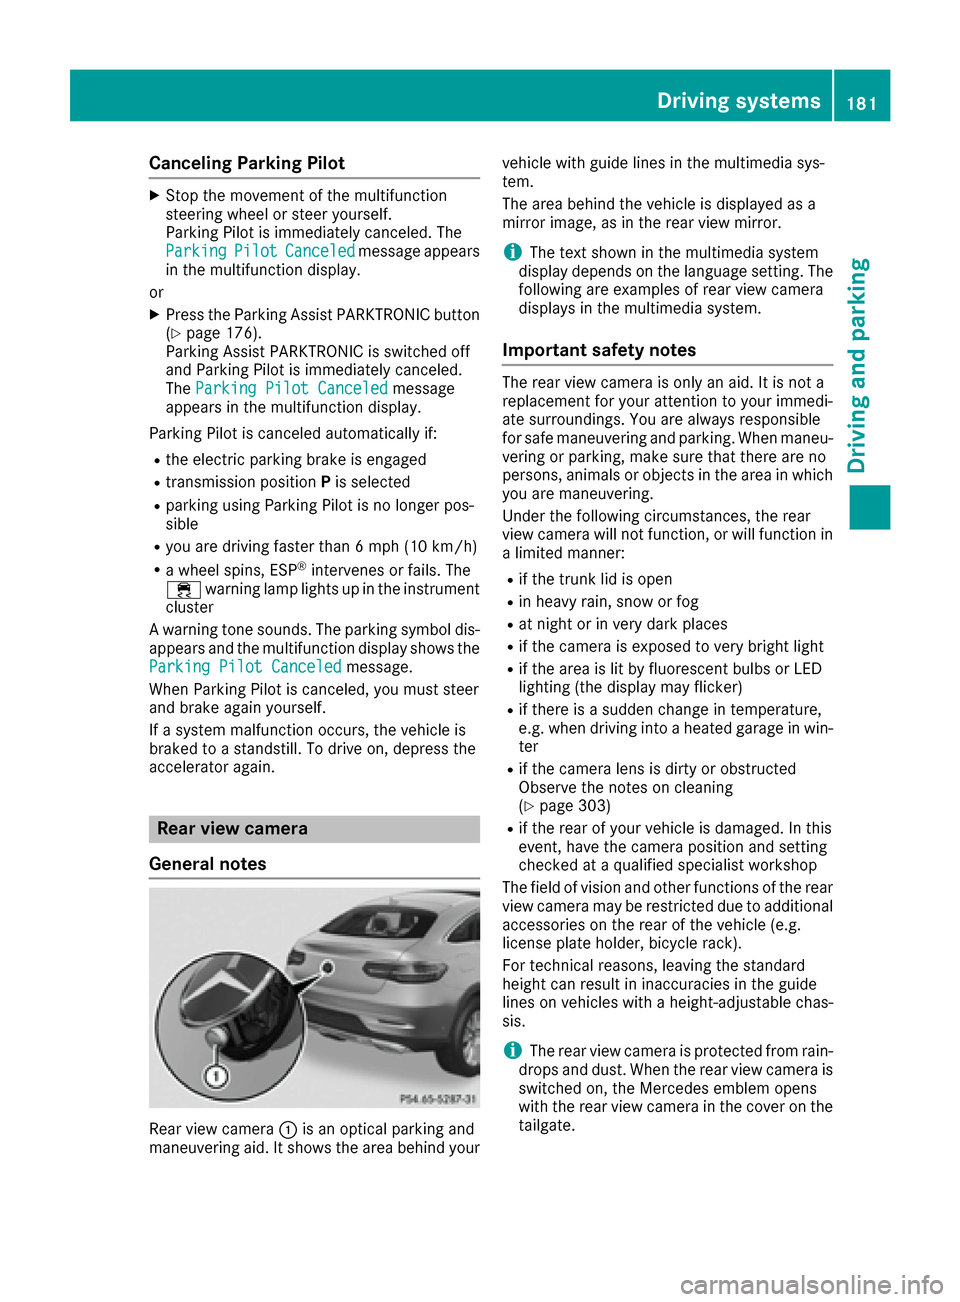
Rear view camera :is an optical parking and
maneuvering aid. It shows the area behind your vehicle with guide lines in the multimedia sys-
tem.
The area behind the vehicle is displayed as a
mirror image, as in the rear view mirror.
iThe text shown in the multimedia system
display depends on the language setting. The
following are examples of rear view camera
displays in the multimedia system.
Important safety notes
The rear view camera is only an aid. It is not a
replacement for your attention to your immedi-
ate surroundings. You are always responsible
for safe maneuvering and parking. When maneu-
vering or parking, make sure that there are no
persons, animals or objects in the area in which you are maneuvering.
Under the following circumstances, the rear
view camera will not function, or will function in
a limited manner:
Rif the trunk lid is open
Rin heavy rain, snow or fog
Rat night or in very dark places
Rif the camera is exposed to very bright light
Rif the area is lit by fluorescent bulbs or LED
lighting (the display may flicker)
Rif there is a sudden change in temperature,
e.g. when driving into a heated garage in win- ter
Rif the camera lens is dirty or obstructed
Observe the notes on cleaning
(
Ypage 303)
Rif the rear of your vehicle is damaged. In this
event, have the camera position and setting
checked at a qualified specialist workshop
The field of vision and other functions of the rear
view camera may be restricted due to additional
accessories on the rear of the vehicle (e.g.
license plate holder, bicycle rack).
For technical reasons, leaving the standard
height can result in inaccuracies in the guide
lines on vehicles with a height-adjustable chas-
sis.
iThe rear view camera is protected from rain-
drops and dust. When the rear view camera is
switched on, the Mercedes emblem opens
with the rear view camera in the cover on the tailgate.
Driving systems181
Driving and parking
Z
Page 184 of 366

The emblem closes again when:
Ryou have finished the maneuvering process
Ryou switch off the engine
Ryou open the trunk
Observe the notes on cleaning (
Ypage 303).
For technical reasons, the emblem may
remain open briefly after the rear view camera
has been deactivated.
Activating/deactivating the rear view
camera
XTo activate: make sure that the SmartKey is
in position 2in the ignition lock.
XMake sure that the Activation by R gearfunction is selected in the multimedia system;
see the Digital Operator's Manual.
XEngage reverse gear.
The rear view camera flap opens. The multi-
media system shows the area behind the vehi-
cle with guide lines.
The image from the rear view camera is avail-
able throughout the maneuvering process.
To deactivate: the rear view camera deacti-
vates if you shift the transmission to Por after
driving forwards a short distance.
Displays in the multimedia system
The rear view camera may show a distorted view
of obstacles, show them incorrectly or not at all.
The rear view camera does not show objects in
the following positions:
Rvery close to the rear bumper
Runder the rear bumper
Rin the area immediately above the tailgate
handle
!Objects not at ground level may appear to
be further away than they actually are, e.g.:
Rthe bumper of a parked vehicle
Rthe drawbar of a trailer
Rthe ball coupling of a trailer tow hitch
Rthe rear section of an HGV
Ra slanted post
Use the guidelines only for orientation.
Approach objects no further than the bottom-
most guideline.
:Yellow guide line at a distance of approx-
imately 13 ft (4.0 m) from the rear of the
vehicle
;White guide line without turning the steering
wheel, vehicle width including the exterior
mirrors (static)
=Yellow guide line for the vehicle width
including the exterior mirrors, for current
steering wheel angle (dynamic)
?Yellow lane marking of the tires at current
steering wheel angle (dynamic)
AYellow guide line at a distance of approx-
imately 3 ft (1.0 m) from the rear of the vehi-
cle
BVehicle center axle (marker assistance)
CBumper
DRed guide line at a distance of approximately
12 in (0.30 m) from the rear of the vehicle
The guide lines are shown when the transmis-
sion is in position R.
The distance specifications only apply to
objects that are at ground level.
182Driving systems
Driving and parking
Page 185 of 366
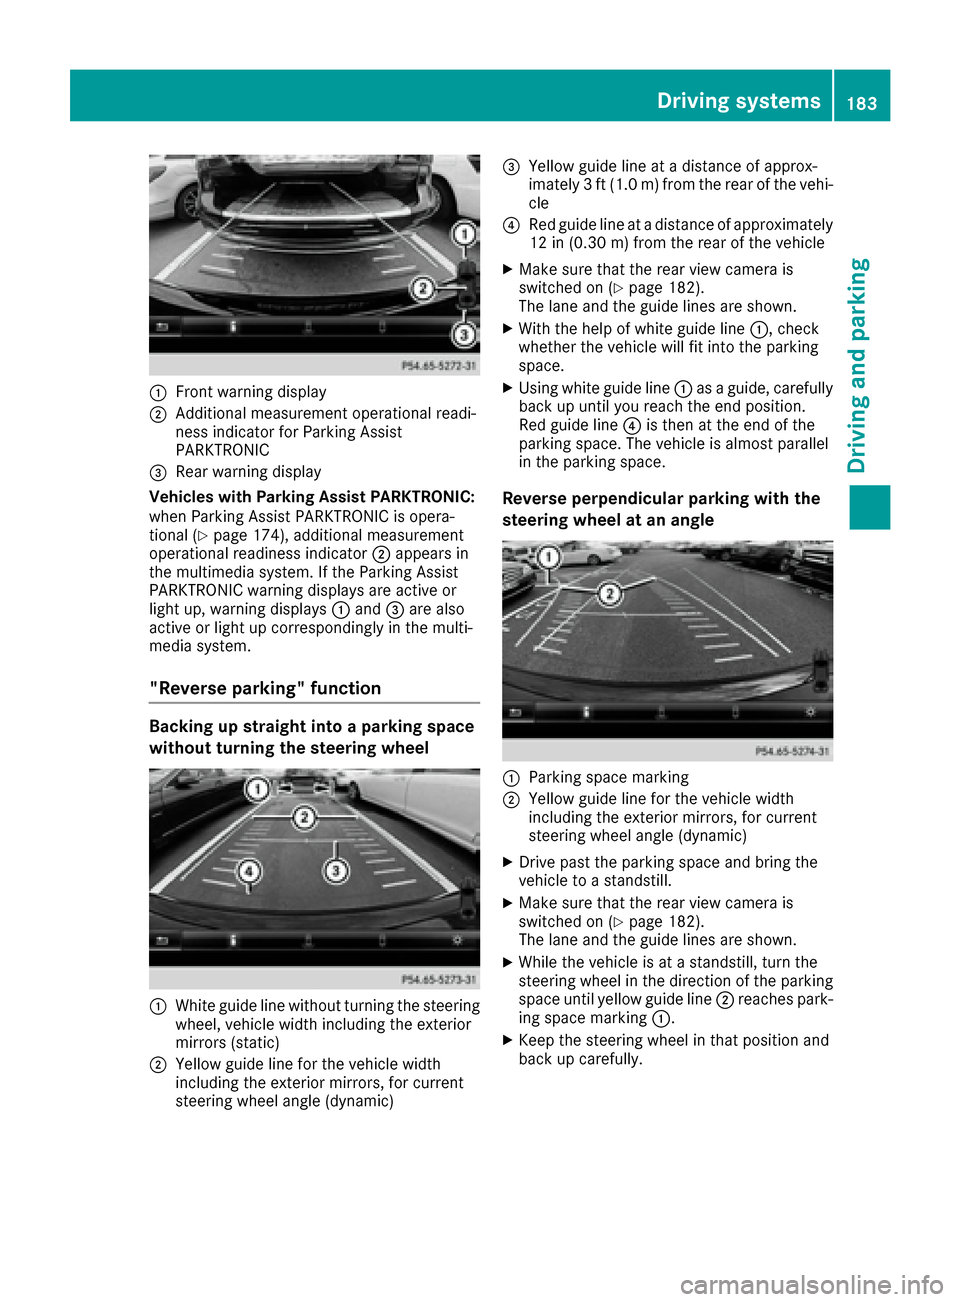
:Front warning display
;Additional measurement operational readi-
ness indicator for Parking Assist
PARKTRONIC
=Rear warning display
Vehicles with Parking Assist PARKTRONIC:
when Parking Assist PARKTRONIC is opera-
tional (
Ypage 174), additional measurement
operational readiness indicator ;appears in
the multimedia system. If the Parking Assist
PARKTRONIC warning displays are active or
light up, warning displays :and =are also
active or light up correspondingly in the multi-
media system.
"Reverse parking" function
Backing up straight into a parking space
without turning the steering wheel
:White guide line without turning the steering
wheel, vehicle width including the exterior
mirrors (static)
;Yellow guide line for the vehicle width
including the exterior mirrors, for current
steering wheel angle (dynamic)
=Yellow guide line at a distance of approx-
imately 3 ft (1.0 m) from the rear of the vehi-
cle
?Red guide line at a distance of approximately
12 in (0.30 m) fromthe rear of the vehicle
XMake sure that the rear view camera is
switched on (Ypage 182).
The lane and the guide lines are shown.
XWith the help of white guide line :, check
whether the vehicle will fit into the parking
space.
XUsing white guide line :as a guide, carefully
back up until you reach the end position.
Red guide line ?is then at the end of the
parking space. The vehicle is almost parallel
in the parking space.
Reverse perpendicular parking with the
steering wheel at an angle
:Parking space marking
;Yellow guide line for the vehicle width
including the exterior mirrors, for current
steering wheel angle (dynamic)
XDrive past the parking space and bring the
vehicle to a standstill.
XMake sure that the rear view camera is
switched on (Ypage 182).
The lane and the guide lines are shown.
XWhile the vehicle is at a standstill, turn the
steering wheel in the direction of the parking
space until yellow guide line ;reaches park-
ing space marking :.
XKeep the steering wheel in that position and
back up carefully.
Driving systems183
Driving an d parking
Z
Page 186 of 366
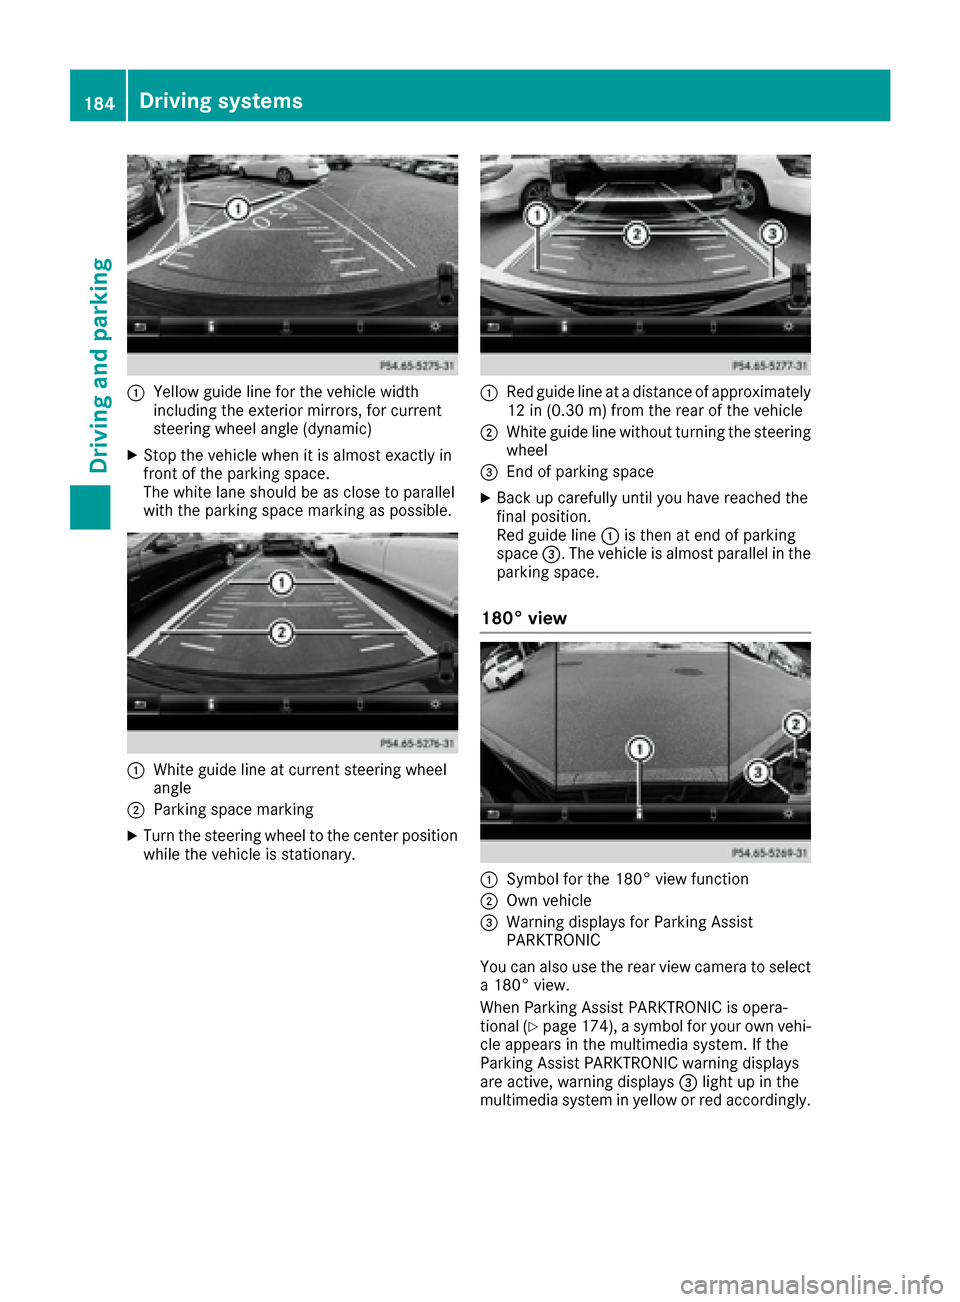
:Yellow guide line for the vehicle width
including the exterior mirrors, for current
steering wheel angle (dynamic)
XStop the vehicle when it is almost exactly in
front of the parking space.
The white lane should be as close to parallel
with the parking space marking as possible.
:White guide line at current steering wheel
angle
;Parking space marking
XTurn the steering wheel to the center position
while the vehicle is stationary.
:Red guide line at a distance of approximately
12 in (0.30 m) from the rear of the vehicle
;White guide line without turning the steering
wheel
=End of parking space
XBack up carefully until you have reached the
final position.
Red guide line:is then at end of parking
space =. The vehicle is almost parallel in the
parking space.
180° view
:Symbol for the 180° view function
;Own vehicle
=Warning displays for Parking Assist
PARKTRONIC
You can also use the rear view camera to select
a 180° view.
When Parking Assist PARKTRONIC is opera-
tional (
Ypage 174), a symbol for your own vehi-
cle appears in the multimedia system. If the
Parking Assist PARKTRONIC warning displays
are active, warning displays =light up in the
multimedia system in yellow or red accordingly.
184Driving systems
Driving and parking
Page 187 of 366
360° camera
General notes
The 360° camera is a system consisting of four
cameras.
The system processes images from the follow-
ing cameras:
RRear view camera
RFront camera
RTwo cameras in the exterior rear view mirrors
The cameras capture the immediate surround-
ings of the vehicle. The system supports you,
e.g. when parking or if vision is restricted at an
exit.
You can show pictures from the 360° camera in
full-screen mode or in seven different split-
screen views on the multimedia system display.
A split-screen view also includes a top view of
the vehicle. This view is calculated from the data
supplied by the installed cameras (virtual cam-
era).
The six split-screen views are:
RTop view and picture from the rear view cam-
era (130° viewing angle)
RTop view and image from the front camera
(130° viewing angle without displaying the
maximum steering wheel angle)
RTop view and enlarged rear view
RTop view and enlarged front view
RTop view and rear-view images from the exte- rior mirror cameras (rear wheel view)
RTop view and forward-view images from the
exterior mirror cameras (front wheel view)
When the function is active and you shift the
transmission from Dor Rto N, the dynamic
guidelines are hidden.
When you change between transmission posi-
tions Dand R, you see the previously selected
front or rear view.
Distances measured by Parking Assist
PARKTRONIC will also be optically displayed:
Rin split screen view as red or yellow brackets around the vehicle icon in the top view, or
Rat the bottom right as red or yellow brackets
around the vehicle symbol in full-screen mode
The line thickness and color of the brackets
show how far the vehicle is away from an object:
Ryellow brackets with thin lines: Parking Assist
PARKTRONIC is active
Ryellow brackets with normal lines: an object is present in close range of the vehicle
Rred line: an object is present in the immediate
close range of the vehicle
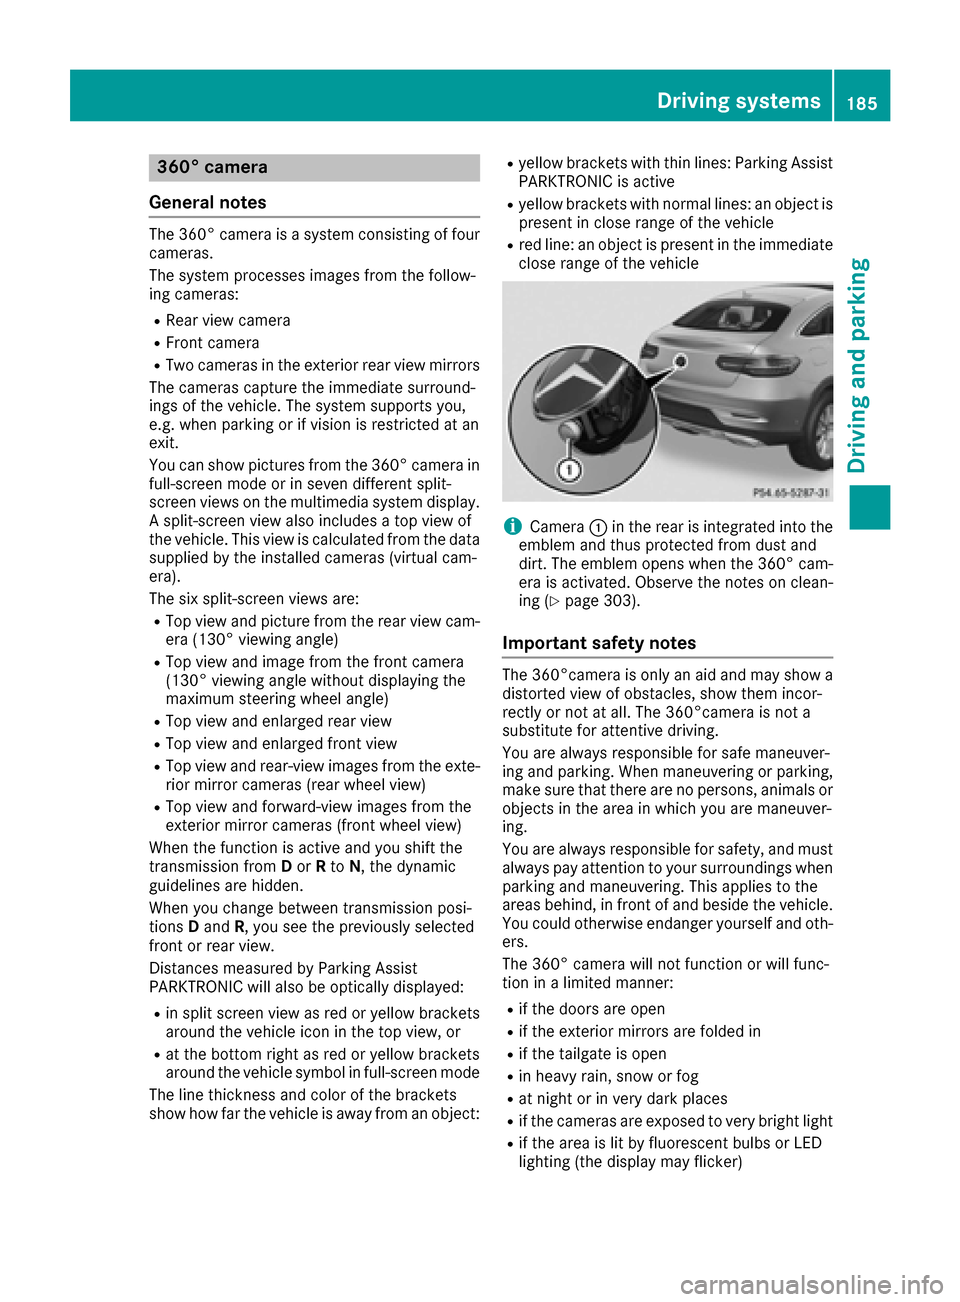
iCamera:in the rear is integrated into the
emblem and thus protected from dust and
dirt. The emblem opens when the 360° cam-
era is activated. Observe the notes on clean-
ing (
Ypage 303).
Important safety notes
The 360°camera is only an aid and may show a
distorted view of obstacles, show them incor-
rectly or not at all. The 360°camera is not a
substitute for attentive driving.
You are always responsible for safe maneuver-
ing and parking. When maneuvering or parking, make sure that there are no persons, animals or
objects in the area in which you are maneuver-
ing.
You are always responsible for safety, and must
always pay attention to your surroundings when parking and maneuvering. This applies to the
areas behind, in front of and beside the vehicle.
You could otherwise endanger yourself and oth-
ers.
The 360° camera will not function or will func-
tion in a limited manner:
Rif the doors are open
Rif the exterior mirrors are folded in
Rif the tailgate is open
Rin heavy rain, snow or fog
Rat night or in very dark places
Rif the cameras are exposed to very bright light
Rif the area is lit by fluorescent bulbs or LED
lighting (the display may flicker)
Driving systems185
Driving and parking
Z
Page 189 of 366
Rvery close to the exterior mirrors
Rin the transitional areas between the various
cameras in the virtual top view
!Objects not at ground level may appear to
be further away than they actually are, e.g.:
Rthe bumper of a parked vehicle
Rthe drawbar of a trailer
Rthe ball coupling of a trailer tow hitch
Rthe rear section of an HGV
Ra slanted post
Use the guidelines only for orientation.
Approach objects no further than the bottom-
most guideline.
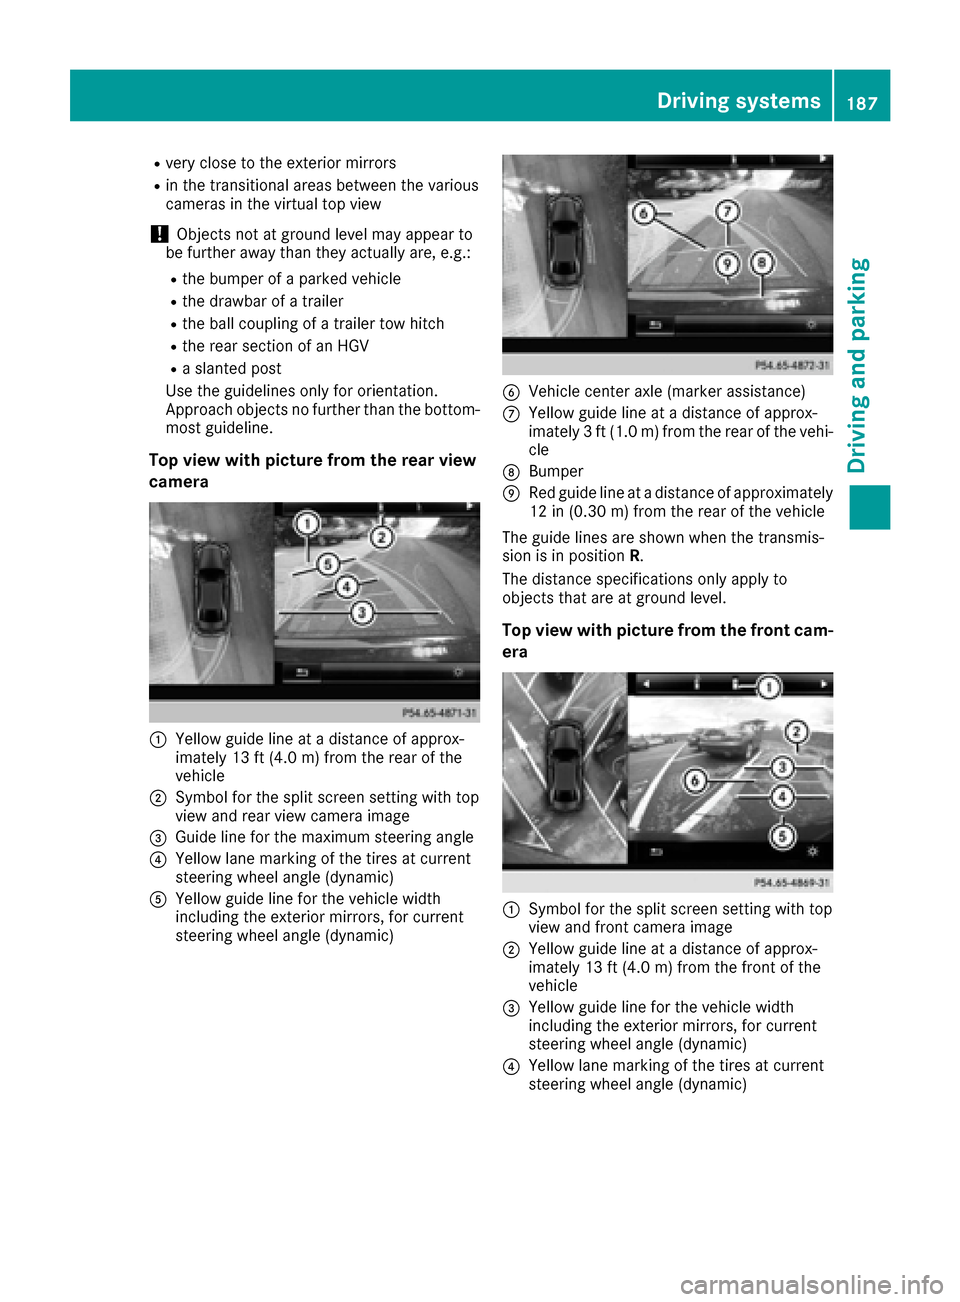
Top view with picture from the rear view
camera
:Yellow guide line at a distance of approx-
imately 13 ft (4.0 m) from the rear of the
vehicle
;Symbol for the split screen setting with top
view and rear view camera image
=Guide line for the maximum steering angle
?Yellow lane marking of the tires at current
steering wheel angle (dynamic)
AYellow guide line for the vehicle width
including the exterior mirrors, for current
steering wheel angle (dynamic)
BVehicle center axle (marker assistance)
CYellow guide line at a distance of approx-
imately 3 ft (1.0 m) from the rear of the vehi-
cle
DBumper
ERed guide line at a distance of approximately
12 in (0.30 m) from the rear of the vehicle
The guide lines are shown when the transmis-
sion is in position R.
The distance specifications only apply to
objects that are at ground level.
Top view with picture from the front cam-
era
:Symbol for the split screen setting with top
view and front camera image
;Yellow guide line at a distance of approx-
imately 13 ft (4.0 m) from the front of the
vehicle
=Yellow guide line for the vehicle width
including the exterior mirrors, for current
steering wheel angle (dynamic)
?Yellow lane marking of the tires at current
steering wheel angle (dynamic)
Driving systems187
Driving and parking
Z
Page 192 of 366
is adapted accordingly and the driver is warned
earlier.
When ATTENTION ASSIST is deactivated, the
Àsymbol and OFF appear in the multifunc-
tion display in the assistance display when the
engine is running.
When ATTENTION ASSIST has been deactivated,
it is automatically reactivated after the engine
has been stopped. The sensitivity selected cor-
responds to the last selection activated (stand-
ard/sensitive).
Warning in the multifunction display
If fatigue or increasing lapses in concentration
are detected, a warning appears in the multi-
function display: Attention
Assist:TakeaBreak!
In addition to the message shown in the multi-
function display, you will then hear a warning
tone.
XIf necessary, take a break.
XConfirm the message by pressing the a
button on the steering wheel.
On long journeys, take regular breaks in good
time to allow yourself to rest. If you do not take
a break, you will be warned again after
15 minutes at the earliest. This will only happen
if ATTENTION ASSIST still detects typical indi-
cators of fatigue or increasing lapses in concen-
tration.
Vehicles with COMAND: if a warning is issued
in the multifunction display, a service station
search is performed in COMAND. You can select a service station and navigation to this service
station will then begin. This function can be acti-
vated and deactivated in COMAND.
Traffic Sign Assist
General notes
Traffic Sign Assist displays the maximum speed
permitted to the driver in the instrument cluster.
The data stored in the navigation system and
general traffic regulations are used to determine
the current speed limit.
As Traffic Sign Assist is a map-based system,
traffic signs put up temporarily (e.g. near road-
works) are not detected. If a traffic sign that is relevant to your vehicle is
passed, the display of the speed limits is upda-
ted.
Traffic signs with a restriction indicated by an
additional sign (e.g. in wet conditions) are also
shown.
The traffic signs are only displayed with the
restrictions if:
Rthe regulation must be observed with the
restriction, or
RTraffic Sign Assist is unable to determine
whether the restriction applies
If Traffic Sign Assist is unable to determine a
maximum permitted speed from any of the avail-
able sources, no speed limit is displayed in the
instrument cluster either.
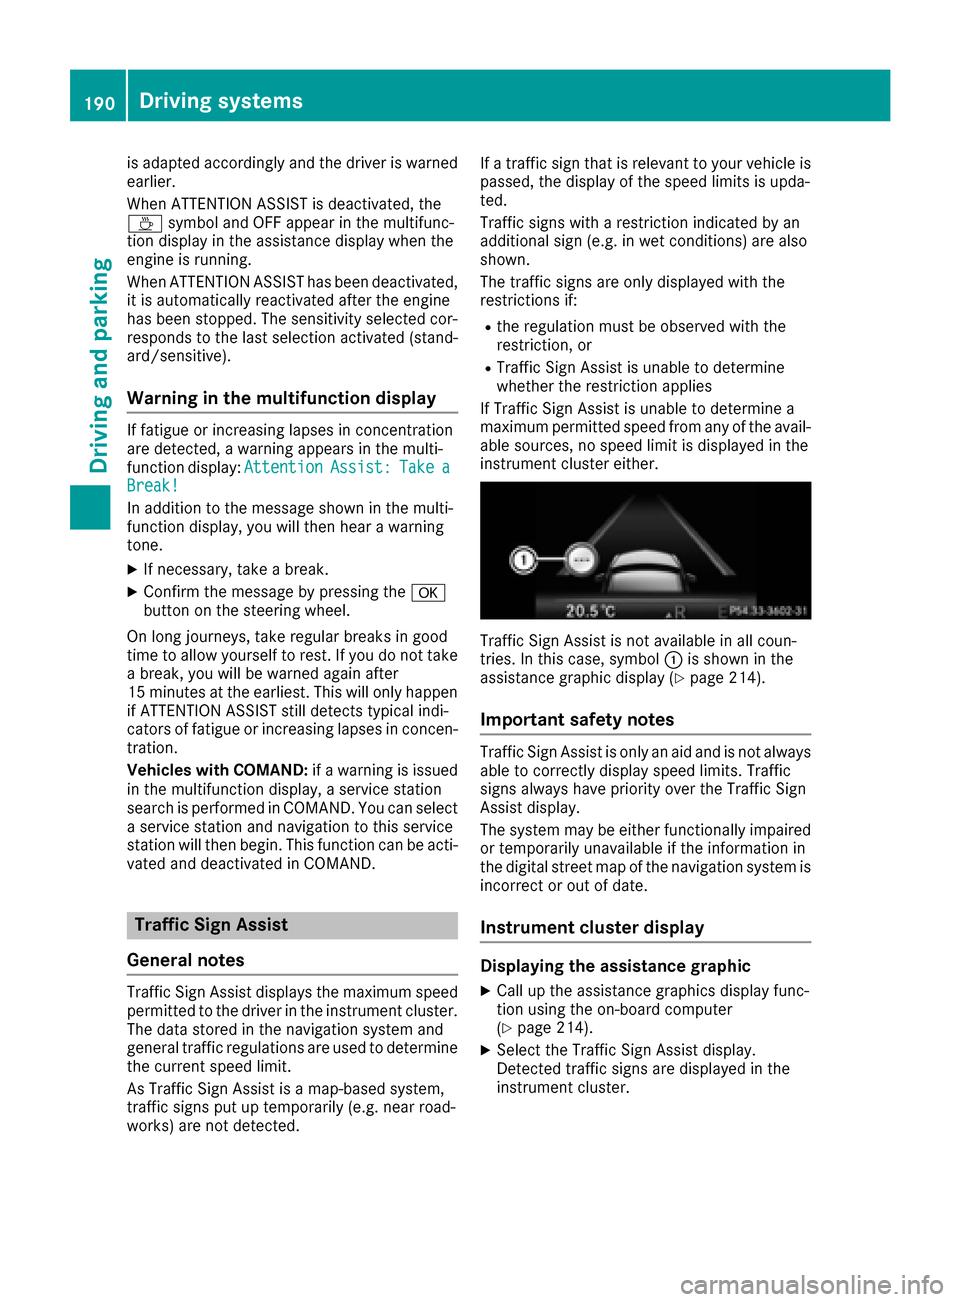
Traffic Sign Assist is not available in all coun-
tries. In this case, symbol :is shown in the
assistance graphic display (
Ypage 214).
Important safety notes
Traffic Sign Assist is only an aid and is not always
able to correctly display speed limits. Traffic
signs always have priority over the Traffic Sign
Assist display.
The system may be either functionally impaired
or temporarily unavailable if the information in
the digital street map of the navigation system is
incorrect or out of date.
Instrument cluster display
Displaying the assistance graphic
XCall up the assistance graphics display func-
tion using the on-board computer
(
Ypage 214).
XSelect the Traffic Sign Assist display.
Detected traffic signs are displayed in the
instrument cluster.
190Driving systems
Driving and parking
Page 195 of 366
Towing a trailer
When you attach a trailer, make sure you have
correctly established the electrical connection.
This can be accomplished by checking the trailer
lighting. In this event, Blind Spot Assist is deac-tivated. The indicator lamp lights up yellow in
the exterior mirrors and the Blind Spot
Assist Not Available When Towing aTrailer See Operator's Manualmessage
appears in the multifunction display.
iYou can deactivate the indicator lamps in
the exterior mirrors.
To do so, switch off Blind Spot Assist when:
Rthe SmartKey is in position 2in the ignition
lock
Rthe engine is not running
Lane Keeping Assist
General notes
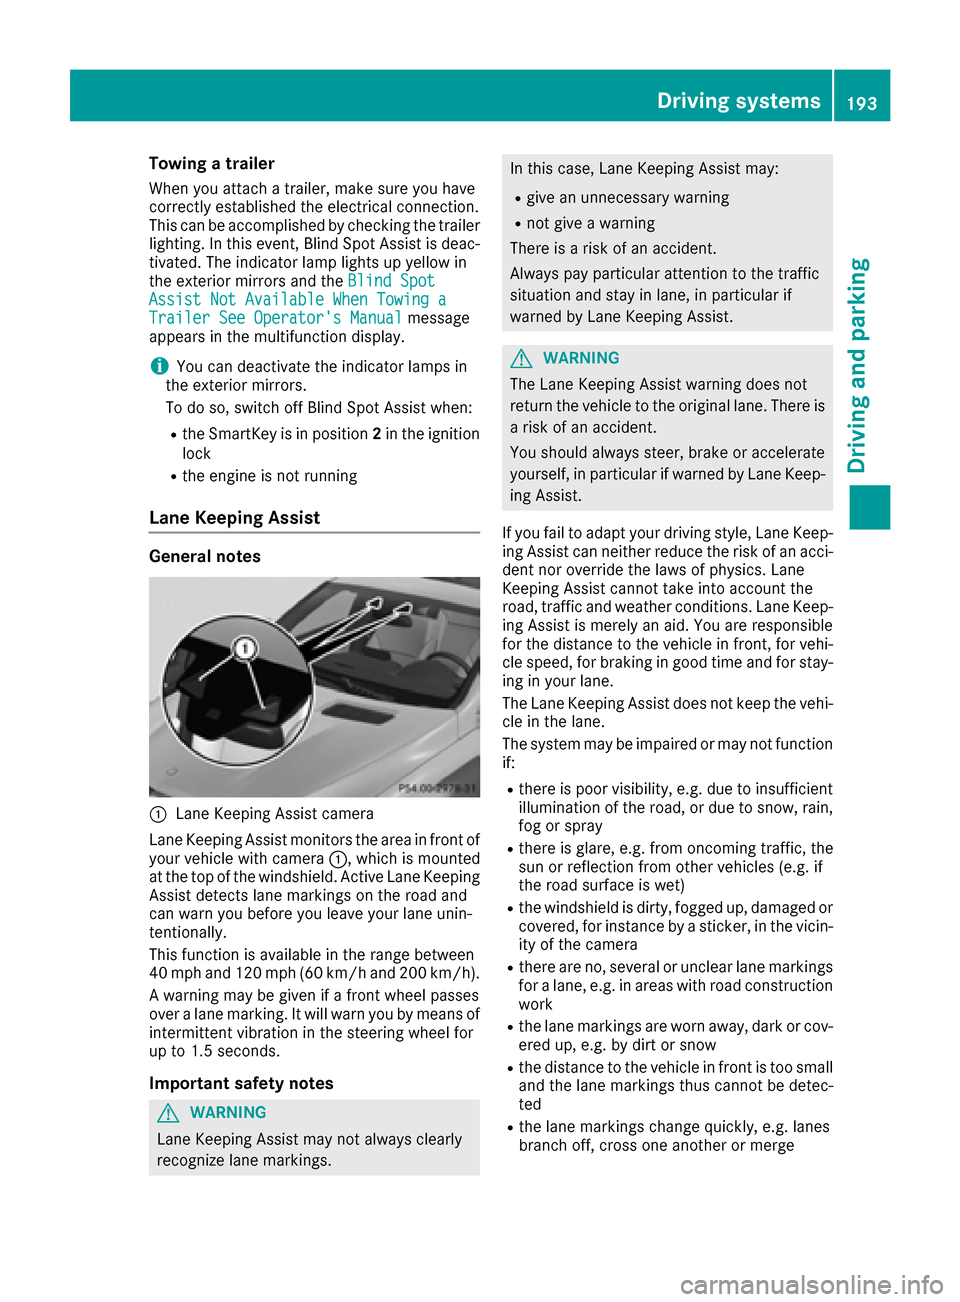
:Lane Keeping Assist camera
Lane Keeping Assist monitors the area in front of
your vehicle with camera :, which is mounted
at the top of the windshield. Active Lane Keeping
Assist detects lane markings on the road and
can warn you before you leave your lane unin-
tentionally.
This function is available in the range between
40 mph and 120 mph (60 km/h and 200 km/h).
A warning may be given if a front wheel passes
over a lane marking. It will warn you by means of
intermittent vibration in the steering wheel for
up to 1.5 second s.
Important safety notes
GWARNING
Lane Keeping Assist may not always clearly
recognize lane markings.
In this case, Lane Keeping Assist may:
Rgive an unnecessary warning
Rnot give a warning
There is a risk of an accident.
Always pay particular attention to the traffic
situation and stay in lane, in particular if
warned by Lane Keeping Assist.
GWARNING
The Lane Keeping Assist warning does not
return the vehicle to the original lane. There is
a risk of an accident.
You should always steer, brake or accelerate
yourself, in particular if warned by Lane Keep-
ing Assist.
If you fail to adapt your driving style, Lane Keep-
ing Assist can neither reduce the risk of an acci-
dent nor override the laws of physics. Lane
Keeping Assist cannot take into account the
road, traffic and weather conditions. Lane Keep- ing Assist is merely an aid. You are responsible
for the distance to the vehicle in front, for vehi-
cle speed, for braking in good time and for stay-
ing in your lane.
The Lane Keeping Assist does not keep the vehi-
cle in the lane.
The system may be impaired or may not function
if:
Rthere is poor visibility, e.g. due to insufficient
illumination of the road, or due to snow, rain,
fog or spray
Rthere is glare, e.g. from oncoming traffic, the
sun or reflection from other vehicles (e.g. if
the road surface is wet)
Rthe windshield is dirty, fogged up, damaged or
covered, for instance by a sticker, in the vicin-
ity of the camera
Rthere are no, several or unclear lane markings
for a lane, e.g. in areas with road construction
work
Rthe lane markings are worn away, dark or cov-
ered up, e.g. by dirt or snow
Rthe distance to the vehicle in front is too small
and the lane markings thus cannot be detec-
ted
Rthe lane markings change quickly, e.g. lanes
branch off, cross one another or merge
Driving systems193
Driving and parking
Z