2017 MERCEDES-BENZ GLC SUV Left door
[x] Cancel search: Left doorPage 43 of 374
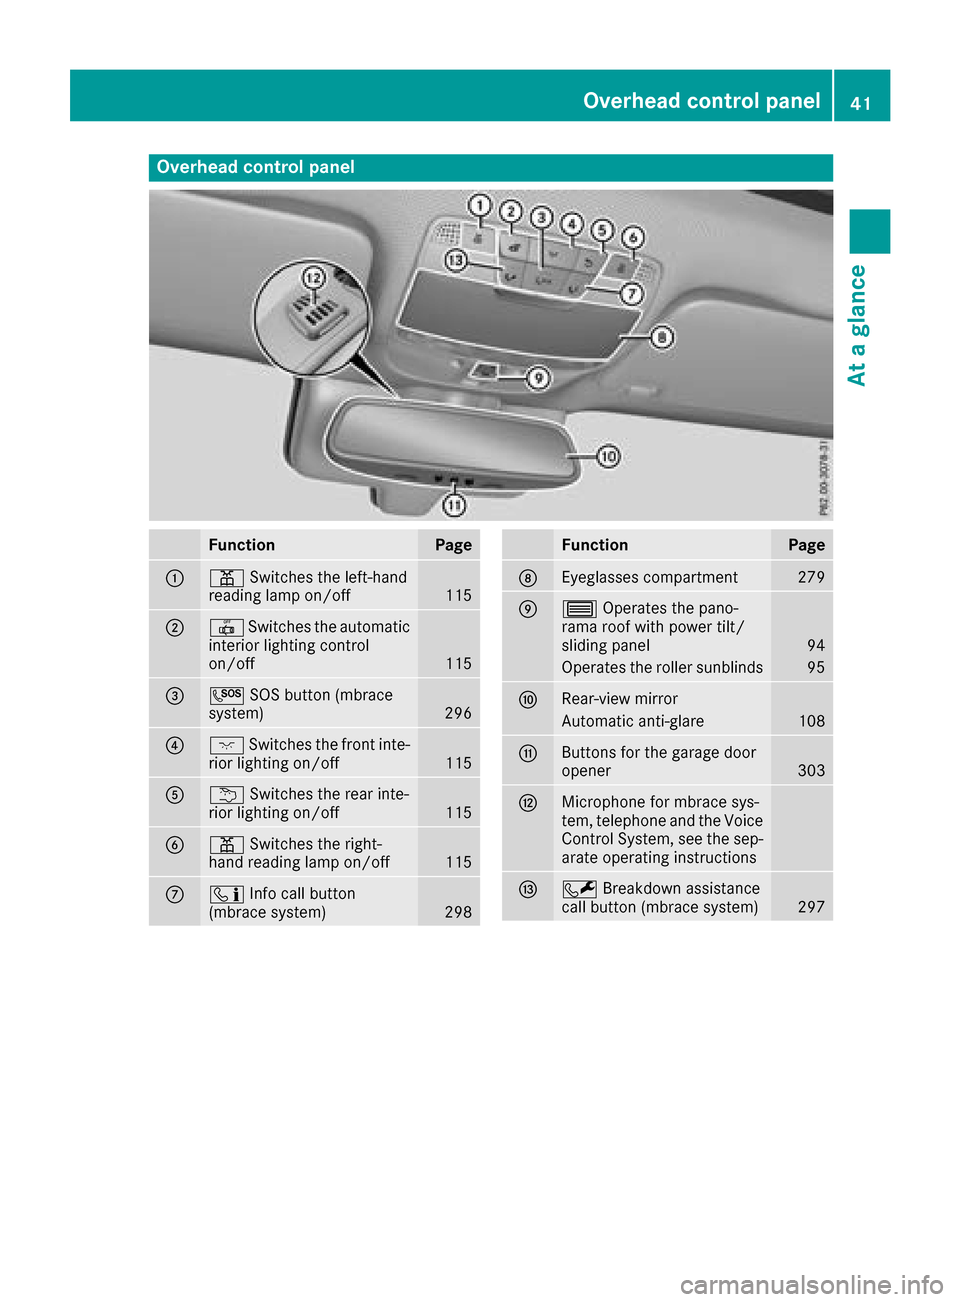
Overhead control panel
FunctionPage
:pSwitches the left-hand
reading lamp on/off115
;| Switches the automatic
interior lighting control
on/off
115
=G SOS button (mbrace
system)296
?c Switches the front inte-
rior lighting on/off115
Au Switches the rear inte-
rior lighting on/off115
Bp Switches the right-
hand reading lamp on/off115
Cï Info call button
(mbrace system)298
FunctionPage
DEyeglasses compartment279
E3 Operates the pano-
rama roof with power tilt/
sliding panel
94
Operates the roller sunblinds95
FRear-view mirror
Automatic anti-glare108
GButtons for the garage door
opener303
HMicrophone for mbrace sys-
tem, telephone and the Voice
Control System, see the sep-
arate operating instructions
IF Breakdown assistance
call button (mbrace system)297
Overhead control panel41
At a glance
Page 44 of 374
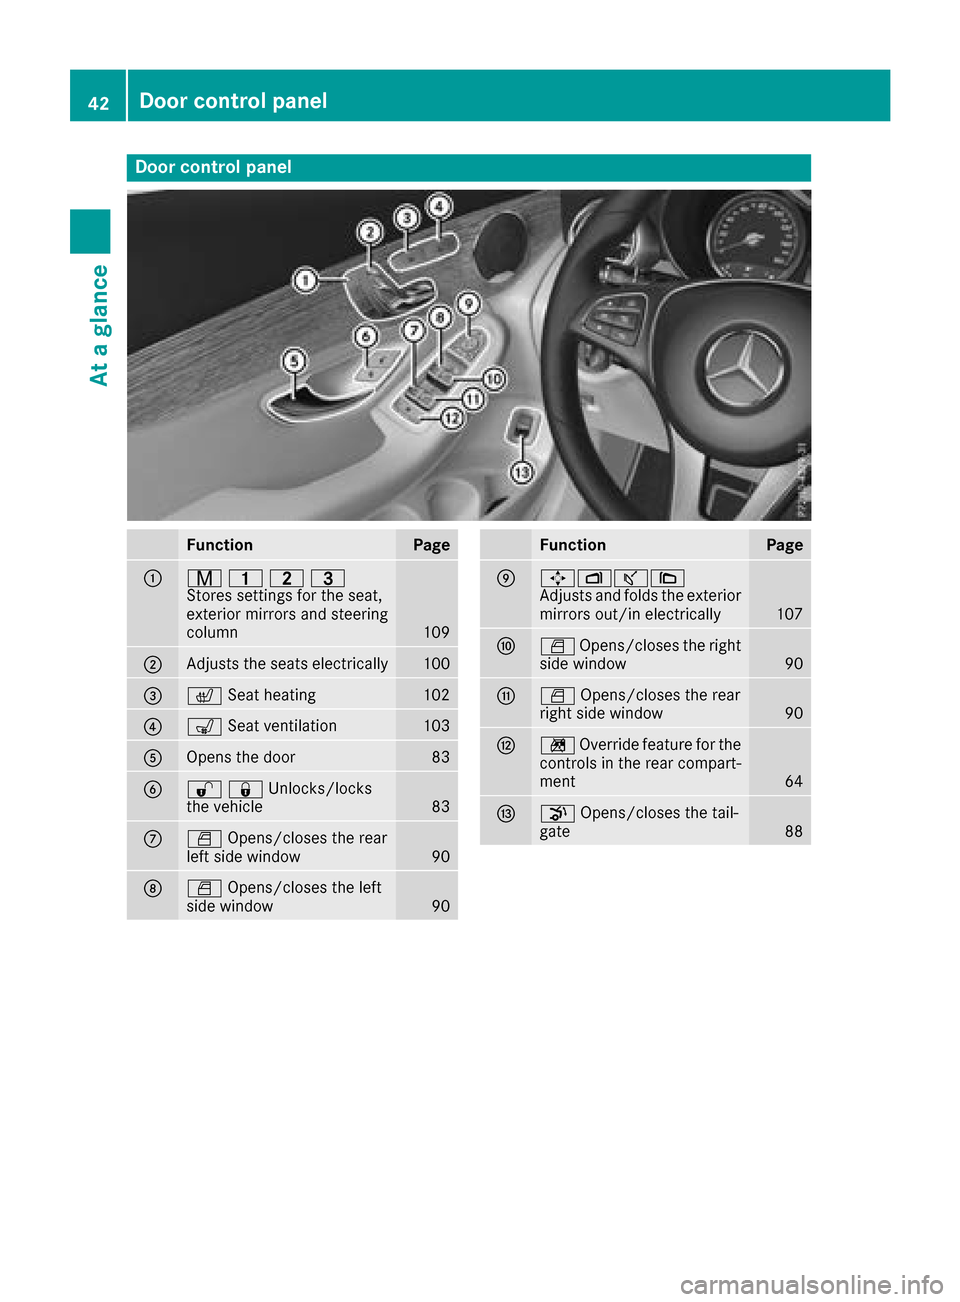
Door controlpanel
FunctionPage
:r 45=
Stores settings for the seat,
exterior mirrors and steering
column
109
;Adjusts the seats electrically100
=c Seat heating102
?sSeat ventilation103
AOpens the door83
B%&Unlocks/locks
the vehicle83
CWOpens/closes the rear
left side window90
DW Opens/closes the left
side window90
FunctionPage
E7Zª\
Adjusts and folds the exterior
mirrors out/in electrically
107
FW Opens/closes the right
side window90
GW Opens/closes the rear
right side window90
Hn Override feature for the
controls in the rear compart-
ment
64
Ip Opens/closes the tail-
gate88
42Door control panel
At a glance
Page 49 of 374
Fastening and adjusting the seat belts
Observeth esafet ynote son th eseat belt
(Ypage 45) and th enote son correct use of seat
belt s (Ypage 46) .
If th ecente rrear seat belt is bein gused, also
observ eth einformation about th eseat belt for
th ecente rrear seat (
Ypage 47).
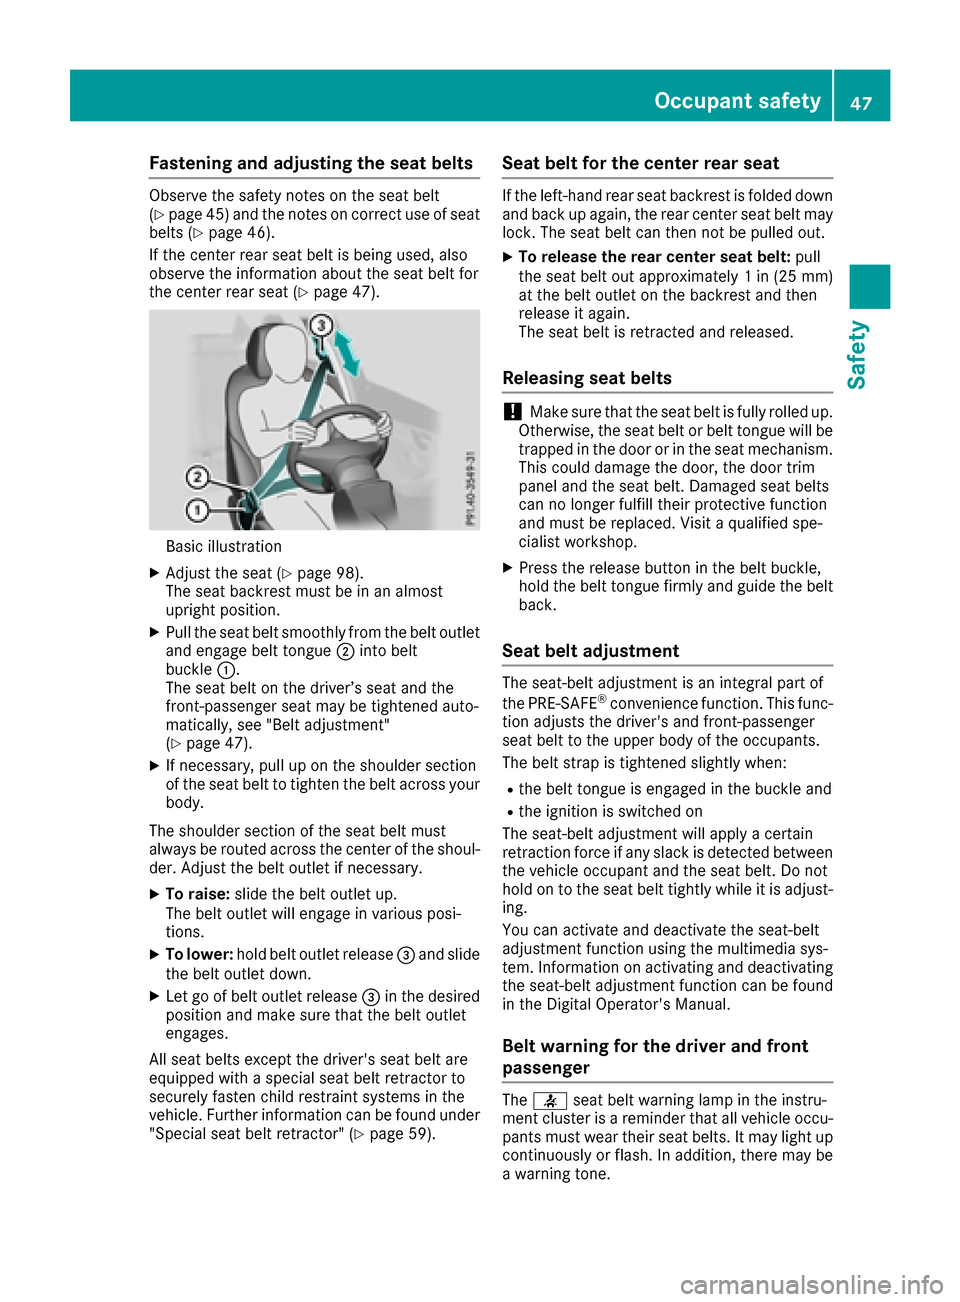
Basic illustration
XAdjustth eseat (Ypage 98).
The seat backrest must be in an almost
upright position .
XPull theseat belt smoothly from th ebelt outlet
and engage belt tongue ;intobelt
buckle :.
The seat belt on th edriver’s seat and th e
front-passenger seat may be tightened auto -
matically, see "Belt adjustment"
(
Ypage 47).
XIf necessary, pull up on th eshoulder section
of th eseat belt to tighten th ebelt across your
body.
The shoulder section of th eseat belt must
always be routed across th ecente rof th eshoul-
der .Adjus tth ebelt outlet if necessary.
XTo raise: slide thebelt outlet up.
The belt outlet will engage in various posi-
tions.
XTo lower :hold belt outlet release =and slide
th ebelt outlet down .
XLet go of belt outlet release =in th edesired
position and mak esure that th ebelt outlet
engages.
All seat belt sexcep tth edriver' sseat belt are
equipped wit h aspecial seat belt retracto rto
securel yfaste nchild restrain tsystems in th e
vehicle. Further information can be foun dunder
"Special seat belt retractor" (
Ypage 59).
Seat belt for the center rear seat
If theleft-han drear seat backrest is folded down
and bac kup again ,th erear cente rseat belt may
lock. The seat belt can then no tbe pulled out .
XTo releaseth erea rcenter sea tbelt :pull
th eseat belt out approximately 1in (25 mm )
at th ebelt outlet on th ebackrest and then
release it again .
The seat belt is retracte dand released.
Releasing seat belts
!Mak esure that th eseat belt is fully rolled up.
Otherwise, th eseat belt or belt tongue will be
trapped in th edoor or in th eseat mechanism .
This could damag eth edoor ,th edoor trim
panel and th eseat belt .Damaged seat belt s
can no longer fulfill their protective function
and must be replaced. Visit aqualified spe-
cialist workshop.
XPress th erelease butto nin th ebelt buckle,
hold th ebelt tongue firmly and guide th ebelt
back.
Seat belt adjustment
The seat-belt adjustmen tis an integral part of
th ePRE-SAF E®convenience function .This func-
tion adjust sth edriver' sand front-passenger
seat belt to th eupper body of th eoccupants.
The belt strap is tightened slightly when :
Rthebelt tongue is engage din th ebuckle and
Rth eignition is switched on
The seat-belt adjustmen twill apply acertai n
retraction force if any slac kis detected between
th evehicl eoccupant and th eseat belt .Do no t
hold on to th eseat belt tightly while it is adjust -
ing .
You can activat eand deactivat eth eseat-belt
adjustmen tfunction usin gth emultimedia sys-
tem. Information on activating and deactivating
th eseat-belt adjustmen tfunction can be foun d
in th eDigital Operator's Manual.
Belt warning for the driver and front
passenger
The 7 seat belt warning lamp in th einstru-
men tcluste ris areminder that all vehicl eoccu-
pants must wear their seat belts. It may ligh tup
continuously or flash. In addition ,there may be
a warning tone .
Occupant safety47
Safety
Z
Page 78 of 374
Protection against theft
Immobilizer
The immobilizer prevents your vehicle from
being started without the correct SmartKey.
XTo activate with the SmartKey:remove the
SmartKey from the ignition lock.
XTo activate with KEYLESS-GO start-func-
tion or KEYLESS-GO: switch the ignition off
and open the driver's door.
XTo deactivate: switch on the ignition.
When leaving the vehicle, always take the
SmartKey with you and lock the vehicle. Anyone
can start the engine if a valid SmartKey has been
left inside the vehicle.
iThe immobilizer is always deactivated when
you start the engine.
In the event that the engine cannot be started
(yet the vehicle's battery is charged), the sys-
tem is not operational. Contact an authorized
Mercedes-Benz Center or call
1-800-FOR-MERCedes (in the USA) or
1-800-387-0100 (in Canada).
ATA (anti-theft alarm system)
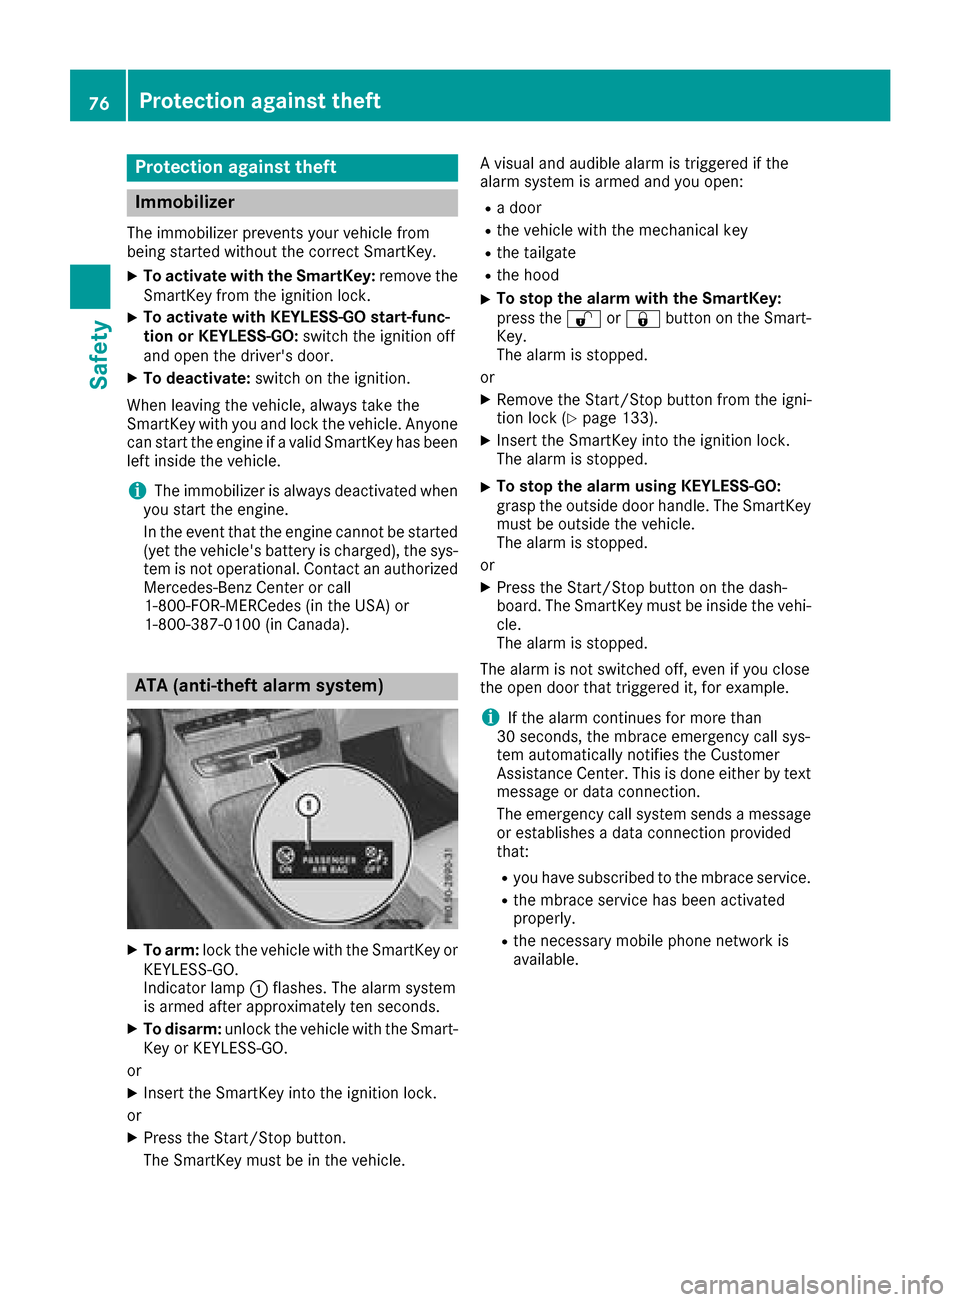
XTo arm: lock the vehicle with the SmartKey or
KEYLESS-GO.
Indicator lamp :flashes. The alarm system
is armed after approximately ten seconds.
XTo disarm: unlock the vehicle with the Smart-
Key or KEYLESS-GO.
or
XInsert the SmartKey into the ignition lock.
or
XPress the Start/Stop button.
The SmartKey must be in the vehicle. A visual and audible alarm is triggered if the
alarm system is armed and you open:
Ra door
Rthe vehicle with the mechanical key
Rthe tailgate
Rthe hood
XTo stop the alarm with the SmartKey:
press the
%or& button on the Smart-
Key.
The alarm is stopped.
or
XRemove the Start/Stop button from the igni-
tion lock (Ypage 133).
XInsert the SmartKey into the ignition lock.
The alarm is stopped.
XTo stop the alarm using KEYLESS-GO:
grasp the outside door handle. The SmartKey
must be outside the vehicle.
The alarm is stopped.
or
XPress the Start/Stop button on the dash-
board. The SmartKey must be inside the vehi-
cle.
The alarm is stopped.
The alarm is not switched off, even if you close
the open door that triggered it, for example.
iIf the alarm continues for more than
30 seconds, the mbrace emergency call sys-
tem automatically notifies the Customer
Assistance Center. This is done either by text
message or data connection.
The emergency call system sends a message
or establishes a data connection provided
that:
Ryou have subscribed to the mbrace service.
Rthe mbrace service has been activated
properly.
Rthe necessary mobile phone network is
available.
76Protection against theft
Safety
Page 79 of 374
SmartKey
Important safety notes
GWARNING
If children are left unsupervised in the vehicle,
they could:
Ropen the doors, thus endangering other
people or road users.
Rget out and disrupt traffic.
Roperate the vehicle's equipment.
Additionally, children could set the vehicle in
motion if, for example, they:
Rrelease the parking brake.
Rshifting the automatic transmission out of
park position P
RStart the engine.
There is a risk of an accident and injury.
When leaving the vehicle, always take the
SmartKey with you and lock the vehicle. Never
leave children or animals unattended in the
vehicle. Always keep the SmartKey out of
reach of children.
GWARNING
If you attach heavy or large objects to the
SmartKey, the SmartKey could be uninten-
tionally turned in the ignition lock. This could
cause the engine to be switched off. There is a risk of an accident.
Do not attach any heavy or large objects to the
SmartKey. Remove any bulky key rings before
inserting the SmartKey into the ignition lock.
!Keep the SmartKey away from strong mag-
netic fields. Otherwise, the remote control
function could be affected.
Strong magnetic fields can occur in the vicin-
ity of powerful electrical installations.
Do not keep the SmartKey:
Rwith electronic devices, e.g. a mobile phone
or another SmartKey.
Rwith metallic objects, e.g. coins or metal foil.
Rinside metallic objects, e.g. a metal case.
This can affect the functionality of the Smart- Key. Vehicles with KEYLESS-GO start function:
do
not keep the SmartKey in the cargo compart-
ment. Otherwise, the SmartKey may not be
detected, e.g. when starting the engine using
the Start/Stop button.
A brief radio connection between the vehicle
and the SmartKey determines whether a valid
SmartKey is in, or in the direct vicinity of, the
vehicle. This occurs, for example:
Rwhen starting the engine
Rwhile driving
Rwhen using HANDS-FREE ACCESS
Rwhen the external door handles are touched
Rduring convenience closing
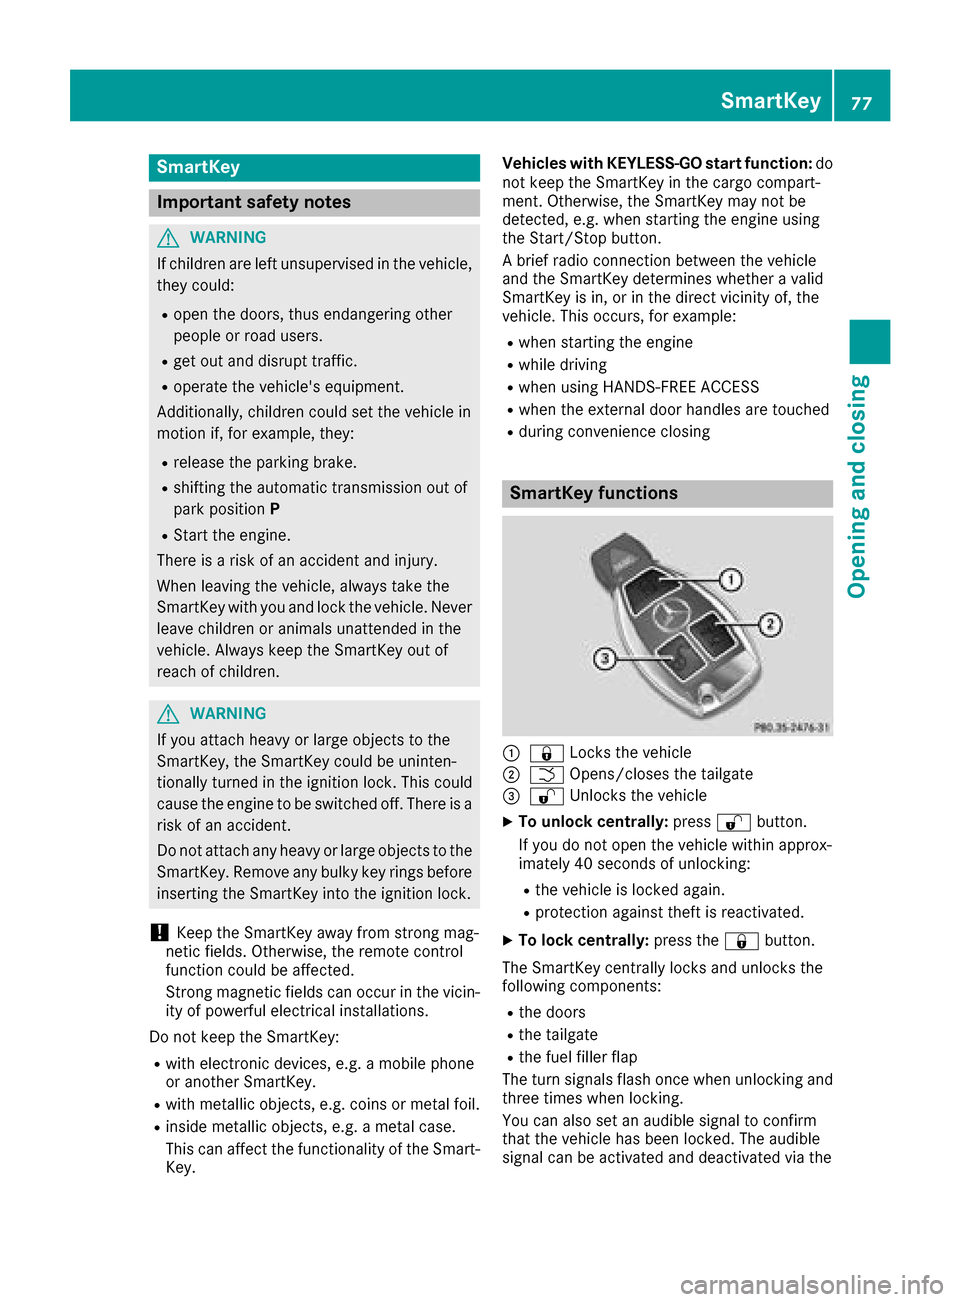
SmartKey functions
:& Locks the vehicle
;FOpens/closes the tailgate
=%Unlocks the vehicle
XTo unlock centrally: press%button.
If you do not open the vehicle within approx-
imately 40 seconds of unlocking:
Rthe vehicle is locked again.
Rprotection against theft is reactivated.
XTo lock centrally: press the&button.
The SmartKey centrally locks and unlocks the
following components:
Rthe doors
Rthe tailgate
Rthe fuel filler flap
The turn signals flash once when unlocking and
three times when locking.
You can also set an audible signal to confirm
that the vehicle has been locked. The audible
signal can be activated and deactivated via the
SmartKey77
Opening and closing
Z
Page 92 of 374

!The tailgate swings upwards and to the rear
when opened. Therefore, make sure that
there is sufficient clearance above and behind
the tailgate.
Unlocking
XRemove cargo compartment cover
(Ypage 285).
XFold the rear seat backrest forward
(Ypage 281).
XInsert mechanical key ;into opening :in
the paneling and push it in.
XOpen the tailgate.
When you lock the vehicle, the cargo compart-
ment is also locked again.
Side windows
Important safety notes
GWARNING
While opening the side windows, body parts
could become trapped between the side win-
dow and the door frame as the side window
moves. There is a risk of injury.
Make sure that nobody touches the side win-
dow during the opening procedure. If some-
body becomes trapped, release the switch or
pull the switch to close the side window again.
GWARNING
While closing the side windows, body parts in
the closing area could become trapped. There is a risk of injury.
When closing make sure that no parts of the
body are in the closing area. If somebody
becomes trapped, release the switch or press
the switch to open the side window again.
GWARNING
If children operate the side windows they
could become trapped, particularly if they are left unsupervised. There is a risk of injury.
Activate the override feature for the rear side
windows. When leaving the vehicle, always
take the SmartKey with you and lock the vehi-
cle. Never leave children unsupervised in the
vehicle.
Side window reversing feature
The side windows are equipped with an auto-
matic reversing feature. If a solid object blocks
or restricts a side window from traveling
upwards during the automatic closing process,
the side window opens again automatically. Dur-
ing the manual closing process, the side windowonly opens again automatically after the corre-
sponding switch is released. The automatic
reversing feature is only an aid and is no substi-
tute for your attention when closing a side win-
dow.
GWARNING
The reversing feature does not react:
Rto soft, light and thin objects, e.g. small fin-
gers
Rwhile resetting
This means that the reversing feature cannot
prevent someone being trapped in these sit-
uations. There is a risk of injury.
Make sure that no body parts are in close
proximity during the closing procedure. If
someone becomes trapped, press the switch
to open the side window again.
Opening and closing the side win-
dows
The switches for all side windows are located on the driver's door. There is also a switch on each
door for the corresponding side window.
90Side windows
Opening and closing
Page 93 of 374

The switches on the driver's door take prece-
dence.
:Front left
;Front right
=Rear right
?Rear left
XTurn the SmartKey to position1or2 in the
ignition lock.
XTo open manually: press and hold the cor-
responding switch.
XTo open fully: press the switch beyond the
pressure point and release it.
Automatic operation is started.
XTo close manually: pull the corresponding
switch and hold it.
XTo close fully: pull the switch beyond the
pressure point and release it.
Automatic operation is started.
XTo interrupt automatic operation: press/
pull the corresponding switch again.
If you press the switch beyond the pressure
point and release, automatic operation is star-
ted in the corresponding direction. You can stop
automatic operation by pressing/pulling the
switch again.
You can continue to operate the side windows
after you switch off the engine or remove the
SmartKey. This function remains active for five
minutes or until you open a front door.
When the override feature for the side windows
is activated, the side windows cannot be oper-
ated from the rear (
Ypage 64).
Information on opening and closing the roller
sunblinds on the rear side windows
(
Ypage 291).
Convenience opening
General notes
If the SmartKey is in close proximity to the vehi-
cle, the convenience opening function is availa-
ble.
Vehicles with KEYLESS-GO or KEYLESS-GO
start function: you can ventilate the vehicle
before you start driving.
To do this, the SmartKey is used to carry out the
following functions simultaneously:
Runlock the vehicle
Ropen the side windows
Ropen the panorama roof with power tilt/slid-
ing panel and the roller sunblind
Rswitch on the seat ventilation for the driver's
seat
The "convenience opening" feature is also avail-
able when the vehicle is unlocked.
Convenience opening
XPress and hold the %button on the Smart-
Key until the side windows and the panorama
roof with power tilt/sliding panel are in the
desired position.
If the roller sunblinds of the panorama roof
with power tilt/sliding panel are closed, the
roller sunblinds are opened first.
XPress and hold the %button again until the
panorama roof with power tilt/sliding panel is
in the desired position.
XTo interrupt convenience opening: release
the % button.
Convenience closing feature
Important safety notes
GWARNING
When the convenience closing feature is oper- ating, parts of the body could become trapped
in the closing area of the side window and the
sliding sunroof. There is a risk of injury.
Observe the complete closing procedure
when the convenience closing feature is oper-
ating. Make sure that no body parts are in
close proximity during the closing procedure.
Side windows91
Opening and closing
Z
Page 113 of 374

Exterior lighting
General notes
USA only: if you wish to drive during the daytime
without lights, switch off theDaytime Run‐
ning Lightsfunction via the on-board com-
puter (Ypage 223).
Setting the exterior lighting
Setting options
Exterior lighting can be set using the:
Rlight switch (Ypage 111)
Rcombination switch (Ypage 112)
Ron-board computer (Ypage 223)
Light switch
Operation
1 WLeft-hand standing lamps
2XRight-hand standing lamps
3TParking lamps, license plate and
instrument cluster lighting
4ÃAutomatic headlamp mode, controlled
by the light sensor
5 LLow-beam/high-beam headlamps
BRRear fog lamp
If you hear a warning tone when you leave the
vehicle, the lights may still be switched on.
XTurn the light switch to the Ãposition.
The exterior lighting (except the parking/stand-
ing lamps) switches off automatically if you:
Rremove the SmartKey from the ignition lock
Ropen the driver's door with the SmartKey in
position u
Automatic headlamp mode
GWARNING
When the light switch is set to Ã, the low-
beam headlamps may not be switched on
automatically if there is fog, snow or other
causes of poor visibility due to the weather
conditions such as spray. There is a risk of an
accident.
In such situations, turn the light switch to
L.
The automatic headlamp feature is only an aid.
The driver is responsible for the vehicle's light-
ing at all times.
à is the favored light switch setting.
The light setting is automatically selected
according to the brightness of the ambient light,
but not in the event of poor visibility due to
weather conditions such as fog, snow or spray.
RWith the SmartKey in position 1in the igni-
tion lock, the parking lamps are switched on
or off automatically depending on the bright-
ness of the ambient light.
RUSA only: if you have switched on the Day‐time Running Lightsfunction via the on-
board computer, and the engine is running,
the daytime running lamps or the parking
lamps and low-beam headlamps are switched
on or off automatically depending on the
ambient light.
RCanada only: depending on the ambient light,
the daytime running lamps or the parking and
low-beam headlamps are switched on/off
automatically when the engine is running.
XTo switch on the automatic headlamps:
turn the light switch to the Ãposition.
USA only: The daytime running lamps improve
the visibility of your vehicle during the day. Here,
the Daytime Running Lights
function must
be switched on via the on-board computer
(
Ypage 223).
If the engine is running and you turn the light
switch to the TorL position, the manual
settings take precedence over the daytime run-
ning lamps.
Canada only: The daytime running lamps
improve the visibility of your vehicle during the
day. The daytime running lamps function is
required by law in Canada. It cannot therefore
be deactivated.
Exterior lighting111
Lights and windshield wipers
Z