2017 MERCEDES-BENZ GLC SUV climat
[x] Cancel search: climatPage 208 of 374

When overtaking, pay particular attention to the
extended length of your vehicle/trailer combi-
nation.
Due to the length of the vehicle/trailer combi-
nation, you require additional road space when
overtaking before you can change back to the
original lane.
If the automatic transmission repeatedly shifts
between gears on uphill or downhill gradients,
shift to a lower gear.
Driving in a lower gear and at a reduced speed
decreases the risk of engine damage.
If the coolant temperature increases signifi-
cantly when climate control is switched on,
switch climate control off.
Coolant heat can also be dissipated by opening
the windows and switching the ventilation
blower and the interior temperature to the high-
est level.
Decoupling a trailer
GWARNING
If you uncouple a trailer with the overrun
brake engaged, you could trap your hand
between the vehicle and the trailer drawbar.
There is a risk of injury.
Do not uncouple a trailer if the overrun brake
is engaged.
GWARNING
Vehicles with level control:
The vehicle is lowered as soon as you discon-
nect the trailer cable. This could result in your
limbs or those of other people that are
between the vehicle body and tires or under-
neath the vehicle being trapped. There is a
risk of injury.
Make sure that nobody is in the immediate
vicinity of the wheel housings or under the
vehicle when you disconnect the trailer cable.
!Do not disconnect a trailer with an engaged
overrun brake. Otherwise, your vehicle could
be damaged by the rebounding of the overrun
brake.
XApply the vehicle's parking brake manually.
XShift the transmission to position j.
XClose all doors and the tailgate.
XSwitch off the engine.
XSecure the vehicle and trailer against rolling
away.
XRemove the trailer cable.
XRemove the safety chains, if there are any.
XUncouple the trailer.
Removing the ball coupling
XObserve the manufacturer's installation
instructions.
XPress the protective cap into the ball coupling
recess.
XMake sure that the protective cap is firmly in
place.
Observe the loading guidelines (
Ypage 278)
and the safety notes regarding stowage spaces
(
Ypage 278).
Information on cleaning and care of the trailer
tow hitch (
Ypage 316).
Trailer power supply
!
Accessories with a maximum power con-
sumption of 180 W can be connected to the
permanent power supply.
You must not charge a trailer battery using the
power supply.
The trailer socket of your vehicle is equipped at
the factory with a permanent power supply.
The permanent power supply is supplied via
trailer socket pin 4.
The trailer's permanent power supply is
switched off in the event of low vehicle supply
voltage and after six hours at the latest.
A qualified specialist workshop can provide
more information about installing the trailer
electrics.
Permissible trailer loads and trailer
drawbar noseweights
Weight specifications
The gross trailer weight is calculated as the
weight of the trailer plus the weight of the load
and the trailer's equipment.
206Towing a trailer
Driving and parking
Page 274 of 374

Adding your own favorite
XSelectVehicl eQClimate Contro l.
XPress and hold theg buttonuntil th e
favorite sare displayed.
XAd d a favorite at th edesired position.
If afavorite has already been added at this
position, it will be overwritten .
Climate control settings
General notes
You can adjust th eclimat econtrol settings
usin gth eclimat econtrol bar or th eclimat econ-
trol menu.
Importan tclimat econtrol function scan be set
in th eclimat econtrol bar:
RTemperatur e
RAirflow
RAir distribution
The climat econtrol bar is visible in mos tdis-
plays.
You can fin dall available climat econtrol func-
tions in th eclimat econtrol menu. You can use
th eclimat econtrol bar to switch to th eclimat e
control menu.
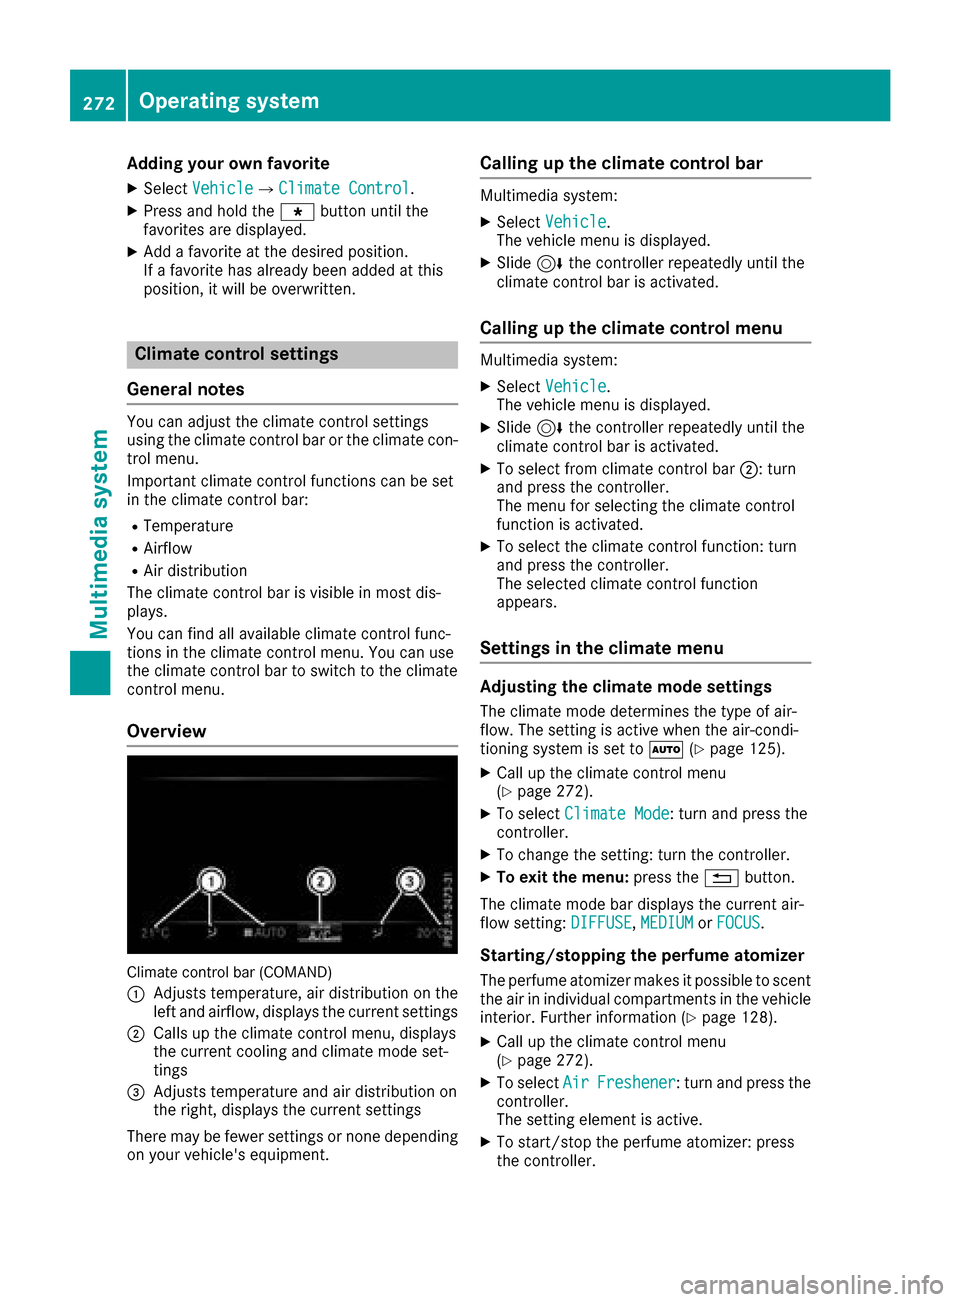
Overview
Climat econtrol bar (COMAND)
:
Adjusts temperature, air distribution on th e
left and airflow, displays th ecurren tsettings
;Calls up th eclimat econtrol menu, displays
th ecurren tcoolin gand climat emod eset -
tings
=Adjusts temperature and air distribution on
th eright ,displays th ecurren tsettings
Ther emay be fewe rsettings or none depending
on your vehicle's equipment.
Calling up the climate control bar
Multimedia system:
XSelec tVehicl e.
The vehicl emen uis displayed.
XSlide 6thecontroller repeatedly until th e
climat econtrol bar is activated.
Calling up the climate control menu
Multimedia system:
XSelec tVehicl e.
The vehicl emen uis displayed.
XSlide 6thecontroller repeatedly until th e
climat econtrol bar is activated.
XTo select from climat econtrol bar ;:turn
and press th econtroller.
The men ufor selecting th eclimat econtrol
function is activated.
XTo select th eclimat econtrol function :tur n
and press th econtroller.
The selected climat econtrol function
appears.
Settings in the climate menu
Adjusting the climate mode settings
The climat emod edetermine sth etyp eof air-
flow. The settin gis active when th eair-condi-
tionin gsystem is set to Ã(
Ypage 125).
XCall up th eclimat econtrol men u
(Ypage 272).
XTo select ClimateMod e:tur nand press th e
controller.
XTo chang eth esetting: tur nth econtroller.
XTo exit th emenu: press th e% button.
The climat emod ebar displays th ecurren tair-
flo wsetting: DIFFUSE
,MEDIUMor FOCUS.
Starting/stopping the perfu meatomi zer
The perfum eatomizer makes it possible to scen t
th eair in individual compartments in th evehicl e
interior. Further information (
Ypage 128).
XCall up theclimat econtrol men u
(Ypage 272).
XTo select AirFreshener:tur nand press th e
controller.
The settin gelemen tis active.
XTo start/sto pth eperfum eatomizer: press
th econtroller.
272Operating system
Multimedia system
Page 275 of 374

XTo set the intensity: turn the controller when
the atomizer is switched on.
XTo exit the menu:press the%button.
Switching the ionization on/off
The ionization has a cleansing effect on the air in
the vehicle interior. Further information
(
Ypage 129).
XCall up the climate control menu
(Ypage 272).
XTo select Ionization: turn and press the
controller.
The setting element is active.
XTo switch the ionization on or off: turn the
controller.
XTo exit the menu: press the%button.
Settings in the bottom bar of the cli-
mate control menu
Switching cooling with air dehumidifica-
tion on/off
XCall up the climate control menu
(Ypage 272).
XSlide6the controller repeatedly until the
bottom bar is activated.
XTo select OA/C: turn and press the control-
ler.
XSwitch cooling with air dehumidification on
O or off ª.
iThe current status of the cooling function is
displayed in the climate control bar: A/C ON
– activated, A/C OFF – deactivated.
iDeactivating the cooling with air dehumidi-
fication function reduces fuel consumption.
Synchronizing the climate control set-
tings
Use OSync(synchronization) to select the cli-
mate control setting for all zones together Oor
separately ª.
XCall up the climate control menu
(Ypage 272).
XSlide6the controller repeatedly until the
bottom bar is activated.
XTo select OSync: turn and press the con-
troller.
XSwitch the synchronization function on Oor
off ª. For further information on synchronizing climate
control settings, see (
Ypage 126).
Navigation mode
Important safety notes
GWARNING
If you operate information systems and com-
munication equipment integrated in the vehi-
cle while driving, you will be distracted from
traffic conditions. You could also lose control
of the vehicle. There is a risk of an accident.
Only operate the equipment when the traffic
situation permits. If you are not sure that this
is possible, park the vehicle paying attention
to traffic conditions and operate the equip-
ment when the vehicle is stationary.
You must observe the legal requirements for the
country in which you are currently driving when
operating the navigation system.
General notes
Among other things, correct functioning of the
navigation system depends on GPS reception. In
certain situations, GPS reception may be
impaired, there may be interference or there
may be no reception at all, e.g. in tunnels or
parking garages.
Audio 20 is equipped with Garmin
®MAP PILOT
(see the manufacturer's operating instructions).
The Garmin
®MAP PILOT operating instructions
are stored on the SD card as a PDF file. The SD
card box contains a quick guide.
The following descriptions apply to navigation
with COMAND. Further information can be
found in the Digital Operator's Manual.
Selecting a route type and route options
Multimedia system:
XSelect NaviQNavigation.
XSelectOptionsQRoute Settings.
iIf route guidance is active, first slide 6the
controller and show the menu.
XSelect a route type.
Operating system273
Multimedia system
Z
Page 316 of 374

If water no longer forms "beads" on the paint
surface, use the paint care products recommen-
ded and approved by Mercedes-Benz. This is the
case approximately every three to five months,
depending on the climate conditions and the
care product used.
The cleaning product Paint Cleaner, which has
been recommended and approved by
Mercedes-Benz, should be used when dirt has
penetrated the paint surface.
Also use Paint Cleaner on paint that has become
dull.
Do not use these care products in the sun or on
the hood while the hood is hot.
XUse a suitable touch-up stick, e.g. MB Touch-
Up Stick, to repair slight damage to the paint- work quickly and provisionally.
Matte finish care
!Never polish the vehicle or the light alloy
wheels. Polishing causes the finish to shine.
!The following may cause the paint to
become shiny and thus reduce the matte
effect:
Rstrong rubbing of the paintwork with
unsuitable materials
Rfrequent use of automatic car washes
Rwashing the vehicle in direct sunlight
!Never use paint cleaner, buffing or polishing
products, or gloss preserver, e.g. wax, for the
purpose of paintwork care. These products
are only suitable for high-gloss surfaces. Their
use on vehicles with matte paintwork leads to considerable surface damage or, more spe-
cifically, to shiny, spotted areas.
Always have paintwork repairs carried out at a
qualified specialist workshop.
!Do not use wash programs with a hot wax
treatment under any circumstances.
Observe these notes if your vehicle has a clear
matte finish. This will help you to avoid damage to the paintwork due to incorrect treatment.
These notes also apply to light alloy wheels with
a clear matte finish.
The vehicle should preferably be washed by
hand using a soft sponge, car shampoo and
plenty of water. Use only insect remover and car shampoo from
the range of approved Mercedes-Benz care
products.
Cleaning the vehicle parts
Cleaning the wheels
GWARNING
The water jet from a circular jet nozzle (dirt
blasters) can cause invisible exterior damage
to the tires or chassis components. Compo-
nents damaged in this way may fail unexpect-
edly. There is a risk of an accident.
Do not use power washers with circular jet
nozzles to clean the vehicle. Have damaged
tires or chassis components replaced imme-
diately.
!Do not use acidic wheel cleaning products
to remove brake dust. This could damage
wheel bolts and brake components.
!Do not park your vehicle for a long period of
time directly after cleaning, particularly after
cleaning the wheel rim with wheel cleaner.
Wheel cleaner can lead to the increased cor-
rosion of the brake discs and pads. Therefore,
drive for a few minutes after cleaning. By
heating up the brakes, the brake discs and
pads dry. The vehicle can then be parked for a
long period of time.
Cleaning the windows
GWARNING
You could become trapped by the windshield wipers if they start moving while cleaning the
windshield or wiper blades. There is a risk of
injury.
Always switch off the windshield wipers and
the ignition before cleaning the windshield or
wiper blades.
!Do not use dry cloths, abrasive products,
solvents or cleaning agents containing sol-
vents to clean the inside of the windows. Do
not touch the insides of the windows with
hard objects, e.g. an ice scraper or ring. There
is otherwise a risk of damaging the windows.
314Care
Maintenance and care
Page 366 of 374

Example: vehicle identification plate (Can-
ada only)
:Paint code
;VIN
iThe data shown on the vehicle identification
plate is used only as an example. This data is
different for every vehicle and can deviate
from the data shown here. You can find the
data applicable to your vehicle on the vehicle
identification plate.
Vehicle identification number (VIN)
XSlide the right-hand front seat to its rearmost
position.
XFold floor covering ;upwards.
The VIN is visible :.
The VIN can also be found on the vehicle iden-
tification plate (
Ypage 363).
The VIN can also be found at the lower edge of
the windshield (
Ypage 364).
Engine number
:Engine number (stamped into the crank-
case)
;VIN (on the lower edge of the windshield)
=Emission control information plate, includ-
ing the certification of both federal and Cali-
fornian emissions standards
Service products and filling capaci-
ties
Important safety notes
GWARNING
Service products may be poisonous and haz-
ardous to health. There is a risk of injury.
Comply with instructions on the use, storage
and disposal of service products on the labels
of the respective original containers. Always
store service products sealed in their original
containers. Always keep service products out
of the reach of children.
HEnvironmental note
Dispose of service products in an environ-
mentally responsible manner.
Service products include the following:
RFuels
RExhaust gas aftertreatment additives, e.g.
DEF
RLubricants (e.g. engine oil, transmission oil)
RCoolant
RBrake fluid
RWindshield washer fluid
RClimate control system refrigerant
364Service products and filling capacities
Technical data
Page 371 of 374

Otherwise, the engine cooling system is not
sufficiently protected from corrosion and
overheating.
iHave the coolant regularly replaced at a
qualified specialist workshop and the replace-
ment confirmed in the Maintenance Booklet.
Comply with the important safety notes for ser-
vice products when handling coolant
(
Ypage 364).
The coolant is a mixture of water and anti-
freeze/corrosion inhibitor. It performs the fol-
lowing tasks:
RAnti-corrosion protection
RAntifreeze protection
RRaising the boiling point
If the coolant has antifreeze protection down to -35 ‡ (-37 †), the boiling point of the coolant
during operation is approximately 266 ‡
(130 †).
The antifreeze concentrate/corrosion inhibitor
concentration in the engine cooling system
should:
Rbe at least 50%. This will protect the engine
cooling system against freezing down to
approximately -35 ‡ (-37 †).
Rnot exceed 55% (antifreeze protection down
to -49 ‡[-45 †]) .Otherwise ,hea twill no tbe
dissipated as effectively.
Mercedes-Ben zrecommends an antifreeze/
corrosion inhibitor concentrat ein accordance
wit hMB Specification sfo rServic eProducts
310.1.
iWhe nth evehicle is first delivered, it is filled
wit h a coolan tmixture that ensures adequat e
antifreez ean danti-corrosio nprotection .
iThe coolan tis checke dwit hever ymainte-
nanc einterval at aqualifie dspecialis twork-
shop.
Filling capacities
ModelCapacity
GLC 300 d4MATIC10.6 US qt (10.0l)
Mercedes-AMG
GLC 43 4MATIC12.2 US qt (11.5 l)
Allot her models9.5 US qt (9.0 l)
Windshield washer system
Important safety notes
GWARNING
Windshield washer concentrate could ignite if it comes into contact with hot engine compo-
nents or the exhaust system. There is a risk of
fire and injury.
Make sure that no windshield washer con-
centrate is spilled next to the filler neck.
!Only use washer fluid that is suitable for
plastic lamp lenses, e.g. MB SummerFit or MB WinterFit. Unsuitable washer fluid could dam-
age the plastic lenses of the headlamps.
!Only MB SummerFit and MB WinterFit
washer fluid should be mixed together. The
spray nozzles may otherwise become
blocked.
Do not use distilled or de-ionized water. Other-
wise, the level sensor may give a false reading.
When handling washer fluid, observe the impor-
tant safety notes on service products
(
Ypage 364).
At temperatures above freezing:
XFill the washer fluid reservoir with a mixture of
water and windshield washer fluid, e.g. MB
SummerFit.
Add 1 part MB SummerFit to 100 parts water.
At temperatures below freezing:
XFill the washer fluid reservoir with a mixture of
water and washer fluid, e.g. MB WinterFit.
For the correct mixing ratio refer to the infor-
mation on the antifreeze reservoir.
iAdd windshield washer fluid, e.g. MB Sum-
merFit or MB WinterFit, to the washer fluid all
year round.
Climate control system refrigerant
Important safety notes
The climate control system of your vehicle is fil-
led with refrigerant R ‑134a.
The instruction label regarding the refrigerant
type used can be found on the radiator cross
member.
Service products and filling capacities369
Technical data
Z
Page 372 of 374

!Only the refrigerant R‑134a and the PAG oil
approved by Mercedes-Benz may be used.
The approved PAG oil may not be mixed with
any other PAG oil that is not approved for
R-134a refrigerant. Otherwise, the climate
control system may be damaged.
Service work, such as refilling with refrigerant or
replacing component parts, may only be carried
out by a qualified specialist workshop. All appli- cable regulations, as well as SAE standard J639,
must be adhered to.
Always have work on the climate control system
carried out at a qualified specialist workshop.
Refrigerant instruction label
Example: refrigerant instruction label
:Warning symbol
;Refrigerant filling capacity
=Applicable standards
?PAG oil part number
AType of refrigerant
Warning symbol :advises you about:
RPossible dangers
RHaving service work carried out at a qualified
specialist workshop
Filling capacities
All models
Refrigerant22.2 ± 0.4 oz
(630 ± 10 g)
PAG oil2.8 oz(80 g)
Vehicle data
General notes
Please note that for the specified vehicle data:
Rthe heights specified may vary as a result of:
-tires
-load
-condition of the suspension
-optional equipment
Roptional equipment reduces the maximum
payload.
Observe the information relating to level con-
trol:
RAIR BODY CONTROL (Ypage 173)
Dimensions and weights
Model:
Opening height
;
Maximum
headroom
Mercedes-
AMG GLC 43
4MATIC82.9 in
(2106 mm)75.6 in
(1920 mm)
All other mod-
els84.5 in
(2146 mm)78.4 in
(1992 mm)
Mercedes-AMG
GLC 43 4MATIC
Vehicle length183.5 in (4661 mm)
Vehicle width
including exterior
mirrors82.5 in (2096 mm)
Vehicle height64.1 in (1629 mm)
370Vehicle data
Technical data