2017 MERCEDES-BENZ GLC-Class light
[x] Cancel search: lightPage 74 of 178

Change-of-direction phase
The multimedia system announces the immedi-
ate change of direction. The change of directionis announced ahead of time, e.g. with the
announcement "Now turn right".
The display is split in two like in the announce-
ment phase.
The change of direction is performed when the
light-color bar on the right drops down to 0 ft and
the current vehicle position symbol has reached
the white change-of-direction point.
When the change of direction is completed, the
map will appear in full screen mode again.
Display on highways
The image shows an example of route guidance
at a highway intersection when driving on a
highway.
Lane recommendations
Display on multi-lane roads
:Lanes not recommended (dark gray)
;Possible lane (light gray)
=Recommended lanes (white)
If the digital map contains the relevant data, the
multimedia system can display lane recommen-
dations on multi-lane roads for the next change
of direction.
Lane not recommended :: you will not be able
to complete the next change of direction if you
stay in this lane.
Possible lane ;: you will only be able to com-
plete the next change of direction in this lane.
Recommended lane =: in this lane you will be
able to complete the next change of direction
and the one after that.
The multimedia system shows the lane recom-
mendations for the next two changes of direc-
tion. Lane recommendations are also shown in
the multifunction display of the instrument clus-
ter (see the vehicle Operator's Manual).
Approaching new lanes
:Approaching new lane
During the change of direction, new lanes may
be added. These will be shown in the display of
72Route guidance
Navigation
Page 75 of 178

lane recommendations with a lower boundary
line.
Highway information
Display mode
Requirement: the Highway Informationmap
content must be enabled (Ypage 83).
While driving on the highway, gas stations, rest
stops, rest areas and highway exits are dis-
played along with their immediate distances
from the current vehicle position.
Calling up the selection mode
XWhen highway information is displayed, slide 9 the controller.
The marker is on the highway information. The
associated position is highlighted on the map.
XTo select the desired rest stop/freeway
exit: turn and press the controller.
The available POIs are displayed.
Starting route guidance to a POI
XTo select a POI: turn the controller and press
to confirm.
The POI details are displayed.
You can perform the following functions:
RStore in the address book (Ypage 80)
RView on the map (Ypage 84)
RCall if a phone is connected and a phone
number is available (Ypage 98)
RSelect for route guidance and calculate a
route to it (Ypage 59)
Using the traffic jam function
Highway information enables the use of the traf-
fic jam function. The remaining route on the
highway in this case is blocked in the direction of
travel from the selected exit.
XTo select Detour: turn and press the control-
ler.
The traffic jam function appears
(
Ypage 76).
Route guidance73
Navigation
Z
Page 80 of 178

Displaying real-time traffic reports
Starting asearc hfor traffic reports
XTo switch to navigation mode: press the
Ø button.
XTo show th emenu :slid e6 thecontroller .
XTo selectTraffi c:turn and press th econ-
troller.
If satellite signal scanno tbe received or there
are no traffic reports ,you will see amessag e
to this effect .
XTo close thereport: press th econtroller .
Traffic symbol information
:Affected roads wit hindication of direction
;Symbol fo rrepor ttype, e.g. traffic flo wmes -
sag e
XTo switch to navigation mode: press the
Ø button.
XTo show th emenu :slid e6 thecontroller .
XTo selectTraffi c:turn and press th econ-
troller.
XTo selec tTraffi cSymbol Information:
turn and press th econtroller .
The map appears and shows th eavailable
traffic information as icons. The first traffic
information is highlighted.
XTo highlight additional traffic symbols ,selec t
Nex torPrevious.
XTo move th emap: selectMap.
You can move th emap to enable further traf-
fic information to be displayed.
You can hav eth etraffic repor trelevant to atraf-
fic icon shown .
XTo selectDetail s:turn and press th econ-
troller.
The repor tshows th efollowin ginformation :
RState/province ,road and display of th eaffec -
te ddirection
RSection of th eroad to whic hth etraffic repor t
applies
RTraffic icon and traffic repor t
XTo close thedetailed display :press th e
% button.
Displaying reports on th erout e
The function is only available whil erout eguid -
anc eis active .It shows th eavailable traffic
reports affecting th ecurren troute.
If there are no reports fo rth erout eor th efunc-
tion is no tsupporte din th eselecte dlanguage:
th eMessages
OnRoutemen uitem is gray and
canno tbe selected.
78Real-time traffic reports
Navigation
Page 83 of 178

XTo select the destination address: turn and
press the controller.
The destination address is overwritten.
XTo save as "My address"selectAs "My
Address".
The destination is saved as your home
address.
Saving a destination to an SD card
XInsert the SD memory card (Ypage 145).
XSelect a POI, for example (Ypage 61).
XTo select Save: turn and press the controller.
A menu appears.
XSelect To Memory Card.
If no destination has been saved yet on the SD
card, an input menu will appear.
or
XSelect NotClassifiedor, if available, select
a category that you have created yourself.
An input menu appears.
XEnter a new name and a new category for the
destination in the input menu if required.
Character entry (
Ypage 31).
XSelect OK.
The Saving Successfulmessage appears.
The destination is saved to the SD card.
Saving the current vehicle position
XTo switch to navigation mode: press the
Ø button.
XTo show the menu: slide6the controller.
XTo select Position: turn and press the con-
troller.
XSelect Save.
The current vehicle position is saved in "Last
destinations".
Saving the crosshair position
XTo switch to navigation mode: press the
Ø button.
XTo display the crosshair: press the control-
ler.
XMove the map to the desired position
(Ypage 54).
XTo show the menu: press the controller.
XTo select Position: turn and press the con-
troller.
XSelect Save.
The crosshair position is saved in the last des-
tinations.
Editing the last destinations
XTo switch to navigation mode: press the
Ø button.
XTo show the menu: slide6the controller.
XTo select Destination: turn and press the
controller.
XSelect From Previous Destinations.
The "Last destinations" memory appears.
XTo save the destination: select the destina-
tion.
The destination address appears.
XStore the destination in the address book
(Ypage 80).
XSave the destination to the SD card
(Ypage 81).
XTo view the details: while in the "Last desti-
nations" memory, turn the controller and
highlight the entry.
XSlide 9the controller.
A menu appears.
XTo select Details: press the controller.
iThe destination address can be changed if
desired. For instance, a different street or
house number can be selected.
XTo delete one or all destinations: while in
the "Last destinations" memory, turn the con-
troller and highlight the entry.
XSlide 9the controller.
A menu appears.
Storing destinations81
Navigation
Z
Page 89 of 178

For North American countries, it is possible to
update the map data for the multimedia system
free of charge for a period of three years. Infor-
mation on the availability of this service for your
vehicle can be obtained from your Mercedes-
Benz Service Center.
Entitlement to the free update
For the first three years after your vehicle is reg-
istered, you are entitled to all available updates
to the map software for the multimedia system.
They are usually installed during a regular vehi-
cle service. After this period, you can purchase
further updates from your Mercedes-Benz Ser-
vice Center.
The free updates relate to the vehicle and not to
an individual. If there is a change of ownership
within the three years after first registration, the
new owner is entitled to the map software
updates.
Updating at an authorized Mercedes-
Benz Center
If an update for your map software is available,
you will receive it free of charge at your
Mercedes-Benz Service Center during your vehi-
cle's annual service. You can arrange a separate
appointment for this at your Mercedes-Benz
Service Center on request.
The update can only be performed:
Rat an authorized Mercedes-Benz Center
Rfor map data for North America
The map software is not provided on DVD.
Carrying out a manual update
After the free update of the map data has
expired or when buying map data, you can
update the data yourself.
The update process may take some time (up to
45 minutes), depending on the size of the digital
map. The update will be completed more quickly
if the vehicle is stationary. If you begin the
update while the vehicle is stationary and the
starter battery has insufficient power, the mul-
timedia system may switch off automatically.
This protects the battery. In order to prevent
this, a suitable power supply to the vehicle must
be maintained.
Navigation functions
Calling up the navigation system
menu
XTo switch to navigation mode: press the
ß button.
XTo show the menu: slide5the controller.
Navi
is highlighted in the main function bar.
XPress the controller.
The navigation menu appears.
XTurn the controller to display the navigation
functions one after another.
XTo change to the map: turn the controller until
Navigationis shown and then press the con-
troller.
Calling up the online map display
Requirement for online map display (USA):
mbrace must be activated for Internet access
(
Ypage 120).
Requirement for the online map display (Can-
ada): a mobile phone is connected to the multi-
media system via Bluetooth
®(Ypage 92) or
USB (Ypage 157).
XCall up the navigation menu (Ypage 87).
XTurn the controller until Online Map Dis‐playis brought to the front.
XPress the controller.
The online connection is established. Once
the connection is established, the Google
Maps™ map shows the vicinity of the current
vehicle position.
iAlternatively you can call up this function
using the touchpad (Ypage 24).
XTo exit the online map display: press the %
button.
Navigation functions87
Navigation
Z
Page 90 of 178

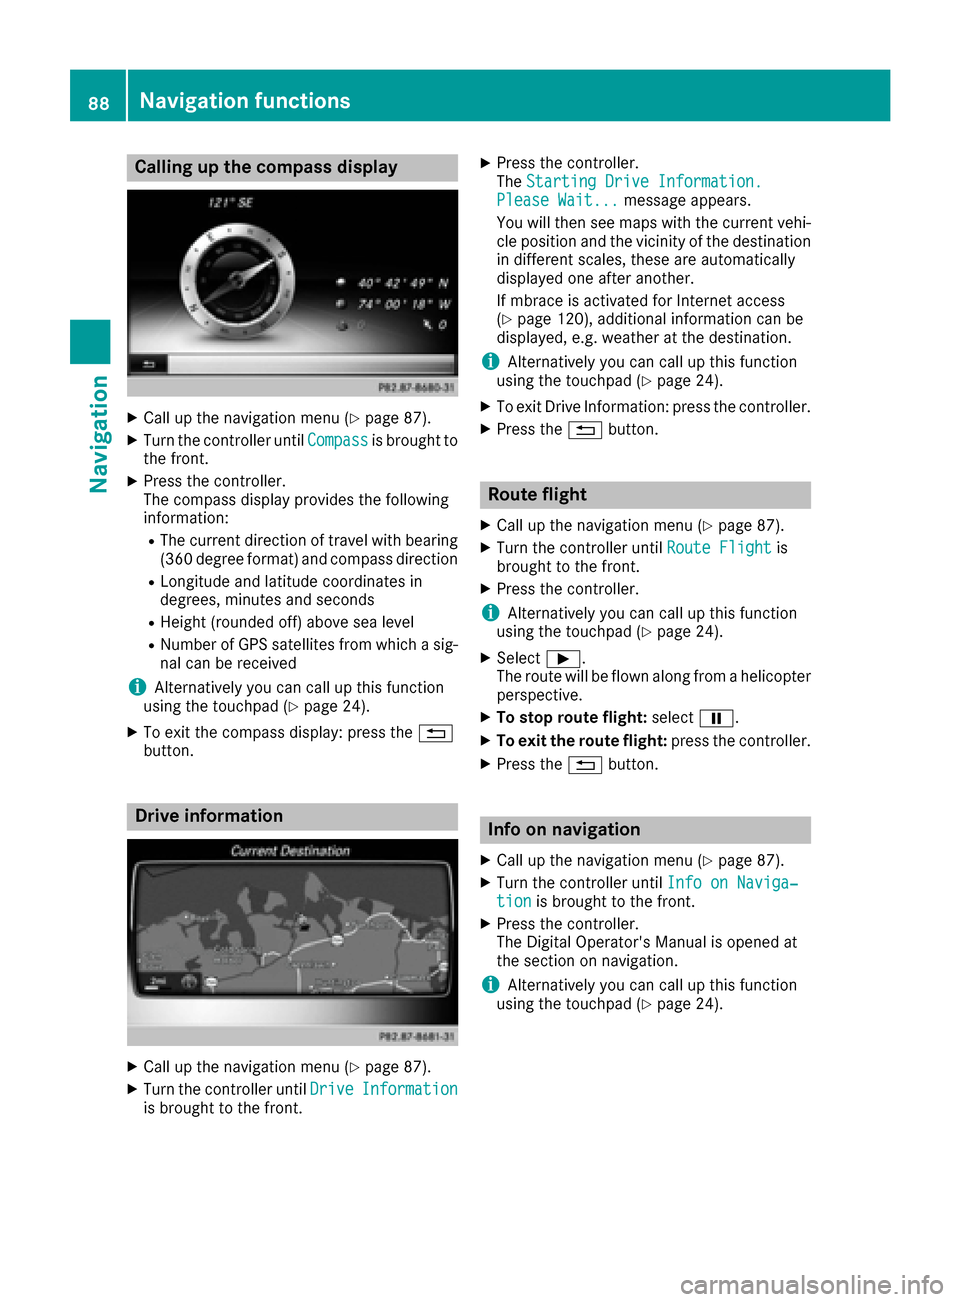
Calling up the compass display
XCall up the navigation menu (Ypage 87).
XTurn the controller untilCompassis brought to
the front.
XPress the controller.
The compass display provides the following
information:
RThe current direction of travel with bearing
(360 degree format) and compass direction
RLongitude and latitude coordinates in
degrees, minutes and seconds
RHeight (rounded off) above sea level
RNumber of GPS satellites from which a sig- nal can be received
iAlternatively you can call up this function
using the touchpad (Ypage 24).
XTo exit the compass display: press the %
button.
Drive information
XCall up the navigation menu (Ypage 87).
XTurn the controller until DriveInformationis brought to the front.
XPress the controller.
TheStarting Drive Information.
Please Wait...message appears.
You will then see maps with the current vehi-
cle position and the vicinity of the destination
in different scales, these are automatically
displayed one after another.
If mbrace is activated for Internet access
(
Ypage 120), additional information can be
displayed, e.g. weather at the destination.
iAlternatively you can call up this function
using the touchpad (Ypage 24).
XTo exit Drive Information: press the controller.
XPress the %button.
Route flight
XCall up the navigation menu (Ypage 87).
XTurn the controller until Route Flightis
brought to the front.
XPress the controller.
iAlternatively you can call up this function
using the touchpad (Ypage 24).
XSelect Ì.
The route will be flown along from a helicopter perspective.
XTo stop route flight: selectË.
XTo exit the route flight: press the controller.
XPress the%button.
Info on navigation
XCall up the navigation menu (Ypage 87).
XTurn the controller until Info on Naviga‐tionis brought to the front.
XPress the controller.
The Digital Operator's Manual is opened at
the section on navigation.
iAlternatively you can call up this function
using the touchpad (Ypage 24).
88Navigation functions
Navigation
Page 98 of 178

XTo selectConnect Device: turn and press
the controller.
The device list is displayed.
XTo select the desired mobile phone: turn and press the controller.
The selected mobile phone is searched for
and connected if it is within Bluetooth
®range
and if Bluetooth®is activated.
Only one mobile phone can be connected at any one time. The currently connected mobile
phone is indicated by the #dot in the device list.
iYou can only switch to another authorized
mobile phone if you are not currently making
a call.
De-authorizing (disconnecting) a
mobile phone
Mercedes-Benz USA, LLC recommends de-
authorization in the multimedia system as well
as on the mobile phone. Subsequent authoriza-
tion may otherwise fail.
XTo call up the telephone menu: press the
% button.
XTo show the menu bar: slide 6the control-
ler.
XTo select Connect Device: turn and press
the controller.
XTo highlight the desired mobile phone in the
device list: turn the controller.
XTo select G: slide 9the controller.
XTo select Deauthorize: turn and press the
controller.
A prompt appears, asking whether you really
wish to de-authorize this device.
XTo select Yes: turn and press the controller.
The mobile phone is de-authorized.
iBefore re-authorizing the mobile phone, you
should also delete the device name MBBlue‐
toothfrom your mobile phone's Bluetooth®
list.
Displaying connection details
XTo call up the telephone menu: press the
%button.
XTo switch to the menu bar in the telephone
menu: slide 6the controller.
XTo select Connect Device: turn and press
the controller.
XTo highlight the desired mobile phone in the
device list: turn the controller.
XTo select G: slide 9the controller.
XTo select Details: turn and press the con-
troller.
The following information concerning the
selected mobile phone is shown:
RBluetooth®device name
RBluetooth®address
RAvailability status (shown after a new
search)
RAuthorization status
XTo close the detailed display: slide8 the
controller.
Reception and transmission volume
Once the mobile phone has been authorized,
you can optimize the transmission and recep-
tion volume settings. To find out about the best
possible settings for your mobile phone, visit
http://www.mercedes-benz.com/connect .
Or call the Mercedes-Benz Customer Assistance
Center at 1-800-FOR-MERCedes
(1-800-367-6372)( USA) or Customer Relations
at 1-800-387-0100 (Canada).
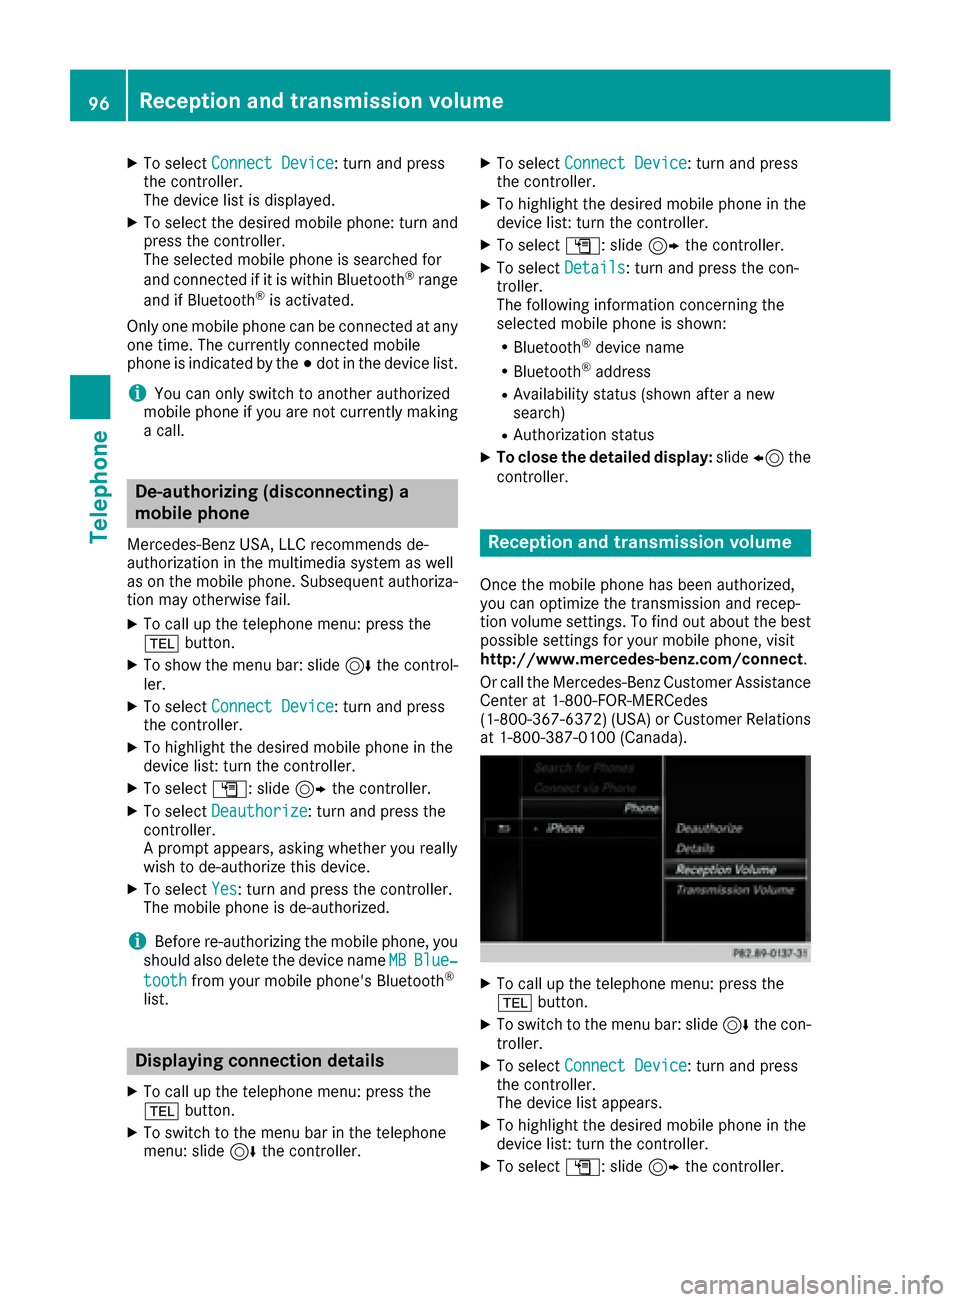
XTo call up the telephone menu: press the
% button.
XTo switch to the menu bar: slide 6the con-
troller.
XTo select Connect Device: turn and press
the controller.
The device list appears.
XTo highlight the desired mobile phone in the
device list: turn the controller.
XTo select G: slide 9the controller.
96Reception and transmission volume
Telephone
Page 100 of 178

XTo selectCallsReceivedorCallsDialed:
turn and press the controller.
The relevant list is displayed.
XTo select an entry and make a call: turn and
press the controller.
Selecting and placing a call using the multifunc- tion steering wheel (see vehicle Operator's Man-
ual)
Further information about ending a call
(
Ypage 100).
Using the phone book
XTo call up the telephone menu: press the
% button.
XTo select Namein the telephone menu: turn
and press the controller.
XSearch for a contact (Ypage 101).
XTo make a call: press the controller.
Selecting and placing a call using the multifunc- tion steering wheel (see vehicle Operator's Man-
ual)
Further information about ending a call
(
Ypage 100).
Using speed dial
XTo call up the telephone menu: press the
% button.
XTo highlight a number from the character bar:
turn the controller.
XPress the controller for longer than two sec-
onds.
The telephone menu displays the selected
entry. The number is dialed.
Further information on setting up speed dial
(
Ypage 112).
Further information about ending a call
(
Ypage 100).
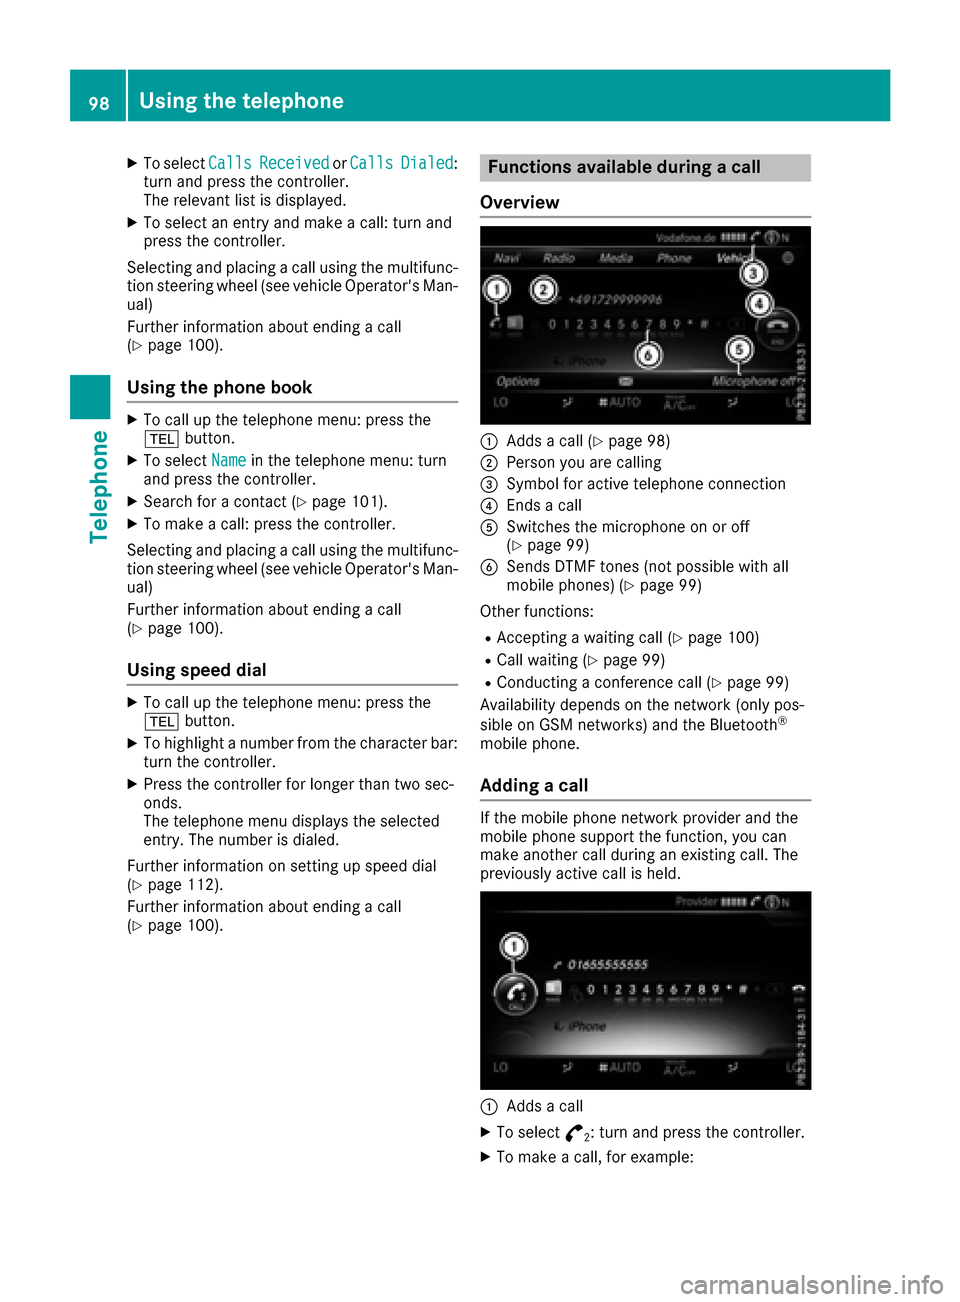
Functions available during a call
Overview
:Adds a call (Ypage 98)
;Person you are calling
=Symbol for active telephone connection
?Ends a call
ASwitches the microphone on or off
(Ypage 99)
BSends DTMF tones (not possible with all
mobile phones) (Ypage 99)
Other functions:
RAccepting a waiting call (Ypage 100)
RCall waiting (Ypage 99)
RConducting a conference call (Ypage 99)
Availability depends on the network (only pos-
sible on GSM networks) and the Bluetooth
®
mobile phone.
Adding a call
If the mobile phone network provider and the
mobile phone support the function, you can
make another call during an existing call. The
previously active call is held.
:Adds a call
XTo select °2: turn and press the controller.
XTo make a call, for example:
98Using the telephone
Telephone