2017 MERCEDES-BENZ GLA SUV window
[x] Cancel search: windowPage 104 of 369
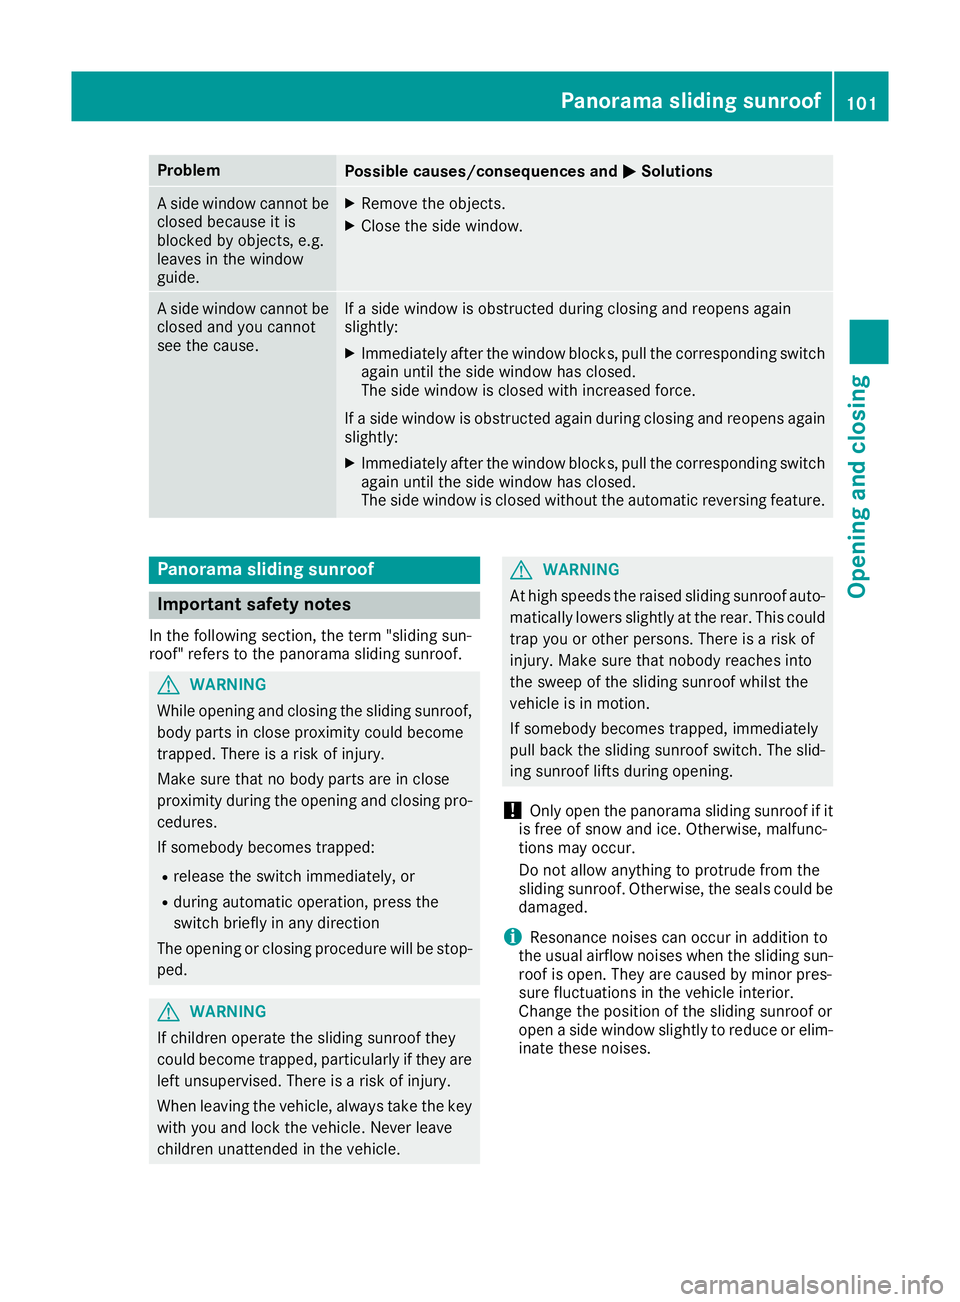
Problem
Possible causes/consequences and
M
MSolutions A side window cannot be
closed because it is
blocked by objects, e.g.
leaves in the window
guide. X
Remove the objects.
X Close the side window. A side window cannot be
closed and you cannot
see the cause. If a side window is obstructed during closing and reopens again
slightly:
X Immediately after the window blocks, pull the corresponding switch
again until the side window has closed.
The side window is closed with increased force.
If a side window is obstructed again during closing and reopens again slightly:
X Immediately after the window blocks, pull the corresponding switch
again until the side window has closed.
The side window is closed without the automatic reversing feature. Panorama sliding sunroof
Important safety notes
In the following section, the term "sliding sun-
roof" refers to the panorama sliding sunroof. G
WARNING
While opening and closing the sliding sunroof, body parts in close proximity could become
trapped. There is a risk of injury.
Make sure that no body parts are in close
proximity during the opening and closing pro- cedures.
If somebody becomes trapped:
R release the switch immediately, or
R during automatic operation, press the
switch briefly in any direction
The opening or closing procedure will be stop- ped. G
WARNING
If children operate the sliding sunroof they
could become trapped, particularly if they are left unsupervised. There is a risk of injury.
When leaving the vehicle, always take the key
with you and lock the vehicle. Never leave
children unattended in the vehicle. G
WARNING
At high speeds the raised sliding sunroof auto- matically lowers slightly at the rear. This could
trap you or other persons. There is a risk of
injury. Make sure that nobody reaches into
the sweep of the sliding sunroof whilst the
vehicle is in motion.
If somebody becomes trapped, immediately
pull back the sliding sunroof switch. The slid- ing sunroof lifts during opening.
! Only open the panorama sliding sunroof if it
is free of snow and ice. Otherwise, malfunc-
tions may occur.
Do not allow anything to protrude from the
sliding sunroof. Otherwise, the seals could be damaged.
i Resonance noises can occur in addition to
the usual airflow noises when the sliding sun-
roof is open. They are caused by minor pres-
sure fluctuations in the vehicle interior.
Change the position of the sliding sunroof or
open a side window slightly to reduce or elim-
inate these noises. Panorama sliding sunroof
101Opening and closing Z
Page 114 of 369
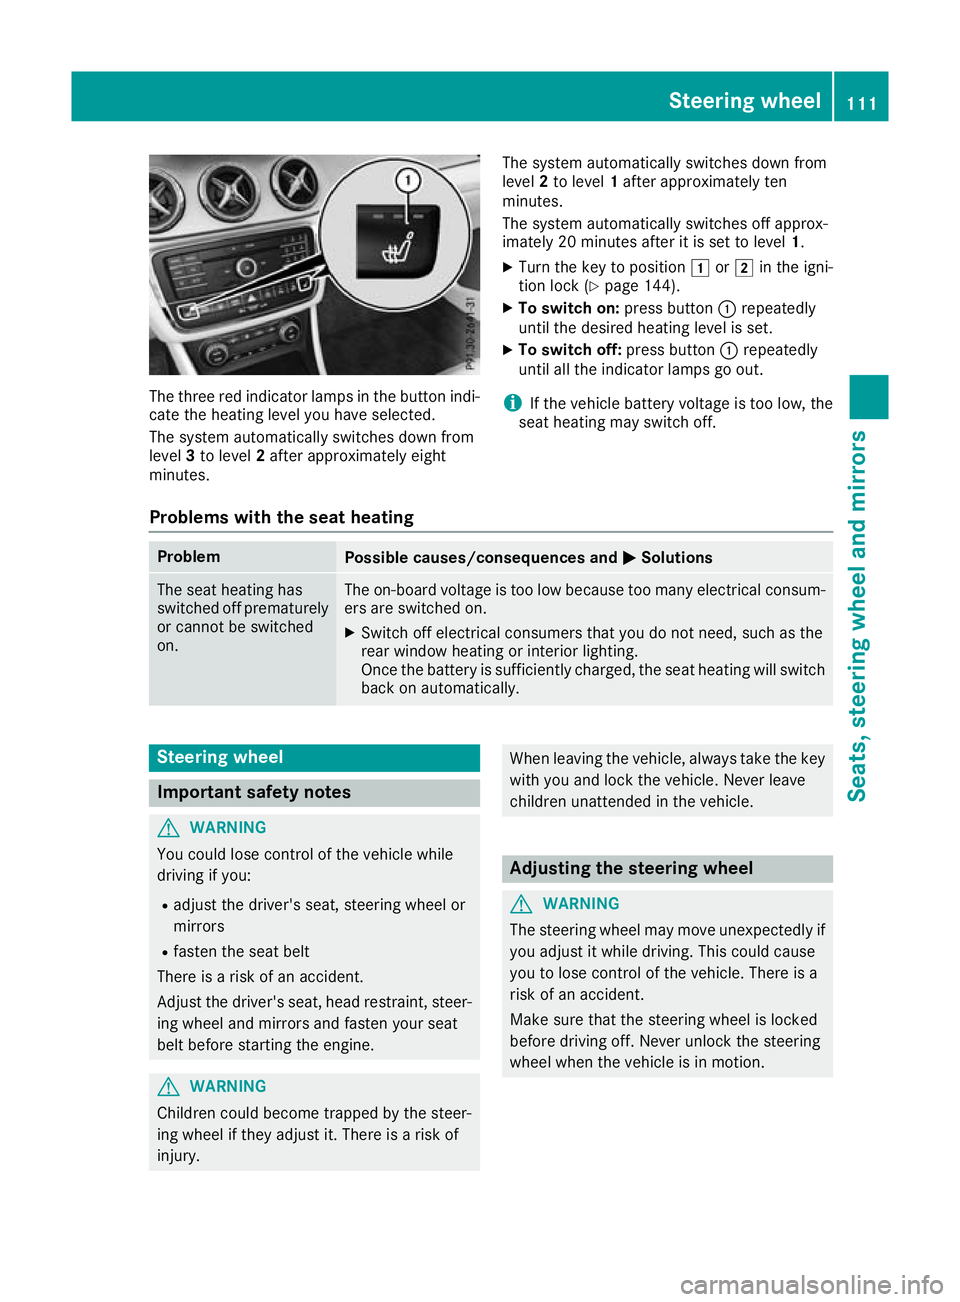
The three red indicator lamps in the button indi-
cate the heating level you have selected.
The system automatically switches down from
level 3to level 2after approximately eight
minutes. The system automatically switches down from
level 2to level 1after approximately ten
minutes.
The system automatically switches off approx-
imately 20 minutes after it is set to level 1.
X Turn the key to position 1or2 in the igni-
tion lock (Y page 144).
X To switch on: press button:repeatedly
until the desired heating level is set.
X To switch off: press button:repeatedly
until all the indicator lamps go out.
i If the vehicle battery voltage is too low, the
seat heating may switch off.
Problems with the seat heating Problem
Possible causes/consequences and
M MSolutions The seat heating has
switched off prematurely
or cannot be switched
on. The on-board voltage is too low because too many electrical consum-
ers are switched on.
X Switch off electrical consumers that you do not need, such as the
rear window heating or interior lighting.
Once the battery is sufficiently charged, the seat heating will switch
back on automatically. Steering wheel
Important safety notes
G
WARNING
You could lose control of the vehicle while
driving if you:
R adjust the driver's seat, steering wheel or
mirrors
R fasten the seat belt
There is a risk of an accident.
Adjust the driver's seat, head restraint, steer-
ing wheel and mirrors and fasten your seat
belt before starting the engine. G
WARNING
Children could become trapped by the steer-
ing wheel if they adjust it. There is a risk of
injury. When leaving the vehicle, always take the key
with you and lock the vehicle. Never leave
children unattended in the vehicle. Adjusting the steering wheel
G
WARNING
The steering wheel may move unexpectedly if you adjust it while driving. This could cause
you to lose control of the vehicle. There is a
risk of an accident.
Make sure that the steering wheel is locked
before driving off. Never unlock the steering
wheel when the vehicle is in motion. Steering wheel
111Seats, steering wheel and mirrors Z
Page 116 of 369
mirror using button
=as long as the indicator
lamp is lit.
X Press button =up, down, or to the right or
left until you have adjusted the exterior mirror
to the correct position. You should have a
good overview of traffic conditions.
The convex exterior mirrors provide a larger field of vision.
After the engine has been started, the exterior
mirrors are automatically heated at low outside
temperatures. Heating takes a maximum of ten
minutes.
i The exterior mirrors can also be heated
manually by switching on the rear window
heating.
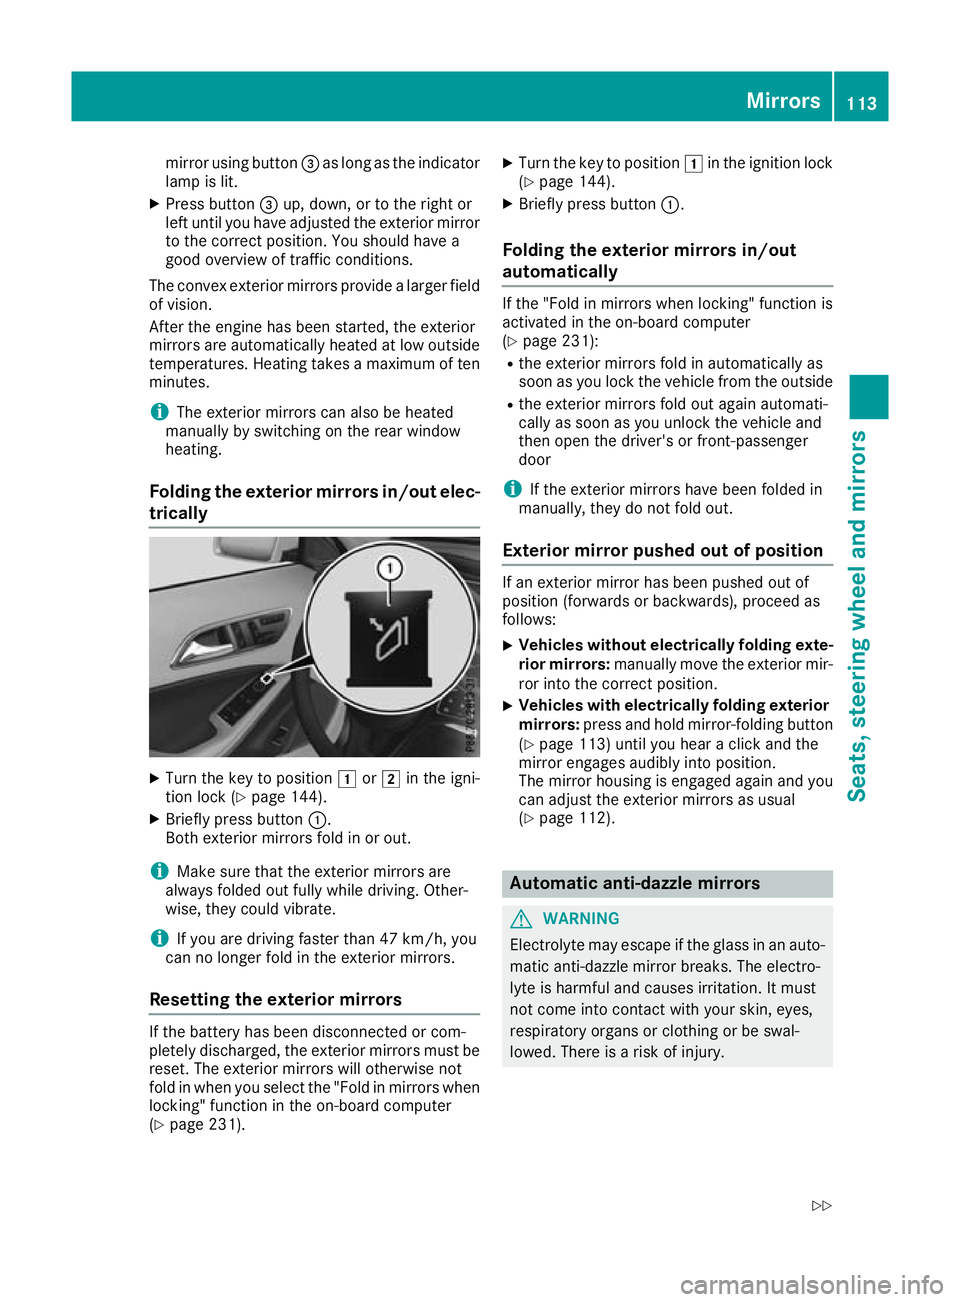
Folding the exterior mirrors in/out elec- trically X
Turn the key to position 1or2 in the igni-
tion lock (Y page 144).
X Briefly press button :.
Both exterior mirrors fold in or out.
i Make sure that the exterior mirrors are
always folded out fully while driving. Other-
wise, they could vibrate.
i If you are driving faster than 47 km/h, you
can no longer fold in the exterior mirrors.
Resetting the exterior mirrors If the battery has been disconnected or com-
pletely discharged, the exterior mirrors must be
reset. The exterior mirrors will otherwise not
fold in when you select the "Fold in mirrors when locking" function in the on-board computer
(Y page 231). X
Turn the key to position 1in the ignition lock
(Y page 144).
X Briefly press button :.
Folding the exterior mirrors in/out
automatically If the "Fold in mirrors when locking" function is
activated in the on-board computer
(Y page 231):
R the exterior mirrors fold in automatically as
soon as you lock the vehicle from the outside
R the exterior mirrors fold out again automati-
cally as soon as you unlock the vehicle and
then open the driver's or front-passenger
door
i If the exterior mirrors have been folded in
manually, they do not fold out.
Exterior mirror pushed out of position If an exterior mirror has been pushed out of
position (forwards or backwards), proceed as
follows:
X Vehicles without electrically folding exte-
rior mirrors: manually move the exterior mir-
ror into the correct position.
X Vehicles with electrically folding exterior
mirrors: press and hold mirror-folding button
(Y page 113) until you hear a click and the
mirror engages audibly into position.
The mirror housing is engaged again and you
can adjust the exterior mirrors as usual
(Y page 112). Automatic anti-dazzle mirrors
G
WARNING
Electrolyte may escape if the glass in an auto- matic anti-dazzle mirror breaks. The electro-
lyte is harmful and causes irritation. It must
not come into contact with your skin, eyes,
respiratory organs or clothing or be swal-
lowed. There is a risk of injury. Mirrors
113Seats, steering wheel and mirrors
Z
Page 127 of 369
Windscreen wipers
Switching the windscreen wipers on/
off
! Do not operate the windscreen wipers when
the windscreen is dry, as this could damage
the wiper blades. Moreover, dust that has col-
lected on the windscreen can scratch the
glass if wiping takes place when the wind-
screen is dry.
If it is necessary to switch on the windscreen wipers in dry weather conditions, always
operate them using washer fluid.
! If the windscreen wipers leave smears on
the windscreen after the vehicle has been
washed in an automatic car wash, this may be
due to wax or other residue. Clean the wind-
screen with washer fluid after an automatic
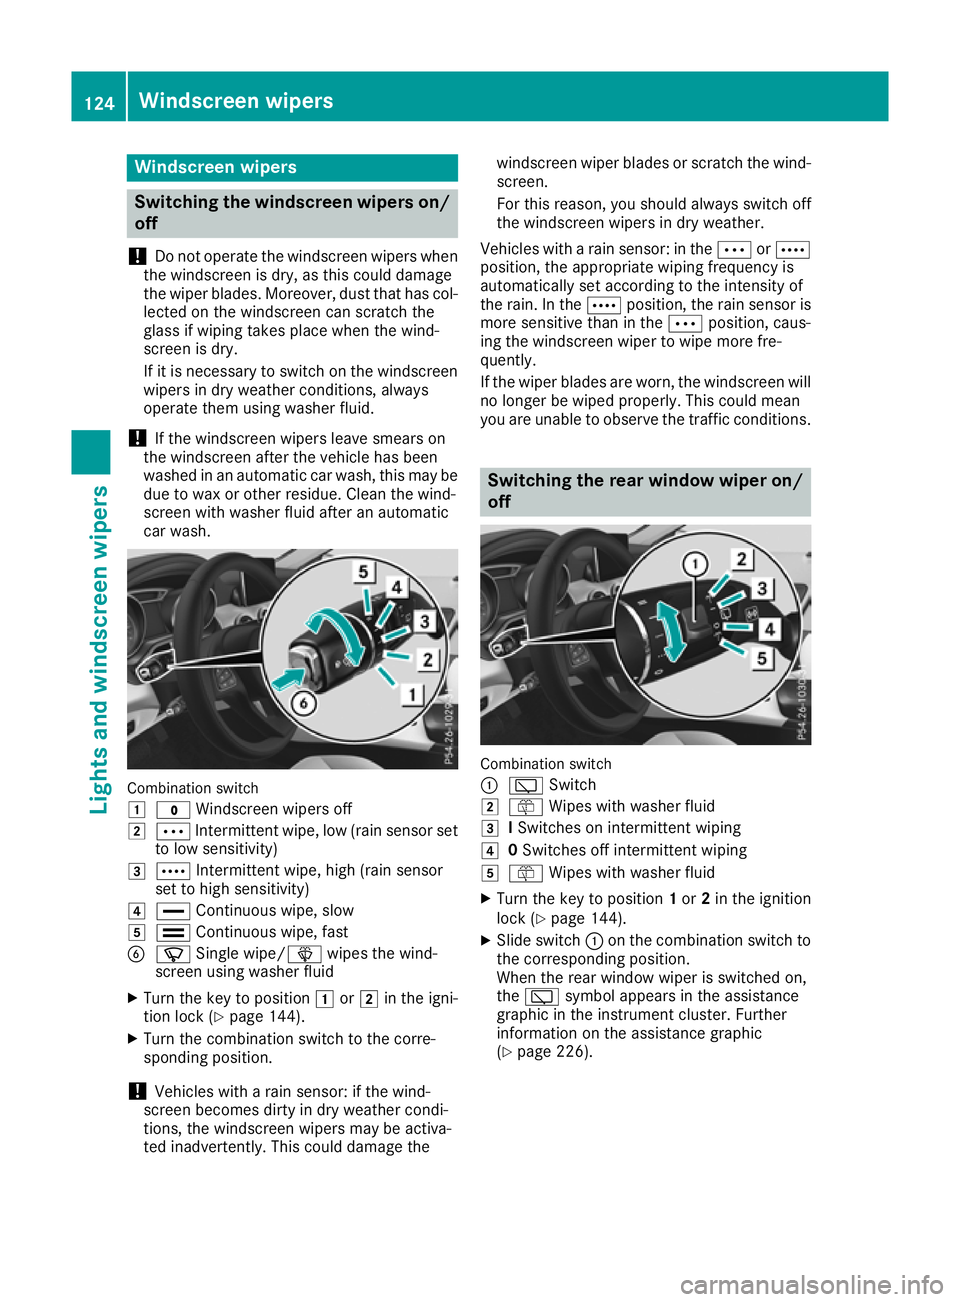
car wash. Combination switch
1
$ Windscreen wipers off
2 Ä Intermittent wipe, low (rain sensor set
to low sensitivity)
3 Å Intermittent wipe, high (rain sensor
set to high sensitivity)
4 ° Continuous wipe, slow
5 ¯ Continuous wipe, fast
B í Single wipe/î wipes the wind-
screen using washer fluid
X Turn the key to position 1or2 in the igni-
tion lock (Y page 144).
X Turn the combination switch to the corre-
sponding position.
! Vehicles with a rain sensor: if the wind-
screen becomes dirty in dry weather condi-
tions, the windscreen wipers may be activa-
ted inadvertently. This could damage the windscreen wiper blades or scratch the wind-
screen.
For this reason, you should always switch off
the windscreen wipers in dry weather.
Vehicles with a rain sensor: in the ÄorÅ
position, the appropriate wiping frequency is
automatically set according to the intensity of
the rain. In the Åposition, the rain sensor is
more sensitive than in the Äposition, caus-
ing the windscreen wiper to wipe more fre-
quently.
If the wiper blades are worn, the windscreen will
no longer be wiped properly. This could mean
you are unable to observe the traffic conditions. Switching the rear window wiper on/
off Combination switch
:
è Switch
2 ô Wipes with washer fluid
3 ISwitches on intermittent wiping
4 0Switches off intermittent wiping
5 ô Wipes with washer fluid
X Turn the key to position 1or 2in the ignition
lock (Y page 144).
X Slide switch :on the combination switch to
the corresponding position.
When the rear window wiper is switched on,
the è symbol appears in the assistance
graphic in the instrument cluster. Further
information on the assistance graphic
(Y page 226). 124
Windscreen wipersLights and windscreen wipers
Page 128 of 369
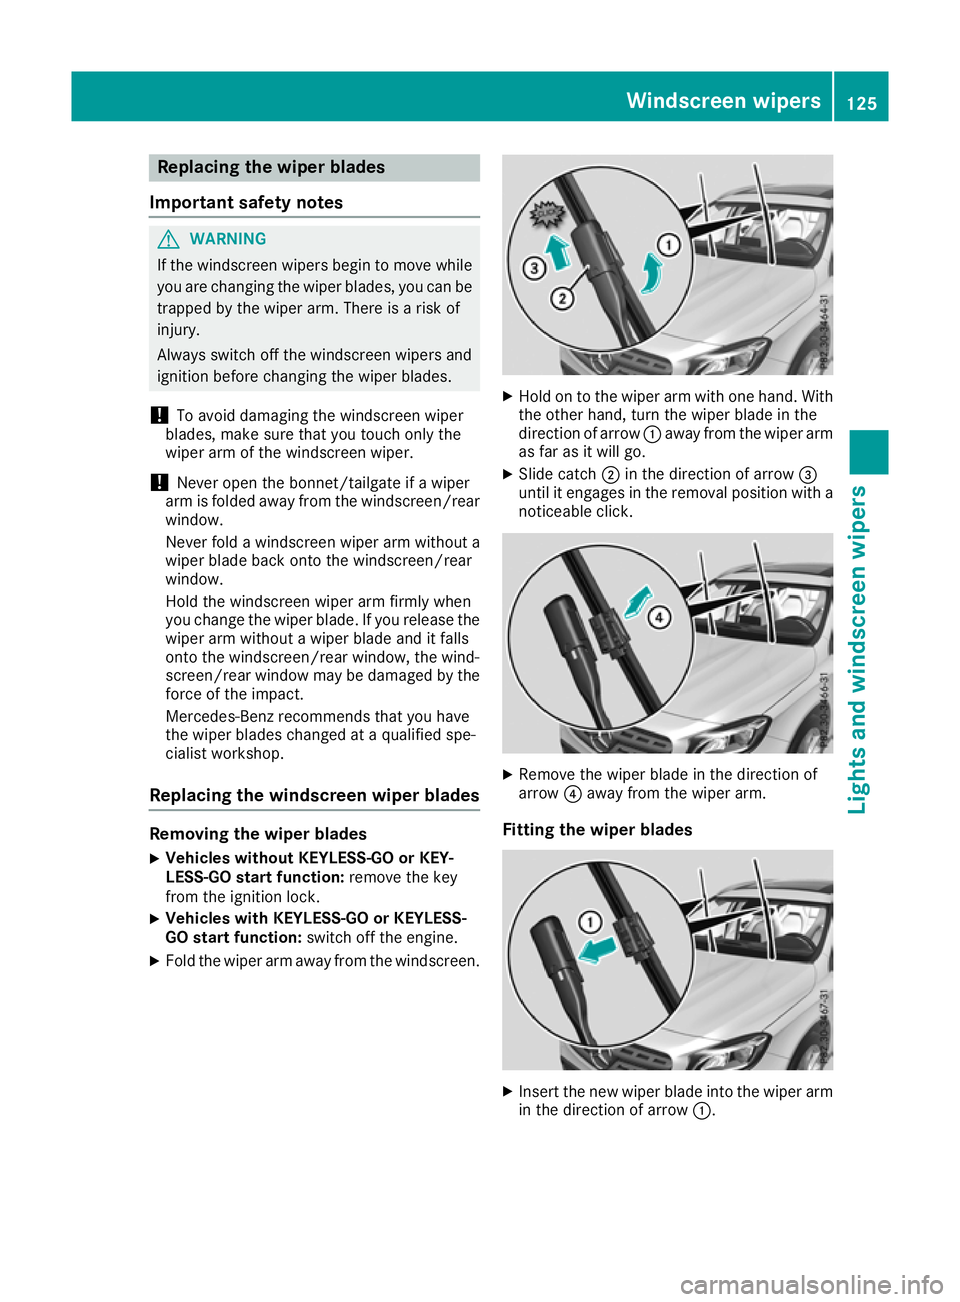
Replacing the wiper blades
Important safety notes G
WARNING
If the windscreen wipers begin to move while
you are changing the wiper blades, you can be trapped by the wiper arm. There is a risk of
injury.
Always switch off the windscreen wipers and
ignition before changing the wiper blades.
! To avoid damaging the windscreen wiper
blades, make sure that you touch only the
wiper arm of the windscreen wiper.
! Never open the bonnet/tailgate if a wiper
arm is folded away from the windscreen/rear
window.
Never fold a windscreen wiper arm without a
wiper blade back onto the windscreen/rear
window.
Hold the windscreen wiper arm firmly when
you change the wiper blade. If you release the
wiper arm without a wiper blade and it falls
onto the windscreen/rear window, the wind-
screen/rear window may be damaged by the
force of the impact.
Mercedes-Benz recommends that you have
the wiper blades changed at a qualified spe-
cialist workshop.
Replacing the windscreen wiper blades Removing the wiper blades
X Vehicles without KEYLESS-GO or KEY-
LESS-GO start function:
remove the key
from the ignition lock.
X Vehicles with KEYLESS-GO or KEYLESS-
GO start function:
switch off the engine.
X Fold the wiper arm away from the windscreen. X
Hold on to the wiper arm with one hand. With
the other hand, turn the wiper blade in the
direction of arrow :away from the wiper arm
as far as it will go.
X Slide catch ;in the direction of arrow =
until it engages in the removal position with a noticeable click. X
Remove the wiper blade in the direction of
arrow ?away from the wiper arm.
Fitting the wiper blades X
Insert the new wiper blade into the wiper arm
in the direction of arrow :. Windscreen wipers
125Lights and windscreen wipers Z
Page 129 of 369
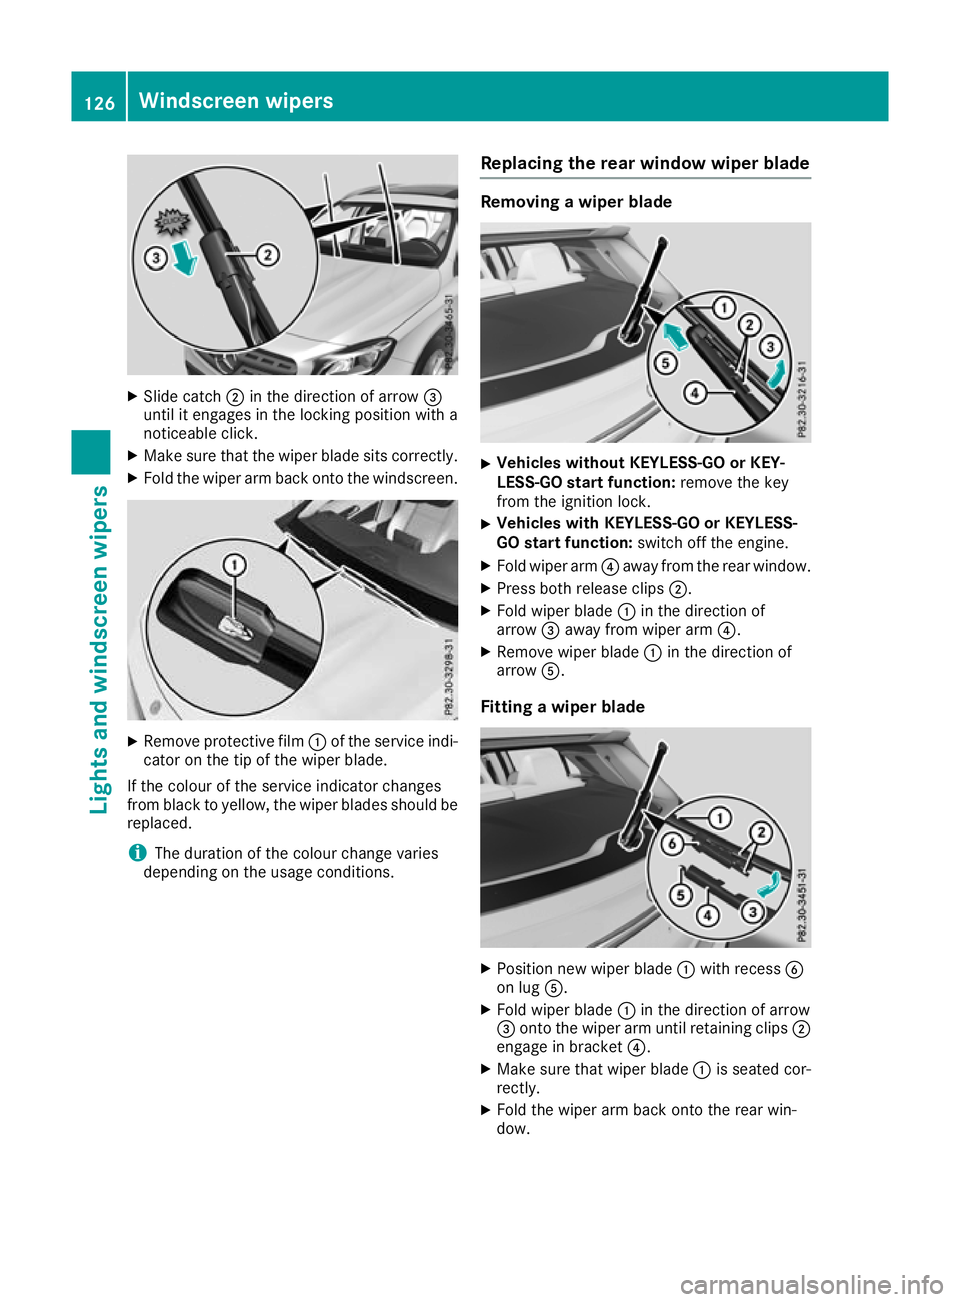
X
Slide catch ;in the direction of arrow =
until it engages in the locking position with a
noticeable click.
X Make sure that the wiper blade sits correctly.
X Fold the wiper arm back onto the windscreen. X
Remove protective film :of the service indi-
cator on the tip of the wiper blade.
If the colour of the service indicator changes
from black to yellow, the wiper blades should be replaced.
i The duration of the colour change varies
depending on the usage conditions. Replacing the rear window wiper blade Removing a wiper blade
X
Vehicles without KEYLESS-GO or KEY-
LESS-GO start function: remove the key
from the ignition lock.
X Vehicles with KEYLESS-GO or KEYLESS-
GO start function: switch off the engine.
X Fold wiper arm ?away from the rear window.
X Press both release clips ;.
X Fold wiper blade :in the direction of
arrow =away from wiper arm ?.
X Remove wiper blade :in the direction of
arrow A.
Fitting a wiper blade X
Position new wiper blade :with recess B
on lug A.
X Fold wiper blade :in the direction of arrow
= onto the wiper arm until retaining clips ;
engage in bracket ?.
X Make sure that wiper blade :is seated cor-
rectly.
X Fold the wiper arm back onto the rear win-
dow. 126
Windscreen wipersLights and windscreen wipers
Page 131 of 369
Overview of climate control systems
General notes
Observe the settings recommended on the fol-
lowing pages. Otherwise, the windows could
mist up.
To prevent the windows from misting up:
R switch off climate control only briefly
R activate air-recirculation mode only briefly
R activate the "Cooling with air dehumidifica-
tion" function
R activate the "Windscreen demisting" function
briefly, if required
The air-conditioning system or THERMOTRONIC automatic climate control regulates the temper-ature and the humidity of the vehicle interior andfilters undesirable substances from the air.
The air-conditioning system or THERMOTRONIC automatic climate control can only be operatedwhen the engine is running. Optimum operation
is only achieved with the side windows and pan- orama sliding sunroof closed.
The "Residual heat" function can only be
switched on or off if the ignition is switched off
(Y page 137).
Always keep the ventilation flaps behind the
side panelling clear (Y page 122). Otherwise the
vehicle will not be ventilated correctly.
i Ventilate the vehicle for a brief period during
warm weather, e.g. using the convenience
opening feature (Y page 98). This will speed up the cooling process and the desired inte-
rior temperature will be reached more
quickly.
i The integrated filter filters out most parti-
cles of dust and soot and completely filters
out pollen. With THERMOTRONIC automatic
climate control, gaseous pollutants and
odours will also be reduced. A clogged filter
reduces the amount of air supplied to the
vehicle interior. For this reason, you should
always observe the interval for replacing the
filter, which is specified in the Service Book-
let. As this depends on environmental condi-
tions, e.g. heavy air pollution, the interval may be shorter than stated in the Service Booklet.
i Vehicles with auxiliary heating:
Under
certain environmental conditions, the resid-
ual heat function may be activated automati-
cally an hour after the ignition key has been
removed in order to dry the automatic climate control. The blue LED on the rocker switch in
the centre console lights up when the active
function to dry the automatic climate control is on. The vehicle is then ventilated for
30 minutes.
Vehicles without auxiliary heating: Under
certain environmental conditions, the resid-
ual heat function may be activated automati-
cally an hour after the ignition key has been
removed in order to dry the automatic climate control. The vehicle is then ventilated for
30 minutes. 128
Overview of climate control systemsClimate control
Page 132 of 369

Control panel for air-conditioning system
:
To set the temperature (Y page 133)
; To demist the windscreen (Y page 134)
= To set the air distribution (Y page 133)
? To activate/deactivate air-recirculation mode (Y page 135)
A To set the airflow (Y page 134)
B To activate/deactivate cooling with air dehumidification (Y page 132)
C To switch the rear window heating on/off (Y page 135)Notes on using the air-conditioning
system
Air-conditioning system Below, you can find a number of tips and rec-
ommendations for optimum use of the air-con-
ditioning system.
R Switch on the air-conditioning system by turn-
ing control knob Aclockwise to the desired
position (except position 0).
R Set the temperature to 22 †.
R Recommendation for avoiding misted
windows at low exterior temperatures or
in rain: switch on the ¿cooling with dehu-
midification function (Y page 132).
Set air distribution to ¯and if possible
switch off PandO( Ypage 133).
Deactivate air-recirculation mode e
(Y page 135).
Set airflow control Ato a setting between 3
and 6(Y page 134). R
Recommendation for rapid cooling or
heating of the vehicle interior: briefly set
airflow control Ato a setting between 3and
6 (Y page 134).
R Recommendation for a constant vehicle
interior temperature: set airflow controlA
to a setting between 1and 3(Y page 134).
R Recommendation for air distribution in
winter: select the Oand¯ settings
(Y page 133).
Recommendation for air distribution in
summer: select the PorP and¯
settings (Y page 133).
R Use the "Windscreen demisting" function only
briefly until the windscreen is clear again.
R Use the "Air-recirculation mode" function only
briefly, e.g. if there are unpleasant outside
odours or when in a tunnel. The windows
could otherwise mist up as no fresh air is
drawn into the vehicle in air-recirculation
mode.
R If you change the settings of the climate con-
trol system, the climate status display Overview of climate control systems
129Climate control