2017 MERCEDES-BENZ GLA SUV clock
[x] Cancel search: clockPage 308 of 369
Topping up engine oil
G
WARNING
Certain components in the engine compart-
ment could be very hot, e.g. the engine, the
radiator and parts of the exhaust system.
There is a risk of injury when accessing the
engine compartment.
As far as possible, allow the engine to cool
down and only touch the components descri- bed in the following. G
WARNING
If engine oil comes into contact with hot com- ponents in the engine compartment, it may
ignite. There is a risk of fire and injury.
Make sure that engine oil does not spill out
over the filler neck. Allow the engine to cool
down and thoroughly clean the components
that have come into contact with engine oil
before you start the engine. H
Environmental note
When topping up the oil, take care not to spill
any. If oil enters the soil or waterways, it is
harmful to the environment.
! Use only engine oils and oil filters that are
approved for vehicles with a service system. A
list of the engine oils and oil filters that have
been tested and approved in accordance with Mercedes-Benz Specifications for Service
Products is available at any Mercedes-Benz
Service Centre.
The following cause engine failure or damage
to the exhaust system:
R Use of engine oils and oil filters that have
not been expressly approved for the service system
R Replacement of engine oil and oil filter after
the replacement interval specified by the
service system has expired
R Use of engine oil additives
! Do not add too much oil. Topping up with too
much engine oil can result in damage to the
engine or to the catalytic converter. Have
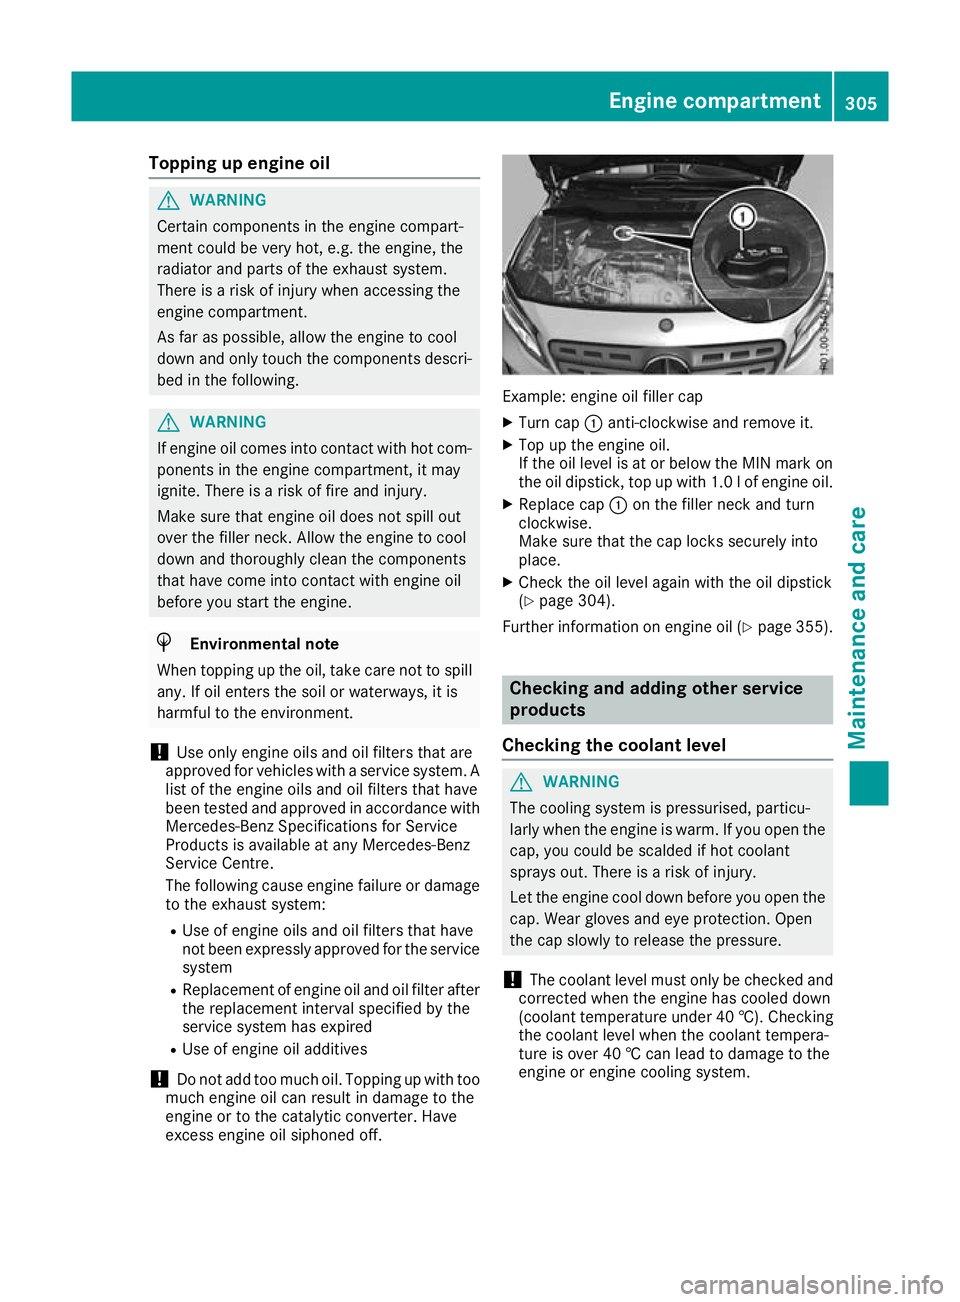
excess engine oil siphoned off. Example: engine oil filler cap
X Turn cap :anti-clockwise and remove it.
X Top up the engine oil.
If the oil level is at or below the MIN mark on
the oil dipstick, top up with 1.0 lof engine oil.
X Replace cap :on the filler neck and turn
clockwise.
Make sure that the cap locks securely into
place.
X Check the oil level again with the oil dipstick
(Y page 304).
Further information on engine oil (Y page 355). Checking and adding other service
products
Checking the coolant level G
WARNING
The cooling system is pressurised, particu-
larly when the engine is warm. If you open the cap, you could be scalded if hot coolant
sprays out. There is a risk of injury.
Let the engine cool down before you open the
cap. Wear gloves and eye protection. Open
the cap slowly to release the pressure.
! The coolant level must only be checked and
corrected when the engine has cooled down
(coolant temperature under 40 †). Checking
the coolant level when the coolant tempera-
ture is over 40 † can lead to damage to the
engine or engine cooling system. Engine compartment
305Maintenance and care Z
Page 309 of 369
X
Park the vehicle on a level surface.
Check the coolant level only if the vehicle is
on a level surface and the engine has cooled
down.
X Turn the key to position 2in the ignition lock
(Y page 144).
X Check the coolant temperature display in the
instrument cluster.
The coolant temperature must be below
40 †.
X Turn the key to position gin the ignition lock
(Y page 144).
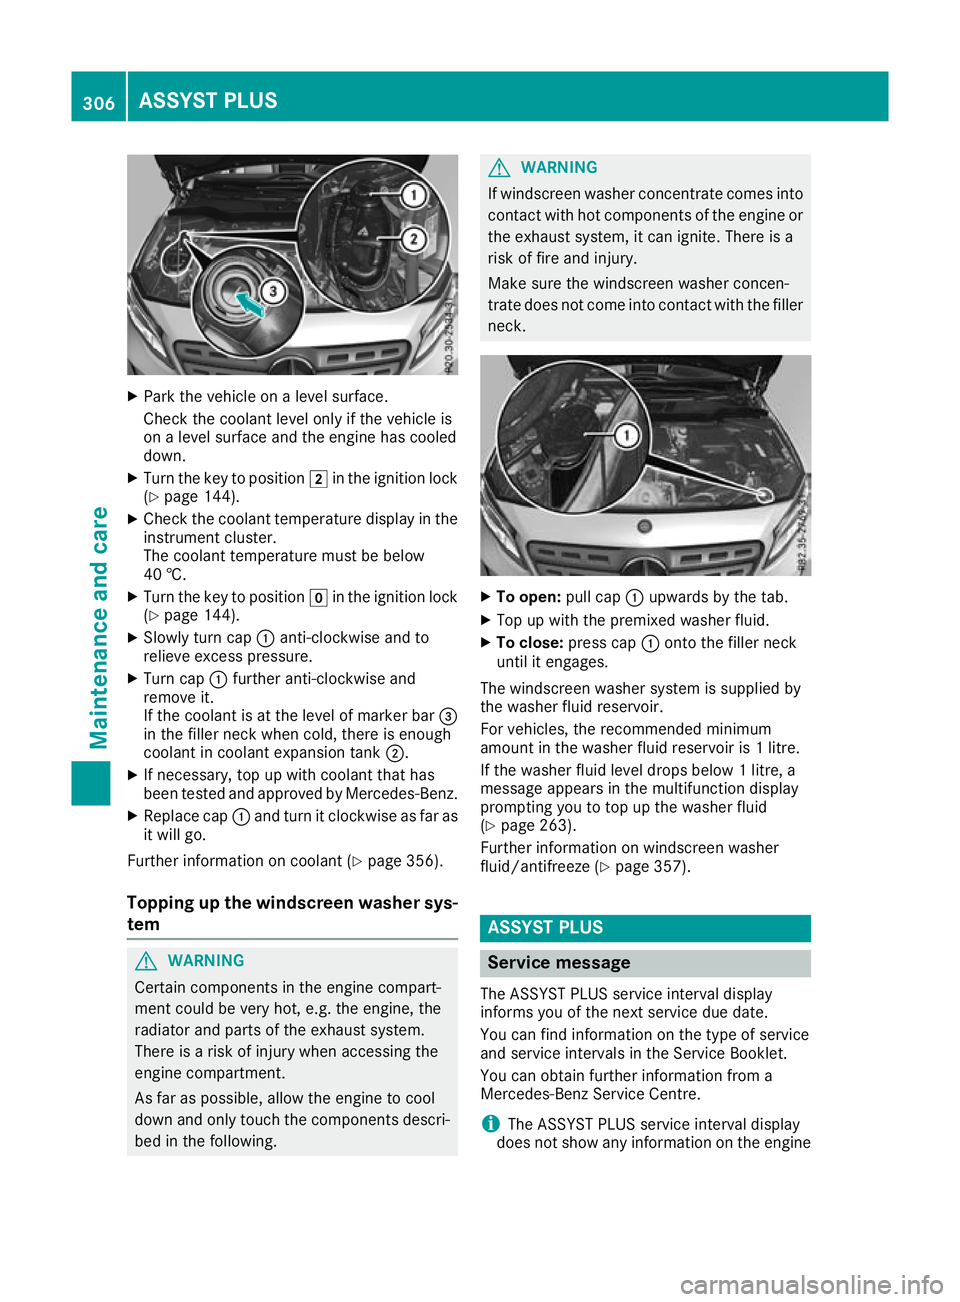
X Slowly turn cap :anti-clockwise and to
relieve excess pressure.
X Turn cap :further anti-clockwise and
remove it.
If the coolant is at the level of marker bar =
in the filler neck when cold, there is enough
coolant in coolant expansion tank ;.
X If necessary, top up with coolant that has
been tested and approved by Mercedes-Benz.
X Replace cap :and turn it clockwise as far as
it will go.
Further information on coolant (Y page 356).
Topping up the windscreen washer sys-
tem G
WARNING
Certain components in the engine compart-
ment could be very hot, e.g. the engine, the
radiator and parts of the exhaust system.
There is a risk of injury when accessing the
engine compartment.
As far as possible, allow the engine to cool
down and only touch the components descri- bed in the following. G
WARNING
If windscreen washer concentrate comes into contact with hot components of the engine or
the exhaust system, it can ignite. There is a
risk of fire and injury.
Make sure the windscreen washer concen-
trate does not come into contact with the filler neck. X
To open: pull cap:upwards by the tab.
X Top up with the premixed washer fluid.
X To close: press cap :onto the filler neck
until it engages.
The windscreen washer system is supplied by
the washer fluid reservoir.
For vehicles, the recommended minimum
amount in the washer fluid reservoir is 1 litre.
If the washer fluid level drops below 1 litre, a
message appears in the multifunction display
prompting you to top up the washer fluid
(Y page 263).
Further information on windscreen washer
fluid/antifreeze (Y page 357). ASSYST PLUS
Service message
The ASSYST PLUS service interval display
informs you of the next service due date.
You can find information on the type of service
and service intervals in the Service Booklet.
You can obtain further information from a
Mercedes-Benz Service Centre.
i The ASSYST PLUS service interval display
does not show any information on the engine 306
ASSYST PLUSMaintenance and care
Page 319 of 369
Warning triangle
Removing/replacing the warning trian-
gle X
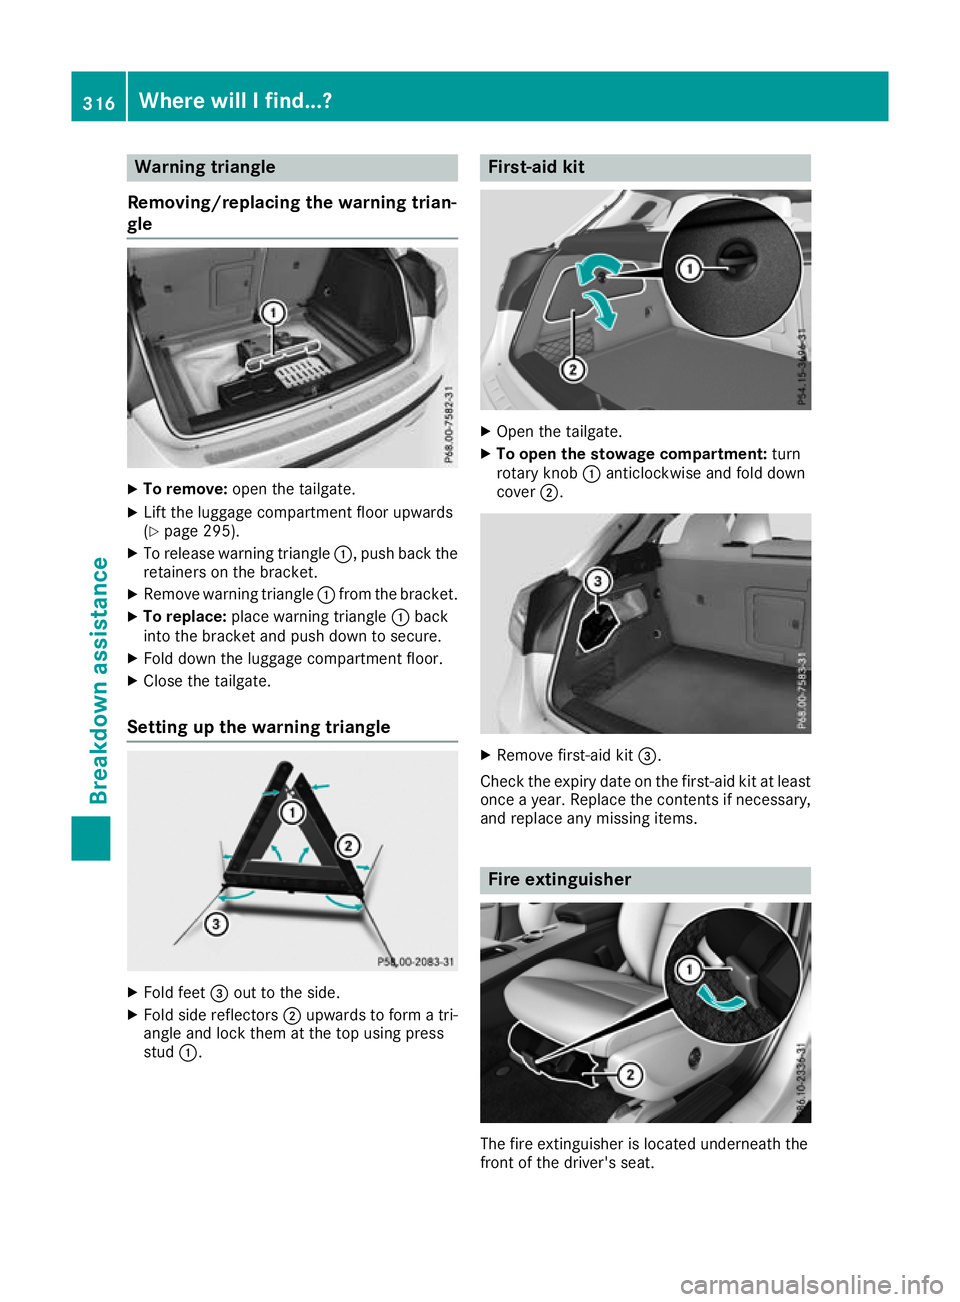
To remove: open the tailgate.
X Lift the luggage compartment floor upwards
(Y page 295).
X To release warning triangle :, push back the
retainers on the bracket.
X Remove warning triangle :from the bracket.
X To replace: place warning triangle :back
into the bracket and push down to secure.
X Fold down the luggage compartment floor.
X Close the tailgate.
Setting up the warning triangle X
Fold feet =out to the side.
X Fold side reflectors ;upwards to form a tri-
angle and lock them at the top using press
stud :. First-aid kit
X
Open the tailgate.
X To open the stowage compartment: turn
rotary knob :anticlockwise and fold down
cover ;. X
Remove first-aid kit =.
Check the expiry date on the first-aid kit at least once a year. Replace the contents if necessary,and replace any missing items. Fire extinguisher
The fire extinguisher is located underneath the
front of the driver's seat. 316
Where will I find...?Breakdown assistance
Page 327 of 369
In order for the battery to achieve the maximum
possible service life, it should always be suffi-
ciently charged.
Like other batteries, the vehicle battery may
discharge over time if you do not use the vehicle. In such cases, have the battery disconnected at
a qualified specialist workshop. However, you
can also charge the battery with a charger rec-
ommended by Mercedes-Benz. For more infor-
mation, please contact a qualified specialist
workshop.
Have the battery charge checked more fre-
quently if you use the vehicle mainly for short
trips or if you leave it standing idle for an exten- ded period. Consult a qualified specialist work-
shop if you wish to leave your vehicle parked up
for a long period of time.
When you park the vehicle, remove the key if you do not require any electrical consumers. The
vehicle will then use very little energy, thus con- serving battery power.
If the power supply has been interrupted, e.g. if
the battery was discharged, you will have to:
R set the clock using the multimedia system;
see the separate operating instructions
R reset the function for folding the exterior mir-
rors in/out automatically, by folding the mir-
rors out once (Y page 113) Charging the battery
G
WARNING
During charging and jump-starting, explosive
gases can escape from the battery. There is a risk of an explosion.
Particularly avoid fire, naked flames, creating
sparks and smoking. Ensure there is sufficient
ventilation while charging and jump-starting.
Do not lean over a battery. G
WARNING
Battery acid is caustic. There is a risk of injury. Avoid contact with the skin, eyes or clothing.
Do not breathe in any battery gases. Do not
lean over the battery. Keep the batteries out of the reach of children. Immediately rinse off
battery acid thoroughly with plenty of clean
water and seek medical attention at once. G
WARNING
A discharged battery can freeze at tempera-
tures below freezing point. When jump-start-
ing the vehicle or charging the battery, gases can escape from the battery. There is a risk of
an explosion.
Allow the frozen battery to thaw out before
charging it or jump-starting.
! Only use battery chargers with a maximum
charging voltage of 14.8 V.
! Only charge the battery using the jump-start
connection point.
The jump-starting connection point is in the
engine compartment (Y page 325).
X Open the bonnet.
X Connect the battery charger to the positive
terminal and earth point in the same order as
when connecting the donor battery in the
jump-starting procedure (Y page 325).
If the indicator/warning lamps do not light up in
the instrument cluster at low temperatures, it is very likely that the discharged battery has fro-
zen. In this case, you may neither jump-start the vehicle nor charge the battery. The service life of
a battery that has been thawed may be reduced. The starting characteristics may be impaired,
especially at low temperatures. Have the
thawed battery checked at a qualified specialistworkshop.
Only charge the installed battery with a battery
charger which has been tested and approved by Mercedes-Benz. A battery charger unit specially
adapted for Mercedes-Benz vehicles and tested and approved by Mercedes-Benz is available as
an accessory. This device permits charging of
the battery while it is installed. Contact a
Mercedes-Benz Service Centre for information
and availability. Read the battery charger's
operating instructions before charging the bat-
tery. 324
Battery (vehicle)Breakdown assistance
Page 332 of 369
The brackets for the screw-in towing eye are
located in the bumpers. They are located at the rear and at the front, under covers :.
X Remove the towing eye from the stowage
space.
The towing eye is located with the vehicle tool
kit under the luggage compartment floor
(Y page 317).
Vehicles with a TIREFIT kit: the towing eye is
located under the tyre inflation compressor
(Y page 317).
X Press the mark on cover :inwards in the
direction of the arrow.
X Remove cover :from the opening.
X Screw in the towing eye clockwise to the stop.
Vehicles with a trailer tow hitch only have a
bracket at the front for the screw-in towing eye.
If you intend to use the vehicle for towing, fold
out the ball coupling (Y page 214) and secure
the towbar to it.
Removing the towing eye X
Loosen the towing eye and unscrew it.
X Attach cover :to the bumper and press until
it engages.
X Place the towing eye in the stowage well
under the luggage compartment floor
(Y page 317).
X Vehicles with a TIREFIT kit: replace the tyre
inflation compressor (Y page 317).Towing the vehicle with the front axle
raised
When towing your vehicle with the front axle
raised, it is important that you observe the
safety instructions (Y page 327).
Only vehicles without 4MATIC can be towed
with the front axle raised.
! Vehicles with 4MATIC must not be towed
with the front or rear axle raised; otherwise,
the transmission may be damaged.
Vehicles with 4MATIC may either be towed with
both axles on the ground or be loaded and trans- ported.
! The ignition must be switched off if you are
towing the vehicle with the front axle raised. Intervention by ESP
®
could otherwise dam-
age the brake system.
X On vehicles with KEYLESS-GO or the KEY-
LESS-GO start function: you must use the
key instead of the Start/Stop button
(Y page 145).
X Make sure that the vehicle is stationary.
X Turn the key to position 2in the ignition
lock.
X When the vehicle is stationary, depress the
brake pedal and keep it depressed.
X Vehicles with automatic transmission:
shift the automatic transmission to position
j.
or X Vehicles with manual transmission:
depress the clutch pedal fully and shift to
neutral.
X Release the brake pedal.
X Release the electric parking brake.
X Deactivate tow-away protection (Y page 77).
X Deactivate automatic locking (Y page 229).
X Switch on the hazard warning lamps
(Y page 118).
X Turn the key in the ignition lock to position g
and leave the key in the ignition lock. Towing the vehicle away with all
wheels on the ground
It is important that you observe the safety
instructions when towing away your vehicle
(Y page 327).
X On vehicles with KEYLESS-GO or the KEY-
LESS-GO start function: you must use the
key instead of the Start/Stop button
(Y page 145).
Vehicles with automatic transmission: The
automatic transmission automatically shifts to
position jwhen you open the driver's or front-
passenger door or when you remove the key
from the ignition lock. In order to ensure that the
automatic transmission stays in position i
when towing away the vehicle, you must
observe the following points:
X Make sure that the vehicle is stationary.
X Turn the key to position 2in the ignition
lock. Towing away and tow-starting
329Breakdown assistance Z