2017 MERCEDES-BENZ G-Class interior lights
[x] Cancel search: interior lightsPage 4 of 286

Index....................................................... 4
Digital Operator's Manual..................22
Introductio n........................................... 22
Operation ............................................... 22
Introduction ......................................... 23
Protecting the environment ...................2 3
Genuine Mercedes-Ben zparts............... 23
Operator's Manual ................................. 24
Service and vehicle operation ................2 4
Operating safety .................................... 26
QR codes for rescue cards .................... 28
Data stored in the vehicle ......................2 8
Information on copyright ....................... 29
At ag lance ........................................... 31
Cockpit .................................................. 31
Instrument cluster .................................3 2
Multifunction steering wheel ................. 33
Center console ...................................... 34
Overhead control panel .........................3 6
Doorc ontrolpan el ................................. 37
Safety ................................................... 38
Occupant safety .................................... 38
Childre ninthe vehicl e........................... 49
Pets in the vehicl e................................. 57
Driving safety systems ........................... 57
Protection against theft .........................6 1
Opening and closing...........................63
SmartKey ............................................... 63
Doors ..................................................... 66
Rear door ............................................... 68
Side windows ......................................... 69
Sliding sunroof ....................................... 71
Seats, steering wheel and mirrors ....74
Correct driver's seat position ............... .74
Seats ..................................................... 74
Steering wheel ....................................... 79
Mirrors. .................................................. 81
Memory functions .................................. 83
Lights and windshield wipers ............85
Exterior lighting ..................................... 85
Interior lighting ...................................... 88
Replacing bulb s..................................... 88
Windshield wipers .................................. 92
Climate control .................................... 95
Overview of the climate control sys-
tem ........................................................ 95
Operating the climate control system .... 97
Air vents .............................................. 101
Drivin gand parking .......................... 103
Notesonb reaking-inanew vehicl e..... 103
Driving ................................................. 103
Adjustable damping ............................. 109
Automati ctransmissio n....................... 109
Refueling ............................................. 118
Parking ................................................ 120
Driving tip s.......................................... 122
Driving systems ................................... 131
Off-road driving systems ...................... 145
Towing atraile r.................................... 149
On-board computer and displays ....157
Important safety notes ........................ 157
Displays and operation ........................ 157
Menusa nd submenus ......................... 159
Displa ymessages ............................... 169
Warning and indicator lamps in the
instrument cluster ............................... 187
Multimedi asystem ........................... 198
Generaln otes ...................................... 198
Important safety notes ........................ 198
Function restrictions ............................ 198
Operating system ................................ 199
Stowag eand features ...................... 204
Loading guideline s............................... 204
Stowag eareas ..................................... 205
Feature s.............................................. 210
2Contents
Page 8 of 286

C
CaliforniaImportant notic efor retail cus-
tomersa nd lessees .......................... 24
Callin gupam alfunction
see Display messages
Camera
see Rear view camera
Care
Car wash ........................................ 231
Carpet s......................................... .237
Chrome parts. ................................ 23 5
Disp lay. ..........................................2 36
Exhaus tpipe. ................................. 235
Exterior lights ................................ 234
General notes ................................ 231
Interior ...........................................2 36
Matte finish ................................... 233
Paint .............................................. 233
Plastic trim ....................................2 36
Power washer ................................ 232
Rea rview camera .......................... 235
Roo flining ...................................... 237
Seat belt. ....................................... 237
Seat cover ..................................... 236
Selector lever. ............................... 236
Sensors ......................................... 234
Steering wheel. .............................. 236
Trimp ieces. ................................... 236
Washing by hand ........................... 232
Wheels. .......................................... 233
Window s........................................ 234
Wipe rblade s.................................. 234
Woode ntrim .................................. 236
Carg ocom partmentc over
Important safety notes .................. 209
Installing/removing ....................... 209
Notes/howtou se......................... 209
Opening and closing ...................... 209
Carg ocom partmente nlargement
Important safety notes .................. 206
Carg otie dow nrings ......................... 209
CD
see also Digital Operator's Man-
ual.................................................. 198
CD player/CD changer (on-board
computer) .......................................... 162 Cente
rc
ons
ole
Lower section .................................. 35
Overview .......................................... 34
Upper section .................................. 34
Central locking
Automati cloc king (on-board com-
puter) ............................................. 166
Locking/unlocking (SmartKey). ....... 63
Changeofa ddress.............................. 25
Changeofo wnership.......................... 25
Changin gbulbs
Standing lamp (rear) ........................ 91
Changin ggears .................................. 112
Child
Restraint system .............................. 50
Child seat
BabySmart™ ai rbag deactivation
system ............................................. 53
Forward-facing restraint system ...... 55
LATCH-typ e(ISOFIX) child seat
anchors ............................................ 51
On the front-passenger seat. ........... 54
Problem (malfunction) ..................... 55
Rearward-facing restraint system .... 54
Top Tether ....................................... 52
Child-proof locks
Important safety notes .................... 56
Rear doors ....................................... 56
Children
Specia lseatb eltr etractor ............... 50
Childrenint he vehicle
Important safety notes .................... 49
Chrome parts (cleaning instruc-
tions) .................................................. 235
Cigarette lighter ................................ 212
Cleaning
Mirror turn signal ........................... 234
Trailer tow hitch ............................. 235
Climate control
Controlling automaticall y................. 98
Cooling with ai rdehumidifica tion ..... 97
Defrosting the window s................... 99
Defrosting the windshield ................ 99
Dual-zone automatic climate con-
trol ................................................... 95
ECO start/stop function .................. 97
Important safety notes .................... 95
6Index
Page 13 of 286
Google™ Local Searchsee alsoD igital Operator's Man-
ual. ................................................. 198
GTW (Gross Trailer Weight) (defini-
tion) .................................................... 268
H
Hazard warning lamps ........................ 87
Head restraints
Adjusting .........................................7 6
Adjusting (rear )................................ 77
Installing/removing (rear )................ 77
Luxur y.............................................. 76
Resetting (front) ............................... 76
see NECK-PR Oheadr estraints
see NECK-PR Oluxuryh eadr estraints
Headlamps
Cleaning system (function) .............. 86
Cleaning system (notes) ................ 280
Fogging up ....................................... 87
Protective grill e................................ 90
see Automatic headlamp mode
Heating
see Climate control
Hig hbeamf lasher ............................... 87
High-beam headlamps
Display message ............................ 176
Switching on/off .............................. 87
HOLDf unction
Activating ....................................... 139
Activation conditions ..................... 139
Deactivating ................................... 139
Function/note s............................. 139
Generaln otes ................................ 139
Home address
see also Digital Operator's Man-
ual.................................................. 198
Hood
Closing ........................................... 226
Displa ymessage ............................ 186
Important safety notes .................. 225
Opening ......................................... 225
Horn ...................................................... 31
Hydroplaning ..................................... 125
I
Ignitionlock
see Key positions
Immobilizer .......................................... 61
Indicator lamp
Replacing bulb s(rear) ...................... 91
Insect protection on the radiator .... 226
Instrument cluster
Overview .......................................... 32
Warning and indicator lamps ........... 32
Instrument clusterl ighting .............. 157
Interior lighting
Automati ccontrol ............................ 88
Delayed switch-off (on-board
computer) ...................................... 166
Overview .......................................... 88
iPod
®
see also Digital Operator's Man-
ua l.................................................. 198
J
Jack
Pump lever ..................................... 270
Storage location ............................ 238
Using ............................................. 270
Jump starting (engine) ...................... 243
K
Keyp ositions
SmartKey ....................................... 104
L
Lap time (RACETIMER) ...................... 168
LATCH-type (ISOFIX )child seat
anchors ................................................ 51
License plate lamp (display mes-
sage) ................................................... 176
Light senso r(display message) ....... 176
Lights
Activating/deactivating the inte-
riorlighting delaye dswitch-off ....... 166
Automati cheadlamp mode. ............. 86
Combination switch ......................... 87
Fogged up headlamp s...................... 87
Generaln otes .................................. 85
Index11
Page 40 of 286
Occupant safety
Introduction to the restraint system
The restraint system can reduce the risk of vehi-cle occupant scomin ginto contact with parts of
the vehicle's interior in the event of an accident.
The restraint system can also reduce the forces to which vehicle occupant sare subjected during
an accident.
The restraint system comprises:
RSeat belt system
RAir bags
RChild restraint system
RChild seat securings ystems
The component softhe restraint system work in
conjunction with each other .They can only
deploy their protective function if, at all times, all
vehicle occupants:
Rhave fastened their seat belts correctly
(Ypage 41)
Rhave the seat and head restraint adjusted
properly (Ypage 74)
As the driver, you also have to make sure that
the steering wheel is adjusted correctly.
Observe the information relating to the correct
driver's seat position (
Ypage 74).
You also have to make sure that an air bag can
inflate properly if deployed (
Ypage 43).
An air bag supplement sacorrectly worn seat
belt. As an additional safety device, the air bag
increases the level of protection for vehicle
occupant sinthe event of an accident. For exam-
ple, if, in the event of an accident, the protection
offered by the seat belt is sufficient, the air bags
are not deployed. When an accidento ccurs,only
the air bags that increase protection in that par- ticular accidents ituation are deployed. How-
ever, seat belts and air bags generally do not
protec tagainst objects penetratin gthe vehicle
from the outside.
Information on restraint system operation can
be found under "Triggering of the Emergency
Tensioning Devices and air bags" (
Ypage 46).
See "Children in the vehicle" for information on
children travelin gwith you in the vehicle as well
as on child restraint systems (
Ypage 49).
Important safetyn otes
GWARNING
Modifications to the restraint system may
cause it to no longer work as intended. The
restraint system may then not perform its
intended protective function and may fail in an
accidentort rigger unexpectedly, for example.
This poses an increased risk of injur yoreven
fatal injury.
Never modify parts of the restraint system.
Never tamper with the wiring, the electronic
component sortheir software.
If it is necessary to modify component softhe
restraint system to accommodate aperson
with disabilities, contact an authorized
Mercedes-Benz Center for details. USA only:
for further information contact our Customer
Assistance Center at 1-800-FOR-MERCedes
(1‑ 800‑367‑ 6372).
Mercedes-Benz recommends that you only use
driving aids which have been approved specifi-
cally for your vehicle by Mercedes-Benz.
Restraint system warning lamp
The function softhe restraint system are
checked after the ignition is switched on and at
regular intervals while the engin eisrunning.
Therefore, malfunctions can be detected in
good time.
The 6 restraint system warning lamp on the
instrument cluster lights up when the ignition is
switched on. It goes out no later than afew sec-
onds after the vehicle is started. The compo-
nents of the restraint system are in operational
readiness.
Am alfunction has occurred if the 6restraint
system warning lamp:
Rdoes not light up after the ignition is switched
on
Rdoes not go out after afew seconds with the
engin erunning
Rlights up again while the engin eisrunning
GWARNING
If the restraint system is malfunctioning,
restraint system component smay be trig-
38Occupant safety
Safety
Page 55 of 286

XRemove cargo compartmentcover
(Ypage 209).
XMov ethe head restrain tup.
XInstall th eLATCH-type (ISOFIX) child restrain t
system wit hTop Tether .Always comply wit h
th ec hild restrain tsystem manufacturer' s
installation instruction swhen doin gso.
XRout eTop Tether belt =under th ehead
restrain tbetween th etwo head restrain tbars .
XHook Top Tether hoo k: of Top Tether belt
= intoT op Tether anchorage ;.
Mak esuret hatT op Tether belt =is no ttwis-
ted.
XTension Top Tether belt =.Always comply
wit hthe child restrain tsystem manufactur -
er' sinstallation instruction swhen doin gso.
XMov ehead restrain tbackd own again slightly
if necessar y(Ypage 77). Mak esuret hat
you do no tinterfere wit hthe correc trouting of
Top Tether belt =.
BabySmart™air bag deactivation sys-
tem
GWARNIN G
Electronic device sonthefront-passenger
seat can affec tthe function of th eBaby-
Smart ™air bag deactivation system, for
example:
RLaptop
RMobile phon e
RTransponder cards suc hasskipasses or
access passes
The front-passenger air bag could deplo yacci-
dentally or no tfunction as intended during an
accident. This poses an increased ris kof
injury or eve nfatal injury.
Do no tplac ea ny of th edevice smentioned
abov eors imilar device sonthefront-
passenger seat .Beaware of th estatus of th e
front-passenger fron tair bag bot hbefore and
during th ejou rney.
The BabySmart ™air bag deactivation system' s
sensor system in th efront-pa ssenger seat
detects whether aspecial Mercedes-Ben zchild
restrain tsystem wit hatransponder for th e
BabySmart ™air bag deactivation system has been installed. In this case, th
ePASSENG ER AIR
BA GO FFindicator lamp lights up and remain s
lit .T he front-passenger fron tair bag is deacti -
vated.
When th eSma rtKey is remove dfromt heignition
loc korisinp osition0,thePASSENGER AI RBAG
OF Findicator lamp does no tligh tup.
iIf th efront-pa ssenger fron tair bag is deac -
tivated by th eBabySmart ™air bag deactiva-
tion system, th ef
o
llowin gremain enabled on
th ef ront-pa ssenger side :
Rthes ide impact air bag
Rthep elvis air bag
Rthew indow curtai nair bag
RtheE me rgency Tensioning Devic e
GWARNING
If you secure achild in achild restrain tsystem
on th efront-pa ssenger seat and th e
PASSENGER AI RBAG OFFindicator lamp is
off ,the front-passenger fron tair bag can
deplo yintheevent of an accident. The child
could be struc kbytheair bag. This poses an
increased ris kofinjury or eve nfatal injury.
Mak esuret hatthe front-passenger fron tair
bag has been disabled. The PASSENGER AI R
BA GO FFindicator lamp mus tbelit.
GWARNIN G
If th ePASSENG ER AIRBAG OFFindicator
lamp is lit ,the front-passenger fron tair bag is
deactivated. It will no tbedeployed in th e
event of an acciden tand canno tperfor mits
intended protective function .Aperson in th e
front-passenger seat could then ,for example,
come int ocontac twitht he vehicle's interior,
especially if th eperson is sitting to oclose to
th ed ashboard. This poses an increased ris kof
injury or eve nfatal injury.
In this cas ethe front-passenger seat may no t
be used .You may only transpor tachild on th e
front-passenger seat if they are seated in a
suitable rearward or forward-facing child
restrain tsystem. Always observ ethe child
restrain tsystem manufacturer' sinstallation
instructions.
Children in th evehicle53
Safety
Z
Page 82 of 286
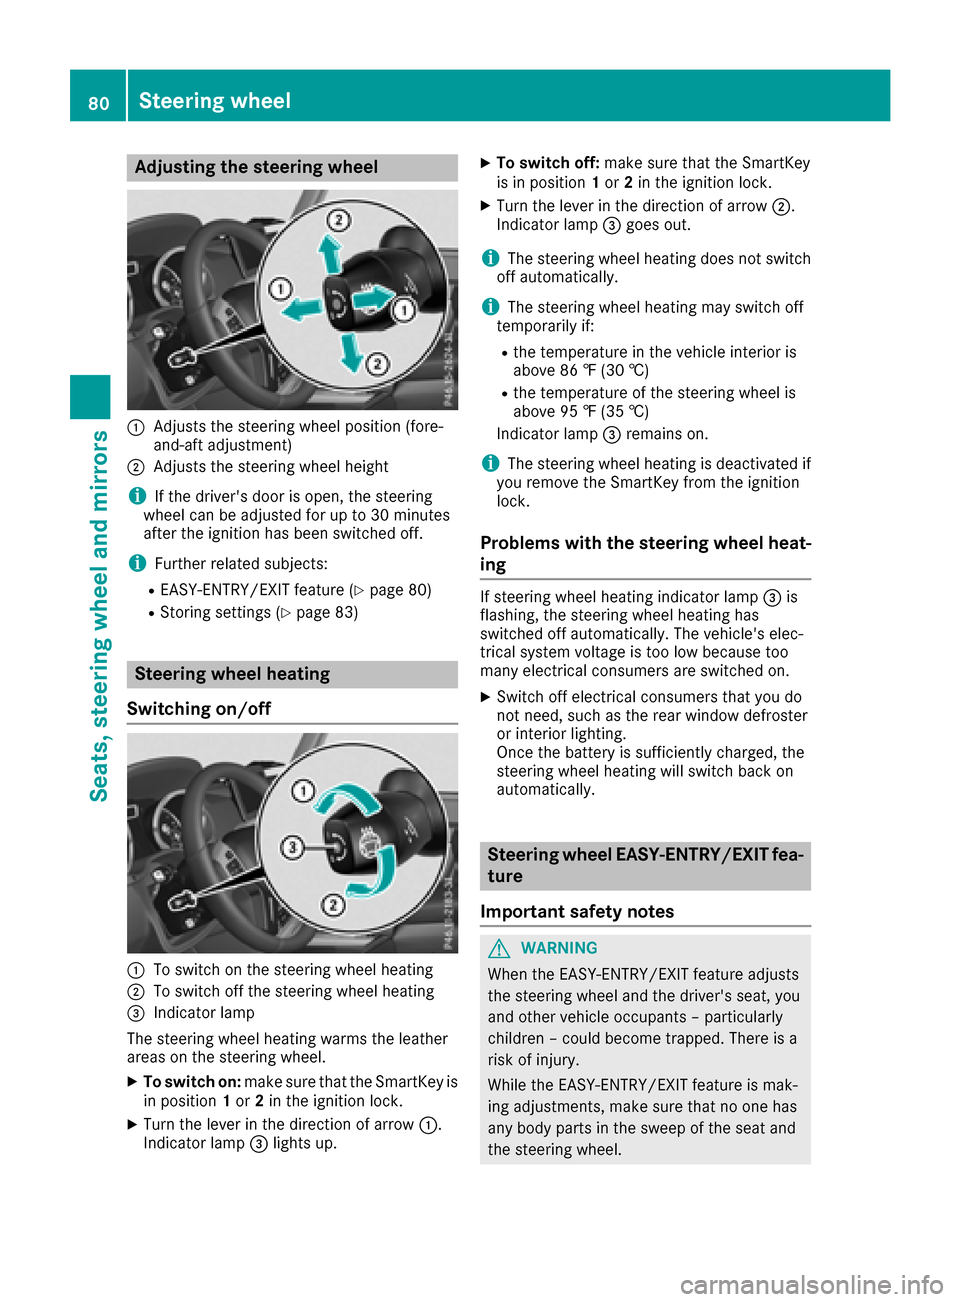
Adjusting thesteering wheel
:Adjusts th esteering whee lposition (fore-
and-af tadjustment)
;Adjusts th esteering whee lheight
iIf th edriver's door is open ,the steering
whee lcan be adjusted for up to 30 minute s
after th eignition has been switched off .
iFurther relatedsubjects :
REASY-ENTRY/EXIT feature (Ypage 80)
RStoring settings(Ypage 83)
Steering wheel heating
Switchin gon/off
:To switch on th esteering whee lheating
;To switch off th esteering whee lheating
=Indicato rlamp
The steering whee lheating warm sthe leather
areas on th esteering wheel.
XTo switch on: makesuret ha tthe SmartKey is
in position 1or 2in th eignition lock.
XTurn th elever in th edirection of arrow :.
Indicato rlamp =lights up.
XTo switch off :mak esuret hatthe SmartKey
is in position 1or 2in th eignition lock.
XTurn th elever in th edirection of arrow ;.
Indicato rlamp =goes out .
iThe steering whee lheating does no tswitch
off automatically.
iThe steering whee lheating may switch off
temporarily if:
Rth et em perature in th evehicl einterior is
abov e86‡ (30 †)
Rthet em perature of th esteering whee lis
abov e95‡ (35 †)
Indicato rlamp =remain son.
iThe steering whee lheating is deactivated if
you remove th eSmartKey from th eignition
lock.
Problemsw ith thesteering wheel heat-
ing
If steering whee lheating indicator lamp =is
flashing, th esteering whee lheating has
switched off automatically. The vehicle's elec -
trical system voltag eistoolow because to o
man yelectrical consumer sare switched on .
XSwitchoff electrical consumer sthaty ou do
no tn eed, suc hastherear window defroste r
or interior lighting .
Once th ebattery is sufficientl ycharged, th e
steering whee lheating will switch bac kon
automatically.
Steering wheel EASY-ENTRY/EX ITfea-
tu re
Import ant safety notes
GWARNIN G
When th eEASY-ENTRY/EXIT feature adjust s
th es teering whee land th edriver's seat ,you
and other vehicl eoccupant s–particularly
children –could become trapped .There is a
ris kofi njury.
Whil ethe EASY-ENTRY/EXIT feature is mak -
ing adjustments ,makes uret hatnoo nehas
any body part sintheswee poft heseat and
th es teering wheel.
80Steering wheel
Seats ,steering wheel and mirrors
Page 90 of 286
Interior lighting
Overview of interior lighting
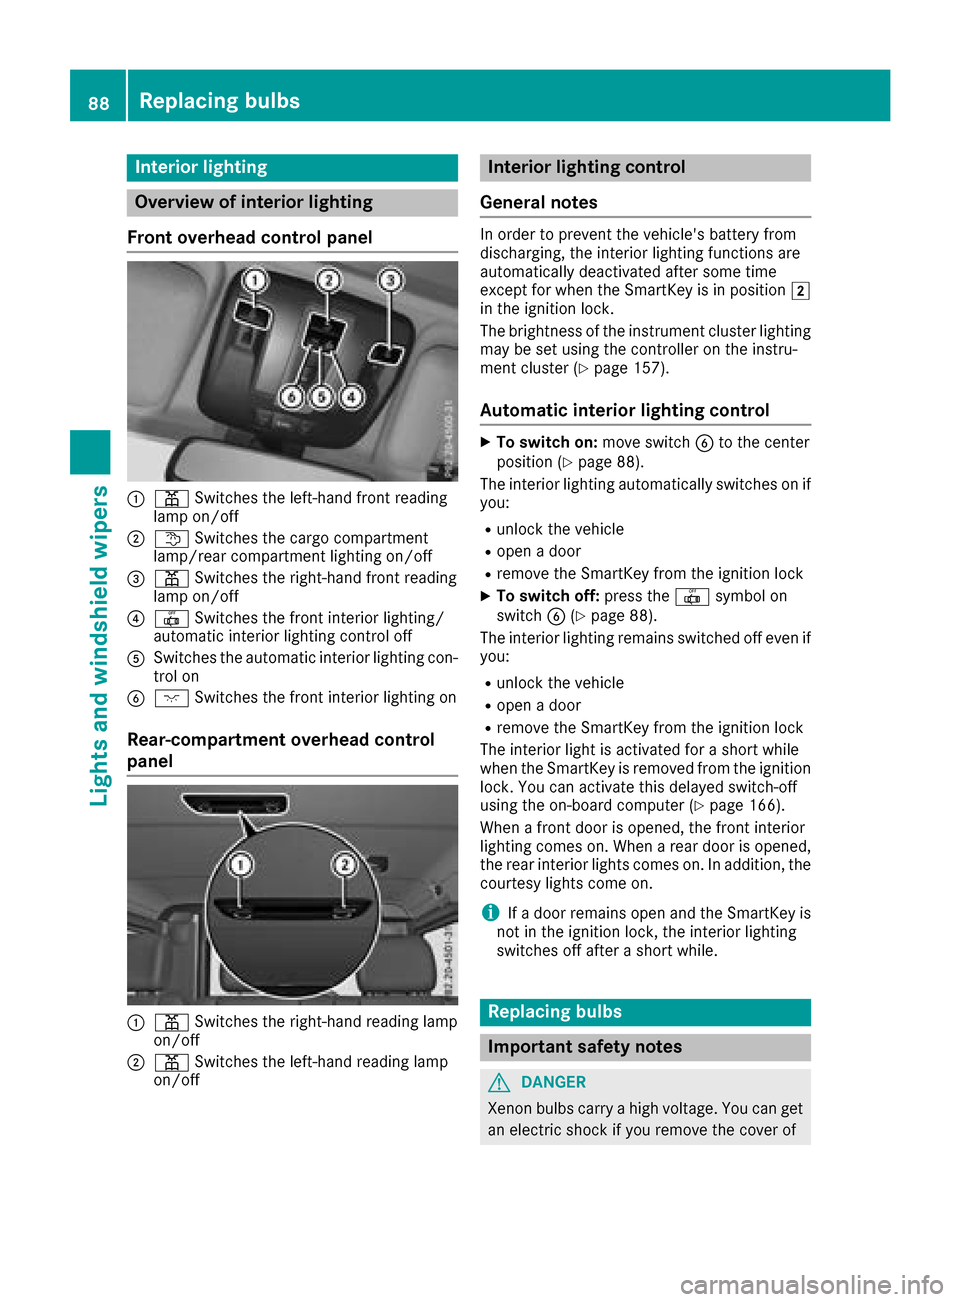
Fron toverhea dcontrol panel
:p Switches th eleft-han dfront reading
lamp on/off
;t Switches th ecargo compartmen t
lamp/rear compartmen tlighting on/off
=p Switches th eright-hand fron treading
lamp on/off
?| Switches th efront interio rlighting /
automatic interior lighting control off
ASwitches th eautomatic interio rlighting con-
trol on
Bc Switches th efront interio rlighting on
Rear-compartment overhea dcontrol
panel
:p Switches th eright-hand reading lamp
on/off
;p Switches th eleft-han dreading lamp
on/off
Interior lighting control
General notes
In order to preven tthe vehicle's battery from
discharging, th einterior lighting function sare
automatically deactivated after som etime
except for when th eSmartKey is in position 2
in th eignition lock.
The brightness of th einstrumen tcluste rlighting
may be set usin gthe controller on th einstru-
men tcluste r(
Ypage 157).
Automati cinterior lighting control
XTo switch on: moveswitch Bto th ecenter
position (Ypage 88) .
The interior lighting automatically switches on if
you:
Runlock th evehicl e
Ropen adoor
Rremove th eSmartKey from th eignition loc k
XTo switch off :press th e| symbol on
switch B(Ypage 88).
The interior lighting remain sswitched off eve nif
you:
Runlock th evehicl e
Ropen adoor
Rremove th eSmartKey from th eignition loc k
The interior ligh tisactivated for ashort while
when th eSma rtKey is remove dfromt heignition
lock. You can activat ethisd elaye dswitch-off
usin gthe on-board computer (
Ypage 166).
When afront door is opened, th efront interior
lighting comes on .When arear door is opened,
th er ear interior lights comes on .Inaddition ,the
courtesy lights come on .
iIfad oor remain sopen and th eSmartKey is
no tint heignition lock, th einterior lighting
switches off after ashort while .
Replacingbulbs
Important safety notes
GDANGER
Xenon bulbs carry ahigh voltage. You can get
an electric shock if you remove th ecover of
88Replacingb ulbs
Lightsand windshield wipers
Page 103 of 286
Switching air-recirculation mode
on/off
General notes
If you switch on air-recirculation mode, the win-
dows can fog up more quickly, in particular at
low temperatures. Only use air-recirculation
mode briefly to prevent the windows from fog-
ging up.
Activating/deactivating
XTurn the SmartKey to position 2in the igni-
tion lock (Ypage 104).
XTo activate: press thedbutton.
The indicator lamp in the dbutton lights
up.
iAir-recirculation mode is automatically acti-
vated at high levels of pollution or at high out-
side temperatures. When air-recirculation
mode is activated automatically, the indicator
lamp in the dbutton is not lit.
Outside air is added after about 30 minutes.
XTo deactivate: press thedbutton.
The indicator lamp in the dbutton goes
out.
iAir-recirculation mode switches off auto-
matically:
Rafter approximately five minutes at outside
temperatures below approximately 41 ‡
Rafter approximately five minutes if cooling
with air dehumidification is deactivated
Rafter approximately 30 minutes at outside
temperatures above approximately 41 ‡
(5 †)
Switching the residual heat on or off
General notes
The residual heat function is only available on
vehicles for Canada.
It is possible to make use of the residual heat of
the engine to continue heating the stationary
vehicle for up to 30 minutes after the engine has
been switched off. The heating time depends on the set interior temperature.
Activating/deactivating
XTurn the SmartKey to position gin the igni-
tion lock (Ypage 104) or remove it.
XTo activate: press theÁbutton.
The indicator lamp in the Ábutton lights
up.
iThe blower will run at alow speed regardless
of the airflow setting.
iIf you activate the residual heat function at
high temperatures, only the ventilation will be
activated.
XTo deactivate: press theÁbutton.
The indicator lamp in the Ábutton goes
out.
Residual heat is deactivated automatically:
Rafter approximately 30 minutes
Rwhen the ignition is switched on
Rif the battery voltage drops
Rif the coolant temperature is too low
Air vents
Important safety notes
GWARNING
Very hot or very cold air can flow from the air
vents. This could result in burns or frostbitei n
the immediate vicinity of the air vents. There
is ar isk of injury.
Make sure that all vehicle occupants always
maintain asufficient distance to the air out-
lets. If necessary, redirect the airflow to
another area of the vehicle interior.
In order to ensure the direct flow of fresh air
through the air ventsi nto the vehicle interior,
please observe the following notes:
Rkeep the air inlet between the windshield and
the hood free of blockages, such as ice, snow or leaves.
Rnever cover the air ventsora ir intake grilles in
the vehicle interior.
iFor virtually draft-free ventilation, adjust the
sliders of the air ventstot he center position.
iIf the automatic climate control constantly
differs from the set temperature or if unde-
Air vents101
Climatec ontrol
Z