2017 MERCEDES-BENZ G-Class engine
[x] Cancel search: enginePage 68 of 286

Problems with the SmartKey
ProblemPossible causes/consequences andMSolutions
You can no longer lock or
unlock the vehicle using
the SmartKey.The SmartKey battery is discharged or nearly discharged.
XCheck the SmartKey battery (Ypage 65) and replace it if necessary
(Ypage 65).
If this does not work:
XLock or unlock the vehicle using the mechanical key (Ypage 68).
There is interference from apowerful source of radio waves.
XLock or unlock the vehicle using the mechanical key (Ypage 68).
The SmartKey is faulty.
XLock or unlock the vehicle using the mechanical key (Ypage 68).
XHave the SmartKey checked at aqualified specialist workshop.
The engine cannot be
started using the Smart-
Key.The on-board voltage is too low
XSwitch off non-essential consumers, e.g. seat heating or interior
lighting, and try to start the engine again.
If this does not work:
XCheck the starter battery and charge it if necessary (Ypage 243).
or
XJump-start the vehicle (Ypage 243).
or
XConsult aqualified specialist workshop.
You have lost aSmart-
Key.XHave the SmartKey deactivated at aqualified specialist workshop.
XReport the loss immediately to the vehicle insurers.
XIf necessary, have the locks changed as well.
You have lost the
mechanical key.XReport the loss immediately to the vehicle insurers.
XIf necessary, have the locks changed as well.
Doors
Important safety notes
GWARNING
If children are left unsupervised in the vehicle,
they could:
Ropen the doors, thus endangering other
people or road users.
Rget out and disrupt traffic.
Roperate the vehicle's equipment.
Additionally, children could set the vehicle in
motion if, for example, they:
Rrelease the parking brake.
Rshifting the automatic transmission out of
park position P
RStart the engine.
There is arisk of an accident and injury.
When leaving the vehicle, always take the
SmartKey with you and lock the vehicle. Never
leave children or animals unattended in the
vehicle. Always keep the SmartKey out of
reach of children.
66Doors
Opening and closing
Page 70 of 286
XTo deactivate:press and holdbutton :for
approximatelyf ives econds unti latone
sounds.
XTo activate: press and hol dbutton ;for
approximatelyf ives econds unti latone
sounds.
If yo upress one of the two buttons and do not
hea rat one, the relevant setting hasa lready
been selected.
The vehicl eislocked automaticall ywhent he
ignition is switched on and the wheels are turn-
ing.
Yo uc ould therefore be locked outi f:
Rthe vehicleisbeing pushed.
Rthe vehicl eisbeing towed.
Rthe vehicl eisbeing teste donadynamometer.
Yo uc an also switch the automatic locking func-
tio nona nd off using the on-board computer
(
Ypage 166).
Locking/unlockin gthe driver's door
with the mechanical key
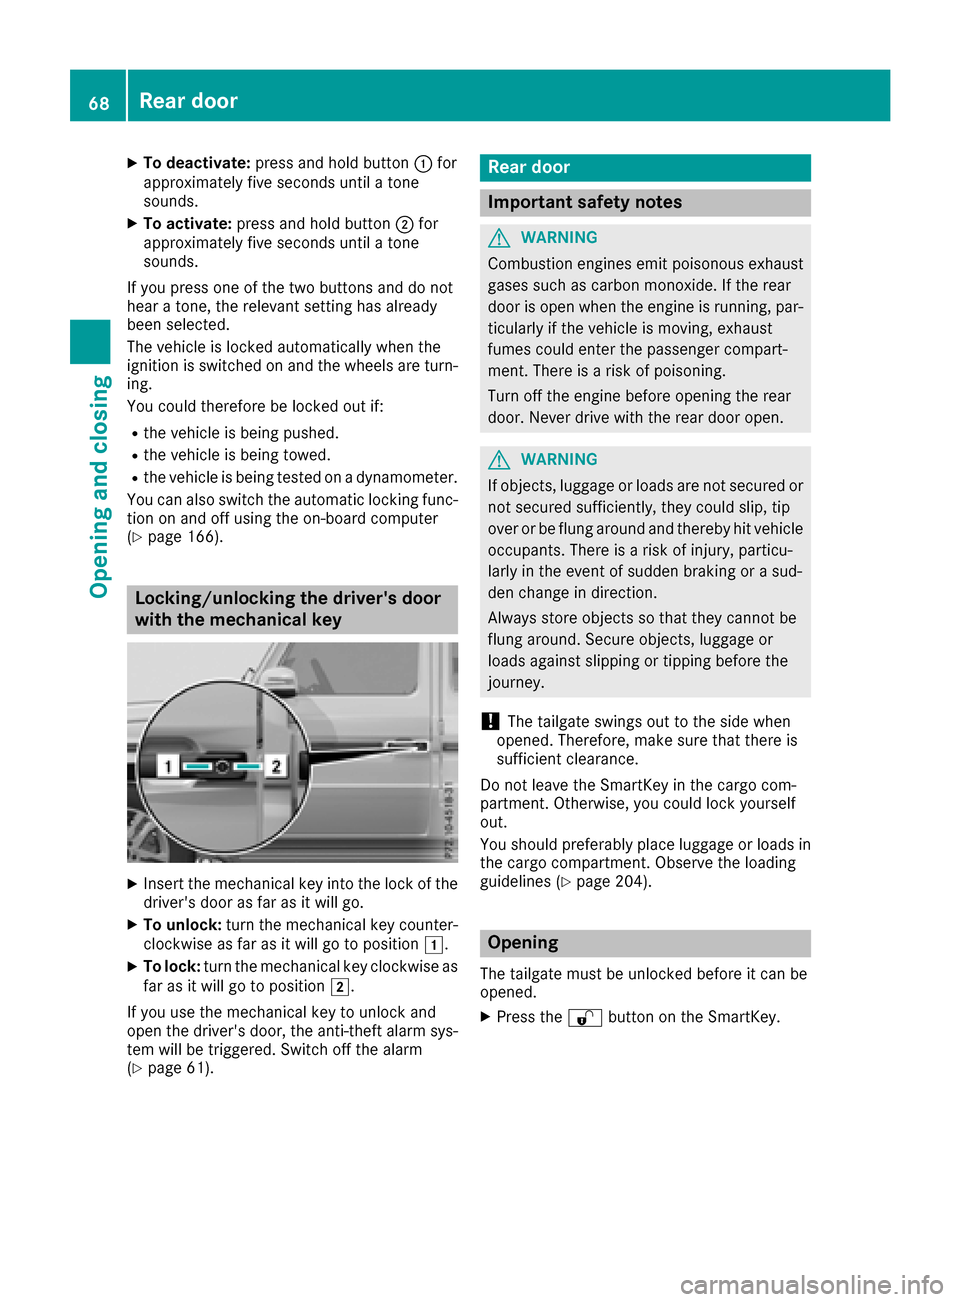
XInsert the mechanical key into the lock of the driver's door as far as it will go.
XTo unlock: turn the mechanical key counter-
clockwise as far as it will go to position 1.
XTo lock:turn the mechanical key clockwise as
far as it will go to position 2.
If yo uusethe mechanical key to unlock and
open the driver's door, the anti-thef talarm sys-
tem will be triggered .Switch off the alarm
(
Ypage 61).
Rear door
Important safety notes
GWARNING
Combustio nengines emi tpoison ouse xhaust
gases such as carbo nmonoxide. If the rear
door is open when the engine is running ,par-
ticularly if the vehicl eismoving, exhaust
fumes could enter the passenger compart-
ment. There is ariskofp oisoning .
Turn off the engine before opening the rear
door. Never drive with the reard ooro pen.
GWARNING
If objects, luggage or load sare not secured or
not secured sufficiently ,they could slip ,tip
overorbef lung around and thereb yhitvehicle
occupants. There is ariskofi njury,p articu-
larly in the event of sudden braking or asud-
de nc hange in direction.
Alway sstoreo bjects so thatt hey cannotbe
flung around .Secure objects, luggage or
load sagain st slipping or tipping before the
journey.
!The tailgate swing soutto the side when
opened. Therefore, make sure thatt hereis
sufficient clearance.
Do not leave the SmartKey in the cargo com-
partment. Otherwise, yo ucould lock yourself
out.
Yo us houl dpreferabl yplace luggage or load sin
the cargo compartment. Observe the loading
guideline s(
Ypage 204).
Opening
The tailgate must be unlockedb efore it can be
opened.
XPress the %button on the SmartKey.
68Rear door
Opening and closing
Page 71 of 286
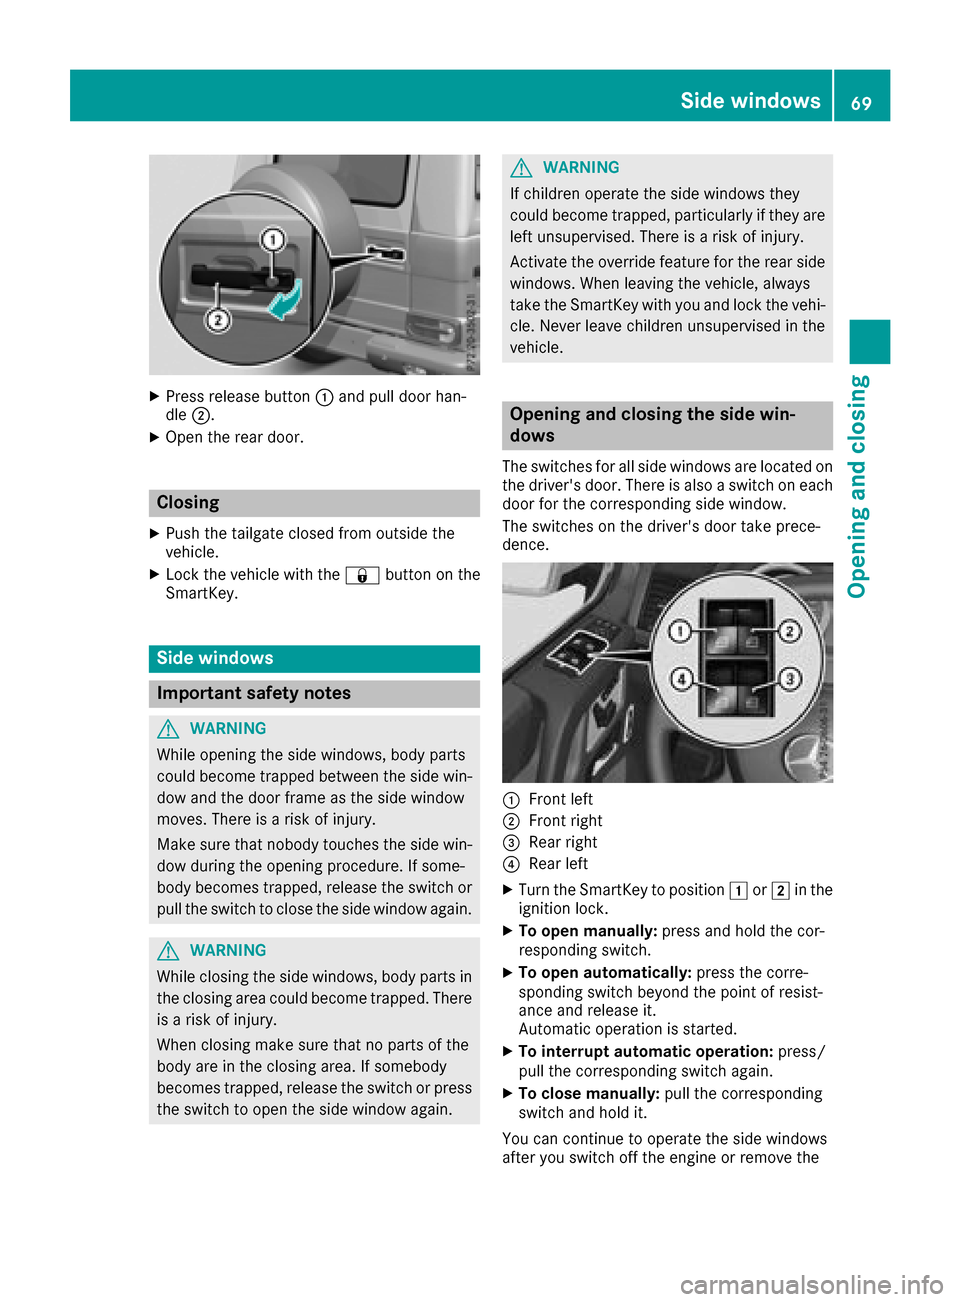
XPress release button:and pull door han-
dle ;.
XOpen the rear door.
Closing
XPush the tailgate closed from outside the
vehicle.
XLock the vehicle with the &button on the
SmartKey.
Side windows
Important safety notes
GWARNING
While opening the side windows, body parts
could become trapped between the side win-
dow and the door frame as the side window
moves. There is arisk of injury.
Make sure that nobody touches the side win-
dow during the opening procedure. If some-
body becomes trapped, release the switch or
pull the switch to close the side window again.
GWARNING
While closing the side windows, body parts in
the closing area could become trapped. There is ar isk of injury.
When closing make sure that no parts of the
body are in the closing area. If somebody
becomes trapped, release the switch or press
the switch to open the side window again.
GWARNING
If children operate the side windows they
could become trapped, particularly if they are left unsupervised. There is arisk of injury.
Activate the override feature for the rear side
windows. When leaving the vehicle, always
take the SmartKey with you and lock the vehi-
cle. Never leave children unsupervised in the
vehicle.
Opening and closing the side win-
dows
The switches for all side windows are located on
the driver's door. There is also aswitch on each
door for the corresponding side window.
The switches on the driver's door take prece-
dence.
:Frontl eft
;Frontr ight
=Rear right
?Rear left
XTurn the SmartKey to position 1or2 in the
ignition lock.
XTo open manually: press and hold the cor-
respondings witch.
XTo open automatically: press the corre-
sponding switch beyond the point of resist-
ance and release it.
Automatic operation is started.
XTo interrupt automatic operation: press/
pull the corresponding switch again.
XTo close manually: pull the corresponding
switch and hold it.
You can continue to operate the side windows
after you switch off the engine or remove the
Side windows69
Opening and closing
Z
Page 77 of 286
GWARNING
You coul dlose control of you rvehicleify ou do
the following while driving:
Radjust the driver's seat, headr estraint,
steering wheelorm irrors
Rfasten the seat belt
There is arisk of an accident.
Adjust the driver's seat, headr estraint, steer-
ing wheela nd mirror and fasten you rseat belt
before starting the engine.
GWARNING
If the headr estraints are not installed or not
adjusted correctly, they cannot providep ro-
tection as intended. There is an increased risk
of injury in the heada nd neck area,e.g. in the
event of an accident or when braking.
Always drive with the headr estraints instal-
led.B efore driving off, make sure for every
vehicleo ccupant that the center of the head
restraint supports the back of the heada t
about eye level.
Make sure that you do not rotate the head
restraints of the front and rear seats when
adjusting the headr estraints. Otherwise, you
cannot adjust the height and angle of the head
restraints correctly.
Adjust the headr estraint so that it is as close as
possible to you rhead.
GWARNING
If you adjust the seat height carelessly, you or
other vehicleo ccupants couldbetrappe dand
thereby injured .Childreninp articular could
accidentally press the electricals eat adjust-
ment buttons and become trapped. There is a
risk of injury.
Whilem oving the seats, make sure that your
hands or other body parts do not get under the
levera ssembly of the seat adjustment sys-
tem.
GWARNING
When you adjust aseat, you or other vehicle
occupants coul dbecome trapped, e.g. on the
seat guide rail .There is arisk of injury.
Make sure when adjusting aseat that no one
has any body parts in the sweepoft he seat.
!To avoiddamage to the seats and the seat
heating, observe the following information:
Rkeep liquid sfrom spilling on the seats. If
liquid is spilled on the seats, dry them as
soon as possible.
Rif the seat covers are damp or wet, do not
switch on the seat heating. The seat heat-
ing should als onot be used to dry the seats.
Rcleant he seat covers as recommended;
see "Interio rcare".
Rdo not transport heav yloads on the seats.
Do not place sharp objects on the seat
cushions, e.g. knives, nail sortools. The
seats should only be occupied by passen-
gers, if possible.
Rwhen the seat heating is in operation, do
not cover the seats with insulating materi-
als ,e.g. blankets, coats, bags, seat covers,
child seats or booster seats.
!Make sure that there are no objects in the
footwellu nder or behind the seats when mov-
ing the seats back. There is arisk that the
seats and/or the objects coul dbedamaged.
!When the rear bench seat is foldedf or-
wards, the front seats cannot be moved to
their rearmost position. You coul dotherwise
damage the seats and the rear bench seat.
!Make sure that the sun visor is foldedu p
before adjusting the backrest and head
restraint height. The head restraint and sun
visor coul dotherwise collide when the head
restraint is full yextended.
iIf the front door is open, the seats can be
adjusted for up to 30 minutes after the igni-
tion has been switched off.
iThe rear-compartment head restraints can
be removed (Ypage7 7).
For more information, contact aqualified spe-
cialist workshop.
iYou can find further information about
enlarging the cargo compartment (folding the
rear bench seat forwards) on (
Ypage2 08).
Seats75
Seats, steering wheel and mirrors
Z
Page 81 of 286
The system automatically switches off
approximately 35 minutes after it is set to
level1.
Switching the seat ventilation on/off
Switching on/off
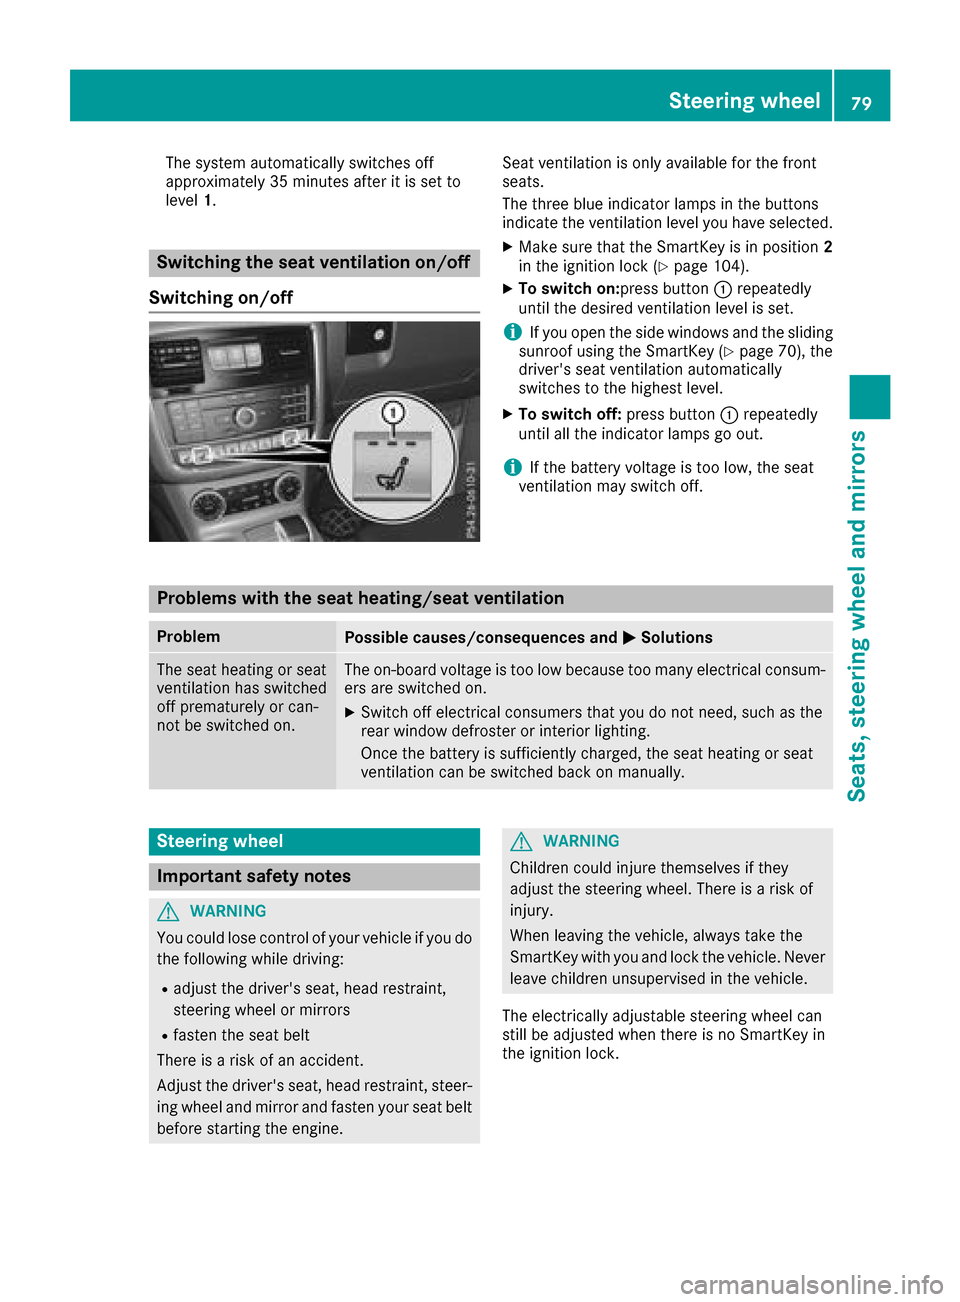
Seat ventilation is only availablef or the front
seats.
The three blue indicator lamps in the buttons
indicate the ventilation level you have selected.
XMake sure that the SmartKey is in position 2
in the ignition lock (Ypage 104).
XTo switch on:press button :repeatedly
until the desired ventilation level is set.
iIf you open the side windows and the sliding
sunroof using the SmartKey (Ypage 70), the
driver's seat ventilation automatically
switches to the highest level.
XTo switch off: press button:repeatedly
until all the indicator lamps go out.
iIf the battery voltage is too low, the seat
ventilation may switch off.
Problems with the seat heating/seat ventilation
ProblemPossible causes/consequences and MSolutions
The seat heating or seat
ventilation has switched
off prematurely or can-
not be switched on.The on-board voltage is too low because too many electrical consum-
ers are switched on.
XSwitch off electrical consumersthat you do not need, such as the
rear window defroster or interior lighting.
Once the battery is sufficiently charged, the seat heating or seat
ventilation can be switched back on manually.
Steering wheel
Important safety notes
GWARNING
You could lose control of your vehicle if you do the following while driving:
Radjust the driver's seat, head restraint,
steerin gwheel or mirrors
Rfasten the seat belt
There is arisk of an accident.
Adjust the driver's seat, head restraint, steer-
ing wheel and mirror and fasten your seat belt before starting the engine.
GWARNING
Children could injure themselves if they
adjust the steerin gwheel. There is arisk of
injury.
When leaving the vehicle, alwayst ake the
SmartKey with you and lock the vehicle. Never
leave children unsupervised in the vehicle.
The electrically adjustable steerin gwheel can
still be adjusted when there is no SmartKey in
the ignition lock.
Steering wheel79
Seats, steering wheel and mirrors
Z
Page 87 of 286

Exteriorlighting
General notes
USAo nly: if you wish to driv edurin gthe daytime
without lights, switch off the DaytimeRun‐
ningLightsfunction via th eon-board com-
puter (Ypage 165).
Light switch
Operation
1 WLeft-hands tanding lamps
2 XRight-hand standing lamps
3TParking lamps ,side marke rlamps,
licens eplatea nd instrumen tcluster
lighting
4 ÃAutomatic headlampm ode, controlled
by th elight sensor
5 LLow-beam/high-beam headlamps
BRRear fog lamp
If you hear awarning tone when you leave the
vehicle ,the lightsm ay still be switched on.
XTurn thelight switch to the Ãposition.
The exteriorl ighting,except th eparking lamps/
standing lamps ,switches off automaticall yif
you:
Rremove th eSmartKey from th eignition lock
Ropen th edriver'sd oor with th eSmartKey in
position u
Low-bea mheadlamps
GWARNING
When th elight switch is set to Ã,thelow-
beam headlamps may no tbeswitched on
automaticall yifthere is fog ,sno woro ther
causes of poor visibilityd ue to theweather
conditionss uchasspray. Thereisar isk of an
accident.
In suchs ituations,tur nt he light switch to
L.
Even if th elight sensor does no tdetect that it is
dark,t heparking lamps and low-beam head-
lamps switch on when th eignition is switched on
and th elight switch is set to the Lposition.
This is aparticularly useful function in th eevent
of rain and fog.
XTo switch on th elow-beam headlamps:
tur nthe SmartKey to position 2in th eigni-
tio nlockors tart th eengine.
XTurn th elight switch to the Lposition.
The green Lindicator lamp on th einstru-
men tcluste rlightsu p.
Daytime running lamps
Daytime running lamps in Canada
The daytime runnin glamps function is required
by law in Canada. It canno tthe refore be deac-
tivated.
XTurn th elight switch to the Ãposition.
Witht heengine running: dependingont he
ambient light,t hedaytime runnin glamps or
th el ow-beam headlamps are switched on.
When th elow-beam headlamps are switched
on,t hegreen Lindicator lamp in the
instrumen tcluste rlightsu p.
When th eengine is runnin gand th evehicle is
stationary: if you shiftt heautomatic transmis-
sion from adriving position to position P,the
daytime runnin glamps or low-beam headlamps
go out after three minutes.
When th eengine is running, th evehicle is sta-
tionar yand th eambient light is good:ify ou turn
th el ight switch to the Tposition,t heday-
tim erunnin glamps and parking lamps are
switched on.
If th eengine is runnin gand you tur nthe light
switch to the Lposition,t hemanual settings
tak eprecedence ove rthe daytime running
lamps.
Daytime running lamps in th eUSA
In th eUSA,the daytime runnin glamps are deac-
tivate dupon delivery from th efactory.
Exterior lighting85
Lightsa nd windshield wipers
Z
Page 88 of 286
XTo switchonthe daytime runnin glamps:
switch on the DaytimeRunningLights
functionvia the on-board computer
(Ypage 165).
XTurn the light switch to the Ãposition.
With the engine running :depen ding on the
ambient light, the daytime running lamps or
the low-bea mheadlamps are switched on.
Whe nthe low-bea mheadlamps are switched
on, the green Lindicator lamp in the
instrument cluster lights up.
If the engine is running and yo uturn the light
switch to the TorL position, the manual
settings take precedence overt he daytime run-
ning lamps.
Automati cheadlamp mode
GWARNING
Whe nthe light switch is set to Ã,the low-
beam headlamps mayn ot be switched on
automaticall yifthereisf og,snow or other
causes of poor visibility du etothe weather
conditions such as spray .There is ariskofa n
accident.
In such situations, turn the light switch to
L.
The automatic headlamp feature is onlyana id.
The driver is responsibl efor the vehicle's light-
ing at al ltimes.
à is the favoredl ight switch setting.
The light setting is automaticall yselected
according to the brightness of the ambient light,
bu tn ot in the event of poor visibility du eto
weather conditions such as fog,s now or spray.
XTo switchonthe automatic headlamps:
turn the light switch to the Ãposition.
With the SmartKey in position 1in the igni-
tio nlock, the parking lamps are switched on
or off automaticall ydepen ding on the bright-
ness of the ambient light.
If yo uhaves witched on the DaytimeRun‐
ningLightsfunctionvia the on-board com-
puter, the daytime running lamps or the park-
ing lamps and low-bea mheadlamps will
switch on or off automaticall ywhile the
engine is running.
Whe nthe low-bea mheadlamps are switched
on, the green Lindicator lamp in the
instrument cluster lights up.
Rear fog lamp
The rearf og lamp improvesv isibility of your
vehicl efor the traffic behind in the event of thick
fog.Y oumust observe the legalr equirements
for the country in which yo uare currentlyd riving
when operating the rearf og lamp.
XTo switchonthe rear fog lamp: turn the
SmartKey in the ignition lock to position 2or
start the engine.
XTurn the light switch to the LorÃ
position.
XPress the Rbutton.
The yellow Rindicator lamp on the instru-
ment cluster lights up.
Parking lamps
!
If the battery charge is very low, the parking
lamps or standing lamps are automatically
switched off to enabl ethe next engine start.
Alway sparky ourvehicl esafelya nd in awelllit
area, in accordance with the relevant legal
stipulations. Avoi dusing the Tparking
lamps overap eriodofs everalhours. If pos-
sible, switch on the right-hand Xor left-
hand W standing lamps.
XTo switc hon:turn the light switch to the
T position.
The green Tindicator lamp on the instru-
ment cluster lights up.
Standin glamps
Switching on the standing lamps ensures the
corresponding side of the vehicl eisilluminated.
XTo switc honthe standin glamp: turn the
SmartKey to position uin the ignition lock or
remove the SmartKey.
XTurn the light switch to the W(left-hand
side of the vehicle) or X(right-hand side of
the vehicle) position.
Headlamp cleanin gsystem
The headlamps are cleane dautomaticall yifthe
"Wip ewithw asherf luid"functio niso perated
ten time swhile the lights are on and the engine
is running (
Ypage 92). Whe nyou switch off
86Exterior lighting
Lights and windshield wiper s
Page 89 of 286
the ignition, the automatic headlamp cleaning
systemisreset and counting is resumed from0 .
Combination switch
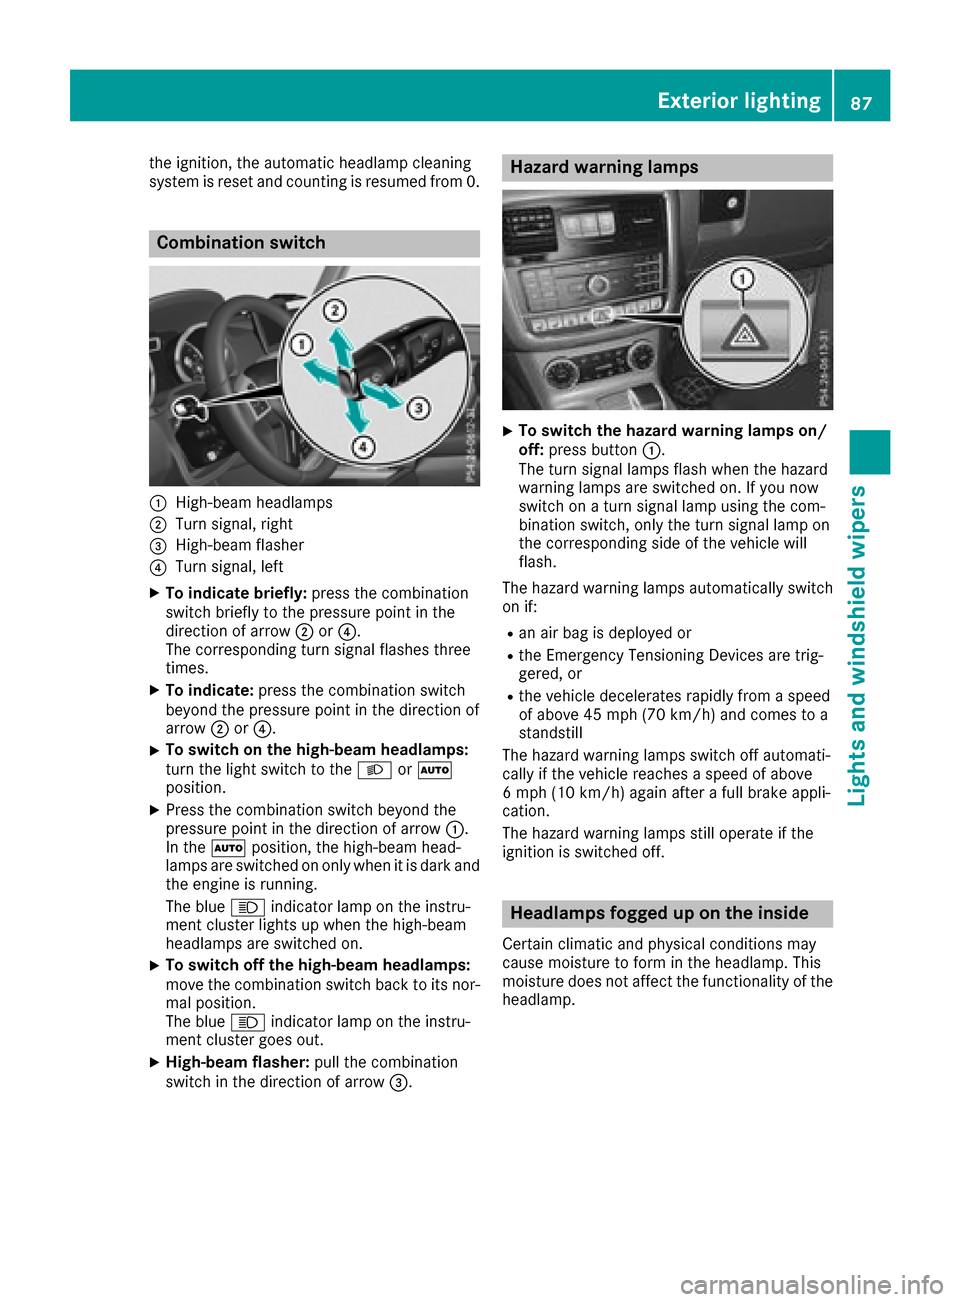
:High-beamheadlam ps
;Turn signal, right
=High-bea mflasher
?Turn signal, left
XTo indicate briefly: press the combination
switch briefl ytothe pressure point in the
direction of arrow ;or?.
The corresponding tur nsigna lflashe sthree
times.
XTo indicate: press the combinatio nswitch
beyond the pressure point in the direction of
arrow ;or?.
XTo switc honthe high-beam headlamps:
tur nthe light switch to the LorÃ
position.
XPress the combinatio nswitch beyond the
pressure point in the direction of arrow :.
In the Ãposition, the high-beam head-
lamps ar eswitched on onl ywhenitisd arka nd
the engine is running.
The blue Kindicator lamp on the instru-
ment clusterl ights up when the high-beam
headlamps ar eswitched on.
XTo switc hoffthe high-beam headlamps:
mov ethe combinatio nswitch back to its nor-
malp osition.
The blue Kindicator lamp on the instru-
ment clusterg oeso ut.
XHigh-beam flasher: pull the combination
switch in the direction of arrow =.
Hazard warning lamps
XTo switchthe hazard warning lamp son/
off: press button :.
The tur nsigna llam ps flash when the hazard
warning lamps ar eswitched on. If yo unow
switch on aturns igna llam pu sing the com-
bination switch ,onlyt he tur nsigna llam po n
the corresponding side of the vehicl ewill
flash.
The hazar dwarning lamps automaticall yswitch
on if:
Ran ai rbag is deployed or
Rthe Emergency Tensioning Devices ar etrig-
gered ,or
Rthe vehicl edecelerates rapidl yfromas peed
of above 45 mph (70 km/h )and come stoa
standstill
Th eh azardw arning lamps switch off automati-
cally if the vehicl ereache saspeed of above
6m ph (10 km/h )again after afullb rake appli-
cation.
Th eh azardw arning lamps still operate if the
ignition is switched off.
Headlamps fogged up on the inside
Certain climatic and physica lconditions may
cause moisture to for minthe headlamp. This
moisture does not affect the functionality of the
headlamp.
Exterior lighting87
Lights and windshield wiper s
Z