2017 MERCEDES-BENZ G-Class rear view mirror
[x] Cancel search: rear view mirrorPage 84 of 286
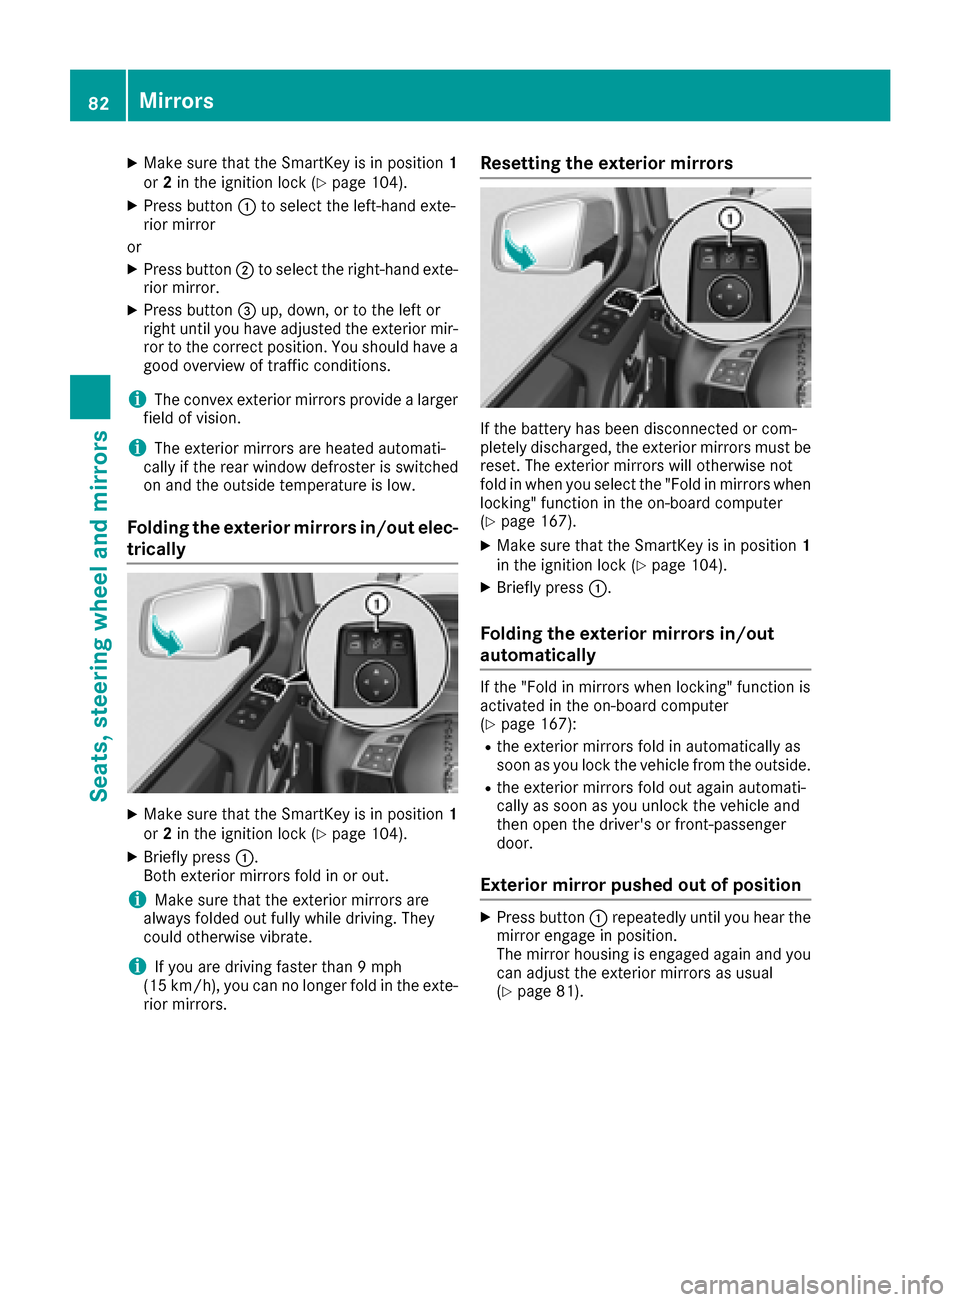
XMake sure that the SmartKey is in position1
or 2in the ignition lock (Ypage 104).
XPress button :to select the left-hand exte-
rior mirror
or
XPress button ;to select the right-hand exte-
rior mirror.
XPress button =up, down, or to the left or
right until you have adjusted the exterior mir- ror to the correct position. You should have a
good overview of traffic conditions.
iThe convex exterior mirrors provide alarger
field of vision.
iThe exterior mirrors are heated automati-
cally if the rear window defroster is switched
on and the outside temperature is low.
Folding the exterior mirrors in/out elec-
trically
XMake sure that the SmartKey is in position 1
or 2in the ignition lock (Ypage 104).
XBriefly press :.
Both exterior mirrors fold in or out.
iMake sure that the exterior mirrors are
always folded out fully while driving. They
could otherwise vibrate.
iIf you are driving faster than 9mph
(15 km/h), you can no longer fold in the exte-
rior mirrors.
Resetting the exterior mirrors
If the battery has been disconnected or com-
pletely discharged, the exterior mirrors must be
reset. The exterior mirrors will otherwise not
fold in when you select the "Fold in mirrors when
locking" function in the on-board computer
(
Ypage 167).
XMake sure that the SmartKey is in position 1
in the ignition lock (Ypage 104).
XBriefly press :.
Folding the exterior mirrors in/out
automatically
If the "Fold in mirrors when locking" function is
activated in the on-board computer
(
Ypage 167):
Rthe exterior mirrors fold in automatically as
soon as you lock the vehicle from the outside.
Rthe exterior mirrors fold out again automati-
cally as soon as you unlock the vehicle and
then open the driver's or front-passenger
door.
Exterior mirror pushed out of position
XPress button :repeatedly until you hear the
mirror engage in position.
The mirror housing is engaged again and you
can adjust the exterior mirrors as usual
(
Ypage 81).
82Mirrors
Seats, steering wheela nd mirrors
Page 85 of 286
Automa tica nti-glar emirror s
The rear-view mirror and th eexter iorm irror on
th ed river's side automatically go int oanti-glare
mod eif:
Rthei gnition is switched on and
Rinciden tligh tfro mh eadlamp sstrikes th esen-
sor in th erear-view mirror
iThe mirror sdonotgo int oanti-glare mod eif
revers egear is engage doriftheinterior light-
ing is switched on .
Parking position for th eexteri or mir-
ror on thef ront-passenger side
Setting/stori ng theparki ng position
Usin grevers egear
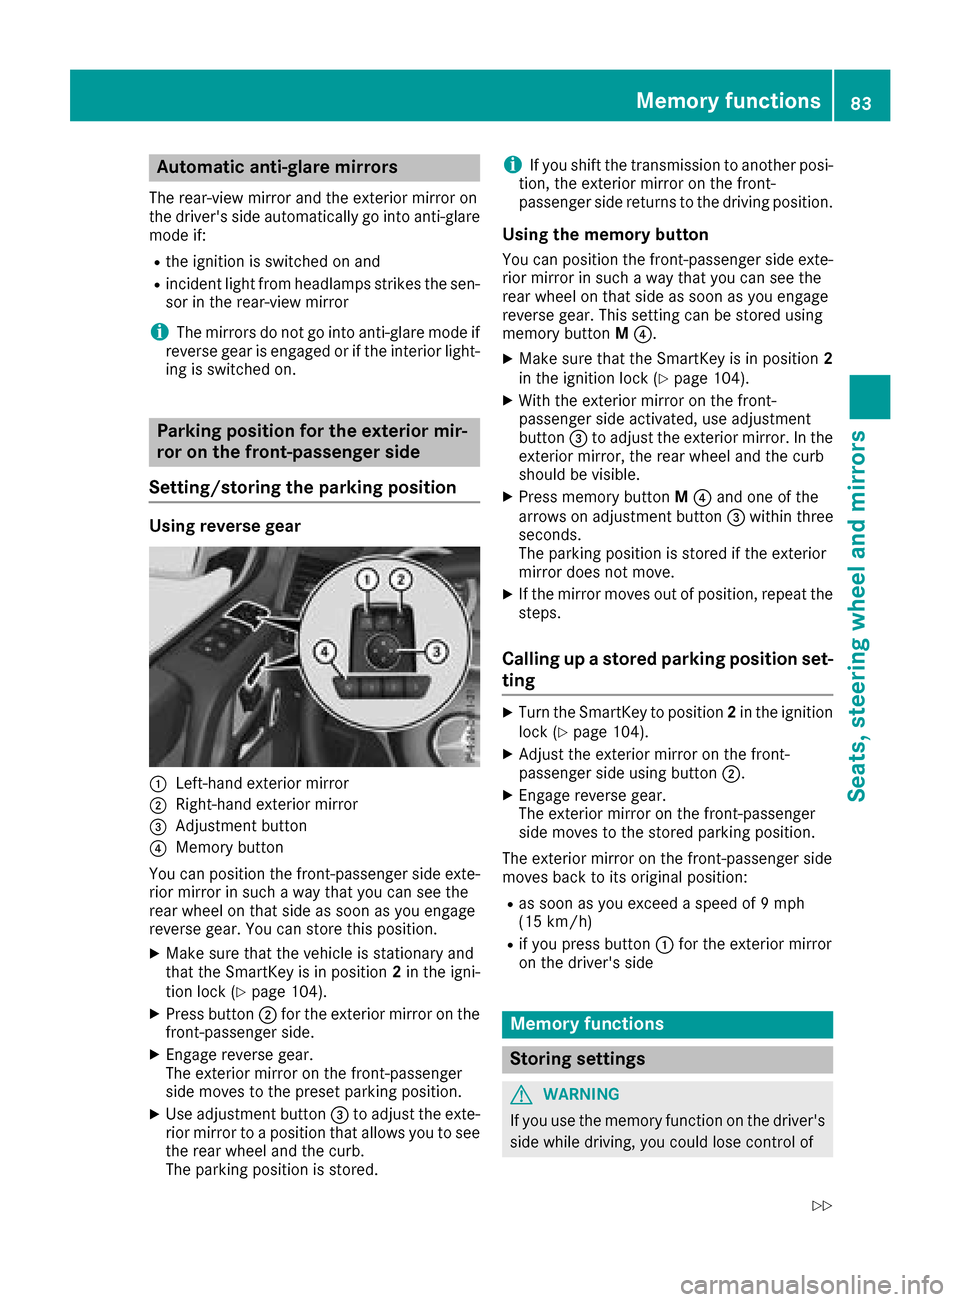
:Left-han dexter iorm irror
;Right-hand exterio rmirror
=Adjustmen tbutto n
?Memory butto n
You can position th efront-pa ssenger side exte -
rio rm irror in suc haway that you can see th e
rear whee lonthats ide as soo nasyou engage
revers egear .You can store this position .
XMakesuret hatthe vehicl eisstationary and
that th eSmartKey is in position 2in th eigni-
tion loc k(
Ypage 104).
XPress butto n; for th eexter iorm irror on th e
front-passenger side .
XEngage reversegear .
The exterio rmirror on th efront-pa ssenger
side moves to th epreset parking position .
XUse adjustmentbutto n= to adjust th eexte-
rio rm irror to aposition that allows you to see
th er ear whee land th ecurb.
The parking position is stored.
iIf you shif tthe transmission to another posi-
tion ,the exterio rmirror on th efront -
passenger side return stothedrivin gposition .
Usingthe memory button
You can position th efront-pa ssenger side exte -
rio rm irror in suc haway that you can see th e
rear whee lonthats ide as soo nasyou engage
revers egear .This setting can be store dusing
memory butto nM ?.
XMak esuret hatthe SmartKey is in position 2
in thei gnition loc k(Ypage 104).
XWiththe exterio rmirror on th efront -
passenger side activated, use adjustmen t
butto n= to adjust th eexter iorm irror .Int he
exterio rmirror ,the rear whee land th ecurb
should be visible.
XPress memory butto nM ? and on eofthe
arrows on adjustmen tbutto n= within three
seconds.
The parking position is store diftheexterio r
mirror does no tmove.
XIf th emirror moves out of position ,repeat th e
steps.
Calling up astoredp arki ng position set-
ting
XTurn th eSma rtKey to position 2in th eignition
loc k(Ypage 104).
XAdjus tthe exterio rmirror on th efront -
passenger side usin gbutto n;.
XEngage revers egear .
The exterio rmirror on th efront-pa ssenger
side moves to th estoredp arking position .
The exterio rmirror on th efront-pa ssenger side
moves bac ktoitsoriginal position :
Ras soonasyou exceed aspee dof9 mph
(15 km/h)
Rif you press butto n: for th eexter iorm irror
on th edriver's side
Mem oryfunctions
Stori ng settings
GWARNIN G
If you use th ememory function on th edriver's
side while driving, you could lose control of
Memoryf unctions83
Seats ,steering wheel and mirrors
Z
Page 145 of 286
Rear viewcamera
General notes
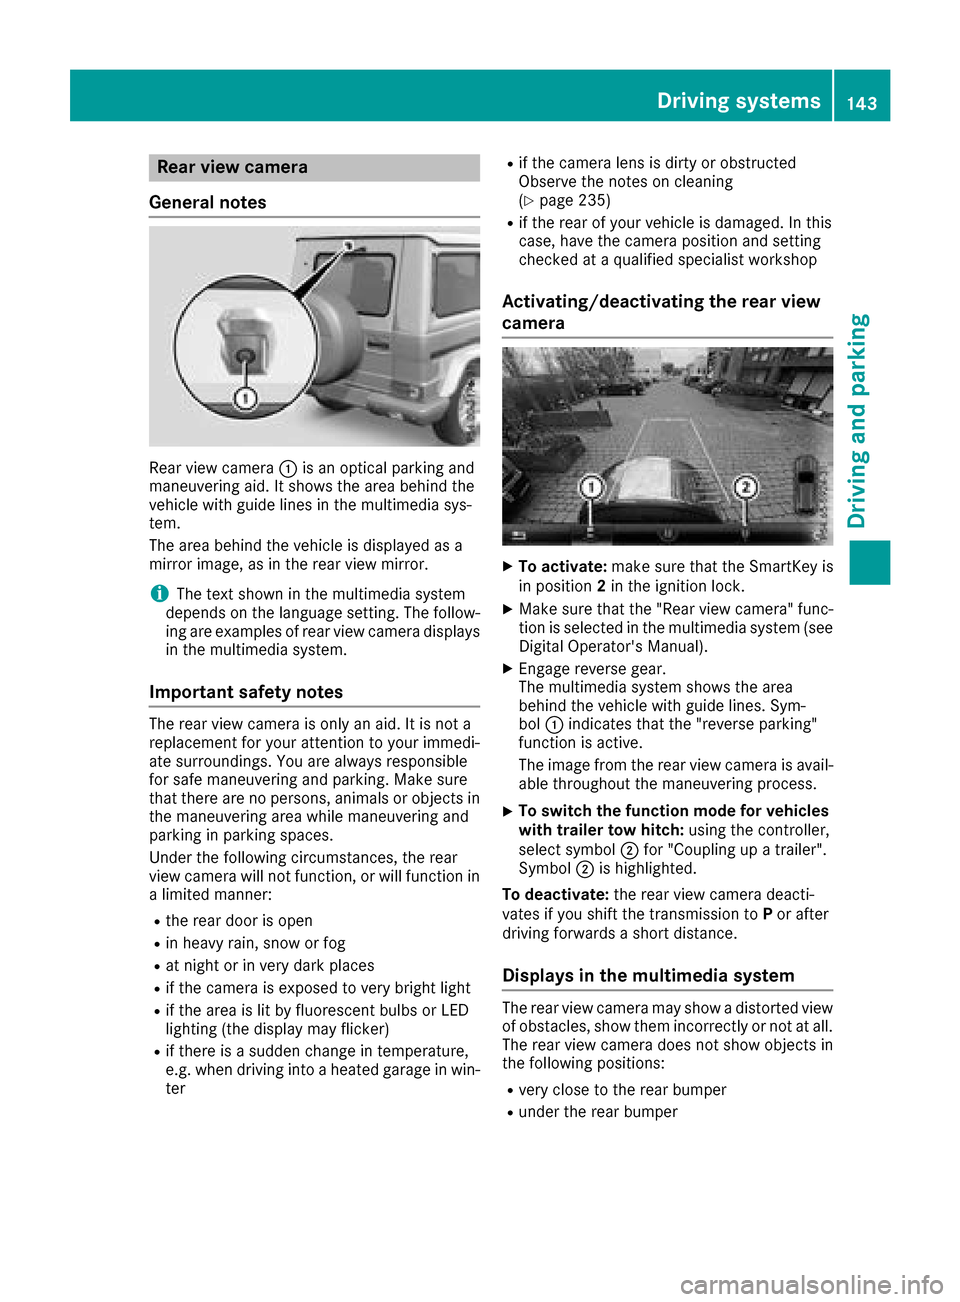
Rear vie wcamera :is an optical parking and
maneuvering aid. It shows the are abehind the
vehicl ewithg uide lines in the multimedi asys-
tem.
The are abehind the vehicl eisdisplayed as a
mirror image, as in the rearv iewm irror.
iThe text shown in the multimedi asystem
depends on the languag esetting. The follow-
ing are examples of rearv iewc amera displays
in the multimedi asystem.
Important safety notes
The rearv iewc amera is only an aid. It is not a
replacement for your attention to your immedi-
ate surroundings. Yo uare always responsible
for safe maneuvering and parking .Makes ure
that there are no persons,a nimalsoro bjects in
the maneuvering are awhile maneuvering and
parking in parking spaces.
Unde rthe following circumstances, the rear
vie wc amera will not function, or will function in
al im ite dm anner:
Rthe reard ooriso pen
Rin heavy rain, snow or fog
Rat nigh torinv ery dark places
Rif the camera is exposed to very bright light
Rif the are aislitby fluorescent bulb sorLED
lighting (the display may flicker)
Rif there is asudde nchange in temperature,
e.g. when driving into aheated garag einwin-
ter
Rif the camera lens is dirty or obstructed
Observe the notes on cleaning
(
Ypage 235)
Rif the rearofy ourv ehicl eisd amaged. In this
case, have the camera position and setting
checke dataq ualified specialist workshop
Activating/deactivatin gthe rear view
camera
XTo activate: make sure that the SmartKey is
in position 2in the ignition lock.
XMake sure that the "Rearv iewc amera" func-
tion is selected in the multimedi asystem (see
Digital Operator's Manual).
XEngag ereverse gear.
The multimedi asystem shows the area
behind the vehicl ewithg uide lines. Sym-
bol :indicates that the "reversep arking"
function is active.
The image from the rearv iewc amera is avail-
able throughout the maneuvering process.
XTo switc hthe functio nmode for vehicles
with trailer tow hitch: using the controller,
select symbol ;for "Coupling up atrailer".
Symbol ;is highlighted.
To deactivate: the rearviewc amera deacti-
vate sify oushift the transmissio ntoP or after
driving forward sashort distance.
Displays in the multimedias ystem
The rearviewc amera may showad istortedv iew
of obstacles, showt hem incorrectlyornot at all.
The rearv iewc amera doe snot showo bjects in
the following positions:
Rvery close to the rearb umper
Runder the rearb umper
Driving systems143
Driving and parking
Z
Page 157 of 286

In order to accumulate driving experience and
accustom yourself to the new handling charac-
teristics, practice the following atalocation
where there is no traffic:
RCornering
RStopping
RBacking up
Before driving, check the following:
RTrailer tow hitch
RSafety switch for braked trailers
RSafety chains
RElectrical connections
RLighting system
RWheelsa nd tires
RLoad-securing measures
Adjust the exterior mirrors to provide an unob-
structed view of the rear section of the trailer.
Trailers with electronically controlled
brakes: pullawaycarefully in the vehicle/trailer
combination, brake manually using the brake
controller and check whether the brakes func-
tion correctly.
Check the load securing measures on aregular
basis.
When towing atrailer, you rvehicle's handling
characteristics willbed ifferent in comparison
with when driving withoutat railer.
The vehicle/trailer combination:
Ris heavier
Ris restricted in its acceleration and gradient-
climbing capability
Rhas an increased braking distance
Ris affected more by strong crosswinds
Rdemands more sensitive steering
Rhas alargert urning radius
Avoid sudden steering movements.
Avoid braking abruptly. If possible, brake gently
at first to allow the trailer to run on. Then,
increase the braking force rapidly.
When overtaking, pay particular attention to the
extended length of you rvehicle/trailer combi-
nation.
Due to the length of the vehicle/trailer combi-
nation, you require additional road space when
overtaking before you can change back to the
originall ane.
If the automatic transmission repeatedly shifts
betweeng ears on uphill or downhill gradients,
shift to alowerg ear. Driving in
alowerg ear and at areduced speed
decreases the risk of engine damage.
Avoid constant braking. Otherwise,t he vehicle
brakes and possibly also the trailerb rakes may
overheat.
When driving downhill, shift to alowerg ear to
utilize the engine's braking effect.
If the coolant temperature increases dramati-
cally whilet he air-conditioning system is
switched on, switch off the air-conditioning sys- tem.
Coolant heat can also be dissipated by opening
the windowsa
nd sw
itching the ventilation
blower and the interior temperature to the high-
est level.
Decoupling atrailer
GWARNING
If you uncoupl eatrailerwith the overrun
brake engaged,y ou could trap you rhand
betweent he vehicle and the trailerd rawbar.
There is arisk of injury.
Do not uncoupl eatrailerift he overrun brake
is engaged.
!Do not disconnect atraile rwith an engaged
overrun brake. Otherwise,y ourv ehicle could
be damaged by the rebounding of the overrun
brake.
XApply the parking brake.
XMake sure that the automatic transmission is
set to position P.
XSecure the vehicle and trailera gainst rolling
away.
XClose all doors, including the rear door.
XRemove the trailerc able.
XRemove the safety chains, if there are any.
XUncouple the trailer.
Permissible trailer and drawbar loads
Weight specifications
The gross trailerw eight is calculated as the
weight of the trailerp lusthe weight of the load
and the trailer'se quipment.
Towingatrailer155
Driving and parking
Z
Page 212 of 286
Features
Cup holder
Important safety notes
GWARNIN G
If you transpor tobject sinthevehicl einterio r
and these are no tadequately secured ,the y
could slip or be flun garoun dand thereby
strik evehicl eoccupants. In addition ,cup
holders ,open stowage spaces and mobile
phon ebrackets may no talways be able to
hold th eobject splaced in them in th eevent of
an accident. Ther eisariskofi njury, particu-
larly in th eevent of shar pbraking or sudde n
changes of direction .
RAlways stow objectsinsuchaw ay that they
canno tbetosseda bout in these or similar
situations.
RAlways mak esure that object sdonotpro -
trude out of th estowage spaces, luggag e
nets or stowage nets .
REnsure that closable stowage spaces are
shut before beginning your journey.
RAlways stow and secure heavy, hard ,poin -
ted, sharp-edged, fragile or larg eobject sin
th ec argo compartment.
!Only use th ecup holders for containers of
th er ight siz eand whic hhave lids. The drinks
could otherwise spill .
Observ ethe loadin gguidelines (
Ypage 204).
Cup holder on th ecenter console
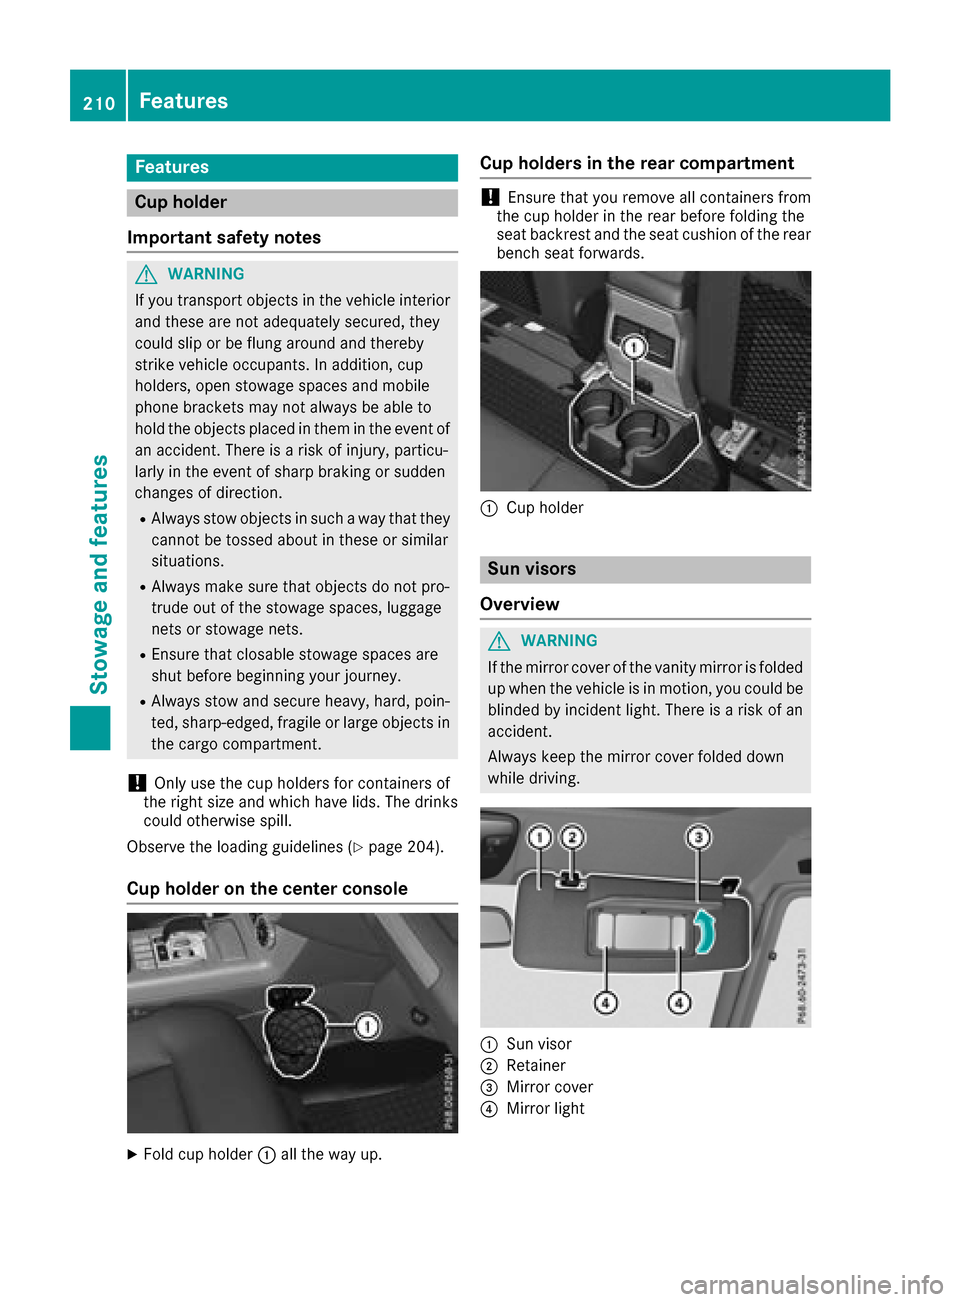
XFold cup holder :all th eway up.
Cup holders in th erearc ompartment
!Ensure that you remove all containers from
th ec up holder in th erear before foldin gthe
seat backrest and th eseat cushion of th erear
bench seat forwards .
:Cup holder
Sun visors
Overview
GWARNIN G
If th emirror cover of th evanit ymirror is folded
up when th evehicl eisinm otion,you could be
blinded by inciden tlight. Ther eisariskofa n
accident.
Always keep th emirror cover folded down
while driving .
:Sun visor
;Retainer
=Mirror cover
?Mirror ligh t
210Features
Stowage and features
Page 223 of 286
Information on Roadside Assistance
(Ypage 25).
Downloading routes
Downloading routes allows you to transfer and
save predefined routes in the navigation sys-
tem.
Aroute can be prepared and sent by either a
customer service representative or under "Own-
ers Online" at http://www.mbusa.com.
Each route can include up to four way points.
Once aroute has been received by the naviga-
tion system, you wills ee theDo
youwanttostart route guidance? DestinationReceived destination has been savedin "Previous destinations".message on
the multimedia system display.
The route is saved.
XTo start route guidance: selectYes.
An overview of the route is shown in the dis-
play.
If you select No
,the saved route can be called
up later in the navigation menu.
XSelect Start.
Route guidance starts.
Downloaded and saved routes can be calledu p
again.
Speed alert
You can define the uppers peed limit, which
must not be exceeded by the vehicle.
If this selected speed is exceeded by the vehicle,
am essagew illbesent to the Customer Assis-
tance Center. The Customer Assistance Center
then forward sthis information to you.
You can select the way in which you receive this
information beforehand. Possible options
include text message,e -mail or an automated
call.
The data you receive contains the following
information:
Rthe location where the speed limitw as excee-
ded
Rthe time at which the speed limitw as excee-
ded
Rthe selected speed limitw hich was exceeded
Geo fencing
Geo fencing allows you to select areasw hich the
vehicle shoul dnot enter or leave. You willb e
informed if the vehicle crosses the boundaries
of the selected areas. You can select the way in
which you receive this information beforehand.
Possible options include text message, e-mail or an automated call.
The area can be determined as either acircle or
ap olygon with amaximum of ten corners. You
can specify up to ten areass imultaneously. Dif-
ferent settings are possible for each area.
These settings can be calledupu nder "Owners
Online" at http://www.mbusa.com.
Alternatively,y ou can trigger an Info call and
notify the customer service representative that
you wish to activate geo-fencing.
Currently inactive areasc an be activated by text
message.
Triggering the vehicle alarm
With this function, you can trigger the vehicle's
panic alarm via text message. An alarm sounds
and the exterior lighting flashes. Depending on
the setting, the panic alarm lasts five or ten sec- onds. Afterwards, the alarm switches off.
Brush guard (USA only)
If the brush guard has to be removed, contact a
qualifieds pecialist workshop.
Garage door opener
General notes
You can use the HomeLink®garage door opener
integrated into the rear-view mirror to operate
up to three different gate/garage door opener
systems.
Certai ngarage door drives are incompatible
with the integrated garage door opener. If you
have difficulty programing the integrated garage
door opener, contact aMercedes-Benz Service
Center.
Features221
Stowagea nd features
Z
Page 225 of 286
will only start flashing atarateofo nceas ec-
ond after 20 second shave elapsed.
XContinue to hold th etransmitter button.
XTo progra mtheremote control: point
transmitter button Bof remote control A
towards th etransmitter buttons on th erear-
view mirror at adistanc eof2to12in(5t o
30 cm).
XKeep transmitte rbutto nB on remote control
A presse duntilindicator lamp :start sto
flas hrapid ly.
When indicator lamp :flashes rapidly: pro-
grammin gisfinished.
XReleaset ransmitte rbuttons ;,=or? on
th ei ntegrate dremotec ontroland transmitter
button Bon remotec ontrolA.
If indicator lamp :does no tflas hrapidly and
goes out after approximately 20 seconds:
repeat th eprogrammin gproces sfor th ecor-
respondin gbutto nont herear-view mirror.
When doingso, var ythe dist ancebetween
remotec ontrolA and th erear-view mirror.
The required distancebetween remotec on-
trol Aand th eintegrate dgarag edoor opener
depends on thegarag edoor drivesystem.
Several attempt smightben ecessary. You
should test every positio nfor at least
20 seconds before trying another position.
If th eg arag edoor system work swithar olling
code, you must synchronize th eremotec ontrol
integrate dintherear-
view mirror
withthe
garag edoor system receive rafter program-
ming.
You can fin dfurther informatio nonthisint he
operatin ginstructionsoft hegarag edoor sys-
tem.
Synchronizing th erolling code
Pay attentio ntothe"Im portan tsafety notes"
(Ypage 222).
If th eg arag edoor system uses arolling code,
you willalso have to synchronize th egarage
door system withthe integrate dgarag edoor
opener inther ear-view mirror .Todothisy ou will
need to use th eprogrammin gbutto nont hedoor
driv econtro lpanel. The programmin gbutton
may belocate dindifferent places dependin gon
th em anufacturer. It isusually locate donthe
door driveunit on th egarag eceilin g.
Fam iliarize yourself withthe garag edoor drive
operatin ginstructions, e.g .unde r"Program-
min gaddit ional remotec ontrols",before carry-
ing out th efollowings teps. Your vehicle must
be within reac hofthegarage
door or gateo pener drive. Makes ure that nei-
ther your vehicle no rany persons/object sare
presentw ithin th esweep of th edoor or gate.
Observ ethe safety note swhen performin gthe
rolling code synchronization (
Ypage 222).
XTurn th eSmartKey to position 2
(Ypage 104) in th eignition lock.
XGet out of th evehicle.
XPress th eprogrammin gbutto nont hedoor
driveu n
it.
You no whave 30 seconds to initiat ethe next
step.
XGet int othe vehicle.
XPress previously programmed button ;,=
or ? on th eintegrate dgarag edoor opener
repeatedly until thedoor closes.
The rolling code synchronization is then com- plete.
Notes on programmin gthe remote con-
trol
Canadian radio frequency lawsrequire a"break"
(or interruption)oft hetransmission signals
after broadcastin gfor afew seconds. Therefore,
these signals may no tlast longe nough for the
integrate dremotec ontroltorecognize th esig-
nal durin gprogramming. Comparable with
Canadian law,American garag edoor openers
also have abuilt -in "interruption".
Procee dasfollows:
Rif you livein Canada.
Rifyou have difficulties programmin gthe
garag edoor opener (regardless of wherey ou
live )when usingt heprogrammin gsteps.
XPress and hold oneofb uttons;to? on the
integrate dgarag edoor opener until th einte-
grated remotec ontrolissuccessfully set up.
XSimultaneouslyp ress transmitterbutton B
on remotec ontrolA and hold for two sec-
onds. Then let go for 2seconds, press again
and hold for 2seconds.
XRepeat th issequenc eontransmitte rbutton
B on remotec ontrolA until th efrequency
signal isestablished.
XIf th esetup procedure is successful ,indicator
lamp :flashes once slowlya nd goes out
after afew seconds.
If indicator lamp :does no tflas hs lowlya nd
then go out:r epeat theprogrammin gprocess
for th ecorres ponding butto nontherear-view
Features223
Stowage and features
Z
Page 226 of 286
mirror. When doing so, vary the distance
betweenremote control Aand the rear-view
mirror.
The required distance betweenr emote con-
trol Aand the integrated garage door opener
depends on the garage door drive system.
Several attempts might be necessary .You
should test every position for at least
20 seconds before trying another position.
The required distance betweenr emote control
A and the integrated garage door opener
depends on the garage door drive system. Sev-
eral attempts might be necessary .You should
test every position for at least 25 seconds
before trying another position.
Problems when programming
If you have problems when programming the
integrated remote control, please note the fol-
lowing:
RCheck the transmitter frequency used by
garage door drive remote control Aand
whetheritiss upported. The transmitter fre-
quency can usuall ybefound on the back of
remote control Afor the garage door drive.
The integrated remote control is compatible
with devicest hat have units which operate in
the frequency range of 280 to 390 MHz.
RReplace the batterie sinremote control A.
This increase sthe probability of remote con-
trol Asending astrong and precise signal to
the integrated remote control on the rear-
view mirror.
RWhen programming, hold remote control A
at varying distances and angle sfrom the
transmitter button that you are programming.
Try various anglesatad istance between2and
12 inches (5to 30 cm) or at the same angle
but at varying distances.
RIf another remote control Ais available for
the same garage door drive, repeatt he same
programming steps with this remote control
A.B efore performing these steps, make sure
that new batterie shave been installed in
garage door drive remote control A.
RNote that some remote controls only transmit
foralimited amount of time (the indicator
lamp on the remote control goes out). Press
button Bon remote control Aagain before
transmission ends.
RAlign the antenna cabl eofthe garage door
opener unit. This can improve signal trans-
mission.
Opening/closing the garage door
Once programmed, the integrated remote con-
trol willa ssume the function of the garage door
system's remote control. Please als oread the
operating instructions for the garage door sys-
tem.
XTurn the SmartKey to position in the ignition
lock 2(Ypage 104).
XPress one of buttons ;to? on the integra-
ted remote control in the rear-vie wmirror that
is programmed to operate the garage door.
Garage door system with fixed code: indicator
lamp :lights up continuously.
Garage door system with rolling code: indica-
tor lamp :flashes brieflya nd then lights up
for approximatelyt wo seconds. This is repea-
ted for up to 20 seconds.
The transmitter willt ransmitasignal for as
long as the transmitter button is being
pressed. The transmission willbeh alted after
am aximumof20s econds and indicator
lamp :willf lash.Press the transmitter but-
ton again if necessary.
XPress button ;,=or? again if necessary.
Clearing the memory
Make sure that you clear the memory of the
integrated garage door opener before selling the
vehicle.
XTurn the SmartKey to position 2
(Ypage 104) in the ignitionl ock.
XPress and hold transmitter buttons ;and ?
for approximately20s econds until indicator
lamp :flashes rapidly.
The memory of the integrated garage door
opener in the rear-vie wmirror is cleared.
224Features
Stowage and features