2017 MERCEDES-BENZ G-Class engine
[x] Cancel search: enginePage 157 of 286

In order to accumulate driving experience and
accustom yourself to the new handling charac-
teristics, practice the following atalocation
where there is no traffic:
RCornering
RStopping
RBacking up
Before driving, check the following:
RTrailer tow hitch
RSafety switch for braked trailers
RSafety chains
RElectrical connections
RLighting system
RWheelsa nd tires
RLoad-securing measures
Adjust the exterior mirrors to provide an unob-
structed view of the rear section of the trailer.
Trailers with electronically controlled
brakes: pullawaycarefully in the vehicle/trailer
combination, brake manually using the brake
controller and check whether the brakes func-
tion correctly.
Check the load securing measures on aregular
basis.
When towing atrailer, you rvehicle's handling
characteristics willbed ifferent in comparison
with when driving withoutat railer.
The vehicle/trailer combination:
Ris heavier
Ris restricted in its acceleration and gradient-
climbing capability
Rhas an increased braking distance
Ris affected more by strong crosswinds
Rdemands more sensitive steering
Rhas alargert urning radius
Avoid sudden steering movements.
Avoid braking abruptly. If possible, brake gently
at first to allow the trailer to run on. Then,
increase the braking force rapidly.
When overtaking, pay particular attention to the
extended length of you rvehicle/trailer combi-
nation.
Due to the length of the vehicle/trailer combi-
nation, you require additional road space when
overtaking before you can change back to the
originall ane.
If the automatic transmission repeatedly shifts
betweeng ears on uphill or downhill gradients,
shift to alowerg ear. Driving in
alowerg ear and at areduced speed
decreases the risk of engine damage.
Avoid constant braking. Otherwise,t he vehicle
brakes and possibly also the trailerb rakes may
overheat.
When driving downhill, shift to alowerg ear to
utilize the engine's braking effect.
If the coolant temperature increases dramati-
cally whilet he air-conditioning system is
switched on, switch off the air-conditioning sys- tem.
Coolant heat can also be dissipated by opening
the windowsa
nd sw
itching the ventilation
blower and the interior temperature to the high-
est level.
Decoupling atrailer
GWARNING
If you uncoupl eatrailerwith the overrun
brake engaged,y ou could trap you rhand
betweent he vehicle and the trailerd rawbar.
There is arisk of injury.
Do not uncoupl eatrailerift he overrun brake
is engaged.
!Do not disconnect atraile rwith an engaged
overrun brake. Otherwise,y ourv ehicle could
be damaged by the rebounding of the overrun
brake.
XApply the parking brake.
XMake sure that the automatic transmission is
set to position P.
XSecure the vehicle and trailera gainst rolling
away.
XClose all doors, including the rear door.
XRemove the trailerc able.
XRemove the safety chains, if there are any.
XUncouple the trailer.
Permissible trailer and drawbar loads
Weight specifications
The gross trailerw eight is calculated as the
weight of the trailerp lusthe weight of the load
and the trailer'se quipment.
Towingatrailer155
Driving and parking
Z
Page 159 of 286

Important safety notes
GWARNING
If you operate information systems and com-
munication equipmen tintegrate dinthevehi-
cle while driving ,you will be distracte dfrom
traffic conditions. You could also lose control
of th evehicle. Ther eisariskofana ccident.
Only operate th eequipmen twhen th etraffic
situation permits. If you are no tsuret hatthis
is possible ,park th evehicl epayin gattention
to traffic condition sand operate th eequip-
men twhen th evehicl eiss tationary.
You must observ ethe legal requirements for th e
country in whic hyou are currentl ydriving when
operating th eon-bo ard computer.
GWARNIN G
If th einstrumen tcluste rhas faile dormal-
functioned, you may no trecognize function
restriction sinsystems relevan ttosafety. The
operating safet yofyour vehicl emay be
impaired .Ther eisar iskofana ccident.
Drive on carefully. Hav ethe vehicl echecked
at aq ualified specialist workshop immedi-
ately.
If th eoperating safet yofyour vehicl eis
impaired ,pull ove rassoonasitiss afetodos o.
Contac taqualified specialist workshop.
The on-board computer only shows message sor
warning sfromc ertai nsystems in th emultifunc-
tion display. You should therefor emakes ure
your vehicl eisoperating safely at all times .
Fo rano verview, see th einstrumen tpanel illus-
tration (
Ypage 32).
Display sand operation
Instrumen tcluster lighting
The brightness control knob is locate donthe
botto mleftoft heinstrumen tcluste r
(
Ypage 32).
XTurn th ebrightness control knob clockwise or
counter-clockwise.
If th eligh tswitch is set to th eÃ, Tor
L position ,the brightness is dependen t
upon th ebrightness of th eambien tlight.
iThe ligh tsensor in th einstrumen tcluste r
automatically control sthe brightness of th e
multifunction display.
In daylight, th edisplays in th einstrumen t
cluste rare no tilluminated.
Speedometer with segments
The segments in th espeedometer indicat e
whic hspee drange is available.
RCruis econtro lactivated (Ypage 131):
The segments ligh tupfromt hestore dspee d
to th eend of th escale.
RDISTRONI CPLUSa ctivated (Ypage 134):
On eort wo segments in th eset spee drange
ligh tup.
RDISTRONI CPLUSd etects avehicl einf ront:
The segments between th espee doft hevehi-
cle in fron tand th estoreds pee dligh tup.
Tachometer
!
Do no tdriveint heoverrevving range, as this
could damag ethe engine.
The red ban dinthetachometer indicates th e
engine's overrevving range.
The fuel suppl yisinterrupted to protect th e
engin ewhen th ered ban disreached.
Outsidet emperatur edisplay
You should pay special attention to road condi-
tion swhen temperatures are aroun dfreezing
point.
Bea rinm indt hatthe outside temperature dis-
play indicates th etem perature measured and
does no trecord th eroad temperature.
The outside temperature display is in th emulti-
function display (
Ypage 159).
Changes in th eoutside temperature are dis-
played after ashort delay.
Display sand operation157
On-boardc omputer and displays
Z
Page 160 of 286
Coolanttemperatur egauge
GWARNING
Opening th ehood when th eengineiso ver-
heated or when there is afireint heengine
compartmen tcoul de xpose you to hot gases
or other servic eproducts. Thereisar isko f
injury.
Let an overheate denginec ooldown before
opening th ehood.Ift here is afireint he
enginec ompartment, keep th ehood closed
and contac tthe fired epartment.
!Ad isplay message is shown if th ecoolant
temperatur eistoohigh.
If th ecoolant temperatur eisover
do no tcontinue driving
.
The engine will otherwise be damaged.
The coolant temperatur egage is in th einstru-
men tcluste ront heright-hands ide (
Ypage 32).
Under normal operatin gconditionsa nd withthe
specifie dcoolant level, th ecoolant temperature
may ris eto
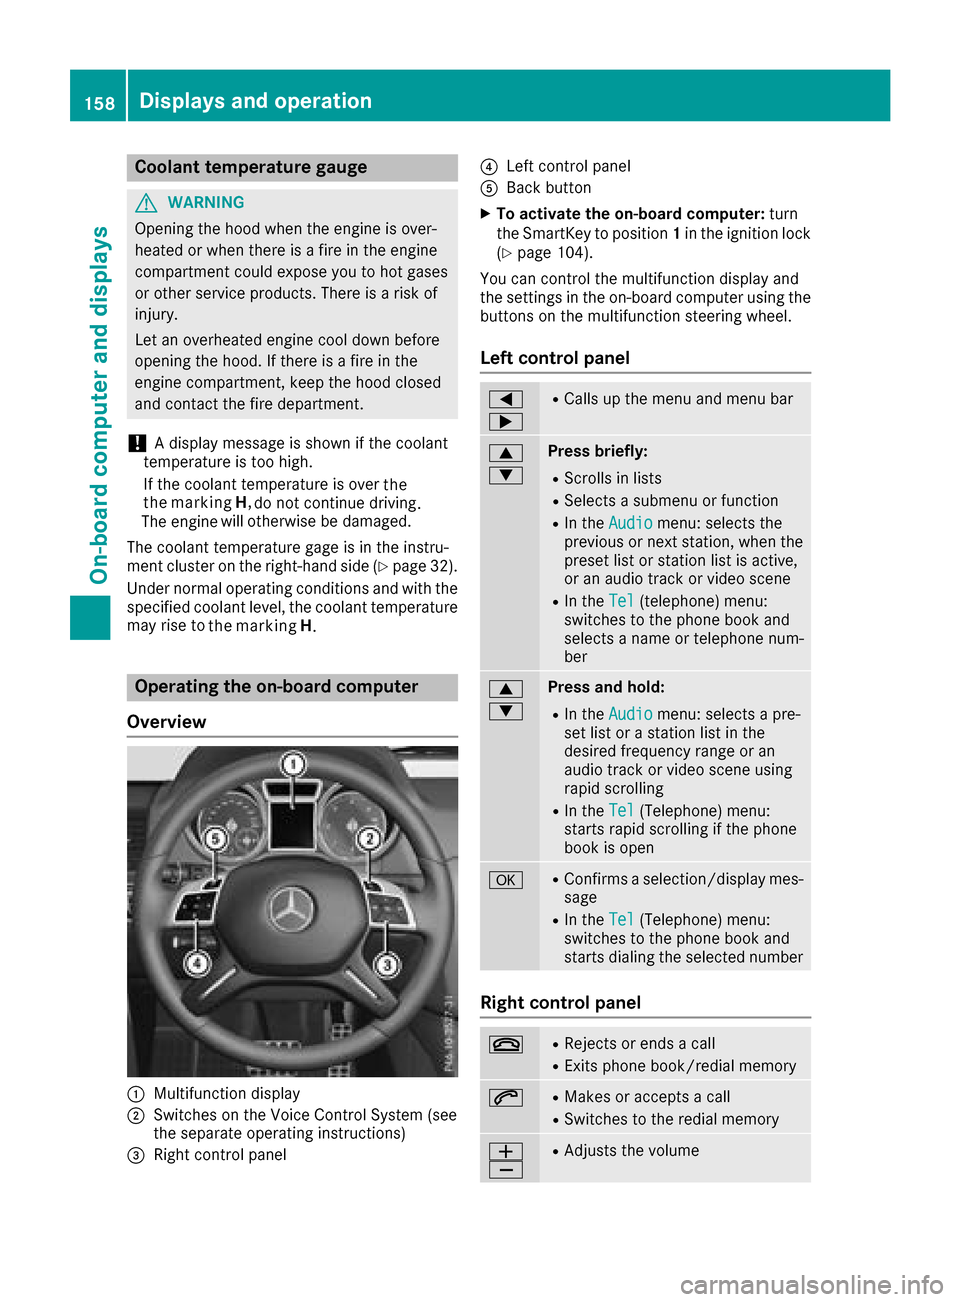
Operatin gthe on-boar dcomputer
Overview
:Multifunction display
;Switches on th eVoiceC ontrol Syste m(see
th es eparate operatin ginstructions)
=Right control panel
?Leftc ontrol panel
ABackbutton
XTo activate th eon-boar dcomputer: turn
th eS ma rtKey to position 1in th eignition lock
(
Ypage 104).
You can control th emultifunction display and
th es ettings in th eon-board computer usingt he
buttons on th emultifunction steering wheel.
Left control panel
=
;RCalls up th emenua nd men ubar
9
:Press briefly:
RScroll sinlists
RSelect sasubmenuorf unction
RIn theAudiomenu: select sthe
previous or next station, when the
preset list or statio nlist is active,
or an audio track or vide oscene
RIn the Tel(telephone )menu:
switches to th ephoneb ook and
selects anam eort elephone num-
ber
9
:Press and hold:
RIn the Audiomenu: selects apre-
set list or astatio nlist in the
desired frequency range or an
audio track or vide oscene using
rapid scrolling
RIn the Tel(Telephone) menu:
start srapid scrolling if th ephone
book is open
aRConfirms aselection/display mes-
sage
RIn the Tel(Telephone) menu:
switches to th ephoneb ook and
start sdialingt heselecte dnumber
Right control panel
~RReject sorendsac all
RExits phoneb ook/redial memory
6RMakes or acceptsac all
RSwitches to theredial memory
W
XRAdjusts th evolume
158Displays and operation
On-boardc omputer and displays
the marking
H
. the
the marking H,
Page 166 of 286

XPress the9or: button to select the
desired name.
or
XTo startr apid scrolling: press and hold9
or : for longer than one second.
Rapid scrolling stops when you release the
button or reach the end of the list.
XIf only one telephone number is stored for
an ame: press the 6ora button to
start dialing.
or
XIf thereism ore thanone number for a
particular name:press the 6ora
button to display the numbers.
XPress the 9or: button to select the
number you want to dial.
XPress the 6ora button to start dialing.
or
XTo exit the phone book: press the~or
% button.
Redialing
The on-board computer saves the last names or
numbers dialed in the redial memory.
XPress the =or; button on the steering
wheel to select the Telmenu.
XPress the6button to switch to the redial
memory.
XPress the 9or: button to select the
desired name or number.
XPress the 6ora button to start dialing.
or
XTo exit the redial memory: press the~
or % button.
Assistance menu
Introduction
In the DriveAssistmenu, you have the follow-
ing options:
RDisplaying the assistanc egraphic
(Ypage 164)
RActivating/deactivatin gBlind Spot Assist
(Ypage 164)
Showing the distance display
XPress the =or; button on the steering
wheel to select the DriveAssistmenu.
XPress9or: to select AssistanceGraphic.
XPressa.
The DISTRONIC PLUS distanc edisplay
appears in the multifunction display.
Activating/deactivating Blind Spot
Assist
XPress the =or; button on the steering
wheel to select the DriveAssistmenu.
XPress the9or: button to select
Blind Spot Assist.
XPress a.
The currents election appears.
XTo activate/deactivate: press theabut-
ton again.
For further information about Blind Spot Assist,
see (
Ypage 137).
Service menu
In the Serv.menu, you have the following
options:
RCalling up display messages (Ypage 170)
RChecking the tire pressure electronically
(Ypage 258)
RCalling up the service due date
(Ypage 231)
RChecking the engine oil level (Ypage 227)
Settings menu
Introduction
In the Sett.menu, you have the following
options:
RChanging the instrument cluster settings
(Ypage 165)
RChanging the light settings (Ypage 165)
RChanging the vehicle settings (Ypage 166)
RChanging the conveniences ettings
(Ypage 166)
RRestoring the factor ysettings (Ypage 167)
164Menus and submenus
On-board computer and displays
Page 167 of 286
Instrumentcluster
Selecting th edistance unit
The Displa yUnitS peed-/Odometer :func-
tion allows you to choos ewhether certain dis-
plays appear in kilometers or mile sinthemul-
tifunction display.
You can determine whether th emultifunction
display shows certain message sinmilesork ilo-
meters .
XPress th e= or; buttononthesteering
whee ltos elect th eSett.menu.
XPress th e: or9 buttontos elect th e
Instrumen tCluste rsubmenu.
XPressato confirm .
XPress the: or9 buttontos elect th e
Displa yUnitS peed-/Odometerfunction .
You will see th eselected setting :kmor miles.
XPress th ea buttontos avet he setting .
The selected unit of measuremen tfor distanc e
applie sto:
Rdigital speedometer in th eTri pmen u
Rtheo dometer and th etripo dometer
Rthet ripc om puter
Rthec urren tconsum ption and th erange
Rthen avigation instruction sintheNav imen u
Rcruise control
RDISTRONI CPLUS
Rthes ervic einterval display
Selecting permanent display
You can determine whether th emultifunction
display permanentl yshows your spee dorthe
outside temperature.
XPress th e= or; buttononthesteering
whee ltos elect th eSett.menu.
XPress th e: or9 buttontos elect th e
Instrumen tCluste rsubmenu.
XPressato confirm .
XPress the: or9 buttontos elect th e
Permanent Display:function .
You will see th eselected setting :Outsid e
TemperatureorSpeedometer [mph].
XPress th ea buttontos avet he setting .
iThe spee disdisplayed in mph .
Lights
Settingthed aytime runningl amps
iThis function is no tavailable in Canada.
XPress th e= or; buttononthesteering
whee ltos elect th eSett.menu.
XPress th e: or9 buttontos elect th e
Lightssubmenu.
XPress ato confirm .
XPress the: or9 buttontos elect th e
Daytim eRunnin gLightsfunction .
If th eDaytim eRunningLightsfunction has
been switched on ,the cone of ligh tand th e
W symbol are shown in red in th emulti-
function display.
XPress th ea buttontos avet he setting .
Further information on daytime runnin glamp s
(
Ypage 85) .
Surround lighti ng and exteriorlighti ng
delayed switch-off
XPress th e= or; buttononthesteering
whee ltos elect th eSett.menu.
XPress th e: or9 buttontos elect th e
Lightssubmenu.
XPress ato confirm .
XPress the: or9 buttontos elect th e
Surround Lightingfunction .
When th eSurround Lightingfunction has
been activated, th econeofl ightiss hown in
red in th emultifunction display.
XPress th ea buttontos avet he setting .
To activat eexter iorl ighting delaye dswitch-off
temporarily:
XBefore leaving th evehicle, tur nthe SmartKey
to position 0in th eignition loc k(Ypage 104).
XTurn theSma rtKey to position 2in th eignition
loc k(Ypage 104).
Exterio rlighting delaye dswitch-off is deacti -
vated.
Exterio rlighting delaye dswitch-off is reactiva-
te dt he next time you start th eengine.
If you have activated th eSurround Lighting
function and th eligh tswitch is set to Ã,the
followin gfunction sare switched on when it is
dark :
Rsurround lighting: thee xter iorl ighting
remain slit for 40 seconds after unlocking
wit hthe SmartKey. If you start th eengine, th e
surroun dlighting is switched off and auto -
Menusand submenus165
On-boardc omputer and displays
Z
Page 168 of 286
matic headlamp mode is activated
(Ypage 86).
Rexteriorlighting delayeds witch-off:the
exterior lighting remains lit for 60 seconds
after the engine is switched off. If you close all
the doors and the trunk lid,t he exterior light-
ing goes off after five seconds.
iDepending on you rvehicle's equipment,
when the surround lighting and exterior light-
ing delayed switch-off are on, the following
lightu p:
RParking lamps
RLow-beamh eadlamps
RDaytime running lamps
RSide marker lamps
RSurround lighting in the exterior mirrors
Switching the interiorl ighting delayed
switch-off on/off
If you activate the Interior Lighting Delayfunction, the interior lighting remains on for
20 seconds after you remove the SmartKey from
the ignitionlock.
XPress the=or; button on the steering
wheeltos elect theSett.menu.
XPress the :or9 button to select the
Lightssubmenu.
XPress ato confirm.
XPress the :or9 button to select the
Interior Lighting Delayfunction.
If the Interior Lighting Delayfunction
has been activated ,the vehiclei nterior is dis-
played in red in the multifunction display.
XPress the abutton to save the setting.
Vehicle
Activating/deactivatingt he automatic
door locking mechanism
If you activate the AutomaticDoorLockfunc-
tion, the vehicleisc entrally locked above a
speed of approximately9 mph (15 km/h).
XPress the=or; button on the steering
wheeltos elect theSett.menu.
XPress the :or9 button to select the
Vehiclesubmenu.
XPress ato confirm.
XPress the :or9 button to select the
Automatic Door Lockfunction.
When the Automatic Door Lockfunction is
activated ,the vehicled oors are displayed in
red in the multifunction display.
XPress the abutton to save the setting.
For further informatio nonthe automatic locking
feature ,see (
Ypage 67).
Activating/deactivatingt he acoustic
locking verification signal
If you switch on the AcousticLockfunction, an
acoustic signal sounds when you lock the vehi-
cle.
XPress the =or; button on the steering
wheeltos elect theSett.menu.
XPress the :or9 button to select the
Vehiclesubmenu.
XPress ato confirm.
XPress the :or9 button to select the
Acoustic Lockfunction.
If the Acoustic Lockfunction is activated,
the & symbo linthe multifunction display
lights up red.
XPress the abutton to save the setting.
Comfort
Activating/deactivatin gthe EASY-
ENTRY/EXIT feature
GWARNING
When the EASY-ENTRY/EXIT feature adjusts
the steering wheel, you and other vehicle
occupants –particularl ychildren –could
become trapped. There is arisk of injury.
Whilet he EASY-ENTRY/EXIT feature is mak-
ing adjustments, make sure that no one has
any body parts in the sweepoft he steering
wheel.
If somebody becomes trapped:
Rpress one of the memory function position
buttons, or
Rmove the switch for steering wheela djust-
ment in the opposite directiontot hat in
which the steering wheelism oving.
The adjustment process is stopped.
166Menus and submenus
On-board computer and displays
Page 169 of 286
XPress the=or; button on the steering
wheel to select the Sett.menu.
XPress the:or9 button to select the
Conveniencesubmenu.
XPress ato confirm.
XPress the :or9 button to select the
Easy Entry/Exitfunction.
If the EasyEntry/Exitfunction is activated,
the vehicle steerin gwheel appears in red in
the multifunction display.
XPress the abutton to save the setting.
Further information on the EASY-ENTRY/EXIT
feature (
Ypage 80).
Switching the fold-in mirrors when lock-
ing feature on/off
When you activat ethe Auto.MirrorFoldingfunction, the exterior mirrors are folded in when
the vehicle is locked. If you unlock the vehicle
and then open adoor, the exterior mirrors fold
out again.
XPress the =or; button on the steering
wheel to select the Sett.menu.
XPress the:or9 button to select the
Conveniencesubmenu.
XPress ato confirm.
XPress the :or9 button to select the
Auto. Mirror Foldingfunction.
If the Auto. Mirror Foldingfunction is
activated, the vehicle's exterior mirror is dis-
played in red in the multifunction display.
XPress the abutton to save the setting.
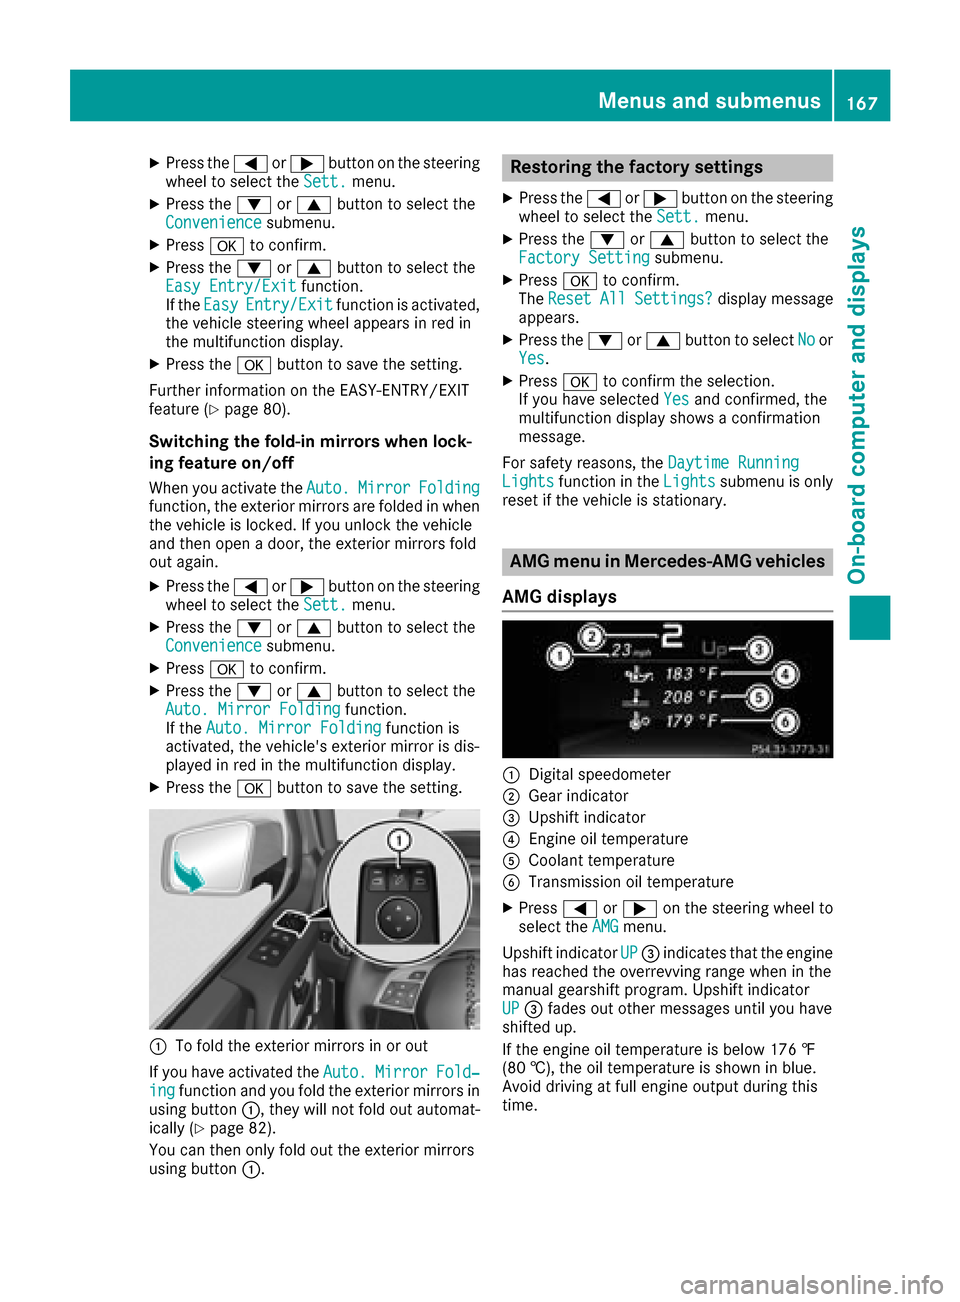
:To fold the exterior mirrors in or out
If you have activated the Auto.
MirrorFold‐ingfunction and you fold the exterior mirrors in
using button :,they will not fold out automat-
ically (
Ypage 82).
You can then only fold out the exterior mirrors
using button :.
Restoring the factor ysettings
XPress the =or; button on the steering
wheel to select the Sett.menu.
XPress the:or9 button to select the
Factory Settingsubmenu.
XPress ato confirm.
The ResetAllSettings?display message
appears.
XPress the :or9 button to select Noor
Yes.
XPress ato confirm the selection.
If you have selected Yesand confirmed, the
multifunction display shows aconfirmation
message.
For safety reasons, the Daytime Running
Lightsfunction in theLightssubmenu is only
reset if the vehicle is stationary.
AMG menu in Mercedes-AMG vehicles
AMG displays
:Digital speedometer
;Gear indicator
=Upshift indicator
?Engine oil temperature
ACoolant temperature
BTransmission oil temperature
XPress =or; on the steerin gwheel to
select the AMGmenu.
Upshift indicator UP
=indicates that the engine
has reached the overrevving range when in the
manual gearshift program. Upshift indicator
UP
= fades out other messages until you have
shifted up.
If the engine oil temperature is below 176 ‡
(80 †), the oil temperature is shown in blue.
Avoid driving at full engine output during this
time.
Menus and submenus167
On-board computer and displays
Z
Page 170 of 286
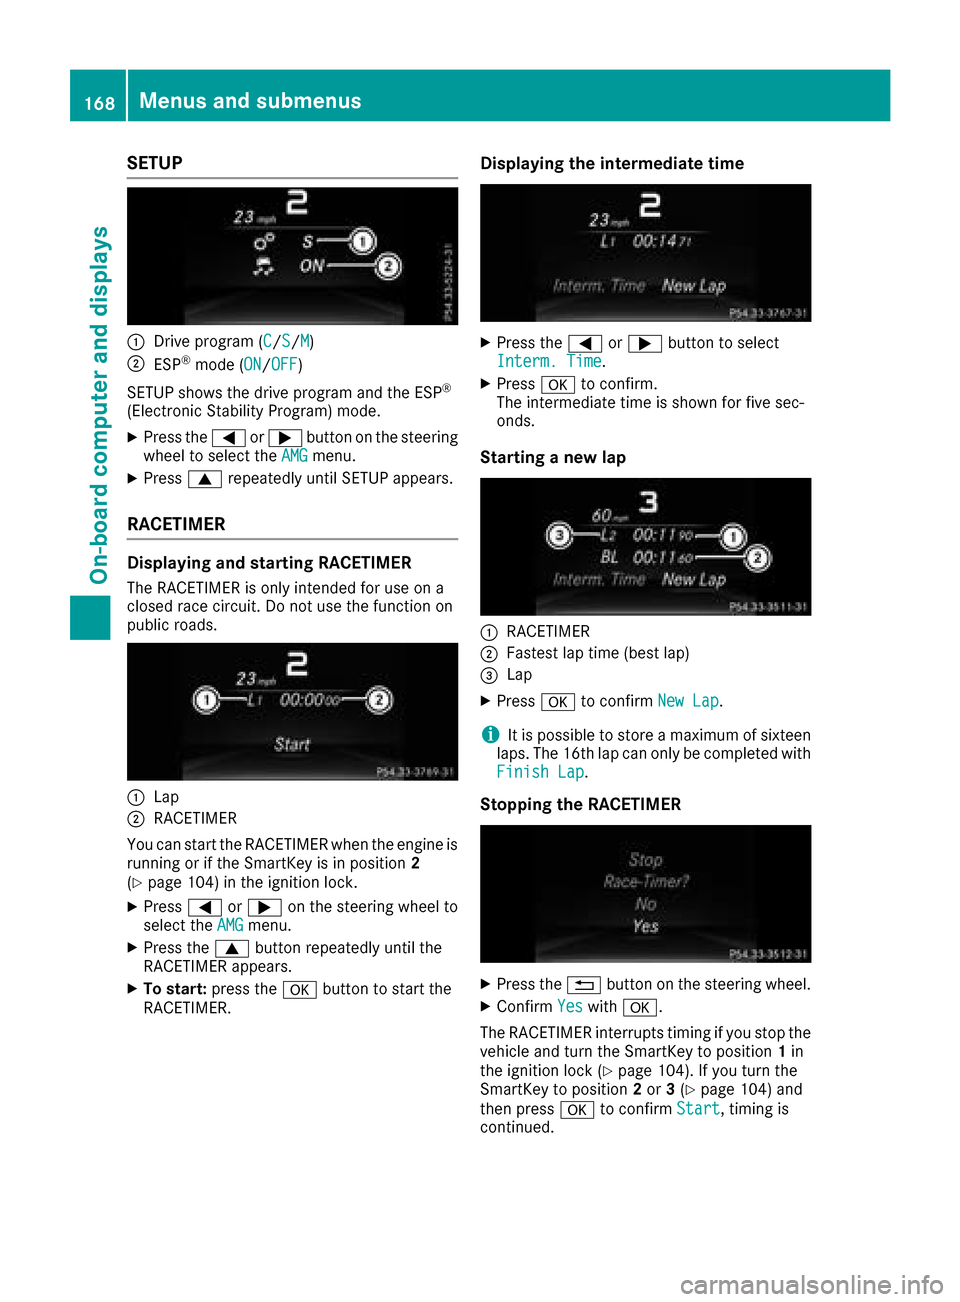
SETUP
:Drive program (C/S/M)
;ESP®mode (ON/OFF)
SETUP shows the drive program and the ESP
®
(Electronic Stability Program) mode.
XPress the =or; button on the steering
wheel to select the AMGmenu.
XPress9repeatedly until SETUP appears.
RACETIMER
Displaying and starting RACETIMER
The RACETIMER is only intended for use on a
closed race circuit. Do not use the function on
public roads.
:Lap
;RACETIMER
You can start the RACETIMER when the engine is
running or if the SmartKey is in position 2
(
Ypage 104) in the ignition lock.
XPress =or; on the steering wheel to
select the AMGmenu.
XPress the9button repeatedly until the
RACETIMER appears.
XTo start: press the abutton to start the
RACETIMER.
Displaying the intermediate time
XPress the =or; button to select
Interm. Time.
XPress ato confirm.
The intermediate time is shown for five sec-
onds.
Starting anew lap
:RACETIMER
;Fastest lap time (best lap)
=Lap
XPress ato confirm New Lap.
iIt is possible to store amaximum of sixteen
laps. The 16th lap can only be completed with
Finish Lap
.
Stopping the RACETIMER
XPress the %button on the steering wheel.
XConfirm Yeswitha.
The RACETIMER interrupts timing if you stop the
vehicle and turn the SmartKey to position 1in
the ignition lock (
Ypage 104). If you turn the
SmartKey to position 2or 3(Ypage 104) and
then press ato confirm Start
,timing is
continued.
168Menus and submenus
On-board computer and displays