Page 161 of 198

iThe Play")
Selecting the playback option
XIn media mode, slide6the controller.
The media menu bar is shown.
XTo select Options: turn and press the con-
troller.
XSelect the playback option (Ypage 148)
iThe Play More Like Thisoption is also
available for Apple®devices. For this, the
Genius functionality must be activated in
iTunes
®. Then synchronization of the Apple®
device with iTunes®must be carried out
again.
Selecting video settings
Video files from Apple®devices cannot be
played.
If playable video files are found, they will be
played by the multimedia system.
XTo switch on full-screen mode: press the con-
troller in the basic display.
XTo show the video menu: slide 6the con-
troller in full-screen mode.
The Media Interface menu bar appears.
XTo select Options: turn and press the con-
troller.
XSelect Video Settings.
Making settings (
Ypage 161)
Video DVD mode
Important safety notes
GWARNING
The CD/DVD drive is a class 1 laser product.
If you open the housing of the CD/DVD drive,
there is a risk of exposure to invisible laser
radiation. This laser radiation could damage
your retina. There is a risk of injury.
Never open the housing. Always have main-
tenance and repair work carried out at a quali- fied specialist workshop.
GWARNING
Handling discs while driving may distract you from traffic conditions. You could also lose
control of the vehicle. There is a risk of an
accident.
Handle discs only when the vehicle is station-
ary.
Bear in mind that at a speed of only 30 mph
(approximately 50 km/h) your vehicle covers a
distance of 44 feet (approximately 14 m) every
second.
General notes
Notes on discs
!Do not affix stickers or labels to the discs.
They could peel off and damage the drive.
The drive is designed to receive EN 60908 standard discs. Therefore, you can
only use discs with a maximum thickness of
1.3 mm.
If you insert thicker discs, e.g. those that con-
tain data on both sides (DVD on one side and
audio data on the other), they cannot be ejec-
ted and can damage the drive.
Do not use discs with an 8 cm diameter, even
when using an adapter. Only use round discs
with a 12 cm diameter.
The variety of discs, burners and burn software
available means there is no guarantee that the
multimedia system will be able to play discs that
you have burned yourself.
DVD playback conditions
The multimedia system can play back video
DVDs produced according to the following
standards:
RRegion code 1 or region code 0 (no region
code)
RPAL or NTSC standard
Video DVD mode159
Media
Z
Page 162 of 198

You will generally find the relevant details either
on the DVD itself or on the DVD case.
With DVDs that do not meet the standard
requirements, you may encounter playback
problems.
iObserve the following notes:
RThe multimedia system is set to region
code 1 at the factory. This setting can be
changed at an authorized Mercedes-Benz
Center. The region code can be changed up
to five times.
RIf the region code is changed at the work-
shop, video DVDs with another region code
can also be played. If you insert a video
DVD with a different region code, a mes-
sage to this effect appears.
RIf a DVD cannot be played back according
to national color transfer methods (PAL or
NTSC standards), problems with the image,
sound or playback may occur.
Control options
There are various control menus available in
DVD video mode.
Most DVDs have their own control menu.
The DVD's control menu is operated directly
using the controller or DVD functions.
Control menu and
functionOperation
RDVD's control
menu
Selection of title,
scene, language,
subtitles ...Operation with the
controller
RMenuOptions
Selection of bright-
ness, contrast,
color, format
Operation using the
menu barOptions,
video settings
RVideo menu
Selection of scene,
fast forward or
rewindIn full-screen mode,
slide 6the control-
ler
RDVD functions
Selection of title,
scene, language,
subtitles ...In full-screen mode,
press the controller
Function restrictions
Depending on the DVD, certain functions or
actions may not function at all. The symbol K
appears in the display.
Switching on video DVD mode
RInsert and eject a disc from the single drive
(Ypage 146)
RInsert a disc into the DVD changer
(Ypage 147)
Further options for switching on:
RUsing the number keypad (Ypage 144)
RUsing the main function bar (Ypage 143)
RUsing the device list (Ypage 144)
RUsing the Õbutton (Ypage 143)
Showing the DVD basic display
:Main function bar
;Main display field
=Media menu bar
The DVD basic display can be shown in the fol-
lowing situations:
XTo show the DVD menu: press the%
button.
XTo show in the video DVD currently play-
ing: slide 6the controller.
The video menu appears.
XPress the controller.
The basic display appears.
160Video DVD mode
Media
Page 163 of 198

Switching on DVD full-screen mode
It is possible to switch from the DVD basic dis-
play to full screen mode as follows:
XSlide5the controller.
The main function bar and menu bar are hid-
den. A full-screen symbol will be shown.
XPress the controller.
The full-screen mode appears.
Calling up the options menu
XTo select options: in full-screen mode, slide
6 the controller.
The video menu appears.
XPress the controller.
The DVD basic display appears.
XTo select Optionsin the menu bar: turn and
press the controller.
The Options
menu appears.
DVD functions
XTo select DVDFunctions: turn and press the
controller.
A menu appears (
Ypage 162).
Selecting video settings
Setting the picture format
The following options are available for the
screen format for the DVD being played:
RAuto
R16:9
R4:3
RZoom
XTo set the picture format: turn and press
the controller.
The dot before the menu entry shows the
selected format.
Manual image enhancement
XTo select Brightness,Contrastor
Color: turn and press the controller.
A sliding menu appears.
XTo select the required value: turn the control-
ler.
XTo exit the sliding menu: slide8 the con-
troller.
Showing the DVD's control menu
Most DVDs have their own control menu which
can be operated using the controller.
Showing the DVD's control menu
XTo show the DVD overlay menu: in full-screen
video mode, press the controller.
The DVD overlay menu is shown.
XTo select Menufrom the DVD overlay menu:
turn and press the controller.
The menu of the DVD overlay menu is hidden
and the DVD's menu entries (e.g. scenes, lan-
guage, trailers) are displayed.
XTo select a menu entry: slide and press the
controller.
Video DVD mode161
Media
Z
Page 164 of 198

Operating the video menu
:Type of data medium
;Current title
=Shows the menu bars for the DVD basic dis-play
?Current scene
ATrack time
Operating the video menu
XTo show: in full-screen video mode, slide 6
the controller.
XTo hide: slide 5the controller.
XTo select the next or previous scene: turn the
controller clockwise/counter-clockwise.
XTo fast forward or rewind: slide 1the
controller and hold until the desired position
has been reached.
XTo hide the video menu: slide 5the con-
troller.
XTo show the menu bars for the DVD basic dis- play: press the controller.
The video menu is hidden and the DVD basic
menu appears.
DVD functions
Showing/hiding the DVD functions
XTo show the DVD overlay menu: in full-screen
video mode, press the controller.
The DVD overlay menu is shown.
XTo hide: select%in the DVD overlay
menu.
XTo show the DVD basic display: selectò
in the DVD overlay menu.
Overview of DVD overlay menu
:Activates DVD control menu
;Hides DVD overlay menu
=Shows the DVD basic display
?Confirms entry in control menu
ANavigates DVD lists
BJumps to the start of the scene
CDisplays camera perspectives
DShows subtitles
ESelects language
FStop function
GPause function
Operating the DVD's own menu with the DVD overlay menu
XIn full-screen mode, press the controller
The DVD overlay menu is shown.
It is possible to navigate within the DVD's owncontrol menu using the arrows in the upper
bar of the DVD overlay menu.
XTo select the XZ¬Yarrow to navigate in the
DVD's own menu: turn the controller.
The active arrow is highlighted.
XTo select the arrow: press the controller.
The next menu entry in the direction of the
arrow is highlighted.
XTo select ¬from the DVD overlay menu:
turn and press the controller.
The selected DVD scene is played.
XTo hide the DVD overlay menu: select &
using the controller.
XPress the controller.
The DVD overlay menu is hidden.
If functions such as Display camera perspec-
tives are available on the DVD, these functions
are shown in the DVD overlay menu.
XTo call up Display camera perspectives: turn
and press the controller
162Video DVD mode
Media
Page 165 of 198

Stops playback
XIn full-screen mode, press the controller
The DVD overlay menu is shown.
XInterrupting playback
To selectÉin the menu of the DVD overlay
menu: turn and press the controller.
The Ë display changes to Ì. The video
image is hidden.
XTo continue playback: selectÌ.
Playback continues from the point where it
was interrupted.
XTo stop playback: selectÉagain while
playback is paused.
XTo start playback again: selectÌ.
Playback restarts from the beginning.
Pausing playback
XIn full-screen mode, press the controller
The DVD overlay menu is shown.
XTo pause playback
Select Ë: turn and press the controller.
The Ë display changes to Ì.
XTo continue playback: selectÌ.
Selecting a scene/chapter
If the film is divided into scenes and chapters,
you can select these directly while the film is
running or you can skip progressively through
them. This is not possible at certain points for
some DVDs (e.g. during the opening credits).
It may also be possible to select the scene and
chapter from the functions stored on the DVD.
XTo skip forward or back: in the video menu,
turn the controller.
or
XPress the EorF button.
The next or previous scene in the film is skip-
ped to.
Picture viewer
General notes
If pictures are stored on a connected medium
(except on Apple®devices), you can view these
on the multimedia system. The following data media and picture formats
are supported:
RData media:
CD, DVD, USB devices, SD cards
RPicture formats: jpeg, jpg, bmp, png
The maximum image resolution is
20 megapixels for JPEG, JPG and 1.5 megapixels
for BMP, PNG.
Displaying pictures
XIn the media basic display, press the control-
ler.
XTo select Search: turn and press the control-
ler.
The category list appears.
XTo select Photos: turn and press the control-
ler.
A directory list appears. Folders and picture
files can be shown.
XSelect a folder or picture.
If there is no picture on the data medium, an
empty list is shown.
Searching for pictures on other data media
XYou can search for pictures on other data
media.
In the directory list, slide 8the controller.
The device list appears.
XTo select a data medium with picture files:
turn the controller and press to confirm.
A directory list appears. Folders and picture
files can be shown.
XSelect a folder or picture.
Starting a slide show
XWhile viewing a picture, press the controller.
The image menu appears.
XTo select Start Slideshow: turn and press
the controller.
The slide show starts.
XTo end the slide show: press the controller.
The image menu appears.
XSelect End Slide Show.
Picture viewer163
Media
Z
Page 166 of 198
Changing the picture view
XPress the controller.
The image menu appears.
XTo selectTurn Clockwise: turn and press
the controller.
The picture rotates 90 degrees.
XSelect Turn Counterclockwise.
The picture rotates 90 degrees.
XSelect Zoom In.
The size of the picture increases.
After you have zoomed into the picture, you
can move the section of the picture.
XTo move the section of the picture: slide 4
and 1 the controller.
XTo revert to the original size: press the con-
troller.
or
XPress the %button.
Closing the picture viewer
XPress the controller.
XTo select Close Picture Viewer: turn and
press the controller.
The multimedia system returns to the last
accessed media function.
164Picture viewer
Media
Page 167 of 198

Your multimediasyste mequipment
These operatin ginstruction sdescribe all th e
standar dan doptional equipment of your multi-
media system, as available at th etime of going
to press. Country-specifi cdifference sare pos -
sible. Bear in min dthat your vehicle may no t
feature all function sdescribed here. Thi salso
applies to safety-relevan tsystems an dfunc-
tions.
Read th einformation on qualifie dspecialis t
workshop sin th evehicle Operator's Manual.
Sound settings
Calling up th esound menu
You can selec tvarious sound setting sfo rth e
differen taudio an dvideo sources. It is possible
to set more bass fo rradio mode than fo raudio
CD mode, fo rexample. The respective sound
men ucan be called up from th emen uof th e
desire dmode.
XSwitch to radio mode (Ypage 134).
or
XSwitch to media mode (Ypage 143).
XTo display themen ubars: slid e6 thecon-
troller.
XTo selec tà :turn an dpress th econtroller .
The men uappears wit hth elast setting
accessed, e.g. Equalizer
.
Sound men uoverview
FunctionOptions
EqualizerSets treble ,mid -
range an dbass
Balance/faderAdjust sth evolume :
right/lef tan d
front/rea r
Setting treble, mid-range an dbass
XCall up th esound men u (Ypage 165).
XTurnth econtroller until Equalizeris brought
to th efront.
XTo activat erotary menus fo rtreble ,mid-range
an dbass :slid e6 thecontroller .
XTo switch between th erotary menus: slid e
8 or9 thecontroller .
XTo maketh edesire dEqualize rsettings: turn
th econtroller .
Rotary menus sho wtheset values.
XTo return to th emenu: slid e5 thecontrol-
ler .
XTo return to th ebasi cmenu: press th e%
butto nbriefly.
Adjusting th ebalance/fader
Balance adjust sth evolume lef tan dright .Fader
adjust sth evolume in fron tan drear.
Fo rth ebes tsound ,setting 0is recommended .
XCall up thesound men u (Ypage 165).
XTurnth econtroller until Balance/Faderis
brought to th efron tan dthen slid e6 the
controller .
XTo activat eth emen ufo rbalance an dfader:
press th econtroller .
Sound settings165
Sound
Page 168 of 198

XTo adjust the balance: slide8or9 the
controller.
XTo adjust the fader: slide 6or5 the con-
troller.
XTo return to the basic menu: press the %
button briefly.
Harman/Kardon®Logic 7®surround
sound system
General notes
The harman/kardon®Logic7®surround sound
system is available for all functions in the radio
and media modes.
The harman/kardon
®Logic7®surround sound
system is available for the following operating
modes:
RRadio (FM only)
RSatellite radio
RAudio CD
RMP3 (including SD card and USB storage
device)
RMedia Interface
RBluetooth®audio mode
RVideo DVD (PCM, DTS®and Dolby®Digital
audio formats)
iFor the best sound, CD or WAV CD format is
recommended. For data-reduced media, AAC
with a data rate of 320 kbit/s is recommen-
ded.
Discs which support the audio formats men-
tioned have the following logos:
iManufactured under license from Dolby
Laboratories. Dolby and the double-D symbol
are trademarks of Dolby Laboratories.
iFor DTS patents see
http://patents.dts.com. Manufactured
under license from DTS Licensing Limited.
DTS, the Symbol & DTS and the Symbol
together are registered trademarks, and DTS
Digital Surround is a trademark of DTS, Inc.
©
DTS, Inc. All rights reserved.
Calling up the sound menu
You can select various sound settings for the
different audio and video sources. It is possible
to set more bass for radio mode than for CD
audio mode, for example. The respective sound
menu is called up from the menu of the desired
mode.
XSwitch to radio mode (Ypage 134).
or
XSwitch to media mode (Ypage 143).
XTo switch to the menu bar: slide 6the con-
troller.
XTo select à: turn and press the controller.
The menu appears with the last setting
accessed, e.g. Equalizer
.
Overview of harman/kardon
®Logic7®surround
sound system
FunctionOptions
EqualizerSets treble, mid-
range and bass
Balance/faderAdjusts the volume:
right/left and
front/rear
Logic 7Optimizes the sound
playback
166Harman/Kardon®Logic 7®surround sound system
Sound
 1
1 2
2 3
3 4
4 5
5 6
6 7
7 8
8 9
9 10
10 11
11 12
12 13
13 14
14 15
15 16
16 17
17 18
18 19
19 20
20 21
21 22
22 23
23 24
24 25
25 26
26 27
27 28
28 29
29 30
30 31
31 32
32 33
33 34
34 35
35 36
36 37
37 38
38 39
39 40
40 41
41 42
42 43
43 44
44 45
45 46
46 47
47 48
48 49
49 50
50 51
51 52
52 53
53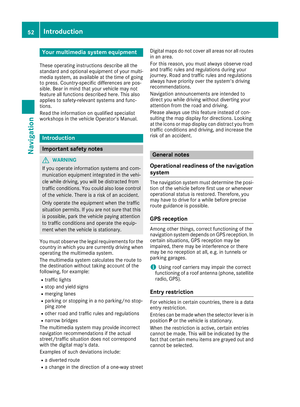 54
54 55
55 56
56 57
57 58
58 59
59 60
60 61
61 62
62 63
63 64
64 65
65 66
66 67
67 68
68 69
69 70
70 71
71 72
72 73
73 74
74 75
75 76
76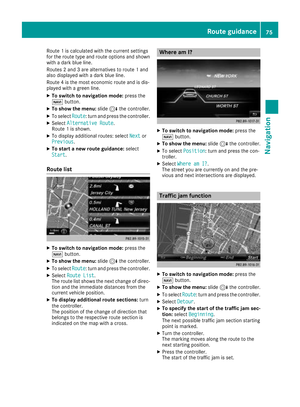 77
77 78
78 79
79 80
80 81
81 82
82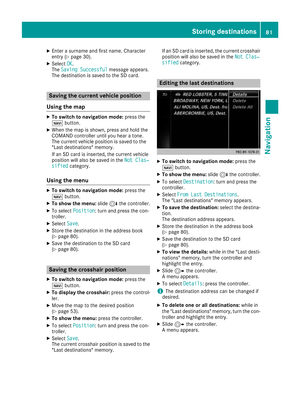 83
83 84
84 85
85 86
86 87
87 88
88 89
89 90
90 91
91 92
92 93
93 94
94 95
95 96
96 97
97 98
98 99
99 100
100 101
101 102
102 103
103 104
104 105
105 106
106 107
107 108
108 109
109 110
110 111
111 112
112 113
113 114
114 115
115 116
116 117
117 118
118 119
119 120
120 121
121 122
122 123
123 124
124 125
125 126
126 127
127 128
128 129
129 130
130 131
131 132
132 133
133 134
134 135
135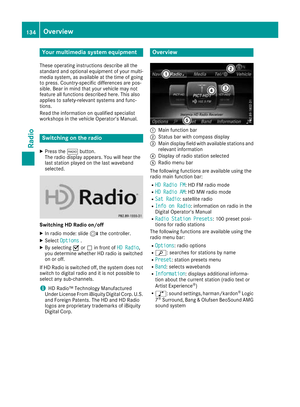 136
136 137
137 138
138 139
139 140
140 141
141 142
142 143
143 144
144 145
145 146
146 147
147 148
148 149
149 150
150 151
151 152
152 153
153 154
154 155
155 156
156 157
157 158
158 159
159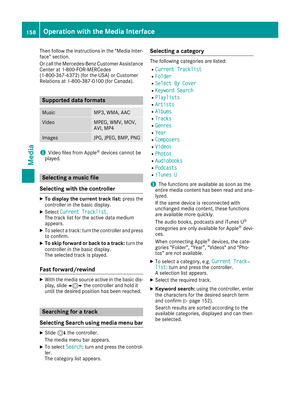 160
160 161
161 162
162 163
163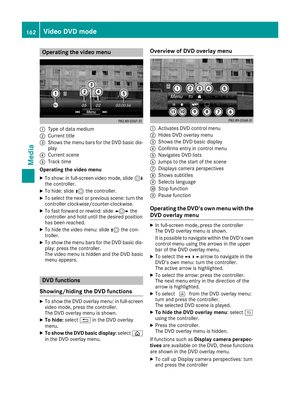 164
164 165
165 166
166 167
167 168
168 169
169 170
170 171
171 172
172 173
173 174
174 175
175 176
176 177
177 178
178 179
179 180
180 181
181 182
182 183
183 184
184 185
185 186
186 187
187 188
188 189
189 190
190 191
191 192
192 193
193 194
194 195
195 196
196 197
197