Page 145 of 198

Your multimediasyste mequipment
These operatin ginstruction sdescribe all th e
standar dan doptional equipment of your multi-
media system, as available at th etime of going
to press. Country-specifi cdifference sare pos -
sible. Bear in min dthat your vehicle may no t
feature all function sdescribed here. Thi salso
applies to safety-relevan tsystems an dfunc-
tions.
Read th einformation on qualifie dspecialis t
workshop sin th evehicle Operator's Manual.
Activating medi amode
General notes
There are severa lways to activat emedia sour-
ce susin gth emultimedia system.
The relevant section sof th eOperator's Manual
describe th esimples tway to activat e amedia
source.
Thi ssection describes all option sfo ractivatin g
media sources.
Connections for externa lmedi asour-
ces
The followin gexternal media sources can be
used :
RApple®devices (e.g. iPhon e®)
RUSBdevices (e.g. US Bstick, MP3 player)
Two US Bports are located in th estowag e
spac eunder th earmrest.
RCD
RDV Dvideo
RSD cards
RDevices wit hBluetoot h®connection
Activating medi ausing th ebutton
XPress th eÕ button.
The last media sourc eyou hav eset is dis -
played.
XPress th eÕ buttonagain .
The men uappears wit hth eavailable media
sources.
XTo selec tmedia sources: turn th econtroller
until th edesire dmedia sourc eis in th ecenter.
Press th econtroller .
Dependin gon th evehicle equipment ,th efol-
lowing media sources will be available :
RDisc
RMemory Card
RMediaInterfac e 1
RMediaInterfac e 2
RBluetoothAudi o
Switching on automatically
Whenan external media sourc eis connected,
CD an dSD memor ycar dfunction sare automat -
ically switched on by th emultimedia system.
Whe nusin gwit hUS Bdevices, switch to th e
respective basi cdisplay.
If playable music files are found ,they will be
playe dby th emultimedia system.
iIf amedia function is already switched on in
th emultimedia system, this will be interrup-
ted. The basi cdisplay of th enewly connecte d
devic ewill appear (except when usin gwit h
USB/iPo d
®). If another function ,suc has nav-
igation ,is bein goperated, th ebasi cdisplay
will no tchange.
Activating medi ausing th emain func-
tion ba r
XTo display th emain function bar :slid e5 the
controller .
XTo selectMedi a:turn an dpress th econtroller .
The last media sourc eyou hav eset is dis -
played.
Activating media mode143
Media
Page 146 of 198

XTo selectMediain media mode: slide 5and
press the controller.
The menu appears with the available media
sources.
XTo select the media source: turn the control-
ler and press to confirm.
If the media source contains music or video
files, these will be played. The corresponding
basic menu will be shown.
Activating media using the number
keypad
XTo select a media source: press the corre-
sponding number key.
If the media source contains music or video
files, these will be played. The corresponding
basic menu will be shown.
XTo enter the track number: press the g
button.
A menu appears.
XUse the number keypad to enter the track
number.
The track is played.
Use the sbutton to show the track infor-
mation for the track that is currently playing.
Activating media using the device list
XIn Media mode, slide 6the controller.
The media menu bar appears.
XTo select Devices: turn and press the con-
troller.
The available media sources will be shown.
The #dot indicates the current setting.
XSelect the media source.
If the media source contains music or video
files, these will be played. The corresponding
basic menu will be shown.
Audio/video mode
Important safety notes
GWARNING
The CD/DVD drive is a class 1 laser product.
If you open the housing of the CD/DVD drive,
there is a risk of exposure to invisible laser
radiation. This laser radiation could damage
your retina. There is a risk of injury.
Never open the housing. Always have main-
tenance and repair work carried out at a quali- fied specialist workshop.
GWARNING
Handling discs while driving may distract you from traffic conditions. You could also lose
control of the vehicle. There is a risk of an
accident.
Handle discs only when the vehicle is station-
ary.
Bear in mind that at a speed of only 30 mph
(approximately 50 km/h), the vehicle covers a
distance of 44 ft (approximately 14 m)per sec-
ond.
Notes on audio/video mode
Permissible data carriers
RCD audio, CD-R and CD-RW
RDVD video, DVD-R and DVD-RW (audio for-
mats PCM DTS®and Dolby®Digital)
RSD card
RUSB storage device
RApple®devices
iManufactured under license from Dolby
Laboratories. Dolby and the double-D symbol
are trademarks of Dolby Laboratories.
iFor DTS patents see
http://patents.dts.com. Manufactured
under license from DTS Licensing Limited.
DTS, the Symbol & DTS and the Symbol
together are registered trademarks, and DTS
Digital Surround is a trademark of DTS, Inc.
©
DTS, Inc. All rights reserved.
144Audio/video mode
Media
Page 147 of 198

Permissible file systems
RISO 9660/Joliet standard for CDs
RUDF for video DVDs
RFAT16, FAT32, exFAT and NTFS for SD card
and USB storage media
RHFS and HFS+ for Apple®devices
iWriting access is not possible on NTFS.
Multisession CDs
For multisession CDs, the content of the first
session determines how the multimedia system
processes the CD. The multimedia system only
plays back one session and gives priority to the
first session on the CD.
File structure of a data carrier
When you create a disc with compressed music
files, the tracks can be organized in folders. A
folder may also contain subfolders. The disc
may contain no more than eight directory levels
(a root and seven sub-levels). Files beyond the
eighth level will not be recognized by the sys-
tem.
iThe multimedia system supports up to
25,000 files for all of the connected sources.
Track and file names
When you create a disc with compressed music
files, you can assign names to the tracks and
folders.
You should observe the following when assign-
ing track names:
Rtrack names must have at least one character
Rtrack names must have an extension of a sup-
ported audio or video format, e.g. mp3, aac or m4v.
Rthere must be a dot between the track name
and the extension
Example of a correct track name:
"Track1.mp3".
Permissible formats
The multimedia system supports the following
audio and video formats:
Audio for-
matsMP3, WMA, CDA, AAC for-
mats (.aac, .mp4, .m4a
and .m4b)
Video for-
matsDVD-V, MPEG, WMV, M4V,
AVI up to 720p
Copy-protected iTunes®music files with
the .m4p file extension are not supported.
Permissible bit and sampling rates
The multimedia system supports MP3 and WMA
files of the following type:
FormatBit rates [kbit/
s]Sampling
rates [kHz]
MP332-320
(fixed and varia-
ble bit rates)8-48
WMA5-384
(fixed and varia-
ble bit rates)8-48
The multimedia system does not support WMA
files of the following type:
RDRM (Digital Rights Management) encrypted
files
RWMA Pro
R5.1 surround sound
iOnly use tracks with a bit rate of at least
128 kbit/s and a sampling rate of at least
44.1 kHz. Lower rates can cause a noticeable deterioration in quality. This is especially the
case if you have activated a surround sound
function.
Selecting an active partition (USB mass
storage devices only)
You can select this function for USB storage
devices if the storage device is partitioned. Up
to 9 partitions (primary or logical, FAT, FAT32,
exFAT and NTFS) are supported.
Audio/video mode145
Media
Z
Page 148 of 198
.
XTo selectOptionsin the media menu bar:
turn and press the controller.
XSelect Select Active Partition.
Notes on copyright
Audio")
Selecting an active partition
XSelect a USB storage device (Ypage 143).
XTo selectOptionsin the media menu bar:
turn and press the controller.
XSelect Select Active Partition.
Notes on copyright
Audio or video files that you create or reproduce
yourself for playback are generally subject to
copyright protection.
In many countries, reproductions, even for pri-
vate use, are not permitted without the prior
consent of the copyright holder.
Make sure that you know about the applicable
copyright regulations and that you comply with
these.
Notes on CDs/DVDs
!Do not affix stickers or labels to the discs.
They could peel off and damage the drive.
The drive is designed to receive EN 60908 standard discs. Therefore, you can
only use discs with a maximum thickness of
1.3 mm.
If you insert thicker discs, e.g. those that con-
tain data on both sides (DVD on one side and
audio data on the other), they cannot be ejec-
ted and can damage the drive.
Do not use discs with an 8 cm diameter, even
when using an adapter. Only use round discs
with a 12 cm diameter.
Discs with copy protection are not compatible
with the audio CD standard and therefore may
not be able to be played.
Playback problems may occur when playing
copied discs.
There may be playback problems if you play CDs
that you have copied yourself with a storage
capacity of more than 700 MB.
Menu overview
:Main function bar
;Display for the active data medium
=Media menu bar
?Title display in the media list
ACurrent track and number in the track list
BNumerical time display
CGraphic time display
DAlbum cover (if available)
Inserting and removing a disc from
the single CD/DVD drive
Inserting
XPress the þbutton on the single drive.
If there is a disc already inserted, it will be
ejected.
XInsert a disc into the disc slot with the printed
side facing up.
The drive closes and the disc is played.
If the CD or DVD is started in Media mode, the
corresponding basic menu will be shown. If
the CD or DVD is started from another appli-
cation (e.g. navigation), the display will not
change.
iThe drive may not be able to play discs with
copy protection.
Removing
XPress the þbutton.
The drive ejects the disc.
XTake the disc out of the slot.
If you do not take the disc out of the slot, it is
drawn in again automatically after a short
while.
146Audio/video mode
Media
Page 149 of 198

Inserting a CD/DVD into the DVD
changer
The DVDchanger has amagazine wit hsix trays.
Insertin g aCD/DVD int oth emagazine tray
XPress th eV button.
The magazin emen uappears.
XTo switch to th edisc view: slide 5thecon-
troller .
XTo select th emagazin etray: tur nth econtrol -
ler and press to confirm .
or
XPress number buttons (1-6) on th emultime-
dia system.
The DV Dchanger switches to th eselected
magazin etray.
The Please Wait.. .message appears.
You will then see th ePlease
insertdis c1.message .
XInsert adisc int oth edisc slot wit hth eprinte d
side facing up.
Loading all empty magazine tray s
XTo showthemagazin emenu: press th eV
button.
XTo select LoadEmptySlots:tur nand press
th econtroller.
The multimedia system switches to th enext
empty magazine tray. The
Please Wait.. .
message appears.
You will then see th ePlease
insertdis c1.message .
XInsert adisc int oth edisc slot wit hth eprinte d
side facing up.
Once th edisc is loaded, th eDV Dchanger
switches to th enext empty tray.
If insertion of th enext disc takes to olong, th e
disc inserted first will be played.
XRepeat these steps until all magazine trays
are filled.
The DV Dchanger plays th efirst inserted disc .
Exiting th eDVD changer men u
XPress theV button.
Ejecting a CD/DVD from the DVD
changer
:Active ejection
;Disc nam e
=Type of dat amedium
If you remove on edisc while playin ganother
disc ,th eDV Dchanger interrupt splayback. Play-
bac kresumes after th edisc is ejected.
Ejecting asingle dis c
XTo showthemagazine menu: press th eV
button.
XTo switch to th edisc view: slide 5thecon-
troller .
The curren tdisc is marked.
XTo select adisc :tur nth econtroller and press
to confirm .
or
XPress number buttons (1-6) on th emultime-
dia system.
The DV Dchanger ejects th edisc .
XTaketh edisc out of th eslot .
Audio/video mode147
Media
Z
Page 150 of 198

Ejecting all CDs/DVDs
XTo show the magazine menu: press theV
button.
XSelect Eject All.
The last active disc is ejected.
The Please remove disc 1.
message
appears.
XRemove the disc.
XRepeat the last step until the magazine is
empty.
If you take too long removing the disc, the disc
is re-loaded.
Exiting a menu
XPress the Vbutton.
or
XSelect %in the magazine menu.
Inserting/removing an SD card
Important safety notes
GWARNING
SD cards are small parts. They can be swal-
lowed and cause choking. This poses an
increased risk of injury or even fatal injury.
Keep the SD card out of the reach of children. If a SD card is swallowed, seek medical atten-
tion immediately.
!If you are no longer using the SD card, you
should remove it and store it outside the vehi-
cle. High temperatures can damage the card.
The multimedia system supports SD cards
(Secure Digital), SDHC cards ( SecureDigital
High Capacity), and SDXC cards ( SecureDigital
eXtended Capacity.
Inserting an SD card
XInsert the SD card into the SD card slot on the
control panel until the SD card engages. The
side with the contacts must face down.
The medium is played and the files are loaded
in the background. If there are no supported
audio or video files, you will see a message to
this effect.
Removing an SD card
XPress the SD card.
The SD card is ejected.
XRemove the SD card.
Connecting USB devices
Two USB ports are located in the stowage space
under the armrest (Ypage 143).
XConnect the USB device with a suitable USB
port.
If the corresponding media display is visible,
the medium is played and the files are loaded
in the background. Otherwise, the system
does not automatically switch to USB. If there
are no supported audio or video files, you will
see a message to this effect.
iMP3 players must support Media Transfer
Protocol (MTP).
Selecting the playback option
XIn media mode, slide 6the controller.
The media menu bar is shown.
XTo select Options: turn and press the con-
troller.
Playing similar tracks
iThis option is available as soon as the music
collection has been read and analyzed.
XTo select Play More Like This: turn and
press the controller.
Selecting Play mode
XTo select PlaybackMode: turn and press the
controller.
XSelect Normal Track Sequence.
The current track list is played in the order it is
stored on the data medium.
XSelect Random Track List.
The current track list is played in random
order.
XSelect Random Medium.
All tracks on the data medium are played in
random order.
148Audio/video mode
Media
Page 151 of 198

Skip to time
XTo selectSkip to Time: turn and press the
controller.
A menu appears.
XTo set the time: turn the controller.
or
XSet the desired time using the number key-
pad.
Selecting an active partition
XTo select Select Active Partition: turn
and press the controller.
With the Select
ActivePartitionoption,
you can select a partition in the current USB
data medium.
Showing track information
XTo switch the Show Track Informationfunction onOor off ª: turn and press the
controller.
You display or hide information for Track,
Artist and Album in the main display field.
If the function is deactivated, the file name
and the folder name of the track are dis-
played.
Entering a track number directly
XTo enter the track number:press the g
button.
A menu appears.
XUse the number keypad to enter the desired
track number.
The track is played.
Pausing/continuing playback
XTo pause playback: in audio or video mode,
slide 6the controller.
The media menu bar is shown.
XTo select Ëin the media menu bar: turn
and press the controller.
Playback is interrupted. The display changes
to Ì.
XTo continue playback: in audio or video
mode, slide 6the controller.
The media menu bar is shown.
XTo select Ìin the media menu bar: turn
and press the controller.
Playback is continued from the point of inter- ruption. The symbol changes to Ë.
Selecting a track
Selecting a track using the current
track list
XTo display the current track list: press the
controller in the basic display.
The category list appears.
Select the current track list.
XTo select a track: turn the controller and press
to confirm.
Selecting a track by skipping to a track
XTo skip forward or back to a track: turn or
briefly slide 1the controller in the media
basic display.
or
XPress the EorF button.
Fast forwarding/rewinding
XIn the media basic display, press and hold the
EorF button until the desired position
is reached.
Searching for a track
XIn Media mode, slide 6the controller.
The media menu bar is shown.
XTo select Search: turn and press the control-
ler.
The category list is shown.
Audio/video mode149
Media
Z
Page 152 of 198

XSelect a category, e.g.Genres.
After the category has been chosen, sub-cat-
egories appear depending on the music
tracks available.
XSelect a sub-category, e.g. Rock.
XSelect a track in the sub-category for playing.
All of the tracks in this sub-category are
played.
Gracenote®Media Database
General notes
This function is available in CD audio, MP3 and
iPod®mode.
There is a version of Gracenote®music recog-
nition technology, Emeryville, California, USA on
the hard disk of the multimedia system. You will
recognize this by the logo in the bottom right-
hand corner of certain audio displays. If the
audio CD does not contain any CD text informa-
tion, the multimedia system can use the Grace-
note
®Media Database to identify unknown
audio tracks when in audio CD mode.
In addition, the cover arts for the main display
field, the album list and the "Select by cover"
function from the Gracenote
®Media Database
are displayed for the music files and the iPod®.
This occurs when the cover art is not contained
in the files but in the Gracenote
®Media Data-
base.
Online prompt for metadata
A connection to the Gracenote®Data Server is
made automatically when an audio CD is inser-
ted. The missing data is loaded, saved in the
multimedia system and shown on the display. If
the search for metadata is unsuccessful, no data
can be displayed. If no phone is connected or
configured for data use, this function is unavail-
able.
An Internet connection is required for this
(
Ypage 128).
Saving audio CDs
General notes
iStore your audio CDs in a safe place. Any
malfunction in the multimedia system may
result in the loss of stored files. Mercedes-
Benz is not liable for any loss of data.
No individual music tracks can be stored or
deleted, only a maximum of 12 complete audio
CDs.
If 12 audio CDs are stored, the REC
option in the
Media menu bar is grayed out and has no func-
tion. One audio CD must be deleted before a
new audio CD can be copied.
Copying an audio CD
XInsert an audio CD.
XIn media mode, slide 6the controller.
The media menu bar appears.
XTo start the copying process: selectRECby
turning and pressing the controller.
XTo select Start: press the controller.
The copying procedure starts and is shown in
the progress bar.
It may take some time for the copying process
to be completed, depending on the amount of
data.
If the copying process is successful, the
Music files copied.
message appears
XTo cancel copying: selectCancel.
The files copied up to the point of cancellation
are lost.
iDuring the copying process, you can switch
to another function (e.g. radio) or to another
media source (e.g. USB). The copying proce-
dure continues in the background. It is how-
ever not possible to select another CD in the
CD changer.
Playing stored audio CDs
XIn Media mode, slide 6the controller.
The media menu bar appears.
XTo select Search: turn and press the control-
ler.
The category list appears.
150Audio/video mode
Media
 1
1 2
2 3
3 4
4 5
5 6
6 7
7 8
8 9
9 10
10 11
11 12
12 13
13 14
14 15
15 16
16 17
17 18
18 19
19 20
20 21
21 22
22 23
23 24
24 25
25 26
26 27
27 28
28 29
29 30
30 31
31 32
32 33
33 34
34 35
35 36
36 37
37 38
38 39
39 40
40 41
41 42
42 43
43 44
44 45
45 46
46 47
47 48
48 49
49 50
50 51
51 52
52 53
53 54
54 55
55 56
56 57
57 58
58 59
59 60
60 61
61 62
62 63
63 64
64 65
65 66
66 67
67 68
68 69
69 70
70 71
71 72
72 73
73 74
74 75
75 76
76 77
77 78
78 79
79 80
80 81
81 82
82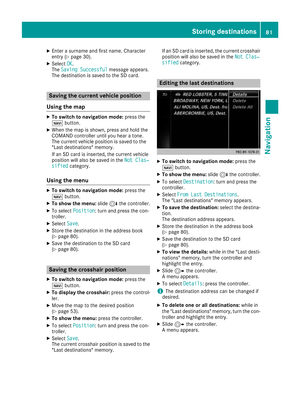 83
83 84
84 85
85 86
86 87
87 88
88 89
89 90
90 91
91 92
92 93
93 94
94 95
95 96
96 97
97 98
98 99
99 100
100 101
101 102
102 103
103 104
104 105
105 106
106 107
107 108
108 109
109 110
110 111
111 112
112 113
113 114
114 115
115 116
116 117
117 118
118 119
119 120
120 121
121 122
122 123
123 124
124 125
125 126
126 127
127 128
128 129
129 130
130 131
131 132
132 133
133 134
134 135
135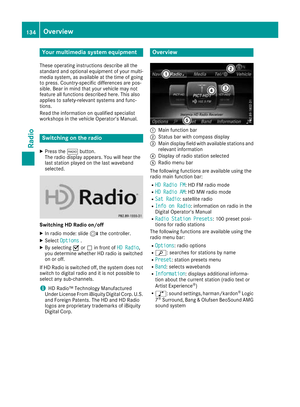 136
136 137
137 138
138 139
139 140
140 141
141 142
142 143
143 144
144 145
145 146
146 147
147 148
148 149
149 150
150 151
151 152
152 153
153 154
154 155
155 156
156 157
157 158
158 159
159 160
160 161
161 162
162 163
163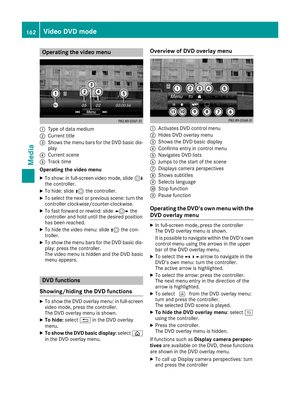 164
164 165
165 166
166 167
167 168
168 169
169 170
170 171
171 172
172 173
173 174
174 175
175 176
176 177
177 178
178 179
179 180
180 181
181 182
182 183
183 184
184 185
185 186
186 187
187 188
188 189
189 190
190 191
191 192
192 193
193 194
194 195
195 196
196 197
197