2017 MERCEDES-BENZ E-CLASS SALOON warning
[x] Cancel search: warningPage 92 of 497

Au
tomatic reve rsing function of thero ller
sunblind
If th ere is an object obstructing thero ller sun‐
blind during the closing process, thero ller sun‐
blind opens again automaticall y.The automatic
re ve rse function is only an aid and is not a sub‐
st itute foryo ur attentiveness. #
When closing thero ller sunblind, make sure
th at no body parts are in thera nge of mo ve‐
ment. &
WARNING Risk of becoming trapped
despi tereve rsing function
In particular, there ve rsing function does not
re act tosoft, light and thin objects, e.g. small
fi ngers.
This means that there ve rsing function can‐
not pr event entrapment in these situations. #
When closing thero ller sunblind, make
sure that no body parts are in thera nge
of mo vement. #
Release the button immediately if
somebody becomes trapped. or
#
Press the button in any direction during
th e automatic closing process.
The closing process is stopped. Au
tomatic features of the sliding sunroof %
The term "sliding sun roof" also refers to the
panoramic sliding sunroof.
By pushing or pulling the3 button, you can
inter rupt the automatic functions: "Rain closing
function when driving" and "Automatic lo wering
fe ature".
Au tomatic closing when the vehicle is sta‐
tionary
R if it starts torain (de tection bythera in sen‐
sor on the windscreen)
R afte r six hours
R ifth ere is a malfunction in the po wer supply
The rear of the sliding sunroof is then raised. Ra
in closing function when driving
Ve hicles with a panoramic sliding sunroof: If
it starts torain, thera ised sliding sunroof is
automatically lo wered while theve hicle is in
motion.
Au tomatic lo weringfeature
Ve hicles with a panoramic sliding sunroof: If
th e sliding sunroof is raised at there ar, the slid‐
ing sunroof is automatically lo wered slightly at
higher speeds. Atlow speeds, it is raised again
automaticall y. &
WARNING Risk of entrapment byauto‐
matic lo wering of the sliding sunroof
At high speeds thera ised sliding sunroof
automatically lo wersslightly at there ar.
This could trap you or other persons. #
Make sure that nobody reaches into the
sweep of the sliding sunroof whilst the
ve hicle is in motion. Opening and closing
89
Page 93 of 497
#
If somebody becomes trapped, briefly
push the sliding sunroof button for‐
wa rds or backwards.
The sliding sunroof lifts during opening. Problems with
the sliding sunroof %
The term "sliding sun roof" also refers to the
panoramic sliding sunroof. Problem
Possible causes/consequences and M
MSolutions
The sliding sunroof cann otbe closed
and you cannot see the cause. &
WARNING Risk of becoming trapped or fata l injury byclosing the sliding sunroof again
If yo u close the sliding sunroof again immediately af ter it has been bloc ked or reset, the sliding sunroof
closes with increased forc e.
Pa rts of the body could become trapped in the closing area in the process. #
Make sure that no parts of the body are in the closing area. #
Release the button immediately if somebody becomes trapped.
or #
Press the button in any direction during the automatic closing process.
The closing process is stopped. If
th e sliding sunroof is obstructed during closing and reopens again slightly: #
Immediately af ter auto matic reve rsing, pull and hold the3 button down again tothe point of resist‐
ance until the sliding sunroof is closed.
The sliding sunroof is closed with increased forc e. 90
Opening and closing
Page 97 of 497

Note
s onthe cor rect driver's seat position &
WARNING Risk of inju rythro ugh adjust‐
ing vehicle settings while theve hicle is in
motion
Yo u could lose cont rol of theve hicle in the
fo llowing situations:
R ifyo u adjust the driver's seat, the head
re stra ints, thesteering wheel or the mir‐
ro r while theve hicle is in motion
R ifyo ufast enyour seat belt while theve hi‐
cle is in motion #
Before starting the engine: adjust the
driver's seat, the head restra ints, the
st eering wheel or the mir ror and fasten
yo ur seat belt. Ensure
thefo llowing when adjusting thesteering
wheel 1, seat belt 2and driver's seat 3:
R you are as faraw ay from the driver's airbag
as possible
R you are sitting in a no rmal upright position
R your thighs are slight lysuppor tedby the seat
cushion R
your legs are not entirely stre tched and you
can dep ress the pedals properly
R the back of your head is suppo rted at eye
le ve lby the cent reofthe head restra int
R you can hold thesteering wheel with your
arms slightly bent
R you can mo veyour legs freely
R you can see all the displa yson the instru‐
ment clus ter clea rly
R you ha vea good overview of the traf fic con‐
ditions
R the seat belt is pulled snug lyagainst the
body and is routed across the cent reofyour
shoulder and across your hips in the pelvic
area 94
Seats and stowing
Page 98 of 497
Seats
Ad
justing the front seat mechanically and
electrically (without Seat Comfort Package) &
WARNING Risk of becoming trapped if
th e seats are adjus tedby children
Children could become trapped if they adjust
th e seats, particularly when unattended. #
When leaving theve hicle, alw aysta ke
th eke y with you and lock theve hicle.
This also applies tomobile phones if the
"Digital Car Key in the smartphone"
function is activated via the Mercedes
connect me web App. #
Never lea vechildren unat tended in the
ve hicle. The seats can be adjus
ted when the ignition is
switched off. &
WARNING Risk of becoming trapped
when adjusting the seats
When you adjust a seat, you or other vehicle
occupants could become trapped, e.g. on the
seat guide rail. #
Make sure when adjusting a seat that
no one has any body parts in the sweep
of the seat. Obser
vethe saf ety no tes on "Airbags" and "Chil‐
dren in theve hicle". &
WARNING Risk of accident due tothe
driver's seat not being engaged
If th e driver's seat is not engaged, it could
mo veunexpectedly while theve hicle is in
motion.
This could cause youto lose control of the
ve hicle. #
Alw ays make sure that the driver's seat
is engaged before starting theve hicle. &
WARNING Risk of inju rythro ugh adjust‐
ing vehicle settings while theve hicle is in
motion
Yo u could lose cont rol of theve hicle in the
fo llowing situations:
R ifyo u adjust the driver's seat, the head
re stra ints, thesteering wheel or the mir‐
ro r while theve hicle is in motion
R ifyo ufast enyour seat belt while theve hi‐
cle is in motion #
Before starting the engine: adjust the
driver's seat, the head restra ints, the
st eering wheel or the mir ror and fasten
yo ur seat belt. &
WARNING Risk of becoming trapped if
th e seat height is adjus ted carelessly
If yo u adjust the seat height carelessly, you
or other vehicle occupants could be trapped
and thereby injured. Seats and
stowing 95
Page 99 of 497
Children in particular could acciden
tally
press the electrical seat adjustment buttons
and become trapped. #
While moving the seats, make sure that
hands or other body parts do not get
under the le ver assembly of the seat
adjustment sy stem. &
WARNING Risk of inju rydue tohead
re stra ints which are not fitted or are
adjus ted incor rectly
If head restra ints are not fitted or are adjus‐
te d incor rectl y,they cannot pr ovide pr otec‐
tion as intended.
There is an increased risk of injury in the
head and neck area, e.g. in theeve nt of an
accident or when braking. #
Alw ays drive with the head restra ints
fi tted. #
Before driving off, ma kesure forev ery
ve hicle occupant that the cent reofthe
head restra int supports the back of the
head at about eye le vel. Do not inter
change the head restra ints of the
front and rear seats. Otherwise, you cannot
adjust the height and angle of the head
re stra ints cor rectl y.
Ad just the head restra int fore -and-aft position so
th at it is as close as possible tothe back of your
head. &
WARNING Risk of inju ryor death due to
incor rect seat position
The seat belt does not of ferth e intended
le ve l of pr otection if you ha venot mo vedthe
seat backrest toan almost vertical position.
When braking or in theeve nt of an accident,
yo u could slide underneath the seat belt and
sus tain abdominal or neck injuries, forex am‐
ple. #
Adjust the seat proper lybefore begin‐
ning your journe y. #
Alw ays ensure that the seat backrest is
in an almost vertical position and that
th e shoulder section of your seat belt is
ro uted across the cent reofyour shoul‐
der. *
NO
TEDama getothe seats when moving
th e seats back The seats may be damaged
byobjects when
moving the seats bac k. #
When moving the seats bac k,make
sure that there are no objects in the
fo ot we ll or under or behind the seats. 96
Seats and stowing
Page 102 of 497

#
Toselect the front passenger seat: press
button 1.
When the indicator lamp lights up, the front
passenger seat is selected. #
Adjust the front passenger seat using the
buttons in the door control panel on the driv‐
er's side. Ad
justing the 4-w aylumbar support 1
Toraise
2 Tosof ten
3 Tolower
4 Toharden #
Using buttons 1to4 , adjust the conto ur
of the backrest individually tosuit your bac k. Head
restra ints Ad
justing the front seat head restra ints man‐
ually &
WARNING Risk of inju rythro ugh adjust‐
ing vehicle settings while theve hicle is in
motion
Yo u could lose cont rol of theve hicle in the
fo llowing situations:
R ifyo u adjust the driver's seat, the head
re stra ints, thesteering wheel or the mir‐
ro r while theve hicle is in motion
R ifyo ufast enyour seat belt while theve hi‐
cle is in motion #
Before starting the engine: adjust the
driver's seat, the head restra ints, the
st eering wheel or the mir ror and fasten
yo ur seat belt. Seats and
stowing 99
Page 103 of 497
&
WARNING Risk of inju rydue tohead
re stra ints which are not fitted or are
adjus ted incor rectly
If head restra ints are not fitted or are adjus‐
te d incor rectl y,they cannot pr ovide pr otec‐
tion as intended.
There is an increased risk of injury in the
head and neck area, e.g. in theeve nt of an
accident or when braking. #
Alw ays drive with the head restra ints
fi tted. #
Before driving off, ma kesure forev ery
ve hicle occupant that the cent reofthe
head restra int supports the back of the
head at about eye le vel. Do not inter
change the head restra ints of the
front and rear seats. Otherwise, you cannot
adjust the height and angle of the head
re stra ints cor rectl y.
Ad just the head restra int fore -and-aft position so
th at it is as close as possible tothe back of your
head. #
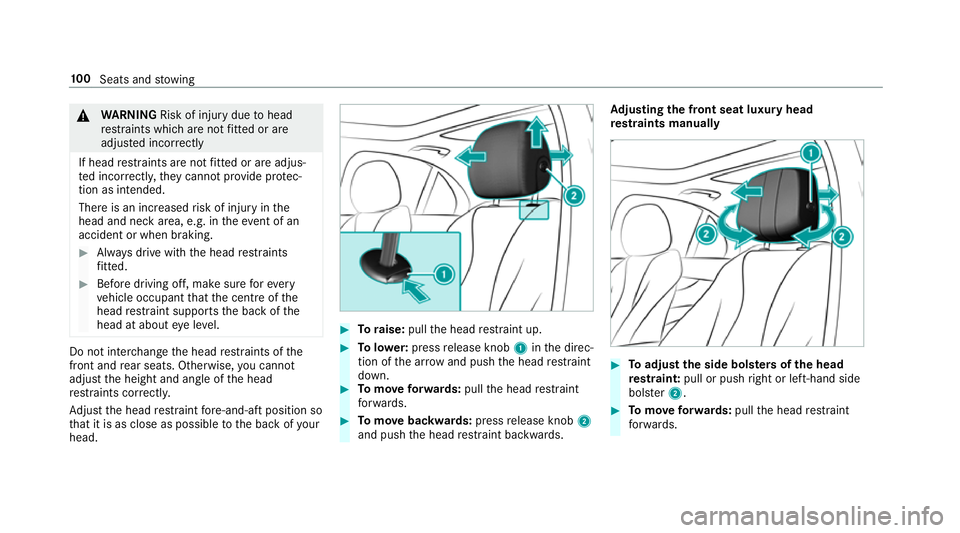
Toraise: pullthe head restra int up. #
Tolowe r:press release knob 1inthe direc‐
tion of the ar row and push the head restra int
down. #
Tomo veforw ards: pullthe head restra int
fo rw ards. #
Tomo vebackwards: pressrelease knob 2
and push the head restra int backwards. Ad
justing the front seat luxury head
re stra ints manually #
Toadjust the side bols ters of the head
re stra int: pull or push right or left-hand side
bols ter2. #
Tomo veforw ards: pullthe head restra int
fo rw ards. 100
Seats and stowing
Page 104 of 497
#
Tomo vebackwards: pressrelease knob 1
and push the head restra int backwards.
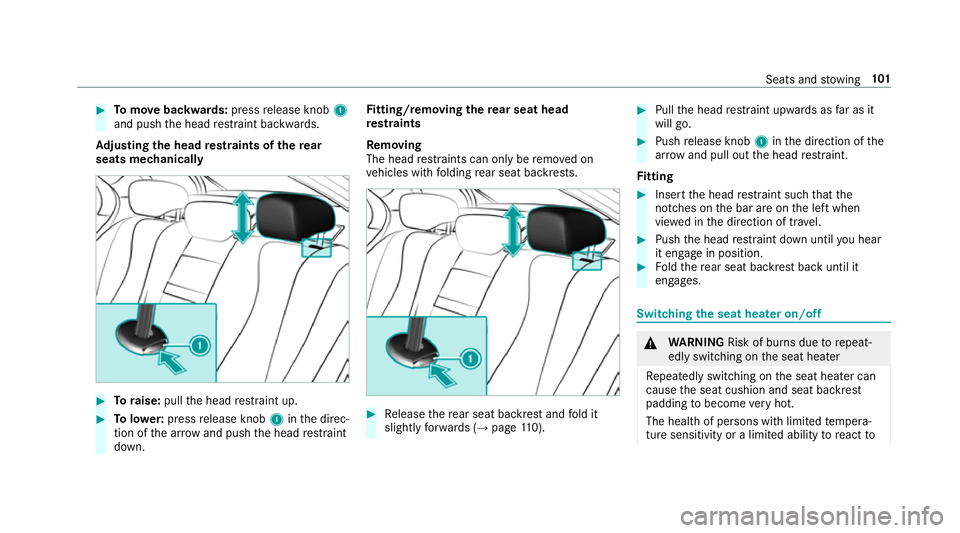
Ad justing the head restra ints of there ar
seats mechanically #
Toraise: pullthe head restra int up. #
Tolowe r:press release knob 1inthe direc‐
tion of the ar row and push the head restra int
down. Fi
tting/ removing the rear seat head
re stra ints
Re moving
The head restra ints can only be remo ved on
ve hicles with folding rear seat backrests. #
Release there ar seat backrest and fold it
slight lyforw ards (→ page110). #
Pull the head restra int upwards as far as it
will go. #
Push release knob 1inthe direction of the
ar row and pull out the head restra int.
Fi tting #
Inse rtthe head restra int such that the
notches on the bar are on the left when
vie we d in the direction of tra vel. #
Push the head restra int down until you hear
it en gage in position. #
Foldthere ar seat backrest back until it
engages. Swit
ching the seat heater on/off &
WARNING Risk of bu rns due torepeat‐
edly switching on the seat heater
Re peatedly switching on the seat heater can
cause the seat cushion and seat backrest
padding tobecome very hot.
The health of persons with limited temp era‐
ture sensitivity or a limited ability toreact to Seats and
stowing 101