2017 MERCEDES-BENZ E-CLASS SALOON light
[x] Cancel search: lightPage 59 of 497

R
For cer tain child restra int sy stems in weight
categories II or III, there might be restrictions
in the maximum size setting, e.g. due topos‐
sible con tact wi th thero of.
R Make sure that thech ild's feet do not touch
th e front seat. If necessar y,mo vethe front
seat forw ard slightl y.
R The child restra int sy stem must not touch the
ro of or be put under stra in by the head
re stra ints. Adjust the head restra ints accord‐
ing ly. R
Obser vethe manufacturer's ins tallation
instructions forth ech ild restra int sy stem.
Legend for the table:
X Not suitable forch ildren in this we ight
categor y.
U Suitable forch ild restra int sy stems of
th e "Universal" category in this we ight
categor y. UF
Suitable forfo rw ard-facing child
re stra int sy stems of the "Universal" cat‐
egory in this we ight categor y.
L Suitable for semi-universal child
re stra int sy stems according totheta ble
in "Recommended child restra int sys‐
te ms", or if theve hicle and the seat are
lis ted in thech ild restra int sy stem man‐
ufacturer's vehicle model list. Fr
ont passenger seat: We
ight categories Front passenger front airbag
enabled Fr
ont passenger front airbag disa‐
bled 1
Category 0: upto10 kg XU, L
Category 0+: upto13 kg XU, L
Category I: 9to 18 kg UF,LU , L
Category II: 15to25 kg UF,LU , L56
Occupant saf ety
Page 62 of 497

R
When using a forw ard-facing child
re stra int sy stem of category I: remo vethe
head restra int from there spective seat if
possible and position the seat backrest of
th ech ild restra int sy stem as flat as possible
against the seat backrest of theve hicle seat.
R When youre mo vethech ild restra int sy stem
yo u must ins tallth e head restra int again
immediately and adjust all of the head
re stra ints cor rectl y.
R For cer tain child restra int sy stems in weight
categories II or III, there might be restrictions
in the maximum size setting, e.g. due topos‐
sible con tact wi th thero of. R
Make sure that thech ild's feet do not touch
th e front seat. If necessar y,mo vethe front
seat forw ard slightl y.
R The child restra int sy stem must not touch the
ro of or be put under stra in by the head
re stra ints. Adjust the head restra ints accord‐
ing ly.
R Obser vethe manufacturer's ins tallation
instructions forth ech ild restra int sy stem. Legend
for the table:
X Not suitable for an ISOFIX child
re stra int sy stem in this we ight category
and/or size categor y.
IUF Suitable forfo rw ard-facing ISOFIX child
re stra int sy stems of the"Universal" cat‐
egory in this we ight categor y.
IL Suitable for ISOFIX child restra int sys‐
te ms according tothetab le in "Over‐
view of there commended child
re stra int sy stems", or if theve hicle and
th e seat are lis ted in thech ild restra int
sy stem manufacturer's vehicle model
list. We
ight categories Size categoryEquipment Rear seat
Left ,ri ght
Car rycotF
GISO/L1
ISO/L2X
X
Category 0:up to10 kgand appr ox. 6 months EISO/R1I L Occupant saf
ety59
Page 63 of 497

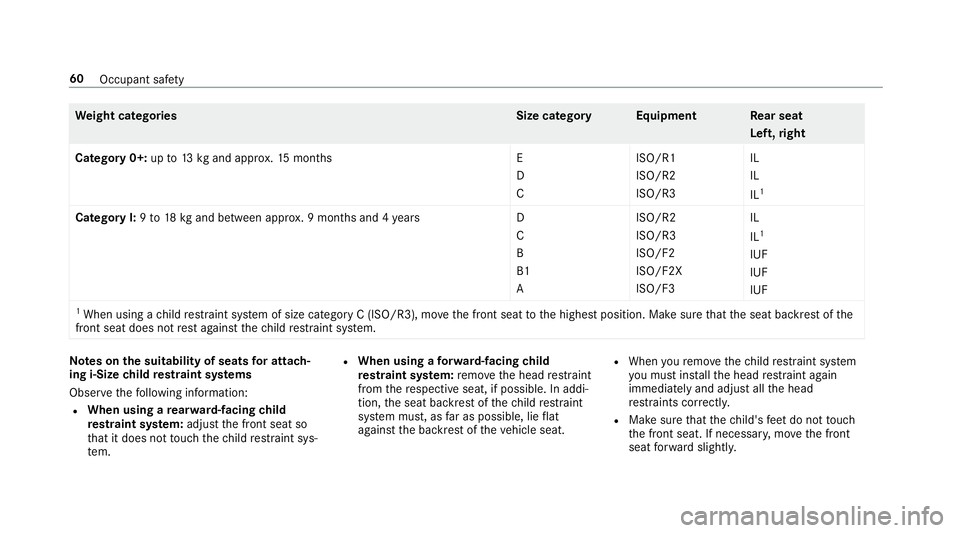
We
ight categories Size categoryEquipment Rear seat
Left ,ri ght
Category 0+: upto13 kgand appr ox.15 months E
D
CISO/R1
ISO/R2
ISO/R3IL
IL
IL
1
Category I:9to 18 kgand between appr ox. 9 months and 4 yearsD
C
B
B1
A ISO/R2
ISO/R3
ISO/F2
ISO/F2X
ISO/F3IL
IL
1
IUF
IUF
IUF
1 When using a child restra int sy stem of size category C (ISO/R3), mo vethe front seat tothe highest position. Make sure that the seat backrest of the
front seat does not rest against thech ild restra int sy stem. Note
s onthe suitability of seats for attach‐
ing i‑Size child restra int sy stems
Obser vethefo llowing information:
R When using a rear wa rd-facing child
re stra int sy stem: adjust the front seat so
th at it does not touch thech ild restra int sys‐
te m. R
When using a forw ard-facing child
re stra int sy stem: remo vethe head restra int
from there spective seat, if possible. In addi‐
tion, the seat backrest of thech ild restra int
sy stem must, as far as possible, lie flat
against the backrest of theve hicle seat. R
When youre mo vethech ild restra int sy stem
yo u must ins tallth e head restra int again
immediately and adjust all the head
re stra ints cor rectl y.
R Make sure that thech ild's feet do not touch
th e front seat. If necessar y,mo vethe front
seat forw ard slightl y. 60
Occupant saf ety
Page 71 of 497

R
Anti-theft pr otection is reactivated
Do not keep theke yto get her with electronic
devices or me tal objects. This can af fect the
ke y's functionalit y.
% If battery check lamp 2does not light up
af te r pressing the% or& button, the
battery is dischar ged.
Changing theke y bat tery ( →page 69). Ac
tivating/deactivating the acoustic lo cking
ve rification signal Multimedia sy
stem:
, Vehicle .
Vehicle settings .
Acoustic
lock feedback #
Activate Oor deacti vate ª the function. Ac
tivating/deactivating the panic alarm Re
quirements:
% The panic alarm function is only available in
cer tain countries.
R The ignition is switched off. #
Toactivate: press button 1for appro x‐
ima tely one second.
A visual and audible alarm is triggered. #
Todeactivate: briefly press but ton1 again.
or #
Press thest art/ stop button on the cockpit
(the key is inside theve hicle). Changing
the unlocking settings Po
ssible unlocking functions of theke y:
R Central unlocking
R Unlocking the driver's door and fuel filler flap #
Toswitch between settings: pressthe
% and& buttons simultaneously for
appr oximately six seconds until the battery
ch eck lamp flashes twice.
If th e unlocking function forth e driver's door
and fuel filler flap has been selec ted:
R Pressing the% button a second time cen‐
trally unloc kstheve hicle.
R Vehicles with KEYLESS-GO: ifyo uto uch
th e inner sur face of the door handle on the
driver's door, only the driver's door and fuel
fi ller flap are unlo cked. Re
ducing the energy consu mption of the key All
vehicles: ifyo u do not use theve hicle or a
ke yfo r an extended pe riod of time, you can
re duce the energy consum ption of there spec‐
tive key. Todo so, deactivate theke y functions. #
Todeactivate: pressthe& button on the
ke y twice in rapid succession.
The battery check lamp of theke yflashes
twice brief lyand lights up once. #
Toactivate: press any button on thekey. 68
Opening and closing
Page 72 of 497

%
When theve hicle is star ted with theke y in
th estow age compartment of the cent recon‐
sole, theke y functions are automatical ly
activated (→ page162). Re
moving/inserting the eme rgency key #
Toremo ve:press release knob 1.
Emer gency key2 is pushed out slight ly.#
Pull out emer gency key2 until it en gage s in
th e intermediate position.
% You can use the intermediate position of
emer gency key2 toattach theke yto akey
ri ng. #
Press release knob 1again and fully
re mo veemer gency key2. #
Toinser t:press release knob 1. #
Insert emer gency key2 tothe intermediate
position or fully until it engages. Re
placing the key battery &
DANG ER Serious damage tohealth
caused byswallowing batteries
Batteries contain toxic and cor rosive sub‐
st ances. Swallowing bat teries may cause
serious damage tohealth.
There is a risk of fata l injur y. #
Keep batteries out of there ach of chil‐
dren. #
If batteries are swallo wed, seek medical
attention immediately. +
ENVIRONMEN
TALNO TEEnvironmental
dama gedue toimproper disposal of bat‐
te ries Batteries conta
in pollutants. It is
illegal todispose of them with the household
ru bbish. #
Dispose of batteries in an
environmen tally responsible manner.
Ta ke dischar ged batteries toaqu alified
specialist workshop or toa collection
point for used batteries. Re
quirements:
R Yourequ ire a CR 2032 3 V cell batter y.
Mercedes-Benz recommends that you ha vethe
battery replaced at a qualified specialist work‐
shop. Opening and closing
69
Page 82 of 497

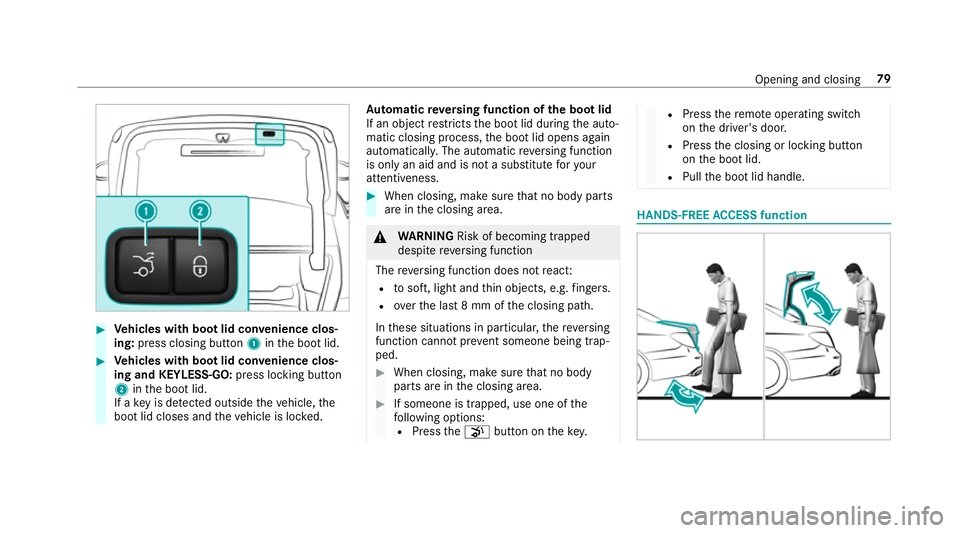
#
Vehicles with boot lid conve nience clos‐
ing: press closing button 1inthe boot lid. #
Vehicles with boot lid conve nience clos‐
ing and KEYLESS-GO: press locking button
2 inthe boot lid.
If a key is de tected outside theve hicle, the
boot lid closes and theve hicle is loc ked. Au
tomatic reve rsing function of the boot lid
If an object restricts the boot lid during the auto‐
matic closing process, the boot lid opens again
automaticall y.The automatic reve rsing function
is only an aid and is not a substitute foryo ur
attentiveness. #
When closing, make sure that no body parts
are in the closing area. &
WARNING Risk of becoming trapped
despi tereve rsing function
The reve rsing function does not react:
R tosoft, light and thin objects, e.g. fingers.
R overth e last 8 mm of the closing path.
In these situations in particular, there ve rsing
function cannot pr event someone being trap‐
ped. #
When closing, ma kesure that no body
parts are in the closing area. #
If someone is trapped, use one of the
fo llowing options:
R Press thep button on thekey. R
Press there mo teoperating switch
on the driver's door.
R Press the closing or locking button
on the boot lid.
R Pull the boot lid handle. HANDS-FREE
ACCESS function Opening and closing
79
Page 87 of 497

#
Tointer rupt automatic operation: press or
pull theW button again.
When theve hicle is switched off, the side win‐
do ws can continue being ope rated.
The function is available for around five minutes
or until a front door is opened.
Au tomatic reve rse function of the side win‐
do ws
If an object bloc ksa side wind owduring the
closing process, the side window opens again
automaticall y.The automatic reve rse function is
only an aid and is not a substitute foryo ur atten‐
tiveness. #
When closing, make sure that no body parts
are in the closing area. &
WARNING Risk of becoming trapped
despi tethere being reve rsing pr otection
on the side window
The reve rse function does not react:
R tosoft, light and thin objects, e.g. small
fi ngers R
during resetting
This means that there ve rse function cann ot
pr eve nt someone from becoming trapped in
th ese situations. #
When closing, make sure that no body
parts are in the closing area. #
If someone becomes trapped, press the
W button toopen the side window
again. Con
venience opening (ventilating theve hicle
before starting a journey) &
WARNING Risk of entrapment when
opening a side window
When opening a side windo w,parts of the
body could be dr awn in or become trapped
between the side window and window frame. #
When opening, make sure that nobody
is touching the side windo w. #
Release the button immediately if
somebody becomes trapped. #
Press and hold the% button on thekey.
The following functions are per form ed:
R The vehicle is unloc ked.
R The side windo wsare opened.
R The sliding sun roof is opened.
R The panoramic sliding sunroof is opened.
R The seat ventilation of the driver's seat is
switched on.
If th ero ller sunblinds of the panoramic sliding
sunroof are closed, thero ller sunblinds are
opened firs t. #
Tocontinue con venience opening: press
th e% button again. #
Tointer rupt convenience opening: release
th e% button. 84
Opening and closing
Page 89 of 497

Problem
Possible causes/consequences and M
MSolutions #
Make sure that no parts of the body are in the closing area. #
Tostop the closing process, release the button or press the button again toreopen the side win‐
do w. If a side window is obstructed during closing and
reopens again slightly: #
Immediately af terth e window bloc ks, pull the cor responding button again until the side window has
closed, and hold the button for an additional second.
The side window is closed with increased forc e.
If a side window is obstructed again during closing and reopens again slightly: #
Repeat the pr evious step.
The side window is closed without the automatic reve rsing function.
The side windo wscannot be opened or
closed using the con venience opening
fe ature. The
key bat tery is dischar ged or nearly dischar ged. #
Check the battery using the battery check lamp and replace if necessary . Sliding sunroof
Opening and closing
the sliding sunroof %
The term "sliding sun roof" also refers to the
panoramic sliding sunroof. 86
Opening and closing