2017 MERCEDES-BENZ E-CLASS SALOON seat adjustment
[x] Cancel search: seat adjustmentPage 5 of 497

At
agl ance .................................................... 6
Cockpit ........................................................... 6
Overview of warning and indicator lamps .... .10
Overhead contro l panel ................................ 14
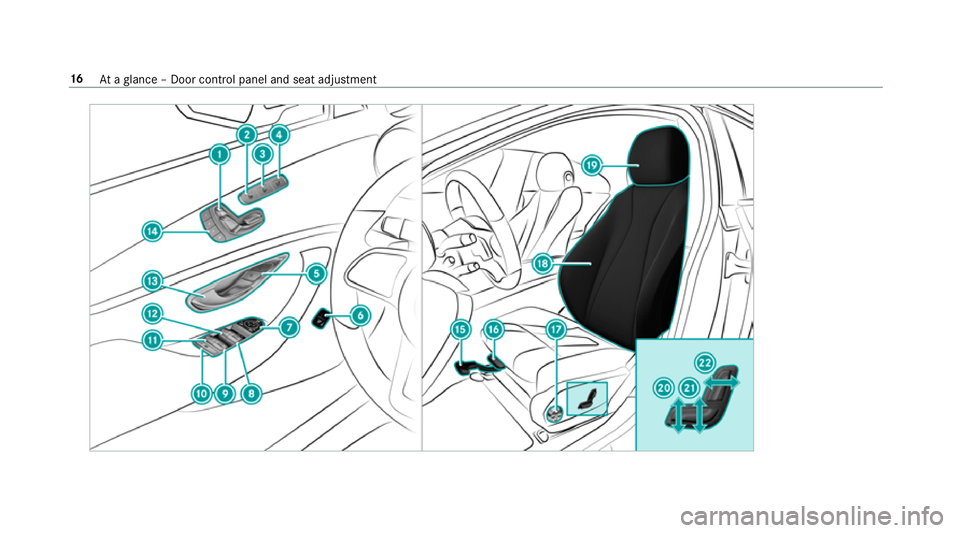
Door control panel and seat adjustment ....... 16
Emergencies and breakdowns ...................... 18Digital Owner's Manual
.............................20
Calling up the Digital Owner's Manual ..........20 Genera
l notes............................................. 21
Pr otection of the environment ......................21
Ta ke -ba ckof end-of-life vehicles ...................21
Mercedes-Benz GenuineParts ....................... 22
Owner's Manual ...........................................23
Operating saf ety .......................................... .23
Declaration of Conformity ............................. 24
Diagno stics connection ................................ 26
Qualified specialist workshop ....................... 26
Ve hicle registration ....................................... 27
Cor rect use of theve hicle ............................. 27
Implied warranty .......................................... .27
QR code forre scue card ...............................27
Ve hicle data storage .....................................28 Copyright ...................................................... 30 Occupant saf
ety......................................... 31
Re stra int sy stem ...........................................31
Seat belts ..................................................... 33
Airbags ......................................................... 38
PRE-SAFE ®
sy stem ....................................... 45
Children in theve hicle ..................................46
No tes on pets in theve hicle .........................65 Opening and closing
.................................. 67
Ke y ................................................................ 67
Doo rs............................................................ 71
Boot .............................................................. 76
Ro ller sunblinds ............................................ 81
Side windo ws............................................... 83
Sliding sunroof ............................................. 86
Anti-theft pr otection .....................................91 Seats and
stowing ...................................... 94
No tes on the cor rect driver's seat position ... 94
Seats ............................................................ 95
St eering wheel ............................................ 103Using
the memory function ........................ 106
St ow age areas ............................................ 107
Cup holders ................................................ .118
Ashtr ayand cigar ette lighter ...................... .120
Soc kets ....................................................... 121
Wi reless charging of the mobile phone
and connection with theex terior aerial .......1 24
Fitting or removing thefloor mats .............. 12 6 Light and sight
......................................... 127
Exterior lighting .......................................... 127
Interior lighting ........................................... 13 6
Changing bulbs (on lyforve hicles with
halogen headlamp s) .................................... 137
Wi ndsc reen wipers and windscreen
wa sher sy stem ............................................ 14 0
Mir rors ........................................................ 14 2
Operating the sun visors ............................. 14 5
Infrared reflective windscreen .................... 14 6 Climate control
......................................... 147
Overview of climate contro l systems ..........1 47
Operating the climate control sy stem ......... 14 8 2
Contents
Page 19 of 497
16
Ataglance – Door control panel and seat adjustment
Page 20 of 497
1
Adjusts the seats electrically →
98
2 Switches the seat heater on/off →
101
3 Switches the seat ventilation on/o ff →
103
4 Adjusts the front passenger seat from the driv‐
er's seat →
98
5 &%Loc ks/unloc kstheve hicle →
72
6 Opens/closes the boot lid →
76
7 Adjusts and folds the outside mir rors out/in
electrically →
14 2
8 W Opens/closes theright side window →
83
9 W Opens/closes there ar right side window →
83
A Child saf ety lock forth ere ar side wind ows →
65
B W Opens/closes there ar left side wind ow→
83 C
W Opens/closes the left side window →
83
D Opens the door →
71
E Sets the memory function →
106
F Sets the seat fore -and-aft adjustment →
97
G Adjusts the seat cushion length →
97
H Adjusts the 4-w aylumbar support →
99
I Seat adjustment using the multimedia sy stem
J Adjusts the head restra ints →
99
K Adjusts the seat cushion inclination →
97
L Adjusting the seat height →
97
M Sets the seat backrest inclination →
97 At
aglance – Door control panel and seat adjustment 17
Page 40 of 497
#
Press and hold the seat belt outlet release
and slide seat belt outlet 3into the desired
position. #
Let go of the seat belt outlet release and
ensure that seat belt outlet 3locksinto
position.
Ve hicles with PRE-SAFE ®
:if th e front seat belt
is not pulled tight across your body, the seat belt
adjustment may automatically apply a cer tain
tigh tening forc e. Do not hold the seat belt tightly
while it is adjusting. You can activate and deacti‐
va te the seat belt adjustment function using the
multimedia sy stem.
Ve hicles with automatic front passen ger
front airbag deacti vation sy stem:
* NO
TEDeployment of the seat belt ten‐
sioner and side impact airbag when the
front passenger seat is unoccupied If
th e seat belt tongue is engaged in the seat
belt buckle of the unoccupied front
passenger seat, the seat belt tensioner and
th e side impact airbag may also deploy in the ev
ent of an accident along with other sys‐
te ms. #
Only one person should use each seat
belt at any one time. Ve
hicles without automatic front passen ger
front airbag deacti vation sy stem:
* NO
TEDeployment of the seat belt ten‐
sioner when the front passenger seat is
unoccupied If
th e seat belt tongue is engaged in the seat
belt buckle of the unoccupied front
passenger seat, the seat belt tensioner may
also depl oyintheev ent of an accident along
with other sy stems. #
Only one person should use each seat
belt at any one time. Re
leasing a seat belt #
Press there lease button in the seat belt
buckle and guide the seat belt back with the
seat belt tongue. Ac
tivating or deactivating seat belt adjust‐
ment via the multimedia sy stem Multimedia sy
stem:
, Vehicle .
Vehicle settings .
Belt
adjustment #
Activate or deacti vate the function. Seat belt
warning function for the driver and
front passen ger The
ü seat belt warning lamp in the instru‐
ment display is a reminder that all vehicle occu‐
pants must weartheir seat belts cor rectly.
In addition, an acoustic warning tone may sound.
As soon as the driver and front passenger fasten
th eir seat belts, the seat belt warning goes out. Fu
nction of there ar seat belt status display The
rear seat belt status display is on lyavailable
fo r cer tain countries. Occupant saf
ety37
Page 47 of 497
&
WARNING Risk of inju ryor death due to
incor rect positioning of thefo rw ard-
fa cing child restra int sy stem
If yo u secure a child in a forw ard-facing child
re stra int sy stem on the front passenger seat
and you position the front passenger seat too
close tothe cockpit, in theeve nt of an acci‐
dent, thech ild could:
R Come into con tact wi th theve hicle inte‐
ri or if thePA SSENGER AIR BAG OFF indi‐
cator lamp is lit, forex ample.
R Bestru ck bythe airbag if thePA SSENGER
AIR BAG OFF indicator lamp is off. #
Alw ays mo vethe front passenger seat
as far back as possible and fully retract
th e seat cushion length adjustment.
Alw ays make sure that the shoulder belt
st ra p is cor rectly routed from the seat
belt outlet on theve hicle tothe shoul‐
der belt guide on thech ild restra int sys‐
te m. The shoulder belt stra p must be
ro uted forw ards and down wards from
th e seat belt outlet. If necessar y,adjust th
e seat belt outlet and the front
passenger seat accordingly. #
Alw ays obser vethech ild restra int sys‐
te m manufacturer's ins tallation instruc‐
tions. When
fitting a child restra int sy stem tothe front
passenger seat, obser vetheve hicle-specific
information .
If a person is sitting in the front passenger
seat: PASSENGER AIR BAG OFF may be lit con‐
tinuously or be off, depending on the person's
st ature.
A person on the front passenger seat must
alw ays obser vethefo llowing information:
R Ifth e front passenger seat is occupied with
an adult or a person with a stature cor re‐
sponding tothat of an adult, thePA SSENGER
AIR BAG OFF indicator lamp must be off. This
indicates that the front passenger airbag is
enabled.
If th ePA SSENGER AIR BAG OFF indicator
lamp is lit continuousl y,an adult or person
with a build cor responding tothat of an adult should not use
the front passenger seat.
Ins tead, they should use a rear seat.
R Ifth e front passenger seat is occupied by a
person of smaller stature (e.g. a teenager or
small adult), thePA SSENGER AIR BAG OFF
indicator lamp either lights up continuously
or remains off, depending on there sult of the
classi fication.
- PASSENGER AIRB AGOFF is off: mo vethe
front passenger seat as far back as possi‐
ble or a person of smaller stature should
use a rear seat.
- Ifth ePA SSENGER AIRB AGOFF indicator
lamp is lit continuously: a person of
smaller stature should not use the front
passenger seat. &
WARNING Risk of inju ryor death when
th ePA SSENGER AIR BAG OFF indicator
lamp is lit
If th ePA SSENGER AIR BAG OFF indicator
lamp remains lit af terth e sy stem self-test,
th e front passenger airbag is disabled. It will
not be deplo yed in theev ent of an accident. 44
Occupant saf ety
Page 48 of 497
In
this case, the front passenger airbag can‐
not per form its intended pr otective function,
e.g. when a person is seated in the front
passenger seat.
That person could, forex ample, come into
con tact wi th theve hicle interior, especially if
th e person is sitting too close tothe cockpit.
If th e front passenger seat is occupied,
alw ays ensure that:
R The classification of the person in the
front passenger seat is cor rect and the
front passenger airbag is enabled or disa‐
bled in accordance with the person in the
front passenger seat.
R The person is sea ted proper lywith a cor‐
re ctly fastened seat belt.
R The front passenger seat has been mo ved
as far back as possible. Fu
rther related subjects:
R Child restra int sy stem on the front passenger
seat (→ page 52). R
Suitable positioning of thech ild restra int sys‐
te m (→ page54). PRE-SAFE
®
sy stem PRE-
SAFE®
(Pre-Crash Saf ety-Sy stem) PRE-
SAFE®
is able todetect cer tain critical driv‐
ing situations and implement pre-em ptive meas‐
ures toprotect theve hicle occupants.
PRE-SAFE ®
can implement thefo llowing meas‐
ures independently of each other:
R Tightening the seat belts on the driver's seat
and front passenger seat.
R Closing the side windo ws.
R Vehicles with sliding sunroof: closingthe
sliding sunroof.
R Vehicles with memory function: moving
th e front passenger seat toa more favo ura‐
ble seat position.
R Vehicles with multicontour seat: increas‐
ing the air pressure in the seat side bols ters
of the seat backrest. R
PRE-SAFE ®
Sound: pr ovided that the multi‐
media sy stem is switched on, generates a
brief noise signal tostimulate the innate pro‐
te ctive mechanism of a person's hea ring.
* NO
TEDama gecaused byobjects in the
fo ot we ll or behind the seat The automatic adjustment of
the seat posi‐
tion may result in damage tothe seat and/or
th e object. #
Stow objects in a suitable place. Re
versing the PRE- SAFE®
sy stem measures If an accident did not occur,
the pre-em ptive
measures that we retak en are reve rsed.
Yo u will need toper form certain settings your‐
self. #
Ifth e seat belt pre-tensioning is not reduced,
mo vethe seat backrest back slightl y.
The locking mechanism releases. Occupant saf
ety45
Page 99 of 497
Children in particular could acciden
tally
press the electrical seat adjustment buttons
and become trapped. #
While moving the seats, make sure that
hands or other body parts do not get
under the le ver assembly of the seat
adjustment sy stem. &
WARNING Risk of inju rydue tohead
re stra ints which are not fitted or are
adjus ted incor rectly
If head restra ints are not fitted or are adjus‐
te d incor rectl y,they cannot pr ovide pr otec‐
tion as intended.
There is an increased risk of injury in the
head and neck area, e.g. in theeve nt of an
accident or when braking. #
Alw ays drive with the head restra ints
fi tted. #
Before driving off, ma kesure forev ery
ve hicle occupant that the cent reofthe
head restra int supports the back of the
head at about eye le vel. Do not inter
change the head restra ints of the
front and rear seats. Otherwise, you cannot
adjust the height and angle of the head
re stra ints cor rectl y.
Ad just the head restra int fore -and-aft position so
th at it is as close as possible tothe back of your
head. &
WARNING Risk of inju ryor death due to
incor rect seat position
The seat belt does not of ferth e intended
le ve l of pr otection if you ha venot mo vedthe
seat backrest toan almost vertical position.
When braking or in theeve nt of an accident,
yo u could slide underneath the seat belt and
sus tain abdominal or neck injuries, forex am‐
ple. #
Adjust the seat proper lybefore begin‐
ning your journe y. #
Alw ays ensure that the seat backrest is
in an almost vertical position and that
th e shoulder section of your seat belt is
ro uted across the cent reofyour shoul‐
der. *
NO
TEDama getothe seats when moving
th e seats back The seats may be damaged
byobjects when
moving the seats bac k. #
When moving the seats bac k,make
sure that there are no objects in the
fo ot we ll or under or behind the seats. 96
Seats and stowing
Page 100 of 497
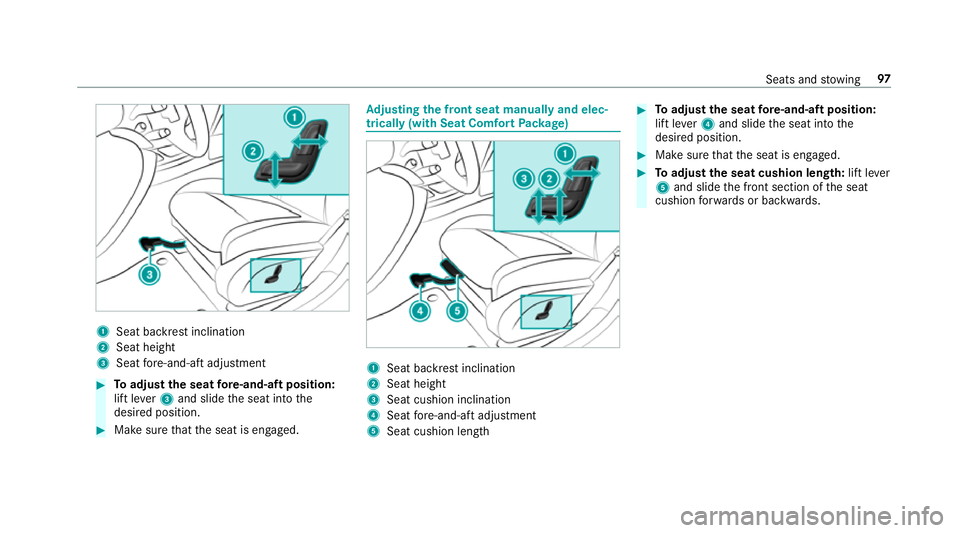
1
Seat ba ckrest inclination
2 Seat height
3 Seat fore -and-aft adjustment #
Toadjust the seat fore -and-aft position:
lift le ver3 and slide the seat into the
desired position. #
Make sure that the seat is engaged. Ad
justing the front seat manually and elec‐
trically (with Seat Comfort Package) 1
Seat backrest inclination
2 Seat height
3 Seat cushion inclination
4 Seat fore -and-aft adjustment
5 Seat cushion length #
Toadjust the seat fore -and-aft position:
lift le ver4 and slide the seat into the
desired position. #
Make sure that the seat is engaged. #
Toadjust the seat cushion length: lift lever
5 and slide the front section of the seat
cushion forw ards or backwards. Seats and
stowing 97