2017 MERCEDES-BENZ CLS-Class CD changer
[x] Cancel search: CD changerPage 6 of 206

Selecting a playback option ........... 163
Starting playback if the Blue-
tooth
®audio device has been
stopped ......................................... 163
Telephony ........................................ 94
Telephony notes .............................. 93
Buttons and controller ........................ 20
C
Call lists
Displaying details ........................... 113
Opening and selecting an entry ..... 113
Saving an entry in the address
book .............................................. 114
Camera
360° camera (COMAND) ................. 47
Rear view camera ............................ 48
Car pool lanes ...................................... 56
Category list (music search) ............ 157
CD
Fast forward/fast rewind ............... 155
Inserting ........................................ 152
Inserting/loading (DVD changer) ... 152
Inserting/loading (Rear Seat
Entertainment System) .................. 194
Notes on discs ............................... 152
Removing/ejecting (Rear Seat
Entertainment System) .................. 194
Selecting a track ............................ 155
Sound settings (balance, bass,
fader, treble) .................................. 172
CD mode
Playback options ........................... 154
Character entry
Phone book ...................................... 28
Characters
Entering (navigation) ........................ 29
Clear button ......................................... 20
Climate control
Ionization (COMAND) ....................... 45
COMAND
Active multicontour seat .................. 46
Basic functions ................................ 26
Components .................................... 17
Control panel ................................... 19
Controller ......................................... 20
Display ............................................. 18 Functions ......................................... 17
Multicontour seat ............................ 46
Seat functions .................................. 46
Switching on/off .............................. 26
COMAND display
Cleaning instructions ....................... 18
Setting ............................................. 33
Contacts
Deleting ......................................... 111
Importing ....................................... 111
Controller ............................................. 20
Cordless headphones
Changing batteries ........................ 191
Indicator lamp ................................ 189
Rear Seat Entertainment System ... 189
Selecting the screen ...................... 190
D
Date format, setting ............................ 35
Day design, setting ............................. 33
Delayed switch-off
Interior lighting ................................ 45
Delayed switch-off time
Setting (COMAND) ........................... 45
Destination
Saving to SD memory card .............. 82
Storing in the address book ............. 81
Destination (navigation)
Entering a destination using the
map ................................................. 64
Entering a point of interest .............. 61
Entering using geo-coordinates ....... 67
Entering using Mercedes-Benz
Apps ................................................ 67
Keyword search ............................... 59
Saving .............................................. 81
Selecting an address book con-
tact as a destination ........................ 61
Selecting from the list of last des-
tinations ........................................... 60
Destination/route download
Deleting a destination from the
server ............................................ 133
Displaying destinations in the
vehicle ........................................... 132
Displaying the vehicle identifica-
tion number (VIN) .......................... 133
4Index
Page 7 of 206

Importing destinations ................... 133
Placing a call at the destination .....133
Procedure and general informa-
tion ................................................ 132
Sending destinations to the
server ............................................ 132
Using a destination for route guid-
ance ............................................... 133
Using destinations ......................... 133
Dialing a number (telephone) ............. 99
Display
Selecting the design ........................ 33
Switching on/off .............................. 34
Displaying energy consumption
and generated electrical energy
(COMAND) ............................................ 45
Driving Dynamics
Displaying ........................................ 50
DVD
Inserting/loading (DVD changer) ... 152
Inserting/loading (Rear Seat
Entertainment System) .................. 194
Notes on discs ............................... 152
Removing/ejecting (DVD
changer) ........................................ 153
Removing/ejecting (Rear Seat
Entertainment System) .................. 194
DVD video
Rear Seat Entertainment System ... 196
DYNAMIC SELECT
Configuration via the DYNAMIC
SELECT controller ............................ 49
Configuring individual drive pro-
gram ................................................ 49
Configuring using the DYNAMIC
SELECT button ................................. 49
Displaying engine data ..................... 49
Setting options ................................ 49
E
E-mailAnswering ...................................... 120
Calling up the settings menu ......... 116
Changing the name of the e-mail
account .......................................... 117
Configuring an e-mail account ....... 117
Configuring the e-mails displayed .. 116 Deactivating the e-mail function .... 117
Deleting ......................................... 121
Displaying details ........................... 118
Downloading e-mails manually ...... 117
Editing text templates .................... 120
Forwarding ..................................... 120
Inbox .............................................. 118
Reading .......................................... 117
Settings ......................................... 116
Storing the sender as a new entry
in the address book ....................... 121
Using a phone number in the text .. 121
Using text templates ...................... 120
Writing ........................................... 119
Entering the address (example) ......... 57
Entering the city .................................. 57
F
Factory setting (reset function) ......... 43
Favorites
Adding ............................................. 31
Deleting ........................................... 31
Displaying and calling up ................. 30
Moving ............................................. 31
Overview .......................................... 30
Renaming ......................................... 31
Favorites (Internet) ........................... 138
Favorites button .................................. 41
Fuel consumption (COMAND) ............ 45
G
Google™ Local Search
Calling up Local Search ................. 130
Entering a search position and
search term ................................... 131
Importing a destination/route ....... 131
Popular Searches ........................... 131
Search history ............................... 132
Using as the destination ................ 131
GPS reception ...................................... 52
Gracenote
®Media Database ............ 156
H
Handwriting recognition
Switching text reader function
on/off .............................................. 24
Index5
Page 19 of 206
Overview
Components
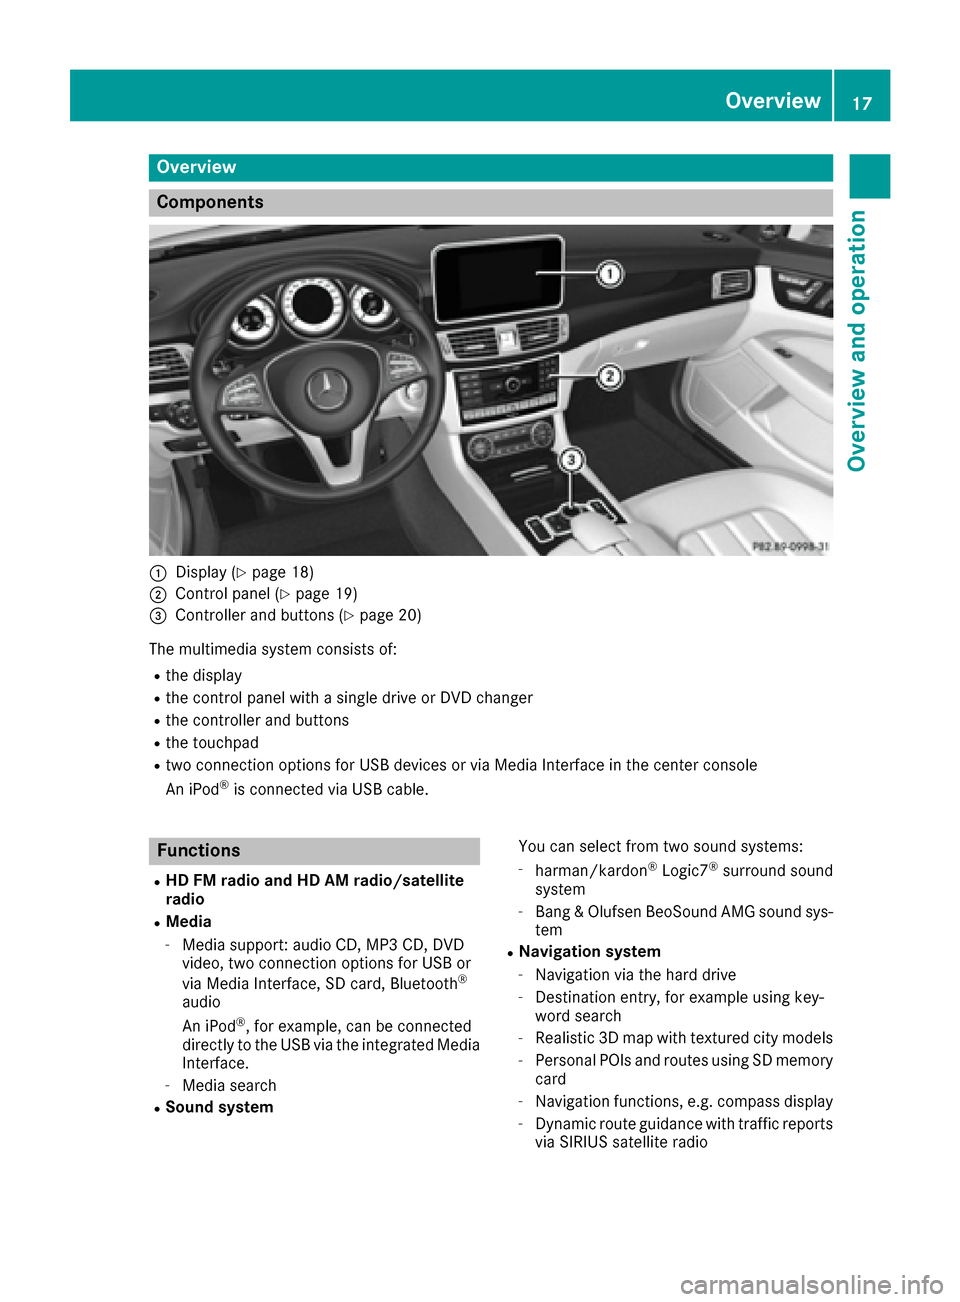
:Display (Ypage 18)
;Control panel (Ypage 19)
=Controller and buttons (Ypage 20)
The multimedia system consists of:
Rthe display
Rthe control panel with a single drive or DVD changer
Rthe controller and buttons
Rthe touchpad
Rtwo connection options for USB devices or via Media Interface in the center console
An iPod®is connected via USB cable.
Functions
RHD FM radio and HD AM radio/satellite
radio
RMedia
-Media support: audio CD, MP3 CD, DVD
video, two connection options for USB or
via Media Interface, SD card, Bluetooth
®
audio
An iPod®, for example, can be connected
directly to the USB via the integrated Media
Interface.
-Media search
RSound system You can select from two sound systems:
-harman/kardon®Logic7®surround sound
system
-Bang & Olufsen BeoSound AMG sound sys-
tem
RNavigation system
-Navigation via the hard drive
-Destination entry, for example using key-
word search
-Realistic 3D map with textured city models
-Personal POIs and routes using SD memory
card
-Navigation functions, e.g. compass display
-Dynamic route guidance with traffic reports
via SIRIUS satellite radio
Overview17
Overview and operation
Page 21 of 206
Control panel
FunctionPage
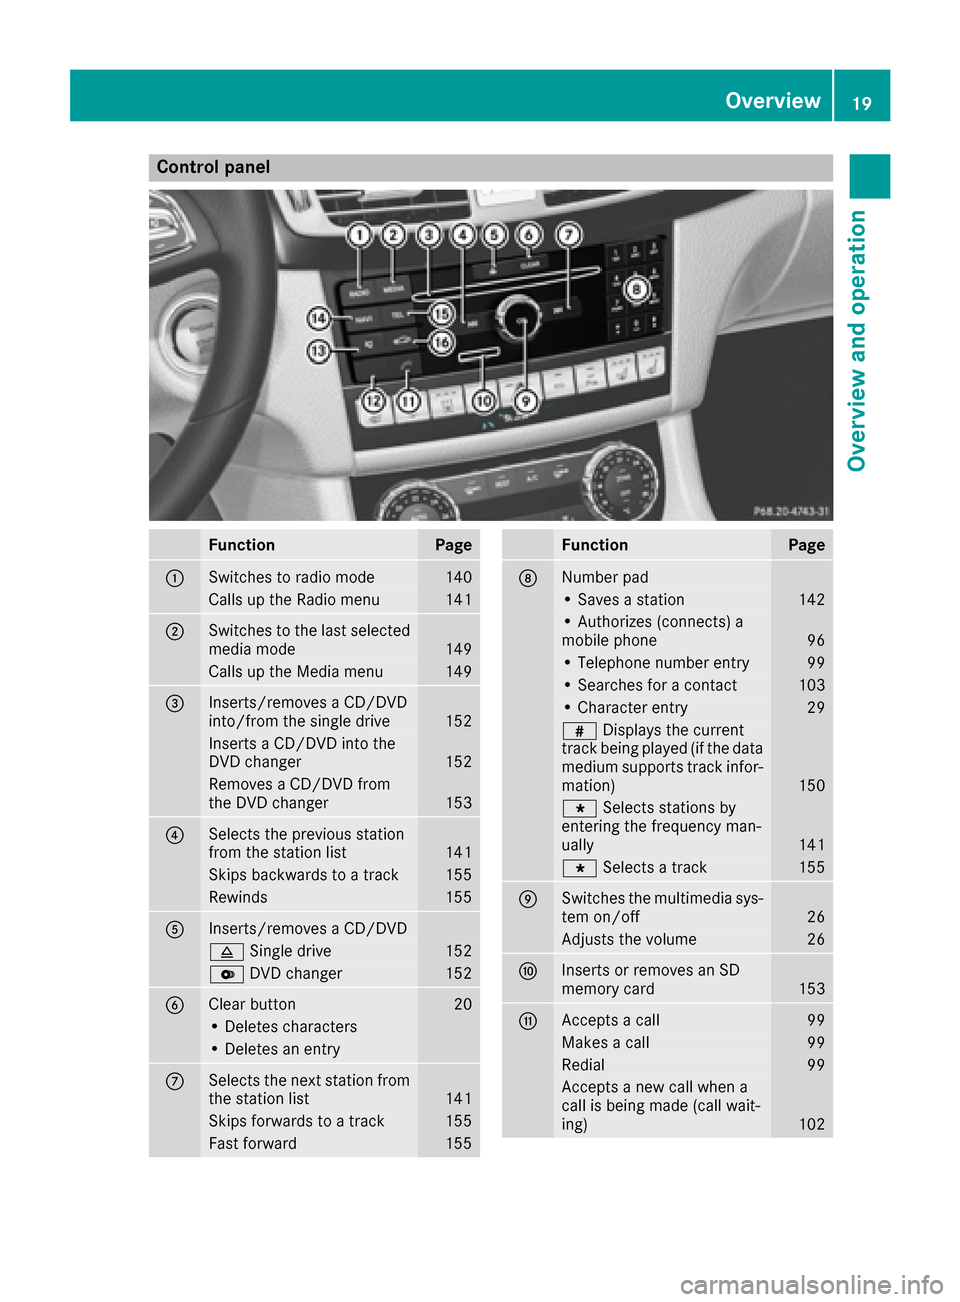
:Switches to radio mode140
Calls up the Radio menu141
;Switches to the last selected
media mode149
Calls up the Media menu149
=Inserts/removes a CD/DVD
into/from the single drive152
Inserts a CD/DVD into the
DVD changer152
Removes a CD/DVD from
the DVD changer153
?Selects the previous station
from the station list141
Skips backwards to a track155
Rewinds155
AInserts/removes a CD/DVD
8Single drive152
VDVD changer152
BClear button20
• Deletes characters
• Deletes an entry
CSelects the next station from
the station list141
Skips forwards to a track155
Fast forward155
FunctionPage
DNumber pad
• Saves a station142
• Authorizes (connects) a
mobile phone96
• Telephone number entry99
• Searches for a contact103
• Character entry29
zDisplays the current
track being played (if the data
medium supports track infor-
mation)
150
g Selects stations by
entering the frequency man-
ually
141
g Selects a track155
ESwitches the multimedia sys-
tem on/off26
Adjusts the volume26
FInserts or removes an SD
memory card153
GAccepts a call99
Makes a call99
Redial99
Accepts a new call when a
call is being made (call wait-
ing)
102
Overview19
Overview and operation
Page 154 of 206
Notes on copyright
Audio/video files that you create or reproduce
yourself for playback are generally subject to
copyright protection.
In many countries, reproductions, even for pri-
vate use, are not permitted without the prior
consent of the copyright holder.
Make sure that you know about the applicable
copyright regulations and that you comply with
these.
Notes on CDs/DVDs
!The drive is designed to accept discs which
correspond to the EN 60908 norm. You can
therefore only use discs with a maximum
thickness of 1.3 mm.
If you insert thicker discs, e.g. those that con-
tain data on both sides (DVD on one side and
audio data on the other), they cannot be ejec- ted and can damage the device.
Use round discs with a diameter of 12 cm. Do
not use discs with a diameter of 8 cm, even if
used in conjunction with an adapter.
Discs with copy protection are not compatible
with the audio CD standard and therefore may
not be able to be played.
Playback problems may occur when playing
copied discs.
There may be playback problems if you play CDs that you have copied yourself with a storage
capacity of more than 700 MB.
Menu overview
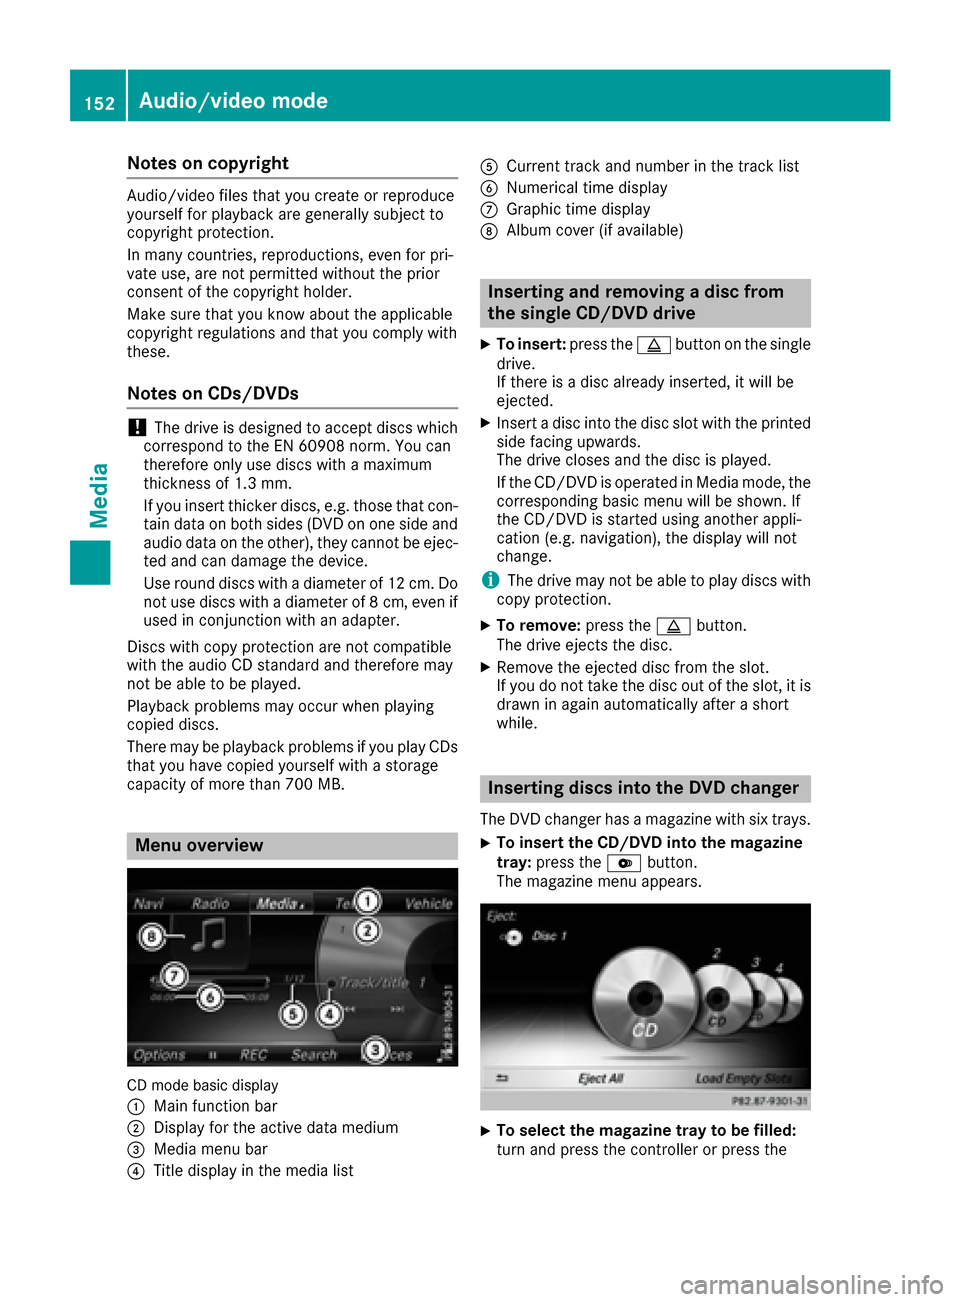
CD mode basic display
:
Main function bar
;Display for the active data medium
=Media menu bar
?Title display in the media list
ACurrent track and number in the track list
BNumerical time display
CGraphic time display
DAlbum cover (if available)
Inserting and removing a disc from
the single CD/DVD drive
XTo insert: press theþbutton on the single
drive.
If there is a disc already inserted, it will be
ejected.
XInsert a disc into the disc slot with the printed
side facing upwards.
The drive closes and the disc is played.
If the CD/DVD is operated in Media mode, the
corresponding basic menu will be shown. If
the CD/DVD is started using another appli-
cation (e.g. navigation), the display will not
change.
iThe drive may not be able to play discs with
copy protection.
XTo remove: press theþbutton.
The drive ejects the disc.
XRemove the ejected disc from the slot.
If you do not take the disc out of the slot, it is drawn in again automatically after a short
while.
Inserting discs into the DVD changer
The DVD changer has a magazine with six trays.
XTo insert the CD/DVD into the magazine
tray: press the Vbutton.
The magazine menu appears.
XTo select the magazine tray to be filled:
turn and press the controller or press the
152Audio/video mode
Media
Page 155 of 206
number buttons (1-6) on the multimedia sys-
tem.
The DVD changer switches to the selected
magazine tray.
ThePlease Wait...
message appears.
You will then see the Please
insertdisc1.message.
XInsert a disc into the disc slot with the printed
side facing upwards.
XTo load all empty magazine trays: press the
V button
The magazine menu appears.
XTo select LoadEmptySlots: slide6, turn
and press the controller to confirm.
The multimedia system switches to the next
empty magazine tray.
The Please Wait...
message appears.
You will then see the Please
insertdisc1.message.
XInsert a disc into the disc slot with the printed
side facing upwards.
Once the disc is loaded, the DVD changer
switches to the next empty tray.
XRepeat these steps until all magazine trays
are filled.
The DVD changer plays the last inserted disc.
XTo exit the DVD changer menu: press the
V button.
Ejecting discs from the DVD changer
i
If you remove one disc while playing another
disc, the DVD changer interrupts playback.
Playback continues once the disc has been
ejected.
XTo eject a single CD/DVD: press theV
button.
The magazine menu appears. The current disc
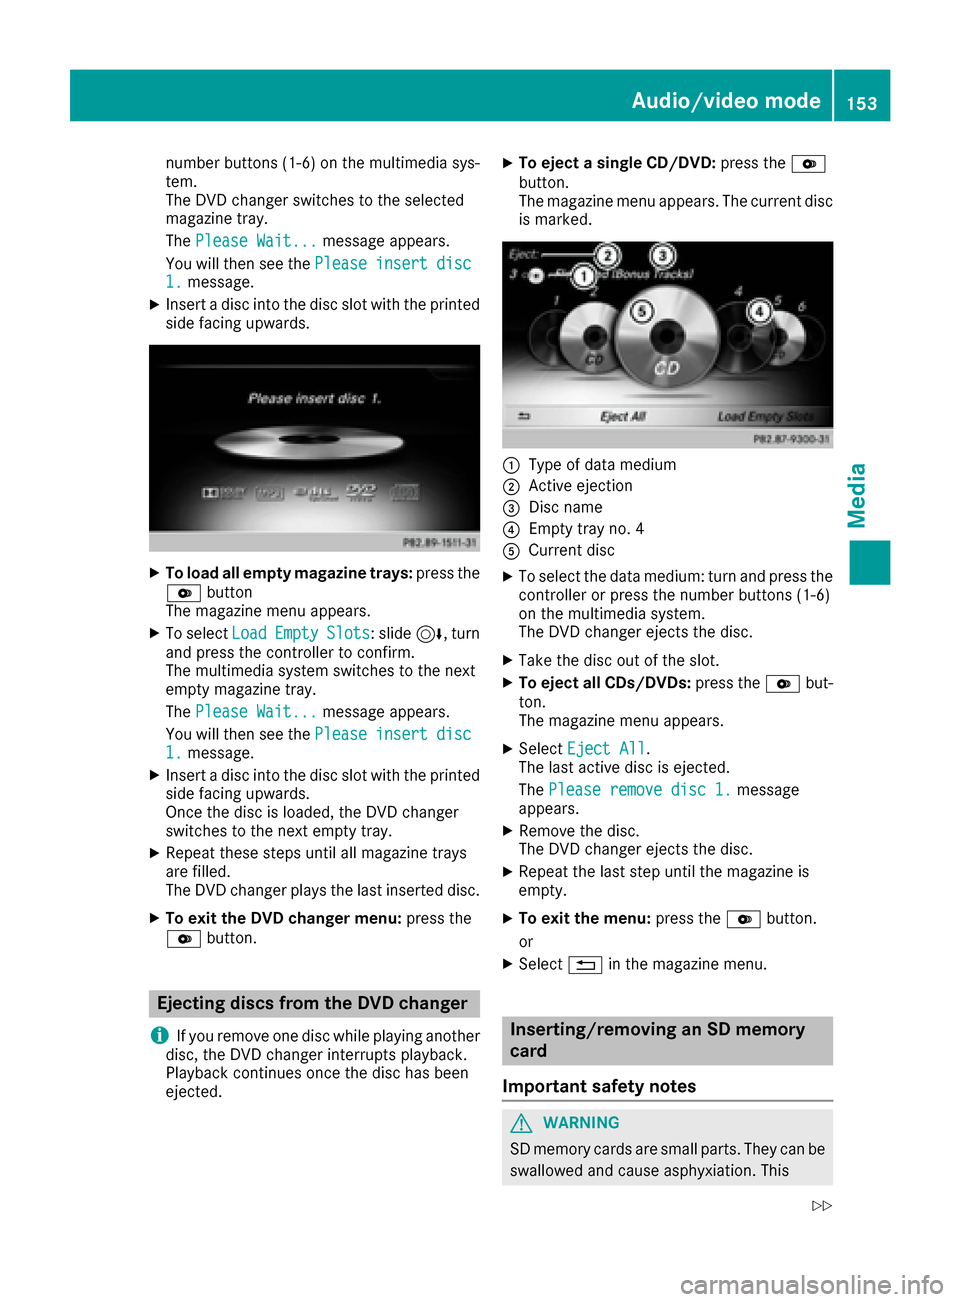
is marked.
:Type of data medium
;Active ejection
=Disc name
?Empty tray no. 4
ACurrent disc
XTo select the data medium: turn and press the
controller or press the number buttons (1-6)
on the multimedia system.
The DVD changer ejects the disc.
XTake the disc out of the slot.
XTo eject all CDs/DVDs: press theVbut-
ton.
The magazine menu appears.
XSelect Eject All.
The last active disc is ejected.
The Please remove disc 1.
message
appears.
XRemove the disc.
The DVD changer ejects the disc.
XRepeat the last step until the magazine is
empty.
XTo exit the menu: press theVbutton.
or
XSelect %in the magazine menu.
Inserting/removing an SD memory
card
Important safety notes
GWARNING
SD memory cards are small parts. They can be
swallowed and cause asphyxiation. This
Audio/video mode153
Media
Z
Page 158 of 206
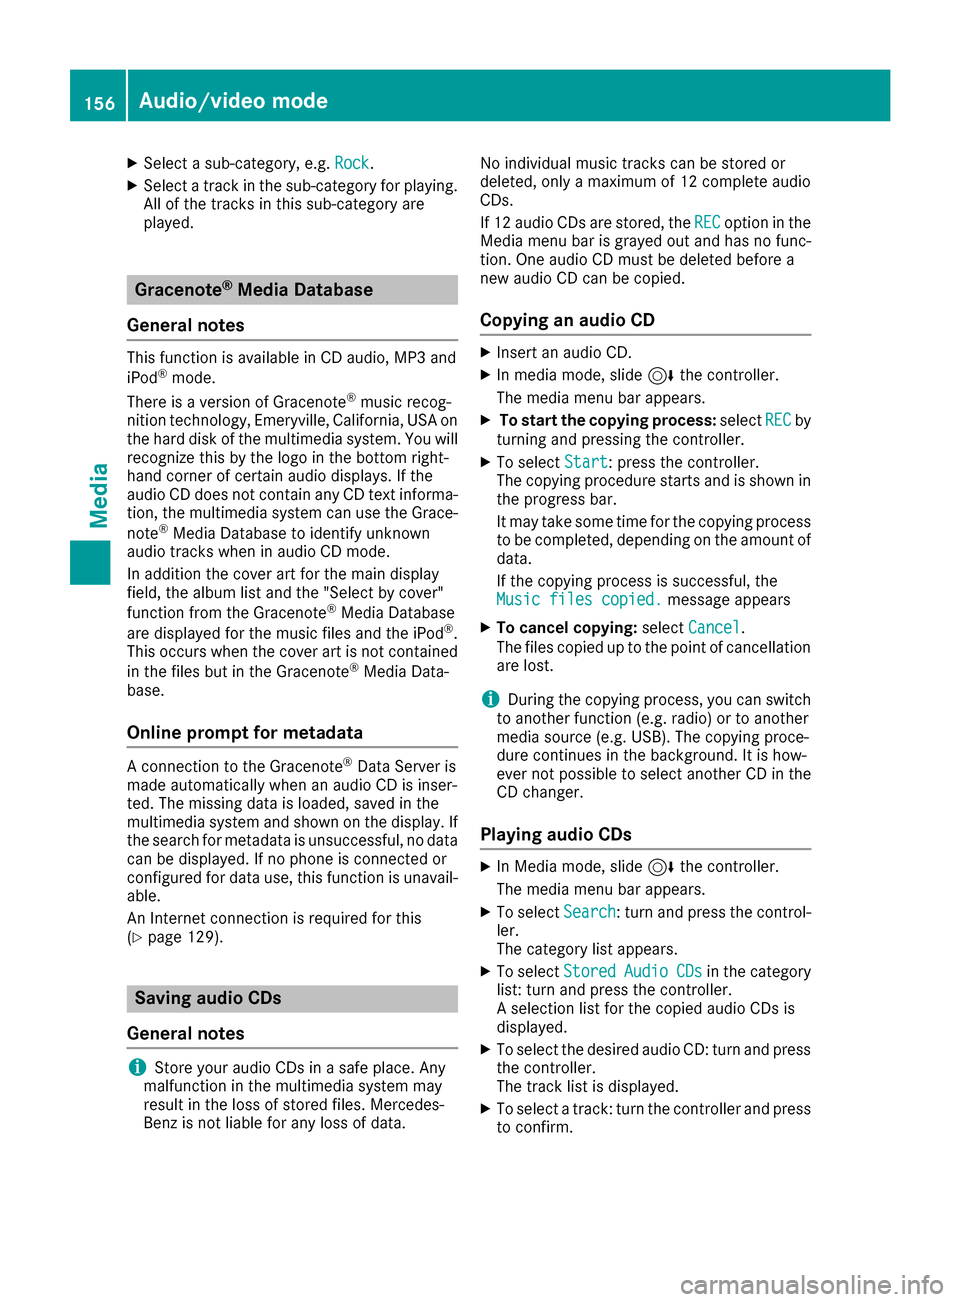
XSelect a sub-category, e.g.Rock.
XSelect a track in the sub-category for playing.
All of the tracks in this sub-category are
played.
Gracenote®Media Database
General notes
This function is available in CD audio, MP3 and
iPod®mode.
There is a version of Gracenote®music recog-
nition technology, Emeryville, California, USA on
the hard disk of the multimedia system. You will recognize this by the logo in the bottom right-
hand corner of certain audio displays. If the
audio CD does not contain any CD text informa-
tion, the multimedia system can use the Grace-
note
®Media Database to identify unknown
audio tracks when in audio CD mode.
In addition the cover art for the main display
field, the album list and the "Select by cover"
function from the Gracenote
®Media Database
are displayed for the music files and the iPod®.
This occurs when the cover art is not contained
in the files but in the Gracenote
®Media Data-
base.
Online prompt for metadata
A connection to the Gracenote®Data Server is
made automatically when an audio CD is inser-
ted. The missing data is loaded, saved in the
multimedia system and shown on the display. If
the search for metadata is unsuccessful, no data
can be displayed. If no phone is connected or
configured for data use, this function is unavail-
able.
An Internet connection is required for this
(
Ypage 129).
Saving audio CDs
General notes
iStore your audio CDs in a safe place. Any
malfunction in the multimedia system may
result in the loss of stored files. Mercedes-
Benz is not liable for any loss of data. No individual music tracks can be stored or
deleted, only a maximum of 12 complete audio
CDs.
If 12 audio CDs are stored, the
REC
option in the
Media menu bar is grayed out and has no func-
tion. One audio CD must be deleted before a
new audio CD can be copied.
Copying an audio CD
XInsert an audio CD.
XIn media mode, slide 6the controller.
The media menu bar appears.
XTo start the copying process: selectRECby
turning and pressing the controller.
XTo select Start: press the controller.
The copying procedure starts and is shown in
the progress bar.
It may take some time for the copying process
to be completed, depending on the amount of
data.
If the copying process is successful, the
Music files copied.
message appears
XTo cancel copying: selectCancel.
The files copied up to the point of cancellation
are lost.
iDuring the copying process, you can switch
to another function (e.g. radio) or to another
media source (e.g. USB). The copying proce-
dure continues in the background. It is how-
ever not possible to select another CD in the
CD changer.
Playing audio CDs
XIn Media mode, slide 6the controller.
The media menu bar appears.
XTo select Search: turn and press the control-
ler.
The category list appears.
XTo select StoredAudioCDsin the category
list: turn and press the controller.
A selection list for the copied audio CDs is
displayed.
XTo select the desired audio CD: turn and press
the controller.
The track list is displayed.
XTo select a track: turn the controller and press
to confirm.
156Audio/video mode
Media
Page 169 of 206
audio data on the other), they cannot be ejec-
ted and can damage the device.
Use round discs with a diameter of 12 cm. Do
not use discs with a diameter of 8 cm, even ifused in conjunction with an adapter.
The variety of discs, burners and burn software
available means there is no guarantee that the
multimedia system will be able to play discs that
you have burned yourself.
DVD playback conditions
If video DVDs do not conform to the NTSC or PAL
TV standards, they may create picture, sound or other problems during playback.
The multimedia system can play back video
DVDs produced according to the following
standards:
RRegion code 1 or region code 0 (no region
code)
RPAL or NTSC standard
You will generally find the relevant details either
on the DVD itself or on the DVD case.
iIf you insert a video DVD with a different
region code, a message to this effect appears.
iThe multimedia system is set to region code
1 at the factory. This setting can be changed
at an authorized Mercedes-Benz Center. It is
also possible to play video DVDs with a dif-
ferent region code, provided that they are
produced in accordance with the PAL or NTSC
TV standard. The region code can be changed
a maximum of four times.
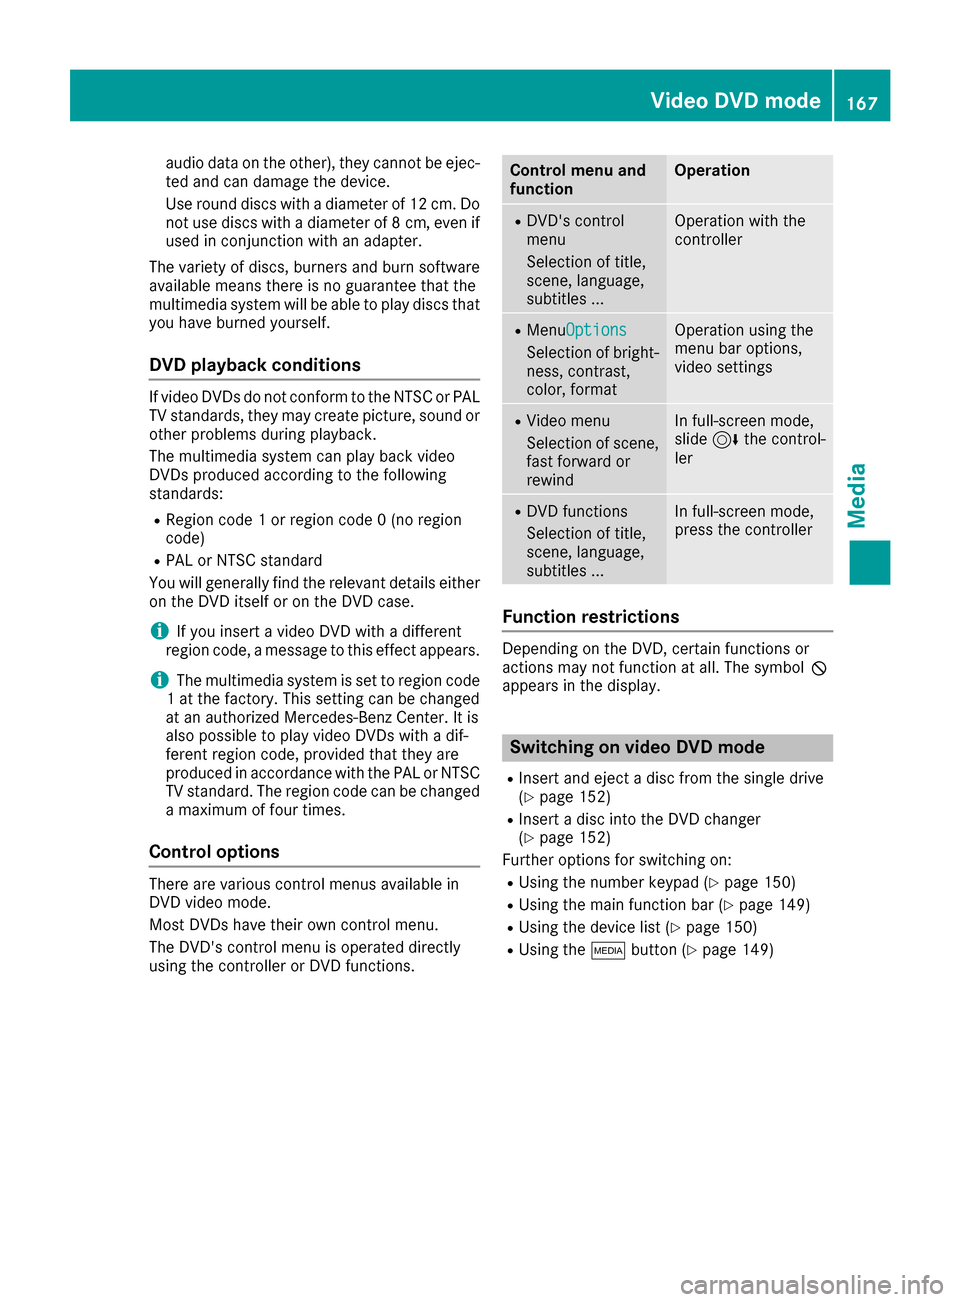
Control options
There are various control menus available in
DVD video mode.
Most DVDs have their own control menu.
The DVD's control menu is operated directly
using the controller or DVD functions.
Control menu and
functionOperation
RDVD's control
menu
Selection of title,
scene, language,
subtitles ...Operation with the
controller
RMenuOptions
Selection of bright-
ness, contrast,
color, format
Operation using the
menu bar options,
video settings
RVideo menu
Selection of scene,
fast forward or
rewindIn full-screen mode,
slide 6the control-
ler
RDVD functions
Selection of title,
scene, language,
subtitles ...In full-screen mode,
press the controller
Function restrictions
Depending on the DVD, certain functions or
actions may not function at all. The symbol K
appears in the display.
Switching on video DVD mode
RInsert and eject a disc from the single drive
(Ypage 152)
RInsert a disc into the DVD changer
(Ypage 152)
Further options for switching on:
RUsing the number keypad (Ypage 150)
RUsing the main function bar (Ypage 149)
RUsing the device list (Ypage 150)
RUsing the Õbutton (Ypage 149)
Video DVD mode167
Media
Z